
User Guide
Page 2
...itione_ FOR YOUR RECORDS Write the modeland serialnumbershere: Model # Serial # You can save you a great deal of time and moneyover the lifeof your air conditioner. Call 1-800-243-0000 to use and maintainyourair conditionerproperlyJ. READ THIS MANUAL inside you may not need to catl for rei:_dror maintenance of this... page in the eventyou need it to ensure that they do not play with the air conditioner. ° If the power cord requires replacement, have an Authorized Servicer install an exact replacement part. ° Installation work must...
...itione_ FOR YOUR RECORDS Write the modeland serialnumbershere: Model # Serial # You can save you a great deal of time and moneyover the lifeof your air conditioner. Call 1-800-243-0000 to use and maintainyourair conditionerproperlyJ. READ THIS MANUAL inside you may not need to catl for rei:_dror maintenance of this... page in the eventyou need it to ensure that they do not play with the air conditioner. ° If the power cord requires replacement, have an Authorized Servicer install an exact replacement part. ° Installation work must...

User Guide
Page 7
...the power cord is a consumer comfort appliance, not a precision climate contro! Injuries can destroy the insulation, leading to dean inside the air conditioner. Have your health. Use a dedi circuit. Such usage could be written on while cleaning inner parts of time could damage the items....See page 1i for an extended period of the unit. Due to direct airflow for details or call (800) 243-_. Before i. The air conditioner is damaged and requires replacement, have an Authorized Se_-lcer install an exact replacement part. !. There is a possibffi_ of injury if ...
...the power cord is a consumer comfort appliance, not a precision climate contro! Injuries can destroy the insulation, leading to dean inside the air conditioner. Have your health. Use a dedi circuit. Such usage could be written on while cleaning inner parts of time could damage the items....See page 1i for an extended period of the unit. Due to direct airflow for details or call (800) 243-_. Before i. The air conditioner is damaged and requires replacement, have an Authorized Se_-lcer install an exact replacement part. !. There is a possibffi_ of injury if ...

User Guide
Page 8
Front G_l,e Air Fiiiter Ho,nzon_l Air Deflector (Horizontal Louver) Vertical mr DeNec_r (Ve_l Louver) -- _r Dis_arge A_r Intake (inlet GrilJe) Con_l Board Remote ControUer _,_ 8 Room Air Condi Base Pan Power Cord WARNING: This appfiance should _ indued in acco_ance with the N_ionai Ele_ric Cede. Introductio_ This symbol alerts you to the risk of el_Hc sh_P_ This sym_l alerts you to ha_rds th_ could _u_ harm to t_ air conditioner, This symbol indicates specta| notes.
Front G_l,e Air Fiiiter Ho,nzon_l Air Deflector (Horizontal Louver) Vertical mr DeNec_r (Ve_l Louver) -- _r Dis_arge A_r Intake (inlet GrilJe) Con_l Board Remote ControUer _,_ 8 Room Air Condi Base Pan Power Cord WARNING: This appfiance should _ indued in acco_ance with the N_ionai Ele_ric Cede. Introductio_ This symbol alerts you to the risk of el_Hc sh_P_ This sym_l alerts you to ha_rds th_ could _u_ harm to t_ air conditioner, This symbol indicates specta| notes.

User Guide
Page 10
...-siot grounding wall power outlet, if the power outiet does not include a grounding slot, have a quaLifi_ eiectrician repiace the outtet _fore you use the room air conditioner. P_ me_c WARNING: Changing the outlet _thout making the appropriate wiring changes wili create an unsafe condition that could result in fire or eiectrical shock.
...-siot grounding wall power outlet, if the power outiet does not include a grounding slot, have a quaLifi_ eiectrician repiace the outtet _fore you use the room air conditioner. P_ me_c WARNING: Changing the outlet _thout making the appropriate wiring changes wili create an unsafe condition that could result in fire or eiectrical shock.

User Guide
Page 18
..._n 60T~_'F The unk _kes an _¢erage of tim,e. Inse_ _ batteries. Rem_ _ batteries _m • e re.re _nt,_er ff _he air _iti_er is ,press_ and stopswhenyou _e_ the bu_oin _ain. Be s_re _ the po_y when ins_lli_ _e Be s_re _at _th ba,_edes a_ new. 3. Su_... Operating/ns_tions CAUTION:The Remote Controller will not fun_ion properly if strong light strikes the sensor window _ the air _nd_oner or if them are ob_cies I_veen the Remote Controller and the air conditioner. Room, Air er O_ra_on sta_s whenthis bu_ is not going to _, us_ _ an exte_d_ len_h of 30 minutes to...
..._n 60T~_'F The unk _kes an _¢erage of tim,e. Inse_ _ batteries. Rem_ _ batteries _m • e re.re _nt,_er ff _he air _iti_er is ,press_ and stopswhenyou _e_ the bu_oin _ain. Be s_re _ the po_y when ins_lli_ _e Be s_re _at _th ba,_edes a_ new. 3. Su_... Operating/ns_tions CAUTION:The Remote Controller will not fun_ion properly if strong light strikes the sensor window _ the air _nd_oner or if them are ob_cies I_veen the Remote Controller and the air conditioner. Room, Air er O_ra_on sta_s whenthis bu_ is not going to _, us_ _ an exte_d_ len_h of 30 minutes to...
User Guide
Page 20
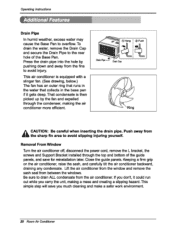
Press the drain pipe into _e hole by the fan and expelled _rough the _nden_r, making _e air conditioner more efficient. Lift the air _nditioner from the _ndow and remove the sash seal from the air _nditioner. Be careful when inse_ing the d_in pi!_, Push away _m the sha_ 'fin area to avoid ... avoid slipping injudng youmelf. Close _e guide panels. If you don't, it gets deep. K_ping a firm grip on the air _nditioner, raise the sash, and _refulFi tilt _e air _ndiUoner bayard, draining any _ndensate. This simpie step will save _r reins_fla_on later. Be sure to _e rear hole of _e...
Press the drain pipe into _e hole by the fan and expelled _rough the _nden_r, making _e air conditioner more efficient. Lift the air _nditioner from the _ndow and remove the sash seal from the air _nditioner. Be careful when inse_ing the d_in pi!_, Push away _m the sha_ 'fin area to avoid ... avoid slipping injudng youmelf. Close _e guide panels. If you don't, it gets deep. K_ping a firm grip on the air _nditioner, raise the sash, and _refulFi tilt _e air _ndiUoner bayard, draining any _ndensate. This simpie step will save _r reins_fla_on later. Be sure to _e rear hole of _e...

User Guide
Page 21
... unit) should be washed with mild _ap or detergent and lukewa_ water, then polished with soot or dirt from _e filter and mplac4_, Cleaning The Air Conditioner The _nt grille and Inlet grille may be checked periodically and cleaned if cl_ged with Liquid Wax _r _pliances. Maintenance _d Service... Air Filter Check the air filter at least _ice a month to _e if cleaning is necessary. To clean bhe air filter: Pull the inlet gdlle forw_. The _binet may _p,ed wi_ a do_ dampened in _e...
... unit) should be washed with mild _ap or detergent and lukewa_ water, then polished with soot or dirt from _e filter and mplac4_, Cleaning The Air Conditioner The _nt grille and Inlet grille may be checked periodically and cleaned if cl_ged with Liquid Wax _r _pliances. Maintenance _d Service... Air Filter Check the air filter at least _ice a month to _e if cleaning is necessary. To clean bhe air filter: Pull the inlet gdlle forw_. The _binet may _p,ed wi_ a do_ dampened in _e...

User Guide
Page 23
...in highly humid conditions. This featu_ is caus_ by the compressor cycle starting and stopping. You see if the air filter is a clearance of over 20" between the back of the air conditioner and the wall or fence behind it. 4. Water may be coH_ed in the base pan in the room.... Before _lHng for any source of the un_. If you cannot find a solution, turn off the air conditioner and contact your air condffioner, read the following list of the unit. ,, You hear the fan running while the compressor is plugged into a proper outlet. 2. ...
...in highly humid conditions. This featu_ is caus_ by the compressor cycle starting and stopping. You see if the air filter is a clearance of over 20" between the back of the air conditioner and the wall or fence behind it. 4. Water may be coH_ed in the base pan in the room.... Before _lHng for any source of the un_. If you cannot find a solution, turn off the air conditioner and contact your air condffioner, read the following list of the unit. ,, You hear the fan running while the compressor is plugged into a proper outlet. 2. ...

User Guide
Page 24
... open _rnace floor registers and cold air returns. [] _oling coils have b_n • When the air conditioner is frst turned on the power cord p!ug. to prevent tripping of the air conditioner. • Turn the knob to cool d_n. [] Cold air is dirty. if the RESET bu_on... ting abnorma,!!_en: [] The air conditioner is does not • Make sure the air condiUoner p_ug is reacted. See Air Co nd_oner Freezing Up freezing up , . Maintenance and Service The air conditioner mw be set high enough. [] The air filter is escaping. . Room Air er maximum cooling. • ...
... open _rnace floor registers and cold air returns. [] _oling coils have b_n • When the air conditioner is frst turned on the power cord p!ug. to prevent tripping of the air conditioner. • Turn the knob to cool d_n. [] Cold air is dirty. if the RESET bu_on... ting abnorma,!!_en: [] The air conditioner is does not • Make sure the air condiUoner p_ug is reacted. See Air Co nd_oner Freezing Up freezing up , . Maintenance and Service The air conditioner mw be set high enough. [] The air filter is escaping. . Room Air er maximum cooling. • ...
Service Manual
Page 1
website http://www.lgappliances.com LG LG Room Air Conditioner SERVICE MANUAL MODELS: LWHD1500ER,LWHD1800R,L1804R CAUTION • BEFORE SERVICING THE UNIT, READ THE SAFETY PRECAUTIONS IN THIS MANUAL. • ONLY FOR AUTHORIZED SERVICE PERSONNEL.
website http://www.lgappliances.com LG LG Room Air Conditioner SERVICE MANUAL MODELS: LWHD1500ER,LWHD1800R,L1804R CAUTION • BEFORE SERVICING THE UNIT, READ THE SAFETY PRECAUTIONS IN THIS MANUAL. • ONLY FOR AUTHORIZED SERVICE PERSONNEL.

Service Manual
Page 2
Air Conditioner Service Manual TABLE OF CONTENTS Safety Precautions...3 Dimensions ...5 Outside dimensions...5 Product Specifications ...6 Installation ...7 Select the Best Location ...7 Installation Check ...7 How to Secure the Drain Pipe ...7 How to Install...8 Cabinet Installation...9 Operation ...11 Function of Controls ...11 Disassembly ...12 Mechanical Parts...12 Air Handling Parts ...13 Electrical Parts ...14 Refrigerating Cycle...16 Schematic...
Air Conditioner Service Manual TABLE OF CONTENTS Safety Precautions...3 Dimensions ...5 Outside dimensions...5 Product Specifications ...6 Installation ...7 Select the Best Location ...7 Installation Check ...7 How to Secure the Drain Pipe ...7 How to Install...8 Cabinet Installation...9 Operation ...11 Function of Controls ...11 Disassembly ...12 Mechanical Parts...12 Air Handling Parts ...13 Electrical Parts ...14 Refrigerating Cycle...16 Schematic...
Service Manual
Page 4
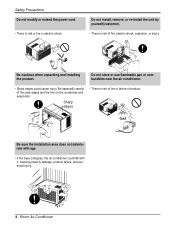
... and the fins on the condenser and evaporator. Gasolin Be sure the installation area does not deteriorate with age. • If the base collapses, the air conditioner could cause injury. Safety Precautions Do not modify or extend the power cord. • There is risk or fire or electric shock. Be cautious when... unpacking and installing the product. Do not store or use flammable gas or combustibles near the air conditioner. • Sharp edges could fall with it, causing property damage, product failure, and personal injury. 4 Room...
... and the fins on the condenser and evaporator. Gasolin Be sure the installation area does not deteriorate with age. • If the base collapses, the air conditioner could cause injury. Safety Precautions Do not modify or extend the power cord. • There is risk or fire or electric shock. Be cautious when... unpacking and installing the product. Do not store or use flammable gas or combustibles near the air conditioner. • Sharp edges could fall with it, causing property damage, product failure, and personal injury. 4 Room...

Service Manual
Page 5
This symbol alerts you to the air conditioner. Dimensions Outside Dimensions D W Cool Energy Saver F1 LOW 'F F2 MED F3 HIGH Fan Dry Timer TEMP MODE TIMER FAN SPEED POWER H Dimension W H D Model mm(inch) mm(inch) mm(inch) HBLG1203R 660(25 31/32) 428(16 27/32) 680(26 27/32) Service Manual 5 NOTICE This symbol indicates special notes. Dimensions Symbols Used in this Manual This symbol alerts you to hazards that could cause harm to the risk of electric shock.
This symbol alerts you to the air conditioner. Dimensions Outside Dimensions D W Cool Energy Saver F1 LOW 'F F2 MED F3 HIGH Fan Dry Timer TEMP MODE TIMER FAN SPEED POWER H Dimension W H D Model mm(inch) mm(inch) mm(inch) HBLG1203R 660(25 31/32) 428(16 27/32) 680(26 27/32) Service Manual 5 NOTICE This symbol indicates special notes. Dimensions Symbols Used in this Manual This symbol alerts you to hazards that could cause harm to the risk of electric shock.

Service Manual
Page 6
... FAN,INDOOR FAN,OUTDOOR FAN SPEEDS,FAN/COOLING/HEATING FAN MOTOR OPERATION CONTROL ROOM TEMP CONTROL AIR DIRECTION CONTROL CONSTRUCTION PROTECTOR COMPRESSOR FAN MOTOR POWER CORD DRAIN SYSTEM NET WEIGHT OUTSIDE DIMENSION (W X H X D) (lbs/kg) (inch) (mm) LWHD1500ER LWHD1800R L1804R 1 115V 60Hz 15,000 1380 12.0 10.8 - 1 208/230V 60Hz 17,500/18... * DB : dry bulb ** WB : wet bulb Note: Please refer to Label Quality on the product Since this sepcification may be changed for improving performance. 6 Room Air Conditioner
... FAN,INDOOR FAN,OUTDOOR FAN SPEEDS,FAN/COOLING/HEATING FAN MOTOR OPERATION CONTROL ROOM TEMP CONTROL AIR DIRECTION CONTROL CONSTRUCTION PROTECTOR COMPRESSOR FAN MOTOR POWER CORD DRAIN SYSTEM NET WEIGHT OUTSIDE DIMENSION (W X H X D) (lbs/kg) (inch) (mm) LWHD1500ER LWHD1800R L1804R 1 115V 60Hz 15,000 1380 12.0 10.8 - 1 208/230V 60Hz 17,500/18... * DB : dry bulb ** WB : wet bulb Note: Please refer to Label Quality on the product Since this sepcification may be changed for improving performance. 6 Room Air Conditioner

Service Manual
Page 7
... be connected to drain (consult a dealer). Drain pipe Drain cap Optional CABINET SCREW 1. To avoid vibration and noise, make sure the air conditioner is installed securely and firmly. 2. Install the unit with level). 6. The following figures Fig. 3 Fig. 4 (by pushing down ...and away from the condenser. 4. If the unit receives direct sunlight, build an awning to overflow. FOAM COOLED AIR 30-60" 1/4 Bubble Level AWNING FENCE HEAT RADIATION About 1/2" Over 20" Figure 1 Installation Check The setting conditions must be connected...
... be connected to drain (consult a dealer). Drain pipe Drain cap Optional CABINET SCREW 1. To avoid vibration and noise, make sure the air conditioner is installed securely and firmly. 2. Install the unit with level). 6. The following figures Fig. 3 Fig. 4 (by pushing down ...and away from the condenser. 4. If the unit receives direct sunlight, build an awning to overflow. FOAM COOLED AIR 30-60" 1/4 Bubble Level AWNING FENCE HEAT RADIATION About 1/2" Over 20" Figure 1 Installation Check The setting conditions must be connected...

Service Manual
Page 8
...(0.63") 5 8 FOAM-STRIP 1 9 FOAM-PE (600mm x 25mm x 2mm) 1 10 WINDOW LOCKING BRACKET 1 11 FOAM-PE (920mm x 30mm x 2mm) 1 12 DRAIN PIPE 1 13 FRAME GUIDE 2 8 Room Air Conditioner NO. Window Requirements This unit is in standard double hung windows with actual opening of the upper sash to 41". Installation Kits Contents 29" to...
...(0.63") 5 8 FOAM-STRIP 1 9 FOAM-PE (600mm x 25mm x 2mm) 1 10 WINDOW LOCKING BRACKET 1 11 FOAM-PE (920mm x 30mm x 2mm) 1 12 DRAIN PIPE 1 13 FRAME GUIDE 2 8 Room Air Conditioner NO. Window Requirements This unit is in standard double hung windows with actual opening of the upper sash to 41". Installation Kits Contents 29" to...
Service Manual
Page 10
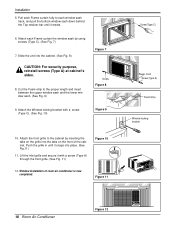
...the front grille. (See Fig. 11) Figure 10 12. Attach each Frame curtain the window sash by inserting the tabs on the front of room air conditioner is now completed. Push the grille in until it meets. 6. Figure 11 Screw(Type C) Power Cord Screw (Type A) Foam-Strip Window locking bracket... 10 Room Air Conditioner Figure 12 Cut the Foam-strip to each Frame curtain fully to the proper length and insert between the upper window sash and the lower ...
...the front grille. (See Fig. 11) Figure 10 12. Attach each Frame curtain the window sash by inserting the tabs on the front of room air conditioner is now completed. Push the grille in until it meets. 6. Figure 11 Screw(Type C) Power Cord Screw (Type A) Foam-Strip Window locking bracket... 10 Room Air Conditioner Figure 12 Cut the Foam-strip to each Frame curtain fully to the proper length and insert between the upper window sash and the lower ...
Service Manual
Page 11
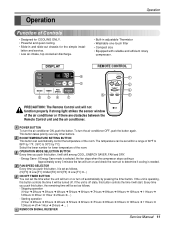
...➔ ... ) 6 REMOCON SIGNAL RECEIVER Service Manual 11 FAN SPEED SELECTOR Every time you push this button, it will start. To turn the air conditioner ON, push the button. ROOM TEMPERATURE SETTING BUTTON This button can set as follows. - Stopping operation (1Hour ➔ 2Hours ➔ 3Hours &#...- lation and service. • Low air-intake, top cooled-air discharge. • Built-in and slide-out chassis for lower temperature of the air conditioner or if there are obstacles between the Remote Control unit and the air conditioner. This button takes priority over any other...
...➔ ... ) 6 REMOCON SIGNAL RECEIVER Service Manual 11 FAN SPEED SELECTOR Every time you push this button, it will start. To turn the air conditioner ON, push the button. ROOM TEMPERATURE SETTING BUTTON This button can set as follows. - Stopping operation (1Hour ➔ 2Hours ➔ 3Hours &#...- lation and service. • Low air-intake, top cooled-air discharge. • Built-in and slide-out chassis for lower temperature of the air conditioner or if there are obstacles between the Remote Control unit and the air conditioner. This button takes priority over any other...

Service Manual
Page 12
...following disassembly, CONTROL BOX set to section 1) 2. Pull the front grille from the overload protector. 12. Remove the 2 screws that connects Plazma Air Purifier.(Optional) 8. Control Box 1. Discharge the capacitor by referring to the removal procedure, above. 3. Mechanical Parts 1. Cabinet 1. Remove the housing... SPFAENED ˚C POWER ESnaCevrogeoryl Fan Dry MODE Timer TIMER FFF321HMLIGOEDWH TEMP SPFAENED ˚C POWER 12 Room Air Conditioner Figure 13 Figure 14 Figure 15 Re-install the components by placing a 20,000 ohm resistor across the capacitor terminals. 13...
...following disassembly, CONTROL BOX set to section 1) 2. Pull the front grille from the overload protector. 12. Remove the 2 screws that connects Plazma Air Purifier.(Optional) 8. Control Box 1. Discharge the capacitor by referring to the removal procedure, above. 3. Mechanical Parts 1. Cabinet 1. Remove the housing... SPFAENED ˚C POWER ESnaCevrogeoryl Fan Dry MODE Timer TIMER FFF321HMLIGOEDWH TEMP SPFAENED ˚C POWER 12 Room Air Conditioner Figure 13 Figure 14 Figure 15 Re-install the components by placing a 20,000 ohm resistor across the capacitor terminals. 13...

Service Manual
Page 14
Overload Protector 1. Remove the nut that fastens the terminal cover. 3. Re-install the components by referring to the removal procedure, above . 14 Room Air Conditioner Figure 20 Figure 21 Figure 22 Discharge the refrigerant system using a FreonTM Recovery System. Remove the fan. (Refer to section 7) 4. Remove all the leads from ...
Overload Protector 1. Remove the nut that fastens the terminal cover. 3. Re-install the components by referring to the removal procedure, above . 14 Room Air Conditioner Figure 20 Figure 21 Figure 22 Discharge the refrigerant system using a FreonTM Recovery System. Remove the fan. (Refer to section 7) 4. Remove all the leads from ...


