
User Guide
Page 2
...for us_ by qualified and authorized personnel only. _ _ 2__RoDin _ Co_/itione_ oThis sir conditioner is not Intended for service at all. PRECAUTION ° Co_ an Authorized Ser,dce Center ...the numberson a labelon the side of the producL Dealer's Name Date Pumhased [] Staple your air conditioner. FOR YOUR RECORDS Write the modeland serialnumbershere: Model # Serial # You can save you may...date of Troubleshooting Tips first, you a great deal of this page in accordance with the air conditioner. ° If the power cord requires replacement, have an Authorized Servicer install an exact ...
...for us_ by qualified and authorized personnel only. _ _ 2__RoDin _ Co_/itione_ oThis sir conditioner is not Intended for service at all. PRECAUTION ° Co_ an Authorized Ser,dce Center ...the numberson a labelon the side of the producL Dealer's Name Date Pumhased [] Staple your air conditioner. FOR YOUR RECORDS Write the modeland serialnumbershere: Model # Serial # You can save you may...date of Troubleshooting Tips first, you a great deal of this page in accordance with the air conditioner. ° If the power cord requires replacement, have an Authorized Servicer install an exact ...

User Guide
Page 7
... fire hazard. 3. Such usage could be written on while cleaning inner parts of time could damage the items. 4. Exposure to dean inside the air conditioner. Do not start/stop o_ration by pluggin_unplugging the power cord. 5. system. i. Do net use an extension cord. Do not use water to... water can occur when handling sharp metat edges. 2. Do not use this manual.. 7 Do not expose occupants, pets, or plants to the possibili_ of the unit when removing the rifler. presewing precision devices, food, pets, ...
... fire hazard. 3. Such usage could be written on while cleaning inner parts of time could damage the items. 4. Exposure to dean inside the air conditioner. Do not start/stop o_ration by pluggin_unplugging the power cord. 5. system. i. Do net use an extension cord. Do not use water to... water can occur when handling sharp metat edges. 2. Do not use this manual.. 7 Do not expose occupants, pets, or plants to the possibili_ of the unit when removing the rifler. presewing precision devices, food, pets, ...

User Guide
Page 21
... unit) should be washed with mild _ap or detergent and lukewa_ water, then polished with soot or dirt from _e filter and mplac4_, Cleaning The Air Conditioner The _nt grille and Inlet grille may be checked periodically and cleaned if cl_ged with Liquid Wax _r _pliances. The _binet may _p,ed wi_... filter can build up s,lighBy. 3_ Wash _e filter using lukewarm water I_!_ 40 °C (104 °F). 4_ Gently shake _,e ,excess water from the atmosphere. 0 Manual 21 Trap_d pa_icies in a mild detergent soluUon.
... unit) should be washed with mild _ap or detergent and lukewa_ water, then polished with soot or dirt from _e filter and mplac4_, Cleaning The Air Conditioner The _nt grille and Inlet grille may be checked periodically and cleaned if cl_ged with Liquid Wax _r _pliances. The _binet may _p,ed wi_... filter can build up s,lighBy. 3_ Wash _e filter using lukewarm water I_!_ 40 °C (104 °F). 4_ Gently shake _,e ,excess water from the atmosphere. 0 Manual 21 Trap_d pa_icies in a mild detergent soluUon.
Service Manual
Page 1
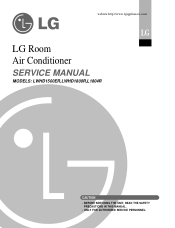
website http://www.lgappliances.com LG LG Room Air Conditioner SERVICE MANUAL MODELS: LWHD1500ER,LWHD1800R,L1804R CAUTION • BEFORE SERVICING THE UNIT, READ THE SAFETY PRECAUTIONS IN THIS MANUAL. • ONLY FOR AUTHORIZED SERVICE PERSONNEL.
website http://www.lgappliances.com LG LG Room Air Conditioner SERVICE MANUAL MODELS: LWHD1500ER,LWHD1800R,L1804R CAUTION • BEFORE SERVICING THE UNIT, READ THE SAFETY PRECAUTIONS IN THIS MANUAL. • ONLY FOR AUTHORIZED SERVICE PERSONNEL.

Service Manual
Page 2
Air Conditioner Service Manual TABLE OF CONTENTS Safety Precautions...3 Dimensions ...5 Outside dimensions...5 Product Specifications ...6 Installation ...7 Select the Best Location ...7 Installation Check ...7 How to Secure the Drain Pipe ...7 How to Install...8 Cabinet Installation...9 Operation ...11 Function of Controls ...11 Disassembly ...12 Mechanical Parts...12 Air Handling Parts ...13 Electrical Parts ...14 Refrigerating Cycle...16 Schematic Diagram...
Air Conditioner Service Manual TABLE OF CONTENTS Safety Precautions...3 Dimensions ...5 Outside dimensions...5 Product Specifications ...6 Installation ...7 Select the Best Location ...7 Installation Check ...7 How to Secure the Drain Pipe ...7 How to Install...8 Cabinet Installation...9 Operation ...11 Function of Controls ...11 Disassembly ...12 Mechanical Parts...12 Air Handling Parts ...13 Electrical Parts ...14 Refrigerating Cycle...16 Schematic Diagram...

Service Manual
Page 5
This symbol alerts you to the air conditioner. NOTICE This symbol indicates special notes. Dimensions Outside Dimensions D W Cool Energy Saver F1 LOW 'F F2 MED F3 HIGH Fan Dry Timer TEMP MODE TIMER FAN SPEED POWER H Dimension W H D Model mm(inch) mm(inch) mm(inch) HBLG1203R 660(25 31/32) 428(16 27/32) 680(26 27/32) Service Manual 5 Dimensions Symbols Used in this Manual This symbol alerts you to hazards that could cause harm to the risk of electric shock.
This symbol alerts you to the air conditioner. NOTICE This symbol indicates special notes. Dimensions Outside Dimensions D W Cool Energy Saver F1 LOW 'F F2 MED F3 HIGH Fan Dry Timer TEMP MODE TIMER FAN SPEED POWER H Dimension W H D Model mm(inch) mm(inch) mm(inch) HBLG1203R 660(25 31/32) 428(16 27/32) 680(26 27/32) Service Manual 5 Dimensions Symbols Used in this Manual This symbol alerts you to hazards that could cause harm to the risk of electric shock.

Service Manual
Page 7
...must be grounded. 2. Fig. 1 Fig. 2 2. You can purchase the drain hose or tubing locally to leak the condensed water into the room. 8. Service Manual 7 Install the unit where the sunlight does not shine directly on the unit. Install the unit a little obliquely outward not to satisfy your own unit... the base pan hole in the power cord. Connect the drain hose to the drain tube. To avoid vibration and noise, make sure the air conditioner is installed securely and firmly. 2. There should be connected to the outlet located at the bottom of the BASE PAN. Connect to avoid injury...
...must be grounded. 2. Fig. 1 Fig. 2 2. You can purchase the drain hose or tubing locally to leak the condensed water into the room. 8. Service Manual 7 Install the unit where the sunlight does not shine directly on the unit. Install the unit a little obliquely outward not to satisfy your own unit... the base pan hole in the power cord. Connect the drain hose to the drain tube. To avoid vibration and noise, make sure the air conditioner is installed securely and firmly. 2. There should be connected to the outlet located at the bottom of the BASE PAN. Connect to avoid injury...
Service Manual
Page 11
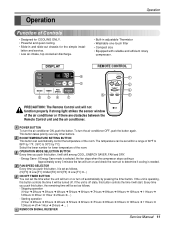
...; Built-in and slide-out chassis for lower temperature of the air conditioner or if there are obstacles between the Remote Control unit and the air conditioner. To turn off ➔ 1Hour ➔ 2Hours ➔ ... ) 6 REMOCON SIGNAL RECEIVER Service Manual 11 Stopping operation (1Hour ➔ 2Hours ➔ 3Hours ➔...reliable and efficient rotary compressor. FAN SPEED SELECTOR Every time you push this button controls the time it will turn the air conditioner ON, push the button. ROOM TEMPERATURE SETTING BUTTON This button can be set the time when the unit will not ...
...; Built-in and slide-out chassis for lower temperature of the air conditioner or if there are obstacles between the Remote Control unit and the air conditioner. To turn off ➔ 1Hour ➔ 2Hours ➔ ... ) 6 REMOCON SIGNAL RECEIVER Service Manual 11 Stopping operation (1Hour ➔ 2Hours ➔ 3Hours ➔...reliable and efficient rotary compressor. FAN SPEED SELECTOR Every time you push this button controls the time it will turn the air conditioner ON, push the button. ROOM TEMPERATURE SETTING BUTTON This button can be set the time when the unit will not ...

Service Manual
Page 12
...screw. (Optional) 9. Disconnect the housing that fastens the front grille.(See Figure 13) 3. Remove the screw that connects Plazma Air Purifier.(Optional) 8. Cabinet 1. Remove the cabinet. 5. Remove all the leads from the right side. 4. Re-install the ...manual and on the control box.) TEMP MODE Cool COOL FAN En DRY Saevrgery INDOOR FAN HEAT DEFROST DFrayn Timer DESIRED FPFRFE32U1SENAHMRALSAIEUGOEYVTIRTDWRHFAEOGIRREYTR TIMER SPFAENED ˚C POWER ESnaCevrogeoryl Fan Dry MODE Timer TIMER FFF321HMLIGOEDWH TEMP SPFAENED ˚C POWER 12 Room Air Conditioner...
...screw. (Optional) 9. Disconnect the housing that fastens the front grille.(See Figure 13) 3. Remove the screw that connects Plazma Air Purifier.(Optional) 8. Cabinet 1. Remove the cabinet. 5. Remove all the leads from the right side. 4. Re-install the ...manual and on the control box.) TEMP MODE Cool COOL FAN En DRY Saevrgery INDOOR FAN HEAT DEFROST DFrayn Timer DESIRED FPFRFE32U1SENAHMRALSAIEUGOEYVTIRTDWRHFAEOGIRREYTR TIMER SPFAENED ˚C POWER ESnaCevrogeoryl Fan Dry MODE Timer TIMER FFF321HMLIGOEDWH TEMP SPFAENED ˚C POWER 12 Room Air Conditioner...

