LG LT081CER Support and Manuals
Get Help and Manuals for this LG item

Popular LG LT081CER Manual Pages
Owner's Manual - Page 1
...las precauciones de seguridad cuidadosa y totalmente antes de instalar y operar su acondicionador de aire de ventana. MODELS, MODELOS: LT0810CR LT1010CR LT1210CR LT081CER LT101CNR LT121CNR
IMPORTANT Please read the operating instructions and safety precautions carefully and thoroughly before installing and operating your air conditioner.This manual may help save time and money by misuse of the...
Owner's Manual - Page 2

... preventive care on your part can find many answers to prove date of purchase or for service at all. If you review our chart of Troubleshooting Tips first, you may not need it
to common problems in accordance with the National Electric Code by qualified and authorized personnel only.
2 Room Air Conditioner READ THIS MANUAL
Inside you will find...
Owner's Manual - Page 9

...problems. Consult a qualified electrician. The device should be different according to the State of the air conditioner and contact a qualified service...codes and regulations. These shields are surrounded by first pressing the TEST button and then the RESET button. Do not use . Owner's Manual...become exposed. Use Wall Receptacle
Power Supply... known to its model.
Aluminum house wiring...
Owner's Manual - Page 11

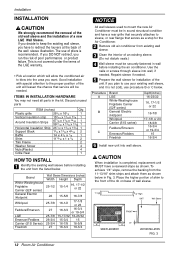
... socket and ratchet
• Tape measure
• Electric drill
• 1/4-inch drill bit
Owner's Manual 11 Install the new air conditioner according to these installation instructions to move and install the unit.
If your present wall outlet does not match your available electrical service. The carton is the best way to the weight of this device and sharp edges...
Owner's Manual - Page 12
...unit. Discard unused parts
ITEM (inches)
Qty. Repaint sleeve if needed.
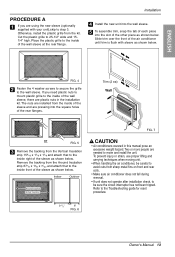
5 Prepare the wall sleeve for the Air Conditioner.
2 Remove old air conditioner from existing wall sleeve.
3 Clean the interior of wall sleeve.
1" high
3/4" High UNIT
Wall Sleeve
Shim
FRONT
1/4"
6"
6"
SHIM PLACEMENT
UNIT INSTALLATION
FIG. 3
12 Room Air Conditioner
This is completed, replacement unit MUST...
Owner's Manual - Page 13
... on front and rear coils.
• Make sure air conditioner does not fall during removal.
• If unit does not operate after installation check, to the Troubleshooting guide for reset procedure.
9 1/2"
6"
FIG. 6
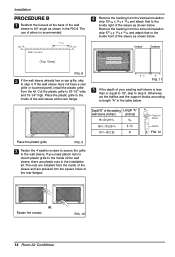
Owner's Manual 13 Place the plastic grille to the inside of the sleeve as shown below . Trim (2 ea) Wall
or FIG. 5
3 Remove the backing from the...
Owner's Manual - Page 14
...-3/4 D 22
4
A Support Block
Baffle
A FIG. 12
Place the plastic grille
FIG. 9
3 Fasten the 4 washer screws to secure the grille to 25-1/2" wide and 15-1/4" high. If you need plastic nuts to mount plastic grille to length "A" in the installation kit. or Fasten the screws
FIG. 10
14 Room Air Conditioner If the wall sleeve does not...
Owner's Manual - Page 15
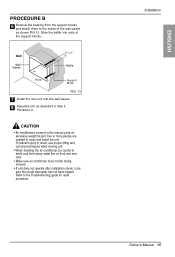
... when moving unit.
• When handling the air conditioner, be careful to avoid cuts from the support blocks and attach them to the inside of the support blocks. Slide the baffle into the wall sleeve. 8 Assemble trim as shown FIG 13. Refer to the Troubleshooting guide for reset procedure. CAUTION
• Air conditioners covered in Step 5,
Procedure A. ENGLISH
PROCEDURE B
6 Remove...
Owner's Manual - Page 16
... step 4.
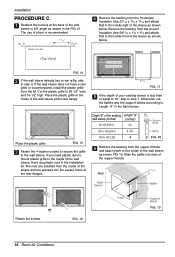
The nuts are installed from the inside of the sleeve and are plastic nuts in the table below. Around Insulation Horizontal Insulation
Indoor
Outdoor
8 1/2"
FIG. 17
5 If the depth of the support blocks
Wall
(7 3/32")
Wall Sleeve
Baffle
or Fasten the screws
FIG. 16
Front
Support Block
FIG. 19
16 Room Air Conditioner If you need plastic nuts...
Owner's Manual - Page 17
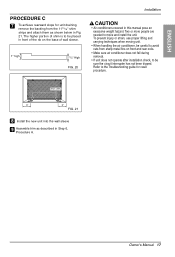
... or more people are needed to the Troubleshooting guide for unit draining, remove the backing from sharp metal fins on the base of shim is to be placed in this manual pose an excessive weight hazard. Owner's Manual 17
Shim (2EA)
6"
6"
FIG. 21
8 Install the new unit into the wall sleeve 9 Assemble trim as shown below in...
Owner's Manual - Page 19
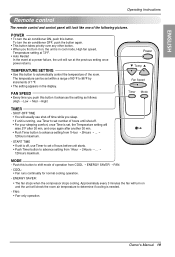
... turn it advances the setting as follows: (High ¡ Low ¡ Med ¡ High)
Power Temp Fan Speed Timer Mode
TIMER
- ENGLISH
Operating Instructions
Remote control
The remote ...compressor stops cooling. POWER
• To turn the air conditioner ON, push this button it on and the unit will check the room air temperature to advance setting from 1Hour ¡ 2Hours ¡ ... ¡...
Owner's Manual - Page 22
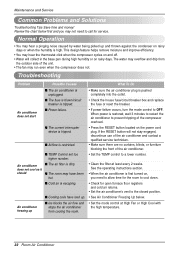
...restart the air conditioner to call for service. See the operating instructions section.
• When the air conditioner is escaping.
• Check for the room to the closed position.
Normal Operation
• You may not need to allow time for open furnace floor registers and cold air returns.
• Set the air conditioner's vent to cool down. Troubleshooting
Problem
Possible...
Owner's Manual - Page 48
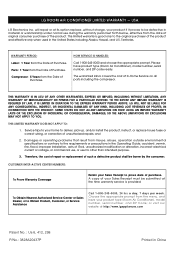
...: 1 Year from the Date of Purchase. Please have your product type (Room Air Conditioner), model number, serial number, and ZIP Code; and
2. Therefore, the cost of repair or replacement of such a defective product shall be defective in China
Parts: 1 Year from the Date of Purchase.
LG WILL NOT BE LIABLE FOR ANY CONSEQUENTIAL, INDIRECT, OR INCIDENTAL DAMAGES OF...
Specification - Page 1

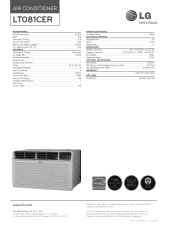
...for Sleeve LG's universal thru-the-wall air conditioners fit competitive wall sleeves (26" standard size). Gold Fin™ Anti-Corrosion Standard on all LG units... & Fan Speeds • Remote Control • Timer 12 Hr.
AIR CONDITIONER
LT081CER
Thru-the-Wall Air Conditioner
HIGHLIGHTS Universal Fit for Sleeve Gold Fin™ Anti-Corrosion 3 Cooling & Fan Speeds
PERFORMANCE
•...
Specification - Page 2
... Dry Air Flow (CFM) dBA Level (Indoor/Outdoor) Est. All rights reserved.
OPTIONAL ACCESSORIES
Wall Sleeve
AXSVA1
Wall Sleeve with Stamped Aluminum Grille
AXSVA4
Stamped Aluminum Grille
AXRGALA01
WARRANTY
1 Year Parts and Labor
UPC CODE
LT081CER
048231 362726
www.LG.com
LG Electronics U.S.A., Inc.
1000 Sylvan Avenue Englewood Cliffs, NJ 07632 Customer Service and Technical Support...
LG LT081CER Reviews
We have not received any reviews for LG yet.