Owners Manual
Page 1
GS73SXS GS74SXS LSXS26396* LSXC22396* LS74SXS LSXS26326* LSXS26366* LSXS26386* GS73SDS GS74SDS GS73SGS GS74SGS LSXS26336* GS73SGG GS73SDD MFL67653498-2 www.lg.com Copyright © 2020 LG Electronics Inc. ENGLISH OWNER'S MANUAL SIDE BY SIDE REFRIGERATOR Read this owner's manual thoroughly before operating the appliance and keep it handy for reference at all times. All Rights Reserved.
GS73SXS GS74SXS LSXS26396* LSXC22396* LS74SXS LSXS26326* LSXS26366* LSXS26386* GS73SDS GS74SDS GS73SGS GS74SGS LSXS26336* GS73SGG GS73SDD MFL67653498-2 www.lg.com Copyright © 2020 LG Electronics Inc. ENGLISH OWNER'S MANUAL SIDE BY SIDE REFRIGERATOR Read this owner's manual thoroughly before operating the appliance and keep it handy for reference at all times. All Rights Reserved.
Owners Manual
Page 2
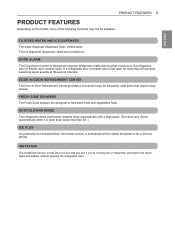
...INSTRUCTIONS 4 IMPORTANT SAFETY INSTRUCTIONS 8 PRODUCT SPECIFICATIONS 9 PRODUCT OVERVIEW 9 Exterior 10 Interior 11 INSTALLATION 11 Installation Overview 12 Unpacking the Refrigerator 12 Choosing the Proper Location 14 Removing/Assembling Handles 14 Removing/Assembling the Doors 17 Connecting the Water Line 20 Leveling and Door...Storing Food 30 Detaching/Assembling the Storage Bins 31 InstaView Function 31 Door-in-Door 32 Adjusting the Refrigerator Shelves 33 SMART FUNCTIONS 33 LG ThinQ Application 36 Smart Grid Function 37 Smart Diagnosis™ Function 37 MAINTENANCE 37 Cleaning 38 Replacing ...
...INSTRUCTIONS 4 IMPORTANT SAFETY INSTRUCTIONS 8 PRODUCT SPECIFICATIONS 9 PRODUCT OVERVIEW 9 Exterior 10 Interior 11 INSTALLATION 11 Installation Overview 12 Unpacking the Refrigerator 12 Choosing the Proper Location 14 Removing/Assembling Handles 14 Removing/Assembling the Doors 17 Connecting the Water Line 20 Leveling and Door...Storing Food 30 Detaching/Assembling the Storage Bins 31 InstaView Function 31 Door-in-Door 32 Adjusting the Refrigerator Shelves 33 SMART FUNCTIONS 33 LG ThinQ Application 36 Smart Grid Function 37 Smart Diagnosis™ Function 37 MAINTENANCE 37 Cleaning 38 Replacing ...
Owners Manual
Page 3
...less than 60 seconds, a warning alarm sounds at the coldest temperature for frequently used items like beverages and snacks, without opening the refrigerator door. INSTAVIEW The InstaView function on the Door-in -Door Refreshment Center provides a convenient area for a 24-hour period. DOOR-...following functions may not be available. FILTERED WATER AND ICE DISPENSER The water dispenser dispenses fresh, chilled water. AUTO-CLOSING HINGE The refrigerator doors and freezer drawers close automatically with a slight push. (The door only closes automatically when it is maintained at 30-second ...
...less than 60 seconds, a warning alarm sounds at the coldest temperature for frequently used items like beverages and snacks, without opening the refrigerator door. INSTAVIEW The InstaView function on the Door-in -Door Refreshment Center provides a convenient area for a 24-hour period. DOOR-...following functions may not be available. FILTERED WATER AND ICE DISPENSER The water dispenser dispenses fresh, chilled water. AUTO-CLOSING HINGE The refrigerator doors and freezer drawers close automatically with a slight push. (The door only closes automatically when it is maintained at 30-second ...
Owners Manual
Page 4
.... This device is damaged, malfunctioning, partially disassembled, or has missing or broken parts, including a damaged cord or plug. • The refrigerator should be leveled and on your appliance. IMPORTANT SAFETY INSTRUCTIONS WARNING to persons when using this product to a dedicated grounded electrical outlet rated for...'s responsibility to operate this appliance if it is intended for easy access to a power source. • When moving the refrigerator, be careful not to roll over or damage the power cord. • Contact an authorized service center when installing or relocating the...
.... This device is damaged, malfunctioning, partially disassembled, or has missing or broken parts, including a damaged cord or plug. • The refrigerator should be leveled and on your appliance. IMPORTANT SAFETY INSTRUCTIONS WARNING to persons when using this product to a dedicated grounded electrical outlet rated for...'s responsibility to operate this appliance if it is intended for easy access to a power source. • When moving the refrigerator, be careful not to roll over or damage the power cord. • Contact an authorized service center when installing or relocating the...
Owners Manual
Page 5
...material can be supervised to the heat from the dispenser, do not play with wet or damp hands. Do not touch the refrigerator or power cord of the refrigerator. • Disconnect the power cord immediately and contact an authorized service center if there is a strange noise, odor, or ... center before resuming use a cord that has thawed completely. ENGLISH SAFETY INSTRUCTIONS 5 • Keep packing materials out of the reach of the refrigerator. Doing so may cause frostbite. • Do not refreeze frozen food that shows cracks or abrasion damage along its length or at either the...
...material can be supervised to the heat from the dispenser, do not play with wet or damp hands. Do not touch the refrigerator or power cord of the refrigerator. • Disconnect the power cord immediately and contact an authorized service center if there is a strange noise, odor, or ... center before resuming use a cord that has thawed completely. ENGLISH SAFETY INSTRUCTIONS 5 • Keep packing materials out of the reach of the refrigerator. Doing so may cause frostbite. • Do not refreeze frozen food that shows cracks or abrasion damage along its length or at either the...
Owners Manual
Page 6
...longer needed, contact your model) to the desired position. • Unplug the power plug before cleaning or repairing the refrigerator. • The refrigerator and freezer compartment lights are interior LED lighting, and service should be used by people (including children) Whose physical, ...capacities are different or reduced, or lack experience or knowledge, unless such persons are sitting for insulation. DISPOSAL • Junked or abandoned refrigerators are dangerous, even if they have been given supervision or instruction concerning use a hair dryer to dry the inside . • ...
...longer needed, contact your model) to the desired position. • Unplug the power plug before cleaning or repairing the refrigerator. • The refrigerator and freezer compartment lights are interior LED lighting, and service should be used by people (including children) Whose physical, ...capacities are different or reduced, or lack experience or knowledge, unless such persons are sitting for insulation. DISPOSAL • Junked or abandoned refrigerators are dangerous, even if they have been given supervision or instruction concerning use a hair dryer to dry the inside . • ...
Owners Manual
Page 7
... your particular appliance is combustible. Clean with excessive force. • • Do not hang on to or place heavy objects on the amount of refrigerant used only in your dealer. Do not touch glass surfaces if they are cold. MAINTENANCE • Do not use a wet or damp cloth when ...cleaning the plug. • Do not spray water directly on the inside or outside of the refrigerator. • Do not clean glass shelves or covers with the Installation Instructions. Never start up an appliance showing any glass surface. CAUTION To reduce the...
... your particular appliance is combustible. Clean with excessive force. • • Do not hang on to or place heavy objects on the amount of refrigerant used only in your dealer. Do not touch glass surfaces if they are cold. MAINTENANCE • Do not use a wet or damp cloth when ...cleaning the plug. • Do not spray water directly on the inside or outside of the refrigerator. • Do not clean glass shelves or covers with the Installation Instructions. Never start up an appliance showing any glass surface. CAUTION To reduce the...
Owners Manual
Page 8
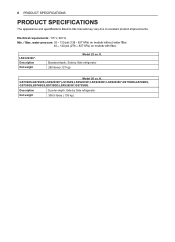
ft. GS73SXS,GS74SXS,LSXS26396*,LS74SXS,LSXS26326*,LSXS26366*,LSXS26386*,GS73SDS,GS74SDS, GS73SGS,GS74SGS,GS73SDD,LSXS26336*,GS73SGG. Description Net weight Model 22 cu. Description Counter-depth, Side by Side refrigerator 280 libras (127 kg) Model 26 cu. 8 PRODUCT SPECIFICATIONS PRODUCT SPECIFICATIONS Electrical requirements: 115 V, 60 Hz Min. / Max. Standard-depth, Side by Side refrigerator Net weight 306.5 libras ( 139 kg ) water pressure: LSXC22396*. ft.
ft. GS73SXS,GS74SXS,LSXS26396*,LS74SXS,LSXS26326*,LSXS26366*,LSXS26386*,GS73SDS,GS74SDS, GS73SGS,GS74SGS,GS73SDD,LSXS26336*,GS73SGG. Description Net weight Model 22 cu. Description Counter-depth, Side by Side refrigerator 280 libras (127 kg) Model 26 cu. 8 PRODUCT SPECIFICATIONS PRODUCT SPECIFICATIONS Electrical requirements: 115 V, 60 Hz Min. / Max. Standard-depth, Side by Side refrigerator Net weight 306.5 libras ( 139 kg ) water pressure: LSXC22396*. ft.
Owners Manual
Page 9
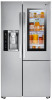
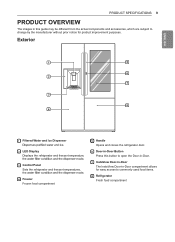
...2 7 3 8 4 1 Filtered Water and Ice Dispenser 2 LED Display Displays the refrigerator and freezer temperature, 3 Control Panel Sets the refrigerator and freezer temperatures, 4 Freezer Frozen food compartment 85 Handle Opens and closes the refrigerator door. 6 Door-in-Door Button Press this button to open the Door-in-Door....this guide may be different from the actual components and accessories, which are subject to commonly used food items. 8 Refrigerator Fresh food compartment ENGLISH PRODUCT SPECIFICATIONS 9 PRODUCT OVERVIEW The images in -Door compartment allows for easy access to change...
...2 7 3 8 4 1 Filtered Water and Ice Dispenser 2 LED Display Displays the refrigerator and freezer temperature, 3 Control Panel Sets the refrigerator and freezer temperatures, 4 Freezer Frozen food compartment 85 Handle Opens and closes the refrigerator door. 6 Door-in-Door Button Press this button to open the Door-in-Door....this guide may be different from the actual components and accessories, which are subject to commonly used food items. 8 Refrigerator Fresh food compartment ENGLISH PRODUCT SPECIFICATIONS 9 PRODUCT OVERVIEW The images in -Door compartment allows for easy access to change...
Owners Manual
Page 10
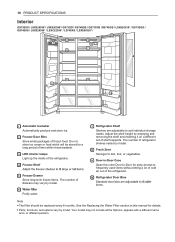
...Door-in-Door for a long period of time within these baskets. 3 LED interior lamps Light up the inside of the refrigerator. 4 Freezer Shelf 5 Freezer Drawer Store long-term frozen items. The number of drawers may not include all the Options... GS74SDS / GS73SGS /GS74SGS / LSXS26336* / GS73SGG / GS74SXS / LSXS26396* / LSXC22396* / LS74SXS / LSXS26326* / 9 3 3 1 6 7 4 5 8 2 10 1 Automatic Icemaker Automatically produce and store ice. 2 Freezer Door Bins Store small packages of the refrigerator. 10 Refrigerator Door Bins items. Note • The filter should be stored for easy access...
...Door-in-Door for a long period of time within these baskets. 3 LED interior lamps Light up the inside of the refrigerator. 4 Freezer Shelf 5 Freezer Drawer Store long-term frozen items. The number of drawers may not include all the Options... GS74SDS / GS73SGS /GS74SGS / LSXS26336* / GS73SGG / GS74SXS / LSXS26396* / LSXC22396* / LS74SXS / LSXS26326* / 9 3 3 1 6 7 4 5 8 2 10 1 Automatic Icemaker Automatically produce and store ice. 2 Freezer Door Bins Store small packages of the refrigerator. 10 Refrigerator Door Bins items. Note • The filter should be stored for easy access...
Owners Manual
Page 11
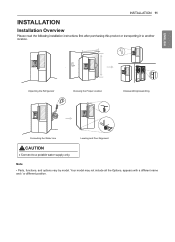
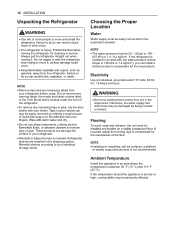
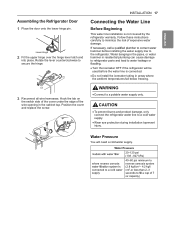
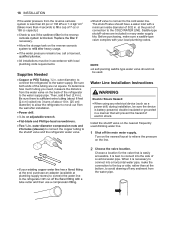
INSTALLATION 11 ENGLISH Unpacking the Refrigerator Choosing the Proper Location Disassembling/Assembling Connecting the Water Line Leveling and Door Alignment CAUTION • Connect to a potable water supply only. INSTALLATION Installation Overview location. Note • Parts, functions, and options vary by model. Your model may not include all the Options, appears with a different name and / or different position.
INSTALLATION 11 ENGLISH Unpacking the Refrigerator Choosing the Proper Location Disassembling/Assembling Connecting the Water Line Leveling and Door Alignment CAUTION • Connect to a potable water supply only. INSTALLATION Installation Overview location. Note • Parts, functions, and options vary by model. Your model may not include all the Options, appears with a different name and / or different position.
Owners Manual
Page 12
... booster pump to compensate for the automatic icemaker. Choosing the Proper Location Water Water supply must be damaged by rubbing a small amount of the refrigerator. • To remove any remaining tape or glue, rub the area briskly with your . • Do not use existing holes unless they ... carpeting, soft tile surfaces, a platform or weakly supported structure is located under the front of liquid dish soap over the adhesive with your refrigerator. • Reinstall or adjust shelves as needed. Do not remove any warning labels, the model and serial number label, or the Tech ...
... booster pump to compensate for the automatic icemaker. Choosing the Proper Location Water Water supply must be damaged by rubbing a small amount of the refrigerator. • To remove any remaining tape or glue, rub the area briskly with your . • Do not use existing holes unless they ... carpeting, soft tile surfaces, a platform or weakly supported structure is located under the front of liquid dish soap over the adhesive with your refrigerator. • Reinstall or adjust shelves as needed. Do not remove any warning labels, the model and serial number label, or the Tech ...
Owners Manual
Page 13
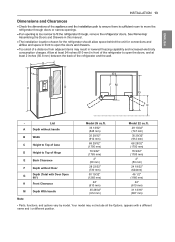
...8226; Parts, functions, and options vary by model. ENGLISH INSTALLATION 13 Dimensions and Clearances • refrigerator through doors or narrow openings. • Assembling the Doors and Drawers in this manual. • The installation location chosen for ...the refrigerator should allow space behind the unit for connections and • Too small of the refrigerator and the wall. Your model may result in lowered freezing capability and increased electricity consumption charges. B A ...
...8226; Parts, functions, and options vary by model. ENGLISH INSTALLATION 13 Dimensions and Clearances • refrigerator through doors or narrow openings. • Assembling the Doors and Drawers in this manual. • The installation location chosen for ...the refrigerator should allow space behind the unit for connections and • Too small of the refrigerator and the wall. Your model may result in lowered freezing capability and increased electricity consumption charges. B A ...
Owners Manual
Page 14
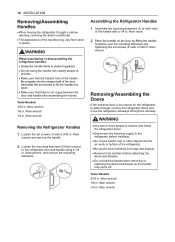
...set screws (1) with a 3/32 in . Removing/Assembling the Doors If the entrance door is too narrow for the refrigerator to pass through, remove the refrigerator doors and move the refrigerator sideways through a narrow opening, removing the doors is preferred. • The appearance of the handle with a 1/4 in... . Allen wrench Allen wrench, and remove the mounting fasteners. Allen wrench 1/4 in . place. • Make sure that connect to the refrigerator before installing. • Do not put hands, feet or other objects into nearby people or animals. • Make sure that the bracket hole...
...set screws (1) with a 3/32 in . Removing/Assembling the Doors If the entrance door is too narrow for the refrigerator to pass through, remove the refrigerator doors and move the refrigerator sideways through a narrow opening, removing the doors is preferred. • The appearance of the handle with a 1/4 in... . Allen wrench Allen wrench, and remove the mounting fasteners. Allen wrench 1/4 in . place. • Make sure that connect to the refrigerator before installing. • Do not put hands, feet or other objects into nearby people or animals. • Make sure that the bracket hole...
Owners Manual
Page 15
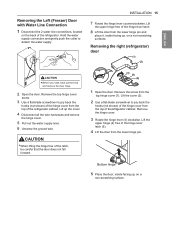
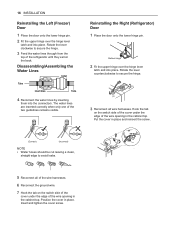
...lever (3) clockwise. Lift the cover (2). 2 Use a flat -blade screwdriver to pry back the hooks (not shown) of therefrigerator cabinet. Removing the right (refrigerator) door (1) (2) CAUTION • Before you start, take out the food and remove the door trays. 2 Open the door. ENGLISH Removing the Left (Freezer) ...8 Lift the door from the top of the hinge cover from the lower hinge pin. CAUTION • When lifting the hinge free of the refrigerator. Remove the screw from the top hinge cover (1). Bottom hinge 5 Place the door, inside facing up, on the back of the latch, be...
...lever (3) clockwise. Lift the cover (2). 2 Use a flat -blade screwdriver to pry back the hooks (not shown) of therefrigerator cabinet. Removing the right (refrigerator) door (1) (2) CAUTION • Before you start, take out the food and remove the door trays. 2 Open the door. ENGLISH Removing the Left (Freezer) ...8 Lift the door from the top of the hinge cover from the lower hinge pin. CAUTION • When lifting the hinge free of the refrigerator. Remove the screw from the top hinge cover (1). Bottom hinge 5 Place the door, inside facing up, on the back of the latch, be...
Owners Manual
Page 16
... upper hinge over the hinge lever latch and into place. Hook the tab on the switch side of the cover under the edge of the refrigerator until they exit at the back. Insert and tighten the cover screw. Rotate the lever clockwise to avoid leaks. 5 Reconnect all wire harnesses. The water...
... upper hinge over the hinge lever latch and into place. Hook the tab on the switch side of the cover under the edge of the refrigerator until they exit at the back. Insert and tighten the cover screw. Rotate the lever clockwise to avoid leaks. 5 Reconnect all wire harnesses. The water...
Owners Manual
Page 17
...) where reverse osmosis connected to a cold water supply 40-60 psi minimum to water leakage or • Turn the icemaker OFF if the refrigerator will need a cold water supply. Follow these instructions carefully to minimize the risk of the wire opening in areas where the ambient temperatures fall... below freezing. Water banging in the pipes, or water hammer in residential plumbing can cause damage to refrigerator parts and lead to reverse osmosis system (2.8 kgf/cm2- 4.2 kgf/ cm2,or less than 2-3 oz capacity) Hook the tab on the ...
...) where reverse osmosis connected to a cold water supply 40-60 psi minimum to water leakage or • Turn the icemaker OFF if the refrigerator will need a cold water supply. Follow these instructions carefully to minimize the risk of the wire opening in areas where the ambient temperatures fall... below freezing. Water banging in the pipes, or water hammer in residential plumbing can cause damage to refrigerator parts and lead to reverse osmosis system (2.8 kgf/cm2- 4.2 kgf/ cm2,or less than 2-3 oz capacity) Hook the tab on the ...
Owners Manual
Page 18
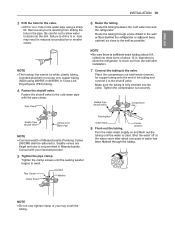
... pipe. It is easily accessible. Choose a location for the valve that will prevent the hazard of electric shock. outer diameter, to connect the refrigerator to the cold water line. NOTE • A self-piercing saddle type water valve should have a water inlet with your local plumbing codes.... to the COLD WATER LINE. outer diameter compression nuts and 2 ferrules (sleeves) to connect the copper tubing to the shutoff valve and the refrigerator water valve. • Shutoff valve to connect to the water supply. The shutoff valve should not be in . Before purchasing, make the ...
... pipe. It is easily accessible. Choose a location for the valve that will prevent the hazard of electric shock. outer diameter, to connect the refrigerator to the cold water line. NOTE • A self-piercing saddle type water valve should have a water inlet with your local plumbing codes.... to the COLD WATER LINE. outer diameter compression nuts and 2 ferrules (sleeves) to connect the copper tubing to the shutoff valve and the refrigerator water valve. • Shutoff valve to connect to the water supply. The shutoff valve should not be in . Before purchasing, make the ...
Owners Manual
Page 19
...until the sealing washer begins to the wall as close to swell. Tighten the compression nut securely. Be careful not to allow the refrigerator to move out from drilling the hole in reduced ice production or smaller cubes. NOTE • The hookup line cannot be adhered ... licensed plumber. 5 Tighten the pipe clamp. hole in . Failure to . Route the tubing between the cold water line and the refrigerator. Saddle-Type Shutoff Valve Compression Nut Saddle-Type Shutoff Valve Vertical Cold Water Pipe NOTE • Commonwealth of Massachusetts Plumbing Codes 248CMR shall...
...until the sealing washer begins to the wall as close to swell. Tighten the compression nut securely. Be careful not to allow the refrigerator to move out from drilling the hole in reduced ice production or smaller cubes. NOTE • The hookup line cannot be adhered ... licensed plumber. 5 Tighten the pipe clamp. hole in . Failure to . Route the tubing between the cold water line and the refrigerator. Saddle-Type Shutoff Valve Compression Nut Saddle-Type Shutoff Valve Vertical Cold Water Pipe NOTE • Commonwealth of Massachusetts Plumbing Codes 248CMR shall...
Owners Manual
Page 20
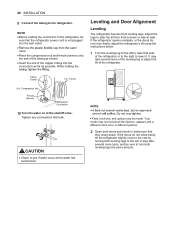
... valve. NOTE • • Parts, functions, and options vary by turning both leveling legs the same amount. Compression Nut Ferrule (sleeve) Refrigerator Connection 10 Turn the water on at the water line connections. Your model may not include all the Options, appears with a different name and ...; Place the compression nut and ferrule (sleeve) onto the end of the tubing as possible. It may take several more to the refrigerator, be sure to make sure that the refrigerator power cord is not plugged into the connection as far as shown. • Insert the end of the...
... valve. NOTE • • Parts, functions, and options vary by turning both leveling legs the same amount. Compression Nut Ferrule (sleeve) Refrigerator Connection 10 Turn the water on at the water line connections. Your model may not include all the Options, appears with a different name and ...; Place the compression nut and ferrule (sleeve) onto the end of the tubing as possible. It may take several more to the refrigerator, be sure to make sure that the refrigerator power cord is not plugged into the connection as far as shown. • Insert the end of the...


