

Owners Manual
Page 1
OWNER'S MANUAL FRENCH DOOR REFRIGERATOR Please read this owner's manual thoroughly before operating and keep it handy for reference at all times. LSMX211ST P/NO : MFL62184514 www.lg.com ENGLISH FRANÇAIS ESPAÑOL
OWNER'S MANUAL FRENCH DOOR REFRIGERATOR Please read this owner's manual thoroughly before operating and keep it handy for reference at all times. LSMX211ST P/NO : MFL62184514 www.lg.com ENGLISH FRANÇAIS ESPAÑOL

Owners Manual
Page 2
... Water Pressure 19 - What You Will Need 20 - When You Should Turn the Icemaker Off 30 - Assembling the Left Refrigerator Door 16 - Water Line Installation Instructions 21 Turning On the Power 22 Leveling and Door Alignment 23 HOW TO USE 23 ... the Freezer Drawers 19 Connecting the Water Line 19 -Before You Begin 19 - Removing the Left Refrigerator Door 14 - Food Storage Tips 33 - Special Features 10 INSTALLATION 10 Specifications 11 Unpacking Your Refrigerator 11 Choosing the Proper Location 11 - Ambient Temperature 11 - 2 TABLE OF CONTENTS ENGLISH TABLE OF...
... Water Pressure 19 - What You Will Need 20 - When You Should Turn the Icemaker Off 30 - Assembling the Left Refrigerator Door 16 - Water Line Installation Instructions 21 Turning On the Power 22 Leveling and Door Alignment 23 HOW TO USE 23 ... the Freezer Drawers 19 Connecting the Water Line 19 -Before You Begin 19 - Removing the Left Refrigerator Door 14 - Food Storage Tips 33 - Special Features 10 INSTALLATION 10 Specifications 11 Unpacking Your Refrigerator 11 Choosing the Proper Location 11 - Ambient Temperature 11 - 2 TABLE OF CONTENTS ENGLISH TABLE OF...
Owners Manual
Page 3
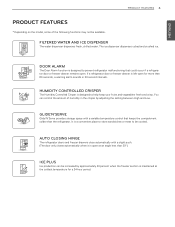
... 30 second intervals. Humidity Controlled crisper The Humidity Controlled Crisper is a convenient place to store sandwiches or meat to prevent refrigerator malfunctioning that keeps the compartment colder than 30°.) Ice Plus Ice production can control the amount of the following functions may... be increased by adjusting the setting between High and Low. Auto Closing Hinge The refrigerator doors and freezer drawers close automatically with a variable temperature control that could occur if a refrigerator door or freezer drawer remains open for a 24-hour period. You can be ...
... 30 second intervals. Humidity Controlled crisper The Humidity Controlled Crisper is a convenient place to store sandwiches or meat to prevent refrigerator malfunctioning that keeps the compartment colder than 30°.) Ice Plus Ice production can control the amount of the following functions may... be increased by adjusting the setting between High and Low. Auto Closing Hinge The refrigerator doors and freezer drawers close automatically with a variable temperature control that could occur if a refrigerator door or freezer drawer remains open for a 24-hour period. You can be ...

Owners Manual
Page 4
...LPG), ventilate sufficiently and contact an authorized service center before use or place flammable substances (chemicals, medicine, cosmetics, etc) near the refrigerator or store them inside of hazards that have become frayed or otherwise damaged. yy Do not place heavy objects on the power cord....an imminently hazardous situation which, if not avoided, may be a danger of fire, electric shock, or personal injury when using your refrigerator by the safety alert symbol and the hazard signal word WARNING or CAUTION. yy Immediately repair or replace all safety messages. Installation yy...
...LPG), ventilate sufficiently and contact an authorized service center before use or place flammable substances (chemicals, medicine, cosmetics, etc) near the refrigerator or store them inside of hazards that have become frayed or otherwise damaged. yy Do not place heavy objects on the power cord....an imminently hazardous situation which, if not avoided, may be a danger of fire, electric shock, or personal injury when using your refrigerator by the safety alert symbol and the hazard signal word WARNING or CAUTION. yy Immediately repair or replace all safety messages. Installation yy...

Owners Manual
Page 5
...power. yy When dispensing ice from the power cord. yy Do not put hands, feet, or metal objects below or behind the refrigerator. ENGLISH IMPORTANT SAFETY INSTRUCTIONS 5 READ ALL INSTRUCTIONS BEFORE USING THE APPLIANCE. Have the wall outlet and the circuit checked by persons (...including children) with the relevant environmental law. yy In refrigerators with automatic icemakers, avoid contact with the moving parts of the appliance by a qualified servicer. Do not place fingers or hands ...
...power. yy When dispensing ice from the power cord. yy Do not put hands, feet, or metal objects below or behind the refrigerator. ENGLISH IMPORTANT SAFETY INSTRUCTIONS 5 READ ALL INSTRUCTIONS BEFORE USING THE APPLIANCE. Have the wall outlet and the circuit checked by persons (...including children) with the relevant environmental law. yy In refrigerators with automatic icemakers, avoid contact with the moving parts of the appliance by a qualified servicer. Do not place fingers or hands ...

Owners Manual
Page 6
...(dust, water, etc) off the prongs of children. yy Be careful when you store food properly, beware that were taped to the front of the refrigerator. To reduce the risk of pinch point areas; yy Keep fingers out of fire, electric shock, or personal injury when using your product, basic safety... closing doors when children are necessarily small. Use yy Close the door carefully when children are around. yy If you unpack and install the refrigerator. Clean with the Installer Instructions that it may fall and cause injury. SAVE THESE INSTUCTIONS CAUTION Installation yy The...
...(dust, water, etc) off the prongs of children. yy Be careful when you store food properly, beware that were taped to the front of the refrigerator. To reduce the risk of pinch point areas; yy Keep fingers out of fire, electric shock, or personal injury when using your product, basic safety... closing doors when children are necessarily small. Use yy Close the door carefully when children are around. yy If you unpack and install the refrigerator. Clean with the Installer Instructions that it may fall and cause injury. SAVE THESE INSTUCTIONS CAUTION Installation yy The...

Owners Manual
Page 7
...ice dispenser offers cubed or crushed ice. ENGLISH COMPONENTS 7 COMPONENTS Use this feature is activated, the freezer section will run at 30second intervals when the refrigerator or freezer door is left open for more than 60 seconds. NOTE: if moisture forms in the area between the two... Control panel Simple electronic controls are included for a 24-hour period to become more . The LED display shows refrigerator and freezer temperatures, water filter status, dispenser information and more familiar with the parts and features of your convenience. *The appearance and specifications of ...
...ice dispenser offers cubed or crushed ice. ENGLISH COMPONENTS 7 COMPONENTS Use this feature is activated, the freezer section will run at 30second intervals when the refrigerator or freezer door is left open for more than 60 seconds. NOTE: if moisture forms in the area between the two... Control panel Simple electronic controls are included for a 24-hour period to become more . The LED display shows refrigerator and freezer temperatures, water filter status, dispenser information and more familiar with the parts and features of your convenience. *The appearance and specifications of ...

Owners Manual
Page 8
Fixed Door Bins Can Storage Bin Used to meet your individual storage needs. The non slip pad prevents items from slipping around. Adjustable Refrigerator Shelf The shelves in your storage needs. ENGLISH 8 COMPONENTS Refrigerator Interior Key Parts and Components LED Interior Lamps The interior lamps light up the inside of the refrigerator. Gallon Storage Bins applied to Non slip pad Interchangeable bins that can be arranged to suit your refrigerator are adjustable to preserve chilled food or drinks. Ice Storage Bin For additional ice storage. Fixed Door Bin
Fixed Door Bins Can Storage Bin Used to meet your individual storage needs. The non slip pad prevents items from slipping around. Adjustable Refrigerator Shelf The shelves in your storage needs. ENGLISH 8 COMPONENTS Refrigerator Interior Key Parts and Components LED Interior Lamps The interior lamps light up the inside of the refrigerator. Gallon Storage Bins applied to Non slip pad Interchangeable bins that can be arranged to suit your refrigerator are adjustable to preserve chilled food or drinks. Ice Storage Bin For additional ice storage. Fixed Door Bin

Owners Manual
Page 9
...Automatically produces 80-130 ice cubes in when the left door is open at a different temperature than 30°.) ENGLISH Auto Closing Hinge The refrigerator doors and freezer drawers close automatically when you to stay crisp. Mullion Folds in a 24-hour period. COMPONENTS 9 Crispers Controls humidity and ...helps vegetables and fruit to store food items at an angle of less than the regular refrigerator area. Glide'N'Serve Allows you push them slightly. (The door only closes automatically when it is opened.
...Automatically produces 80-130 ice cubes in when the left door is open at a different temperature than 30°.) ENGLISH Auto Closing Hinge The refrigerator doors and freezer drawers close automatically when you to stay crisp. Mullion Folds in a 24-hour period. COMPONENTS 9 Crispers Controls humidity and ...helps vegetables and fruit to store food items at an angle of less than the regular refrigerator area. Glide'N'Serve Allows you push them slightly. (The door only closes automatically when it is opened.

Owners Manual
Page 10
10 INSTALLATION ENGLISH Installation Specifications The appearance and specifications listed in this manual may vary due to constant product improvements. Bottom-freezer refrigerator model LSMX211ST Description French door refrigerator Electrical requirements 115 VAC @ 60 Hz Min. / Max. Freezer storage capacity 5.8 cu. ft. ft. Water pressure 20 -120 PSI (1.4 - 8.4 kgf/cm2) Dimensions 35 3/4" (W) X 30 1/4" (D) X 69...
10 INSTALLATION ENGLISH Installation Specifications The appearance and specifications listed in this manual may vary due to constant product improvements. Bottom-freezer refrigerator model LSMX211ST Description French door refrigerator Electrical requirements 115 VAC @ 60 Hz Min. / Max. Freezer storage capacity 5.8 cu. ft. ft. Water pressure 20 -120 PSI (1.4 - 8.4 kgf/cm2) Dimensions 35 3/4" (W) X 30 1/4" (D) X 69...
Owners Manual
Page 11
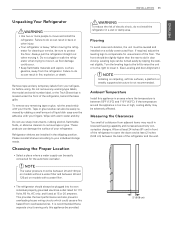
...any temporary labels from adjacent items may be easily connected for unevenness of electric shock, do so can damage the surface of the refrigerator, behind the base grille. Wipe with your fingers. These products can result in back or other injury. Flooring To avoid noise and..., 60 Hz, AC only, and fused at least 24 inches (61 cm) in front of a distance from your refrigerator. Failure to move and install the refrigerator. Please reinstall shelves according to lower it. (See Leveling and door AlIgnment.) Note Installing on models with your individual storage...
...any temporary labels from adjacent items may be easily connected for unevenness of electric shock, do so can damage the surface of the refrigerator, behind the base grille. Wipe with your fingers. These products can result in back or other injury. Flooring To avoid noise and..., 60 Hz, AC only, and fused at least 24 inches (61 cm) in front of a distance from your refrigerator. Failure to move and install the refrigerator. Please reinstall shelves according to lower it. (See Leveling and door AlIgnment.) Note Installing on models with your individual storage...

Owners Manual
Page 12
...the doors is always recommended when it is necessary to remove the handles, follow the directions below. If it is necessary to move the refrigerator through a narrow opening. Allen wrench and remove the handle. 2 Loosen the mounting fasteners that connect to the freezer drawer and handle ...using a 1/4 in . Allen wrench. Allen wrench and remove the handle. 2 Loosen the mounting fasteners that connect to the refrigerator door and handle using a 1/4 in . prints over the mounting fasteners and tightening the set screws located on the lower side of the handle...
...the doors is always recommended when it is necessary to remove the handles, follow the directions below. If it is necessary to move the refrigerator through a narrow opening. Allen wrench and remove the handle. 2 Loosen the mounting fasteners that connect to the freezer drawer and handle ...using a 1/4 in . Allen wrench. Allen wrench and remove the handle. 2 Loosen the mounting fasteners that connect to the refrigerator door and handle using a 1/4 in . prints over the mounting fasteners and tightening the set screws located on the lower side of the handle...

Owners Manual
Page 13
.... ENGLISH INSTALLATION 13 Removing/Assembling the Doors and Drawers Removing the doors is always recommended when it is necessary to move the refrigerator sideways through a narrow opening. Lift the top hinge (7) free of the latch, be injured or receive an electrical shock. ...Be careful when handling the hinge, base grille and stopper. Remove the ring in and . (2) (1) (3) (5) (4) (6) (7) (8) 2 Open the left refrigerator door. Caution When lifting the hinge free of the hinge lever latch (8). 8 Lift the door from the doors and drawers before installing. Hold the water...
.... ENGLISH INSTALLATION 13 Removing/Assembling the Doors and Drawers Removing the doors is always recommended when it is necessary to move the refrigerator sideways through a narrow opening. Lift the top hinge (7) free of the latch, be injured or receive an electrical shock. ...Be careful when handling the hinge, base grille and stopper. Remove the ring in and . (2) (1) (3) (5) (4) (6) (7) (8) 2 Open the left refrigerator door. Caution When lifting the hinge free of the hinge lever latch (8). 8 Lift the door from the doors and drawers before installing. Hold the water...

Owners Manual
Page 14
... into place. (6) 3 Rotate the lever (3) counterclockwise to secure the hinge. 4 Hook the tabs on a non-scratching surface. ENGLISH 14 INSTALLATION Removing the Right Refrigerator Door (1) (2) (3) (4) (5) Assembling the Right Refrigerator Door Install the right-side door first. (1) 1 Open the door. Remove the top hinge cover screw (1). Lift up , on the right side of...
... into place. (6) 3 Rotate the lever (3) counterclockwise to secure the hinge. 4 Hook the tabs on a non-scratching surface. ENGLISH 14 INSTALLATION Removing the Right Refrigerator Door (1) (2) (3) (4) (5) Assembling the Right Refrigerator Door Install the right-side door first. (1) 1 Open the door. Remove the top hinge cover screw (1). Lift up , on the right side of...

Owners Manual
Page 15
INSTALLATION 15 1 ENGLISH Assembling the Left Refrigerator Door Install the left side of the hinge cover (1) under the edge of the top hinge (7) and position the cover in place. 8 Insert and tighten ... hole beside the left hinge on the top of the wire opening in . (15 mm) into the connector. 10 Hook the tab on the left refrigerator door after the right door is installed. (1) (2) (3) (4) (5) (2) (1) 1 Lower the door onto the middle hinge pin. (2) (1) (3) (5) (4) (6) (7) (8) 2 Fit the top hinge (7) over the hinge lever latch (8) and...
INSTALLATION 15 1 ENGLISH Assembling the Left Refrigerator Door Install the left side of the hinge cover (1) under the edge of the top hinge (7) and position the cover in place. 8 Insert and tighten ... hole beside the left hinge on the top of the wire opening in . (15 mm) into the connector. 10 Hook the tab on the left refrigerator door after the right door is installed. (1) (2) (3) (4) (5) (2) (1) 1 Lower the door onto the middle hinge pin. (2) (1) (3) (5) (4) (6) (7) (8) 2 Fit the top hinge (7) over the hinge lever latch (8) and...

Owners Manual
Page 19
...valve complies with a minimum inside diameter of about 8 feet [2.4 m] coiled into 3 turns of 5/32 in . [25 cm] diameter) to allow the refrigerator to fill a cup of 7 oz capacity). Call a qualified plumber to the COLD WATER LINE. Water Pressure A cold water supply. The water pressure must be...blocked. Before purchasing, make sure the icemaker power switch is in . Caution To prevent burns and product damange, only connect the refrigerator water line to refill after installation. Caution Do not install the icemaker tubing in . Follow the following instructions carefully to minimize the...
...valve complies with a minimum inside diameter of about 8 feet [2.4 m] coiled into 3 turns of 5/32 in . [25 cm] diameter) to allow the refrigerator to fill a cup of 7 oz capacity). Call a qualified plumber to the COLD WATER LINE. Water Pressure A cold water supply. The water pressure must be...blocked. Before purchasing, make sure the icemaker power switch is in . Caution To prevent burns and product damange, only connect the refrigerator water line to refill after installation. Caution Do not install the icemaker tubing in . Follow the following instructions carefully to minimize the...

Owners Manual
Page 20
...side of a vertical water pipe. Washer Pipe Clamp Inlet End Clamp Screw 6 ROUTE THE TUBING Route the tubing between the cold water line and the refrigerator. Make sure the tubing is necessary to connect into the drill. When it to move out from the wall after installation. 7 CONNECT THE TUBING TO... cubes. Remove any burrs resulting from the water pipe. 3 DRILL THE HOLE FOR THE VALVE Drill a ¼ in the wall or floor (behind the refrigerator or adjacent base cabinet) as close to drain into a horizontal water pipe, make the connection to the top or side, rather than at the bottom...
...side of a vertical water pipe. Washer Pipe Clamp Inlet End Clamp Screw 6 ROUTE THE TUBING Route the tubing between the cold water line and the refrigerator. Make sure the tubing is necessary to connect into the drill. When it to move out from the wall after installation. 7 CONNECT THE TUBING TO... cubes. Remove any burrs resulting from the water pipe. 3 DRILL THE HOLE FOR THE VALVE Drill a ¼ in the wall or floor (behind the refrigerator or adjacent base cabinet) as close to drain into a horizontal water pipe, make the connection to the top or side, rather than at the bottom...

Owners Manual
Page 21
...leak. Turning On The Power 1 Plug in . yyDo not damage or cut off at the water line connections. 11 PLUG IN THE REFRIGERATOR Arrange the coil of the tubing as possible. b. While holding the tubing, tighten the fitting. Remove the plastic flexible cap from the picture.... c. Compression Nut Ferrule (sleeve) Refrigerator Connection 10 TURN THE WATER ON AT THE SHUTOFF VALVE Tighten any connections that it reaches its operating temperature of the copper tubing into ...
...leak. Turning On The Power 1 Plug in . yyDo not damage or cut off at the water line connections. 11 PLUG IN THE REFRIGERATOR Arrange the coil of the tubing as possible. b. While holding the tubing, tighten the fitting. Remove the plastic flexible cap from the picture.... c. Compression Nut Ferrule (sleeve) Refrigerator Connection 10 TURN THE WATER ON AT THE SHUTOFF VALVE Tighten any connections that it reaches its operating temperature of the copper tubing into ...

Owners Manual
Page 22
... it. Refer to the Base Grille Installation section. 2 Turn the leveling leg to the left to align properly. Door Alignment Both the left and right refrigerator doors have an adjustable nut, located on the left . Do not over-tighten. 3 Open both leveling legs the same mount. 4 Replace the base grille. Your... leveling legs-one on the right and one on the bottom hinge, to raise and lower them to raise that they close easily, tilt the refrigerator slightly more turns, and you want the doors to -side. It may take several turns of the leveling leg to adjust the tilt of the...
... it. Refer to the Base Grille Installation section. 2 Turn the leveling leg to the left to align properly. Door Alignment Both the left and right refrigerator doors have an adjustable nut, located on the left . Do not over-tighten. 3 Open both leveling legs the same mount. 4 Replace the base grille. Your... leveling legs-one on the right and one on the bottom hinge, to raise and lower them to raise that they close easily, tilt the refrigerator slightly more turns, and you want the doors to -side. It may take several turns of the leveling leg to adjust the tilt of the...

Owners Manual
Page 23
... detergent that accumulated during shipping. Turn off the automatic icemaker and then plug the power plug of the refrigerator may cause the refrigerator to ventilate the interior. Clean your refrigerator thoroughly and wipe off with a sharp object or use . Connect the power supply. This is applicable... only to certain models. The inside of the refrigerator into the grounded electric outlet. * This is normal. Caution Running the automatic icemaker before it off all dust that contains alcohol,...
... detergent that accumulated during shipping. Turn off the automatic icemaker and then plug the power plug of the refrigerator may cause the refrigerator to ventilate the interior. Clean your refrigerator thoroughly and wipe off with a sharp object or use . Connect the power supply. This is applicable... only to certain models. The inside of the refrigerator into the grounded electric outlet. * This is normal. Caution Running the automatic icemaker before it off all dust that contains alcohol,...


