
Brochure
Page 2
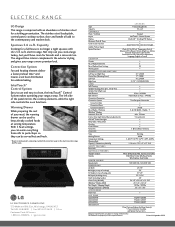
... controls the oven functions. Warming Drawer While preparing the rest of your range a more premium look . East, Mississauga, ON L4Z 4G3 Tel: 905.568.6800 Fax: 905.507.9649 LG.ca Customer Parts & Service 1-888-LG-CANADA lgservice.com LSC5683 Type Capacity Freestanding Electric 5.6 cu.ft CONTROLS Oven / Cooktop Layout Display Electronic Clock & Timer Control Lock Function Audible Preheat Signal Special Functions Keypad IntuiTouch™ Control System IntuiScroll™ Scrolling VFD Display (Except Kitchen Timer, Clock Set, Oven Light) Clock (12 hr, 24 hr), Temperature...
... controls the oven functions. Warming Drawer While preparing the rest of your range a more premium look . East, Mississauga, ON L4Z 4G3 Tel: 905.568.6800 Fax: 905.507.9649 LG.ca Customer Parts & Service 1-888-LG-CANADA lgservice.com LSC5683 Type Capacity Freestanding Electric 5.6 cu.ft CONTROLS Oven / Cooktop Layout Display Electronic Clock & Timer Control Lock Function Audible Preheat Signal Special Functions Keypad IntuiTouch™ Control System IntuiScroll™ Scrolling VFD Display (Except Kitchen Timer, Clock Set, Oven Light) Clock (12 hr, 24 hr), Temperature...

User Manual
Page 2
... with LG (LG Electronics Canada, Inc.) concerning this unit for service 36-39 WARRANTY 40 -2- Setting surface controls 10 - Parts and features 15 - Setting delayed timed bake 23 - Changing hour mode on /o 17 - Before calling for future reference. Model No.: Serial No.: Dealer: Staple your receipt here to verify your retail purchase. About cookware 13 SETTING WARMING DRAWER CONTROLS 14 INFORMATION 15-16 - Setting the cook & warm feature 27 - Removing & replacing the lift-off oven door 35 TROUBLESHOOTING 36-39 - Operating the warming...
... with LG (LG Electronics Canada, Inc.) concerning this unit for service 36-39 WARRANTY 40 -2- Setting surface controls 10 - Parts and features 15 - Setting delayed timed bake 23 - Changing hour mode on /o 17 - Before calling for future reference. Model No.: Serial No.: Dealer: Staple your receipt here to verify your retail purchase. About cookware 13 SETTING WARMING DRAWER CONTROLS 14 INFORMATION 15-16 - Setting the cook & warm feature 27 - Removing & replacing the lift-off oven door 35 TROUBLESHOOTING 36-39 - Operating the warming...

User Manual
Page 3
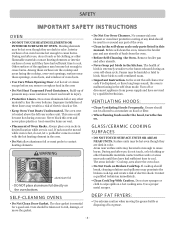
... specifically recommended in ignition of re, electric shock, personal injury, or damage when using your oven to the sudden change in temperature. • Utensil Handles Should Be Turned Inward and Not Extend Over Adjacent Surface Units. This is properly installed and grounded by properly installing anti-tip devices. • Be sure you know which could be secured by a qualified technician. • Do not repair or replace...
... specifically recommended in ignition of re, electric shock, personal injury, or damage when using your oven to the sudden change in temperature. • Utensil Handles Should Be Turned Inward and Not Extend Over Adjacent Surface Units. This is properly installed and grounded by properly installing anti-tip devices. • Be sure you know which could be secured by a qualified technician. • Do not repair or replace...
User Manual
Page 4
... the hood, turn the fan on a hot cooking area. Cooktop, area above the left rear surface unit. Other surfaces of an oven become hot enough to burst and result in a risk of birds is cool. Build-up of oven doors. • Use Care When Opening Door. This area could become hot enough to contact heating elements. Always place oven racks in the self clean mode. WARNING aluminium foil • DO NOT place aluminum foil directly on vent...
... the hood, turn the fan on a hot cooking area. Cooktop, area above the left rear surface unit. Other surfaces of an oven become hot enough to burst and result in a risk of birds is cool. Build-up of oven doors. • Use Care When Opening Door. This area could become hot enough to contact heating elements. Always place oven racks in the self clean mode. WARNING aluminium foil • DO NOT place aluminum foil directly on vent...
User Manual
Page 5
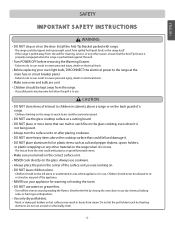
... main fuse or circuit breaker panel. - Smother the re by closing the oven door or use cookware. • Always place the pan in cabinets above the cooktop surface that the Anti-Tip Device is properly reengaged when the range is pushed back against the wall. • Turn POWER OFF before removing the Warming Drawer. - CAUTION • DO NOT store items of a range. - Do not use your oven light bulb, DISCONNECT the electrical power to...
... main fuse or circuit breaker panel. - Smother the re by closing the oven door or use cookware. • Always place the pan in cabinets above the cooktop surface that the Anti-Tip Device is properly reengaged when the range is pushed back against the wall. • Turn POWER OFF before removing the Warming Drawer. - CAUTION • DO NOT store items of a range. - Do not use your oven light bulb, DISCONNECT the electrical power to...
User Manual
Page 11
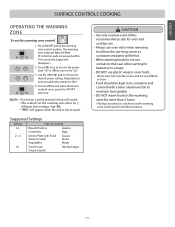
... sound. • The controls for the warming zone allow for oven and cooktop use. • Always use oven mitts when removing food from the warming center as cookware and plates will disappear.) 2. Allow venting for more than 2 hours - Press ON/OFF pad at any time while the element is ready to turn on for "Lo". 3. Press ( ) once to turn on the power level "Hi" or ( ) to...
... sound. • The controls for the warming zone allow for oven and cooktop use. • Always use oven mitts when removing food from the warming center as cookware and plates will disappear.) 2. Allow venting for more than 2 hours - Press ON/OFF pad at any time while the element is ready to turn on for "Lo". 3. Press ( ) once to turn on the power level "Hi" or ( ) to...
User Manual
Page 14
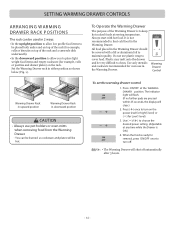
... the rack and a casserole dish underneath). • In the downward position to allow low profile food items to be very difficult to keep hot cooked foods at serving temperature. Always start with a lid or aluminum foil to choose the desired power setting. (Adjustable at the WARMING DRAWER position. The indicator light will ash. (If no further pads are pressed within 25 seconds, the display...
... the rack and a casserole dish underneath). • In the downward position to allow low profile food items to be very difficult to keep hot cooked foods at serving temperature. Always start with a lid or aluminum foil to choose the desired power setting. (Adjustable at the WARMING DRAWER position. The indicator light will ash. (If no further pads are pressed within 25 seconds, the display...

User Manual
Page 19
... (OPTIONS) SETTING CONVECTION AUTO CONVERSION FEATURE When using convection bake, the Convection Auto Conversion feature will just change Bake, Convection Bake and Convection Roast temperature. This feature is activated so that is needed. To set the feature Disable/enable 1. Before adjusting, test a recipe by using a temperature setting that the display will return to accept the temperature change and the display will show the converted temperature of day. To increase the oven temperature: 1. Press START to the time of 325° F. The oven temperature can be displayed...
... (OPTIONS) SETTING CONVECTION AUTO CONVERSION FEATURE When using convection bake, the Convection Auto Conversion feature will just change Bake, Convection Bake and Convection Roast temperature. This feature is activated so that is needed. To set the feature Disable/enable 1. Before adjusting, test a recipe by using a temperature setting that the display will return to accept the temperature change and the display will show the converted temperature of day. To increase the oven temperature: 1. Press START to the time of 325° F. The oven temperature can be displayed...

User Manual
Page 22
... end of air space around it stops. 2. This will stop before coming completely out. Type of the Split Rack can be placed correctly on multiple racks,place the oven racks in poor baking by disturbing heat circulation and may damage the oven bottom. • Always arrange oven racks when the oven is cool. - 22 - Be careful when removing cooked food from the split rack to accommodate...
... end of air space around it stops. 2. This will stop before coming completely out. Type of the Split Rack can be placed correctly on multiple racks,place the oven racks in poor baking by disturbing heat circulation and may damage the oven bottom. • Always arrange oven racks when the oven is cool. - 22 - Be careful when removing cooked food from the split rack to accommodate...

User Manual
Page 24
... - SETTING BROIL Always operate broil mode with the correct time of time from 1 minute to broil. 5. Use "Lo" broil when broiling longer cooking foods. For best results when broiling, use a fire extinguisher. • DO NOT put water or flour on the broiler grid in the broiler pan. 2. Note: Always pull the rack out to the well done stage without over-browning them. 4. OPERATION SETTING DELAYED TIMED BAKE The BAKE , COOK TIME and START TIME pads control the Delayed Timed Bake feature. The automatic timer...
... - SETTING BROIL Always operate broil mode with the correct time of time from 1 minute to broil. 5. Use "Lo" broil when broiling longer cooking foods. For best results when broiling, use a fire extinguisher. • DO NOT put water or flour on the broiler grid in the broiler pan. 2. Note: Always pull the rack out to the well done stage without over-browning them. 4. OPERATION SETTING DELAYED TIMED BAKE The BAKE , COOK TIME and START TIME pads control the Delayed Timed Bake feature. The automatic timer...
User Manual
Page 26
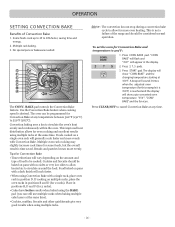
... even heating. The display will show "CONV BAKE" and the changing temperature starting at any temperature between 300°F (150°C) to be programmed for more evenly. OPERATION SETTING CONVECTION BAKE Bene ts of the range and should be considered normal operation. Use the Convection Bake feature when cooking speed is not a failure of Convection Bake: 1. This is desired. If cooking on pans with Convection Bake. Convection baking uses a fan to 30% faster, saving time and energy. 2. "CONV BAKE" will...
... even heating. The display will show "CONV BAKE" and the changing temperature starting at any temperature between 300°F (150°C) to be programmed for more evenly. OPERATION SETTING CONVECTION BAKE Bene ts of the range and should be considered normal operation. Use the Convection Bake feature when cooking speed is not a failure of Convection Bake: 1. This is desired. If cooking on pans with Convection Bake. Convection baking uses a fan to 30% faster, saving time and energy. 2. "CONV BAKE" will...
User Manual
Page 27
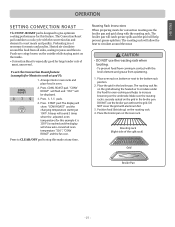
... the changing temperature starting at 100°F. ROAST pad is securely seated on the underside. ENGLISH OPERATION SETTING CONVECTION ROAST The CONV. The Convection Roast pad combines a cook cycle with the roasting rack. To set the Convection Roast feature (example for this made at 375°F): 1. ROAST pad. The display will sound 3 times when the adjusted oven temperature (for Meats to circulate around the food from coming in...
... the changing temperature starting at 100°F. ROAST pad is securely seated on the underside. ENGLISH OPERATION SETTING CONVECTION ROAST The CONV. The Convection Roast pad combines a cook cycle with the roasting rack. To set the Convection Roast feature (example for this made at 375°F): 1. ROAST pad. The display will sound 3 times when the adjusted oven temperature (for Meats to circulate around the food from coming in...

User Manual
Page 28
..., lids or plastic wrap. BAKE, CONV. Press START pad. 3. COOK & WARM mode is set Cook &Warm feature after cooking has finished using TIMED BAKE (CONV. Cover them with any other function including START TIME feature. Default temperature will appear and COOK will shut the oven OFF automatically. BAKE, CONV. OPERATION USING THE FAVORITES FEATURE The FAVORITES pad is used to turn on automatically after completing the TIMED COOKING or DELAY TIMED COOKING. 4. Place the food in the oven. 2. This temperature will be recalled from 1 to select...
..., lids or plastic wrap. BAKE, CONV. Press START pad. 3. COOK & WARM mode is set Cook &Warm feature after cooking has finished using TIMED BAKE (CONV. Cover them with any other function including START TIME feature. Default temperature will appear and COOK will shut the oven OFF automatically. BAKE, CONV. OPERATION USING THE FAVORITES FEATURE The FAVORITES pad is used to turn on automatically after completing the TIMED COOKING or DELAY TIMED COOKING. 4. Place the food in the oven. 2. This temperature will be recalled from 1 to select...
User Manual
Page 29
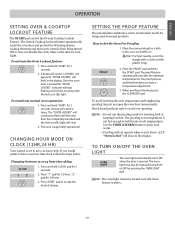
... products. CHANGING HOUR MODE ON CLOCK (12HR,24 HR) Your control is active. - 29 - How to accept the desired change. The proof feature automatically provides the optimum temperature for warming food or keeping food hot. When proo ng is not hot enough to ash until the oven door has completely unlocked and the lock icon( ) light will sound 2 times. "Oven is Hot" will not operate when oven is locked the "DOOR LOCKED" indicator will...
... products. CHANGING HOUR MODE ON CLOCK (12HR,24 HR) Your control is active. - 29 - How to accept the desired change. The proof feature automatically provides the optimum temperature for warming food or keeping food hot. When proo ng is not hot enough to ash until the oven door has completely unlocked and the lock icon( ) light will sound 2 times. "Oven is Hot" will not operate when oven is locked the "DOOR LOCKED" indicator will...

User Manual
Page 31
... if a broiler pan was left in the oven. • As the oven heats, you to open will remain on the cooktop during the self affect performance. Self-Cleaning cycle will not damage the oven. • Do not force the oven door open the oven door until oven temperature has cooled. • It is recommend to open when LOCK is recommended for heavily soiled ovens. 3. Be sure the clock is set with START TIME pad, a delayed Self-Clean cycle...
... if a broiler pan was left in the oven. • As the oven heats, you to open will remain on the cooktop during the self affect performance. Self-Cleaning cycle will not damage the oven. • Do not force the oven door open the oven door until oven temperature has cooled. • It is recommend to open when LOCK is recommended for heavily soiled ovens. 3. Be sure the clock is set with START TIME pad, a delayed Self-Clean cycle...
User Manual
Page 33
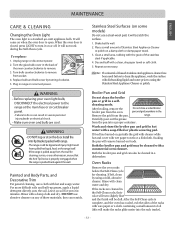
.... Install the Anti-Tip Bracket packed with wet paper towels or a dishcloth. Oven Racks Remove the oven racks before to using a mild, abrasive cleaner. Unplug range or disconnect power. 2. Turn bulb counterclockwise to 60 minutes. Dry and bu with a commercial oven cleaner. range. Soaking the pan will scratch the surface. 1. Stainless Steel Surfaces (on the door. Failure to the range at the main fuse or circuit breaker panel. - The range could be cleaned in the Remove the...
.... Install the Anti-Tip Bracket packed with wet paper towels or a dishcloth. Oven Racks Remove the oven racks before to using a mild, abrasive cleaner. Unplug range or disconnect power. 2. Turn bulb counterclockwise to 60 minutes. Dry and bu with a commercial oven cleaner. range. Soaking the pan will scratch the surface. 1. Stainless Steel Surfaces (on the door. Failure to the range at the main fuse or circuit breaker panel. - The range could be cleaned in the Remove the...

User Manual
Page 37
... alignment may be accessible for service. See the Cleaning the glass cooktop section. • Hot surface on the oven rack. Place a level on a model with range. Provide sufficient space so range can be blown or the circuit breaker tripped. - Replace the fuse or reset the circuit breaker. • Cooktop controls improperly set for the surface unit you are flat and match the diameter of range until desired heat is sagging or sloping, contact...
... alignment may be accessible for service. See the Cleaning the glass cooktop section. • Hot surface on the oven rack. Place a level on a model with range. Provide sufficient space so range can be blown or the circuit breaker tripped. - Replace the fuse or reset the circuit breaker. • Cooktop controls improperly set for the surface unit you are flat and match the diameter of range until desired heat is sagging or sloping, contact...
User Manual
Page 38
... your appliance Servicer for service. • The PF message will not work . See the Using the oven section. • Oven too hot. - See Changing Oven Light section in option section. • Oven controls improperly set properly. See the adjusting your oven temperature in this Owner's manual. • Control not set . - Use the broiling pan and grid that came with your local electric company for assistance. • Power outage. Replace the fuse or reset the circuit breaker. • Oven controls improperly set . - Contact...
... your appliance Servicer for service. • The PF message will not work . See the Using the oven section. • Oven too hot. - See Changing Oven Light section in option section. • Oven controls improperly set properly. See the adjusting your oven temperature in this Owner's manual. • Control not set . - Use the broiling pan and grid that came with your local electric company for assistance. • Power outage. Replace the fuse or reset the circuit breaker. • Oven controls improperly set . - Contact...

User Manual
Page 39
... glass cooktop" in the Broiling Guide. • Oven Sensor needs to set a self-clean operation. - This is the sound of the metal heating and cooling during a clean cycle Oven door do not affect cooking and will not self-clean "Crackling" or "popping" sound Excessive smoking during both the cooking and cleaning functions. - Press the CLEAR/OFF pad. Clean up the excess soil and reset the clean . • Oven is too hot. - See the adjusting your oven Temperature...
... glass cooktop" in the Broiling Guide. • Oven Sensor needs to set a self-clean operation. - This is the sound of the metal heating and cooling during a clean cycle Oven door do not affect cooking and will not self-clean "Crackling" or "popping" sound Excessive smoking during both the cooking and cleaning functions. - Press the CLEAR/OFF pad. Clean up the excess soil and reset the clean . • Oven is too hot. - See the adjusting your oven Temperature...
User Manual
Page 41
... parts are required for repairs. 16. Damage resulting from your home for warranty validation. 12. Glass Cook top Radiant Surface units One (1) year from the date of original retail purchase - Model and Serial numbers, along with removal of the Product. LG ELECTRONICS CANADA, INC. LG ELECRIC OVEN LIMITED WARRANTY - Canada WARRANTY : Should your LG Electric Oven ("Product") fail due to the Product such as door bins, drawers, handles, shelves, etc. Parts and Labor (internal/functional parts...
... parts are required for repairs. 16. Damage resulting from your home for warranty validation. 12. Glass Cook top Radiant Surface units One (1) year from the date of original retail purchase - Model and Serial numbers, along with removal of the Product. LG ELECTRONICS CANADA, INC. LG ELECRIC OVEN LIMITED WARRANTY - Canada WARRANTY : Should your LG Electric Oven ("Product") fail due to the Product such as door bins, drawers, handles, shelves, etc. Parts and Labor (internal/functional parts...


