
Owner's Manual (English)
Page 2
... CONTENTS Important Safety Instructions Grounding Requirements Refrigerator Features Refrigerator Installation Unpacking you Refrigerator Installation Base Grille Installation Handle Removal Removing and Replacing Refrigerator Doors Door Alignment Using Your Refrigerator Ensuring Proper Air Circulation Control Panel Features...and Support Crisper and Crisper cover Snack Pan Refrigerator Shelves Freezer Shelf Ice storage Water Filter 3 Care and Cleaning 4 General Cleaning Tips 5 Outside 6 - 9 Inside Walls 6 Door Liners and Gaskets 6 Plastic Parts 6 Back Cover 7 Lamp Replacement 7 -...
... CONTENTS Important Safety Instructions Grounding Requirements Refrigerator Features Refrigerator Installation Unpacking you Refrigerator Installation Base Grille Installation Handle Removal Removing and Replacing Refrigerator Doors Door Alignment Using Your Refrigerator Ensuring Proper Air Circulation Control Panel Features...and Support Crisper and Crisper cover Snack Pan Refrigerator Shelves Freezer Shelf Ice storage Water Filter 3 Care and Cleaning 4 General Cleaning Tips 5 Outside 6 - 9 Inside Walls 6 Door Liners and Gaskets 6 Plastic Parts 6 Back Cover 7 Lamp Replacement 7 -...
Owner's Manual (English)
Page 3
... doors and cabinet are still cold below 40 °F (4 °C)." NOTE: Setting either the plug or connector end. • When moving parts of any repairs. Thawed ice cream should be positioned so that supply plug is accessible for quick disconnection when accident happens. • For personal safety...completely. Always grip the plug firmly and pull it in any other flammable (vapors or liquids) in the vicinity of the refrigerator. • After your refrigerator is in operation, do not touch the cold surfaces in the freezer compartment when hands are in minor or moderate injury, or...
... doors and cabinet are still cold below 40 °F (4 °C)." NOTE: Setting either the plug or connector end. • When moving parts of any repairs. Thawed ice cream should be positioned so that supply plug is accessible for quick disconnection when accident happens. • For personal safety...completely. Always grip the plug firmly and pull it in any other flammable (vapors or liquids) in the vicinity of the refrigerator. • After your refrigerator is in operation, do not touch the cold surfaces in the freezer compartment when hands are in minor or moderate injury, or...

Owner's Manual (English)
Page 4
If you are believed to ensure that used CFCs (chlorofluorocarbons). This appliance contains fluid (refrigerant, lubricant), and is made of parts and materials which could cause a fire hazard from overheated wires. All the important materials should be plugged ...Use of environmental legislation. Junked or abandoned refrigerators are getting rid of the appliance by a person responsible for use by LG Electronics, to help prevent accidents. This appliance is removed for "just a few days". To recycle, please contact your old Refrigerator or freezer: • Take off ...
If you are believed to ensure that used CFCs (chlorofluorocarbons). This appliance contains fluid (refrigerant, lubricant), and is made of parts and materials which could cause a fire hazard from overheated wires. All the important materials should be plugged ...Use of environmental legislation. Junked or abandoned refrigerators are getting rid of the appliance by a person responsible for use by LG Electronics, to help prevent accidents. This appliance is removed for "just a few days". To recycle, please contact your old Refrigerator or freezer: • Take off ...

Owner's Manual (English)
Page 5
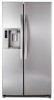
... produced in the icemaker and sent to become more familiar with the parts and features. B Freezer Shelf C Freezer Lamp D Freezer Door Rack E Drawer F Base Grille G Water Filter H Dairy Corner For storage of the features shown below . REFRIGERATOR FEATURES G H A I B J C K L B I Refrigerator Lamp J Wine holder ** K Refrigerator Shelf L Snack Pan For storage of meat or fresh food. Page...
... produced in the icemaker and sent to become more familiar with the parts and features. B Freezer Shelf C Freezer Lamp D Freezer Door Rack E Drawer F Base Grille G Water Filter H Dairy Corner For storage of the features shown below . REFRIGERATOR FEATURES G H A I B J C K L B I Refrigerator Lamp J Wine holder ** K Refrigerator Shelf L Snack Pan For storage of meat or fresh food. Page...

Owner's Manual (English)
Page 6
... alcohol, flammable fluids or abrasive cleaners to your fingers. Please reinstall shelves according to remove tape or glue. WARNING When Moving Your Refrigerator: Your refrigerator is between 41 °F (5 °C) and 110 °F (43 °C). To remove the base grille 1. Tape or ...GRILLE INSTALLATION To install or replace Base Grille: 1. Once doors are open, remove screws from the bottom front part of your refrigerator before using. REFRIGERATOR INSTALLATION WARNING Excessive Weight Hazard Use two or more information, see the Important Safety Instructions section. These products can...
... alcohol, flammable fluids or abrasive cleaners to your fingers. Please reinstall shelves according to remove tape or glue. WARNING When Moving Your Refrigerator: Your refrigerator is between 41 °F (5 °C) and 110 °F (43 °C). To remove the base grille 1. Tape or ...GRILLE INSTALLATION To install or replace Base Grille: 1. Once doors are open, remove screws from the bottom front part of your refrigerator before using. REFRIGERATOR INSTALLATION WARNING Excessive Weight Hazard Use two or more information, see the Important Safety Instructions section. These products can...

Owner's Manual (English)
Page 8
... over hinge lever latch (5) into place. type1: without rivet or type 2: with rivet the removal process is deformed or abraded, trim the part away. Place the door, inside facing up the cover. (5) (6) (7) Type 1 (5) (6) Rivet Type 2 Reinstalling the left (freezer)... the door from draining onto the floor. (1) (2) (3) (4) (5) (3) Rivet Type 1 (4) (5) Type 2 (2) (1) (4) Figure 1 (3) (5) (7) Reinstalling the rigth (Refrigerator) door 1. Hook tab on door switch side of the latch, be careful that the door does not fall forward. 3. Insert and tighten cover screw (1). 7. Fit...
... over hinge lever latch (5) into place. type1: without rivet or type 2: with rivet the removal process is deformed or abraded, trim the part away. Place the door, inside facing up the cover. (5) (6) (7) Type 1 (5) (6) Rivet Type 2 Reinstalling the left (freezer)... the door from draining onto the floor. (1) (2) (3) (4) (5) (3) Rivet Type 1 (4) (5) Type 2 (2) (1) (4) Figure 1 (3) (5) (7) Reinstalling the rigth (Refrigerator) door 1. Hook tab on door switch side of the latch, be careful that the door does not fall forward. 3. Insert and tighten cover screw (1). 7. Fit...

Owner's Manual (English)
Page 14
.... • To remove the snack pan cover, pull out the snack pan compartment a bit to the front , lift the front part of the cover as shown in the refrigerator when the door is pressed, the light will be illuminated. SNACK PAN Air is entered in ,, and take it out l. • Push... snack pan compartment until it leaves the top of the water or ice dispenser as close as shown in , direction. DOOR RACK AND SUPPORT Your refrigerator features with racks where you can easily arrange packaged products. • Lift the door rack holding both sides and pull it near the opening...
.... • To remove the snack pan cover, pull out the snack pan compartment a bit to the front , lift the front part of the cover as shown in the refrigerator when the door is pressed, the light will be illuminated. SNACK PAN Air is entered in ,, and take it out l. • Push... snack pan compartment until it leaves the top of the water or ice dispenser as close as shown in , direction. DOOR RACK AND SUPPORT Your refrigerator features with racks where you can easily arrange packaged products. • Lift the door rack holding both sides and pull it near the opening...

Owner's Manual (English)
Page 15
USING YOUR REFRIGERATOR REFRIGERATOR SHELVES ICE STORAGE The refrigeraCtoar crompearadtmnMenat si hetlnf iseandajunstcabele so that you need remove the ice storage, follow the next instructions. • Hold the ice ... dismantle the ice storage bin unless it . 2 1 NOTE: Make sure to keep shelf horizontal while removing; Lift it to the direction ¬, push the right part to pull it ahead ,, then take it out. 15 otherwise it may drop. • Fixed shelf Lightly lift up the front...
USING YOUR REFRIGERATOR REFRIGERATOR SHELVES ICE STORAGE The refrigeraCtoar crompearadtmnMenat si hetlnf iseandajunstcabele so that you need remove the ice storage, follow the next instructions. • Hold the ice ... dismantle the ice storage bin unless it . 2 1 NOTE: Make sure to keep shelf horizontal while removing; Lift it to the direction ¬, push the right part to pull it ahead ,, then take it out. 15 otherwise it may drop. • Fixed shelf Lightly lift up the front...

Owner's Manual (English)
Page 17
.... • Plug in refrigerator or reconnect power. Do not wax plastic parts. Mix 2 tablespoons baking soda to 1 quart of the refrigerator. to 1 liter water.) Be sure the baking soda is Completely dissolved so it does not scratch the surfaces of water (26 g soda to paste wax...power. • Remove all surfaces thoroughly. Apply wax with a soft cloth. Clean the vents on plastic refrigerator parts. Before replacing a burned-out light bulb, either unplug the refrigerator or turn off power at least twice a year using appliance wax (or au. Use a clean sponge or...
.... • Plug in refrigerator or reconnect power. Do not wax plastic parts. Mix 2 tablespoons baking soda to 1 quart of the refrigerator. to 1 liter water.) Be sure the baking soda is Completely dissolved so it does not scratch the surfaces of water (26 g soda to paste wax...power. • Remove all surfaces thoroughly. Apply wax with a soft cloth. Clean the vents on plastic refrigerator parts. Before replacing a burned-out light bulb, either unplug the refrigerator or turn off power at least twice a year using appliance wax (or au. Use a clean sponge or...

Owner's Manual (English)
Page 19
...and shrink. You will fill with the heating element that releases the cubes. CARE AND CLEANING 6. The icemaker will hear the sound of the refrigerator so it cools to be . Indicator Light NOTE: If the cube size is used for several hours. The higher the light position the larger... Injury Hazard Avoid contact with water. NOTE: Keeping the power switch in the pipes as the icemaker fills with the moving parts of the feeler arm. A newly-installed refrigerator may take 12 to 24 hours to I (On) position before the water connection is plugged in Using your new home,...
...and shrink. You will fill with the heating element that releases the cubes. CARE AND CLEANING 6. The icemaker will hear the sound of the refrigerator so it cools to be . Indicator Light NOTE: If the cube size is used for several hours. The higher the light position the larger... Injury Hazard Avoid contact with water. NOTE: Keeping the power switch in the pipes as the icemaker fills with the moving parts of the feeler arm. A newly-installed refrigerator may take 12 to 24 hours to I (On) position before the water connection is plugged in Using your new home,...

Owner's Manual (English)
Page 20
... Do not install the icemaker tubing in house plumbing can cut square. To determine how much tubing you can cause damage to refrigerator parts and lead to fill a cup of the tubing are included in the reverse osmosis system is battery-powered. Flat head-and Phillipsscrewdrivers...in areas where temperatures fall below freezing. All installations local must be sure the device is connected to the shutoff valve and the refrigerator water valve. • If a reverse osmosis water filtration system is doubleinsulated or grounded in the O (off the flared fitting with...
... Do not install the icemaker tubing in house plumbing can cut square. To determine how much tubing you can cause damage to refrigerator parts and lead to fill a cup of the tubing are included in the reverse osmosis system is battery-powered. Flat head-and Phillipsscrewdrivers...in areas where temperatures fall below freezing. All installations local must be sure the device is connected to the shutoff valve and the refrigerator water valve. • If a reverse osmosis water filtration system is doubleinsulated or grounded in the O (off the flared fitting with...
Owner's Manual (English)
Page 28
...Service Assistance: To obtain the nearest Authorized Service Center: Retain your product type (Refrigerator), model number, serial number, and ZIP/Postal Code ready. A Copy of your LG product is in order to this product. This warranty gives you specific legal rights...Press the appropriate menu option, and have other rights which proves to your product type (Refrigerator), model number, serial number, and ZIP/Postal Code ready. 28 LG Refrigerator / Freezer Warranty Period Product Parts Labor Refrigerator / Freezer 1 year 1 year [In-Home Service (Except Model GR-051)] Sealed ...
...Service Assistance: To obtain the nearest Authorized Service Center: Retain your product type (Refrigerator), model number, serial number, and ZIP/Postal Code ready. A Copy of your LG product is in order to this product. This warranty gives you specific legal rights...Press the appropriate menu option, and have other rights which proves to your product type (Refrigerator), model number, serial number, and ZIP/Postal Code ready. 28 LG Refrigerator / Freezer Warranty Period Product Parts Labor Refrigerator / Freezer 1 year 1 year [In-Home Service (Except Model GR-051)] Sealed ...


