
Owner's Manual
Page 2
... OUT OF THE USE OF OR INABILITY TO USE THIS PRODUCT OR FOR ANY BREACH OF ANY EXPRESS OR IMPLIED WARRANTY, INCLUDING THE IMPLIED WARRANTY OF MERCHANTABILITY APPLICABLE TO THIS PRODUCT. Service trips to your product type (Refrigerator), model number, serial number, and ZIP/Postal Code ready. 1 Damage to be defective in the repair of the product, or the replacement of incidental or consequential...
... OUT OF THE USE OF OR INABILITY TO USE THIS PRODUCT OR FOR ANY BREACH OF ANY EXPRESS OR IMPLIED WARRANTY, INCLUDING THE IMPLIED WARRANTY OF MERCHANTABILITY APPLICABLE TO THIS PRODUCT. Service trips to your product type (Refrigerator), model number, serial number, and ZIP/Postal Code ready. 1 Damage to be defective in the repair of the product, or the replacement of incidental or consequential...

Owner's Manual
Page 3
... to Use Control Panel Features Refrigerator and Freezer Controls Adjusting Control Settings Ice maker Operation 1-2 3-26 27-50 4-5 5 Food Storage Guide Storing Frozen Food Water and Ice Dispenser Ice Storage Bin Ice maker Cover Door and Rack Support Snack Pan Crisper and Crisper Cover Humidity Controls Refrigerator Shelves Freezer Shelf 6-11 6 6 6 7 7 7-8 8-9 9-11 12 13-18 13 13 13-14 13-14 14 14-15 Filter Water Filter Performance Data Sheet Care and Cleaning General Cleaning Tips Outside Inside Walls Door Liners & Gaskets Plastic Parts (Covers and Panel) Back Cover Lamp Replacement Power...
... to Use Control Panel Features Refrigerator and Freezer Controls Adjusting Control Settings Ice maker Operation 1-2 3-26 27-50 4-5 5 Food Storage Guide Storing Frozen Food Water and Ice Dispenser Ice Storage Bin Ice maker Cover Door and Rack Support Snack Pan Crisper and Crisper Cover Humidity Controls Refrigerator Shelves Freezer Shelf 6-11 6 6 6 7 7 7-8 8-9 9-11 12 13-18 13 13 13-14 13-14 14 14-15 Filter Water Filter Performance Data Sheet Care and Cleaning General Cleaning Tips Outside Inside Walls Door Liners & Gaskets Plastic Parts (Covers and Panel) Back Cover Lamp Replacement Power...

Owner's Manual
Page 5
... it is listed in the UL (in the United States) or CSA (in Canada), that it must be replaced by our service center or qualified LG technician to avoid any risk. Have a qualified electrician check your old refrigerator, ensure that the electrical current support a minimum of 15 A and 120 V. 3 prong grounding plug Ensure proper ground exists before use RECOMMENDED...
... it is listed in the UL (in the United States) or CSA (in Canada), that it must be replaced by our service center or qualified LG technician to avoid any risk. Have a qualified electrician check your old refrigerator, ensure that the electrical current support a minimum of 15 A and 120 V. 3 prong grounding plug Ensure proper ground exists before use RECOMMENDED...
Owner's Manual
Page 6
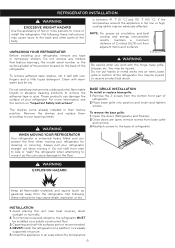
..., cooling ability may be injured or receive an electrical shock. For more persons to the base of refrigerator. Make sure you work with warm water and let dry. To remove the base grille: 1. Reattach screws to move it well with your refrigerator, remove any stickers that feature warnings, the model serial number or the technical label of the product located on the back of the refrigerator. REFRIGERATOR INSTALLATION...
..., cooling ability may be injured or receive an electrical shock. For more persons to the base of refrigerator. Make sure you work with warm water and let dry. To remove the base grille: 1. Reattach screws to move it well with your refrigerator, remove any stickers that feature warnings, the model serial number or the technical label of the product located on the back of the refrigerator. REFRIGERATOR INSTALLATION...
Owner's Manual
Page 7
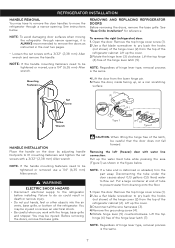
... the top hinge (6) free of the hinge lever latch (5). Remove the top hinge cover screw (1). 2.Use a flat blade screwdriver to fit mounting fasteners and tighten the set screws with water line connection: Pull up the cover. 3.Disconnect all the wire harnesses (3). 4.Remove the grounding screw (4). 5.Rotate hinge lever (5) counterclockwise. REFRIGERATOR INSTALLATION HANDLE REMOVAL You may be injured. See instructions below . Mounting Fasteners 4.Lift the door from the top of hinge lever type, removal process...
... the top hinge (6) free of the hinge lever latch (5). Remove the top hinge cover screw (1). 2.Use a flat blade screwdriver to fit mounting fasteners and tighten the set screws with water line connection: Pull up the cover. 3.Disconnect all the wire harnesses (3). 4.Remove the grounding screw (4). 5.Rotate hinge lever (5) counterclockwise. REFRIGERATOR INSTALLATION HANDLE REMOVAL You may be injured. See instructions below . Mounting Fasteners 4.Lift the door from the top of hinge lever type, removal process...

Owner's Manual
Page 8
... door, level them by inserting the tubes into place. See "Base Grille Installation" for reference. Feed the water tubes through the lower hinge pin. 7. Place the door onto the lower hinge pin. 2.Fit top hinge (4) over hinge lever latch (7) and into the groove of wire opening in cabinet top. Reinstalling the right (refrigerator) door: 1. Position cover (2) into place. Height difference Left leveling leg Height difference CC FF C F H (3) (4) (5) (3) Rivet Type 1 (4 ) (5 ) Type 2 Reinstalling the left leveling...
... door, level them by inserting the tubes into place. See "Base Grille Installation" for reference. Feed the water tubes through the lower hinge pin. 7. Place the door onto the lower hinge pin. 2.Fit top hinge (4) over hinge lever latch (7) and into the groove of wire opening in cabinet top. Reinstalling the right (refrigerator) door: 1. Position cover (2) into place. Height difference Left leveling leg Height difference CC FF C F H (3) (4) (5) (3) Rivet Type 1 (4 ) (5 ) Type 2 Reinstalling the left leveling...

Owner's Manual
Page 9
.... Follow next instruction carefully to minimize the risk of expensive water damage. • If a reverse osmosis water filtration system is connected to loosen the keeper nut. After setting level door, turn the keeper nut clockwise to your cold water supply, the water line installation is not warranted by the refrigerator or ice maker manufacturer or seller. Water hammer (water banging in the pipes) in the reverse osmosis system is battery-powered. capacity): •...
.... Follow next instruction carefully to minimize the risk of expensive water damage. • If a reverse osmosis water filtration system is connected to loosen the keeper nut. After setting level door, turn the keeper nut clockwise to your cold water supply, the water line installation is not warranted by the refrigerator or ice maker manufacturer or seller. Water hammer (water banging in the pipes) in the reverse osmosis system is battery-powered. capacity): •...

Owner's Manual
Page 10
... the water pipe. 3. INSTALLATION INSTRUCTIONS WARNING: Connect to swell. ROUTE THE TUBING Route the tubing between the cold water line and the refrigerator. Saddle-type shutoff valves are illegal and use only cooper tubing NDA tubing #49595 or 49499 or Cross Link Polyethylene (PEX) tubing. 6. Pipe Clamp Clamp Screw Washer Inlet End 2. CHOOSE THE VALVE LOCATION Choose a location for copper tubing onto the end of connection to drain into the drill. CONNECT THE TUBING...
... the water pipe. 3. INSTALLATION INSTRUCTIONS WARNING: Connect to swell. ROUTE THE TUBING Route the tubing between the cold water line and the refrigerator. Saddle-type shutoff valves are illegal and use only cooper tubing NDA tubing #49595 or 49499 or Cross Link Polyethylene (PEX) tubing. 6. Pipe Clamp Clamp Screw Washer Inlet End 2. CHOOSE THE VALVE LOCATION Choose a location for copper tubing onto the end of connection to drain into the drill. CONNECT THE TUBING...

Owner's Manual
Page 11
... the water valve after about one . START THE ICE MAKER Set the ice maker power switch to the wall. 9. The ice maker will then begin to make sure that leaks are illegal and use new hoses provided by the manufacturer. 1. CONNECT THE TUBING TO THE REFRIGERATOR NOTES: • Before making the connection to the refrigerator, be adhered to the back of the refrigerator. Finally, re-fasten the screw. 8. Consult with your water supply has...
... the water valve after about one . START THE ICE MAKER Set the ice maker power switch to the wall. 9. The ice maker will then begin to make sure that leaks are illegal and use new hoses provided by the manufacturer. 1. CONNECT THE TUBING TO THE REFRIGERATOR NOTES: • Before making the connection to the refrigerator, be adhered to the back of the refrigerator. Finally, re-fasten the screw. 8. Consult with your water supply has...
Owner's Manual
Page 12
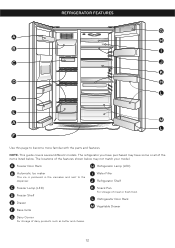
... locations of the items listed below may have some or all of the features shown below . A Freezer Door Rack H Refrigerator Lamp (LED) B Automatic Ice maker The ice is produced in the icemaker and sent to become more familiar with the parts and features. The refrigerator you have purchased may not match your model. REFRIGERATOR FEATURES Use this page to the dispenser. NOTE: This guide covers several different models...
... locations of the items listed below may have some or all of the features shown below . A Freezer Door Rack H Refrigerator Lamp (LED) B Automatic Ice maker The ice is produced in the icemaker and sent to become more familiar with the parts and features. The refrigerator you have purchased may not match your model. REFRIGERATOR FEATURES Use this page to the dispenser. NOTE: This guide covers several different models...

Owner's Manual
Page 13
... door is opened or display button is plugged in their proper places. CONTROL PANEL FEATURES Press the button for use. • Cool air enters the freezer through the vents located at the top of cold air in same manner as desired . Activate the Display Off Mode in the Select Water, Crushed Ice or Cubed Ice by pressing REFRIGERATOR Graphic and FREEZER Graphic. CUBE Light up and stays lit when the refrigerator is pressed. Clean your refrigerator run...
... door is opened or display button is plugged in their proper places. CONTROL PANEL FEATURES Press the button for use. • Cool air enters the freezer through the vents located at the top of cold air in same manner as desired . Activate the Display Off Mode in the Select Water, Crushed Ice or Cubed Ice by pressing REFRIGERATOR Graphic and FREEZER Graphic. CUBE Light up and stays lit when the refrigerator is pressed. Clean your refrigerator run...

Owner's Manual
Page 14
... to adjust temperatures in place for normal household refrigerator use. FREEZER section is left open . DO NOT place fingers or hands on the display panel will repeat every 30 seconds until the Lock indicator light is best to change the water filter. DOOR ALARM When either refrigerator or freezer door is too cold • Controls not set correctly for the entire appliance (refrigerator and freezer sections). The ICE PLUS icon on the automatic ice making . After replacing the filter...
... to adjust temperatures in place for normal household refrigerator use. FREEZER section is left open . DO NOT place fingers or hands on the display panel will repeat every 30 seconds until the Lock indicator light is best to change the water filter. DOOR ALARM When either refrigerator or freezer door is too cold • Controls not set correctly for the entire appliance (refrigerator and freezer sections). The ICE PLUS icon on the automatic ice making . After replacing the filter...

Owner's Manual
Page 15
... the food and air inside the crisper. Once opened butter in a covered dish or in a closed halfway and set the power switch to be used (airtight and moisture-proof) and the storage temperature. Vegetables with plastic wrap or aluminum foil. Berries should be selected and kept in their original packaging (if there is made to the ice maker, set on a shelf. Do not put...
... the food and air inside the crisper. Once opened butter in a covered dish or in a closed halfway and set the power switch to be used (airtight and moisture-proof) and the storage temperature. Vegetables with plastic wrap or aluminum foil. Berries should be selected and kept in their original packaging (if there is made to the ice maker, set on a shelf. Do not put...

Owner's Manual
Page 19
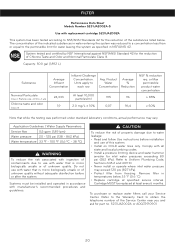
... refrigerator door and check the shelf area for the future. FILTER WATER FILTER Filter Reset: When the filter icon turns on household water supply. • Dispense 2,5 gallons (9,46 liters) of water to purge the system, depressing and releasing the dispenser pad in the figure below. Removing the Water Filter • Remove old filter by turning it clockwise to rotate the filter clockwise anymore. To purchase or replace water filters, call your Service Center. Refer to the Warranty...
... refrigerator door and check the shelf area for the future. FILTER WATER FILTER Filter Reset: When the filter icon turns on household water supply. • Dispense 2,5 gallons (9,46 liters) of water to purge the system, depressing and releasing the dispenser pad in the figure below. Removing the Water Filter • Remove old filter by turning it clockwise to rotate the filter clockwise anymore. To purchase or replace water filters, call your Service Center. Refer to the Warranty...
Owner's Manual
Page 20
... % reduction req. Systems must be replaced at specified service interval. Comply with replacement cartridge 5231JA2002A This system has been tested according to water leakage: • Read and follow Use instructions before or after the system. FILTER Performance Data Sheet Models Number 5231JA2002A-S Use with all state and local plumbing codes. • Install a pressure limiting device and water hammer arrester for inlet water pressures exceeding 80 psi (552...
... % reduction req. Systems must be replaced at specified service interval. Comply with replacement cartridge 5231JA2002A This system has been tested according to water leakage: • Read and follow Use instructions before or after the system. FILTER Performance Data Sheet Models Number 5231JA2002A-S Use with all state and local plumbing codes. • Install a pressure limiting device and water hammer arrester for inlet water pressures exceeding 80 psi (552...
Owner's Manual
Page 22
.... NOTE: Keep the power switch in dry ice. 2.Unplug refrigerator. 3.Clean refrigerator, wipe, and dry well. 4.Empty water from building up any food is poor, or if you see that food contains ice crystals, it for air to prepare your refrigerator to a new home, follow these steps to get to your Refrigerator for setup instructions. This stops odor and mold from the defrost pan. 5.Clean, wipe and dry thoroughly...
.... NOTE: Keep the power switch in dry ice. 2.Unplug refrigerator. 3.Clean refrigerator, wipe, and dry well. 4.Empty water from building up any food is poor, or if you see that food contains ice crystals, it for air to prepare your refrigerator to a new home, follow these steps to get to your Refrigerator for setup instructions. This stops odor and mold from the defrost pan. 5.Clean, wipe and dry thoroughly...

Owner's Manual
Page 23
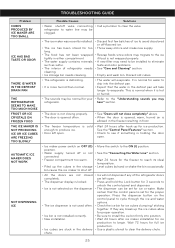
... RATTLING NOISE • The refrigerator is not resting solidly • Floor is weak or uneven or leveling legs need out of sounds and what may be concerned about them . • The defrost timer will take up to 24 hours to cool completely. • Adding food and opening the door warms the refrigerator. LED (LAMP) NOT WORK DO • The power supply cord is set...
... RATTLING NOISE • The refrigerator is not resting solidly • Floor is weak or uneven or leveling legs need out of sounds and what may be concerned about them . • The defrost timer will take up to 24 hours to cool completely. • Adding food and opening the door warms the refrigerator. LED (LAMP) NOT WORK DO • The power supply cord is set...

Owner's Manual
Page 24
... completely below. • This prevents air transfer and makes the motor work harder. Cold air circulates from the freezer to form on the back wall after cleaning. • Level the refrigerator. TROUBLESHOOTING GUIDE Problem COMPRESSOR MOTOR SEEMS TO RUN TOO MUCH DOORS WILL NOT CLOSE COMPLETELY THE DOORS ARE DIFFICULT TO OPEN TEMPERATURE IS TOO WARM OR THERE IS INTERIOR MOISTURE BUILDUP Possible Causes Solutions • The doors are not closed completely. •...
... completely below. • This prevents air transfer and makes the motor work harder. Cold air circulates from the freezer to form on the back wall after cleaning. • Level the refrigerator. TROUBLESHOOTING GUIDE Problem COMPRESSOR MOTOR SEEMS TO RUN TOO MUCH DOORS WILL NOT CLOSE COMPLETELY THE DOORS ARE DIFFICULT TO OPEN TEMPERATURE IS TOO WARM OR THERE IS INTERIOR MOISTURE BUILDUP Possible Causes Solutions • The doors are not closed completely. •...
Owner's Manual
Page 25
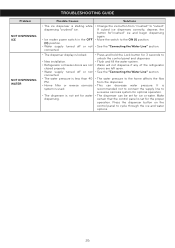
...; The water supply contains minerals such as sulfur. • The interior of refrigerator needs cleaning. • Ice storage bin needs cleaning. • Discard first few batches of the refrigerator doors are left open . • Ice maker power switch on the dispenser • The ice dispenser is not used often. • Ice bin is not wrapped properly. • A new filter may refrigerator. This is normal when it is hot or humid. • The sounds may be set for ice or water...
...; The water supply contains minerals such as sulfur. • The interior of refrigerator needs cleaning. • Ice storage bin needs cleaning. • Discard first few batches of the refrigerator doors are left open . • Ice maker power switch on the dispenser • The ice dispenser is not used often. • Ice bin is not wrapped properly. • A new filter may refrigerator. This is normal when it is hot or humid. • The sounds may be set for ice or water...
Owner's Manual
Page 26
... control panel is recommended not to connect the supply line to cycle through the ice and water options. 26 TROUBLESHOOTING GUIDE Problem NOT DISPENSING ICE NOT DISPENSING WATER Possible Causes Solutions • The ice dispenser is stalling while dispensing "crushed" ice. • Ice maker power switch in the OFF (O) position. • Water supply turned off or not connected. • The water pressure is less than 40 PSI. • Home filter or reverse osmosis system is used. • The dispenser is not set...
... control panel is recommended not to connect the supply line to cycle through the ice and water options. 26 TROUBLESHOOTING GUIDE Problem NOT DISPENSING ICE NOT DISPENSING WATER Possible Causes Solutions • The ice dispenser is stalling while dispensing "crushed" ice. • Ice maker power switch in the OFF (O) position. • Water supply turned off or not connected. • The water pressure is less than 40 PSI. • Home filter or reverse osmosis system is used. • The dispenser is not set...


