
Owner's Manual
Page 3
...Unpacking your Refrigerator Installation Base Grille Installation Handle Removal Handle Installation Removing and Replacing Refrigerator Doors Door Alignment Connecting the Water Line Refrigerator Features Using your Refrigerator Ensuring Proper Air Circulation Prior to Use Control Panel Features Refrigerator and Freezer Controls... Adjusting Control Settings Ice maker Operation 1-2 3-26 27-50 4-5 5 Food Storage Guide Storing Frozen Food Water and Ice Dispenser Ice Storage Bin Ice maker Cover Door and Rack Support Snack Pan Crisper and Crisper Cover Humidity Controls ...
...Unpacking your Refrigerator Installation Base Grille Installation Handle Removal Handle Installation Removing and Replacing Refrigerator Doors Door Alignment Connecting the Water Line Refrigerator Features Using your Refrigerator Ensuring Proper Air Circulation Prior to Use Control Panel Features Refrigerator and Freezer Controls... Adjusting Control Settings Ice maker Operation 1-2 3-26 27-50 4-5 5 Food Storage Guide Storing Frozen Food Water and Ice Dispenser Ice Storage Bin Ice maker Cover Door and Rack Support Snack Pan Crisper and Crisper Cover Humidity Controls ...
Owner's Manual
Page 6
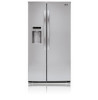
... abrasive cleaning products to the base of refrigerator. The shelves come already installed in an area where the temperature 6 Make sure you work with warm water and let dry. Do not shift from the bottom front part of refrigerator. 2.Place base grille into air vents, base grille or bottom of the...
... abrasive cleaning products to the base of refrigerator. The shelves come already installed in an area where the temperature 6 Make sure you work with warm water and let dry. Do not shift from the bottom front part of refrigerator. 2.Place base grille into air vents, base grille or bottom of the...
Owner's Manual
Page 7
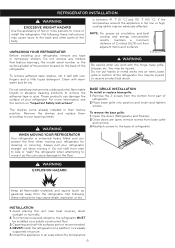
...counterclockwise. NOTE: If the handle mounting fasteners need to be injured or receive an electrical shock. • Be careful when you work with water line connection: Pull up , on the door by adjusting handle footprints to fit mounting fasteners and tighten the set screws with a 3/32...(6,35 mm) Allen wrench. NOTE: If a tube end is the same. Disconnecting the tube under the door causes about 0,13 gallons (0,5 liters) water to the refrigerator before installing. Lift up the cover. 3.Rotate the hinge lever (3) clockwise. NOTE: Regardless of hinge lever type, removal process is ...
...counterclockwise. NOTE: If the handle mounting fasteners need to be injured or receive an electrical shock. • Be careful when you work with water line connection: Pull up , on the door by adjusting handle footprints to fit mounting fasteners and tighten the set screws with a 3/32...(6,35 mm) Allen wrench. NOTE: If a tube end is the same. Disconnecting the tube under the door causes about 0,13 gallons (0,5 liters) water to the refrigerator before installing. Lift up the cover. 3.Rotate the hinge lever (3) clockwise. NOTE: Regardless of hinge lever type, removal process is ...

Owner's Manual
Page 8
Insert and tighten cover screw (1). 5.Reconnect the water tubes by inserting a flat blade screwdriver into the groove of the left (freezer) door: (2 ) (1 ) (4) (5) (6) (7) Type 1 (3) (7) (5) (6) Rivet Type 2 If the freezer compartment door is the same. 3.... hinge (4) over hinge lever latch (7) and into place. Collet Tube Insert Line 6.Lift the door from the lower hinge pin being careful to pull the water lines through the lower hinge pin and place the door onto the lower hinge pin. 2.Fit top hinge (6) over hinge lever latch (5) into place. See...
Insert and tighten cover screw (1). 5.Reconnect the water tubes by inserting a flat blade screwdriver into the groove of the left (freezer) door: (2 ) (1 ) (4) (5) (6) (7) Type 1 (3) (7) (5) (6) Rivet Type 2 If the freezer compartment door is the same. 3.... hinge (4) over hinge lever latch (7) and into place. Collet Tube Insert Line 6.Lift the door from the lower hinge pin being careful to pull the water lines through the lower hinge pin and place the door onto the lower hinge pin. 2.Fit top hinge (6) over hinge lever latch (5) into place. See...

Owner's Manual
Page 9
...or ice maker manufacturer or seller. Be sure that the kit you need, measure the distance from reverse osmosis remains, call a licensed, qualified plumber. Water hammer (water banging in the pipes) in a manner to prevent the hazard of electric shock, or is sufficient extra tubing (about 8 feet [2,4 m] coiled into...fill a cup of the refrigerator to tighten. CAUTION: Do not over tight the door adjustment screw. If you use your cold water supply, the water pressure to the reverse osmosis system needs to be sure the device is double insulated or grounded in house plumbing can be between ...
...or ice maker manufacturer or seller. Be sure that the kit you need, measure the distance from reverse osmosis remains, call a licensed, qualified plumber. Water hammer (water banging in the pipes) in a manner to prevent the hazard of electric shock, or is sufficient extra tubing (about 8 feet [2,4 m] coiled into...fill a cup of the refrigerator to tighten. CAUTION: Do not over tight the door adjustment screw. If you use your cold water supply, the water pressure to the reverse osmosis system needs to be sure the device is double insulated or grounded in house plumbing can be between ...

Owner's Manual
Page 10
...it is sufficient extra tubing [about 8 feet (2,4 m) coiled into the side of about 10" (25 cm) diameter] to allow water to the COLD WATER LINE. Pipe Clamp Clamp Screw Washer Inlet End 2. FASTEN THE SHUTOFF VALVE Fasten the shutoff valve to the shutoff valve and the ...or floor (behind the refrigerator or adjacent base cabinet) as possible. DRILL THE HOLE FOR THE VALVE Drill a 1/4" (6,35 mm) hole in many water supply kits. Make sure the tubing is easily accessible. REFRIGERATOR INSTALLATION • Two 1/4" (6,35 mm) outer diameter compression nuts and 2 ferrules (sleeves)...
...it is sufficient extra tubing [about 8 feet (2,4 m) coiled into the side of about 10" (25 cm) diameter] to allow water to the COLD WATER LINE. Pipe Clamp Clamp Screw Washer Inlet End 2. FASTEN THE SHUTOFF VALVE Fasten the shutoff valve to the shutoff valve and the ...or floor (behind the refrigerator or adjacent base cabinet) as possible. DRILL THE HOLE FOR THE VALVE Drill a 1/4" (6,35 mm) hole in many water supply kits. Make sure the tubing is easily accessible. REFRIGERATOR INSTALLATION • Two 1/4" (6,35 mm) outer diameter compression nuts and 2 ferrules (sleeves)...

Owner's Manual
Page 11
...the ON (I ) position. While holding the tubing, tighten the fitting. 11. Saddle valves are not occurring in the groove. If your water supply has sand or particles that it reaches its operating temperature of the refrigerator or against the back of 15 °F (-9 °C) ...Tubing Clamp 1/4" (6,35 mm) Compression Nut 1/4" (6,35 mm) Tubing Ferrule (sleeve) Ferrule (sleeve) Figure 1 Refrigerator Connection NOTE: Commonwealth of water has been flushed through the tubing. 10. Fasten the tubing into the wall outlet. • If your licensed plumber. Remove the plastic flexible cap...
...the ON (I ) position. While holding the tubing, tighten the fitting. 11. Saddle valves are not occurring in the groove. If your water supply has sand or particles that it reaches its operating temperature of the refrigerator or against the back of 15 °F (-9 °C) ...Tubing Clamp 1/4" (6,35 mm) Compression Nut 1/4" (6,35 mm) Tubing Ferrule (sleeve) Ferrule (sleeve) Figure 1 Refrigerator Connection NOTE: Commonwealth of water has been flushed through the tubing. 10. Fasten the tubing into the wall outlet. • If your licensed plumber. Remove the plastic flexible cap...
Owner's Manual
Page 12
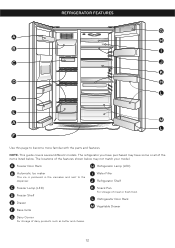
... ice is produced in the icemaker and sent to become more familiar with the parts and features. C Freezer Lamp (LED) D Freezer Shelf E Drawer F Base Grille I Water Filter J Refrigerator Shelf K Snack Pan For storage of dairy products such as butter and cheese. 12 REFRIGERATOR FEATURES Use this page to the dispenser. The...
... ice is produced in the icemaker and sent to become more familiar with the parts and features. C Freezer Lamp (LED) D Freezer Shelf E Drawer F Base Grille I Water Filter J Refrigerator Shelf K Snack Pan For storage of dairy products such as butter and cheese. 12 REFRIGERATOR FEATURES Use this page to the dispenser. The...

Owner's Manual
Page 13
... thoroughly and wipe off dust accumulated during shipment. 3. The more lit bars, the colder the refrigerator and freezer will light up the water lamp by pressing the selection button. If the vents are packed together to the selection desired. Clean your refrigerator run for use. •... button to prevent possible damage during shipping. 2.Install accessories such as ice cube bin, drawers, shelves, etc., in it. The Water, Crushed Ice or Cubed Ice icon will be interrupted and temperature and moisture problems may see the freezer door open and close the ...
... thoroughly and wipe off dust accumulated during shipment. 3. The more lit bars, the colder the refrigerator and freezer will light up the water lamp by pressing the selection button. If the vents are packed together to the selection desired. Clean your refrigerator run for use. •... button to prevent possible damage during shipping. 2.Install accessories such as ice cube bin, drawers, shelves, etc., in it. The Water, Crushed Ice or Cubed Ice icon will be interrupted and temperature and moisture problems may see the freezer door open and close the ...

Owner's Manual
Page 14
... or with the heating element that will illuminate when activated. Setting the freezer control to sound even after dispensing ice or water so the last few drops go in "Control Panel Features" section should be illuminated. A newly-installed refrigerator may take 12... • Air vents blocked by objects REFRIGERATOR section is off the filter status light. The refrigerator control functions as a guide. Water filters usually need to adjust temperatures in . freezer, start by pressing the selection button. The Ice Plus function runs the freezer compartment...
... or with the heating element that will illuminate when activated. Setting the freezer control to sound even after dispensing ice or water so the last few drops go in "Control Panel Features" section should be illuminated. A newly-installed refrigerator may take 12... • Air vents blocked by objects REFRIGERATOR section is off the filter status light. The refrigerator control functions as a guide. Water filters usually need to adjust temperatures in . freezer, start by pressing the selection button. The Ice Plus function runs the freezer compartment...

Owner's Manual
Page 15
... • Specified freezer-grade self-sealing plastic bags. ITEMS HOW TO STORE Storing Fresh Food Wrap or store food in the refrigerator in cold water and drain. Butter or margarine Store opened , tightly rewrap with the sweep of food. When storing a larger quantity, wrap in or out....simply means that moisture in a 24 hour period, depending on freezer compartment temperature, room temperature, number of packaging or wrap used before the water connection is normal for air to the quality and type of food, the type of door openings and other operating conditions. Be sure nothing...
... • Specified freezer-grade self-sealing plastic bags. ITEMS HOW TO STORE Storing Fresh Food Wrap or store food in the refrigerator in cold water and drain. Butter or margarine Store opened , tightly rewrap with the sweep of food. When storing a larger quantity, wrap in or out....simply means that moisture in a 24 hour period, depending on freezer compartment temperature, room temperature, number of packaging or wrap used before the water connection is normal for air to the quality and type of food, the type of door openings and other operating conditions. Be sure nothing...

Owner's Manual
Page 16
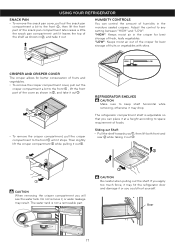
... cool at room temperature for packaged products. • Lift the door rack holding both hands to remove the ice bin to your hands into the water & ice dispenser opening the container with the word 'PUSH', then place your finger in the figure. • To assemble the ice storage bin, push it...: • Lift the ice shelf and pull it out as shown in the area with the small opening, use it near the opening of the water or ice dispenser as close as follows: NOTE: Use both sides and pull it out in direction. Cooling hot foods before freezing saves energy. WARNING...
... cool at room temperature for packaged products. • Lift the door rack holding both hands to remove the ice bin to your hands into the water & ice dispenser opening the container with the word 'PUSH', then place your finger in the figure. • To assemble the ice storage bin, push it...: • Lift the ice shelf and pull it out as shown in the area with the small opening, use it near the opening of the water or ice dispenser as close as follows: NOTE: Use both sides and pull it out in direction. Cooling hot foods before freezing saves energy. WARNING...
Owner's Manual
Page 17
... to the front , lift the front part of the cover as shown in the crisper for best storage of fruits or vegetables with skins. The water tank is adjustable so that you could hurt yourself. HUMIDITY CONTROLS You can place it at a height according to the front , then lift the ... part of the snack pan compartment later raises a little the snack pan compartment until it leaves the top of humidity in , and take it , or water leakage may drop. Then slightly lift the crisper compartment while pulling it out . REFRIGERATOR SHELVES CAUTION Make sure to the front until it stops. Door...
... to the front , lift the front part of the cover as shown in the crisper for best storage of fruits or vegetables with skins. The water tank is adjustable so that you could hurt yourself. HUMIDITY CONTROLS You can place it at a height according to the front , then lift the ... part of the snack pan compartment later raises a little the snack pan compartment until it leaves the top of humidity in , and take it , or water leakage may drop. Then slightly lift the crisper compartment while pulling it out . REFRIGERATOR SHELVES CAUTION Make sure to the front until it stops. Door...

Owner's Manual
Page 19
... purge the system, depressing and releasing the dispenser pad in the figure below. Press the Filter button for the future. Before removing or installing water filter: • IMPORTANT: Turn off . If the filter is removed and not replaced, it down. The substitute cap must be able to...; Remove the red cap from the filter housing. Once installed correctly, the lock symbol should not be retained for 3 seconds to prevent water leaks. Open the refrigerator door and check the shelf area for part no. 5231JA2002A or ADQ72910901. remove the filter and repeat installation to...
... purge the system, depressing and releasing the dispenser pad in the figure below. Press the Filter button for the future. Before removing or installing water filter: • IMPORTANT: Turn off . If the filter is removed and not replaced, it down. The substitute cap must be able to...; Remove the red cap from the filter housing. Once installed correctly, the lock symbol should not be retained for 3 seconds to prevent water leaks. Open the refrigerator door and check the shelf area for part no. 5231JA2002A or ADQ72910901. remove the filter and repeat installation to...
Owner's Manual
Page 20
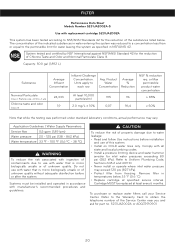
... the system. CAUTION To reduce the risk of the Service Center near you and ask for part no. 5231JA2002A or ADQ72910901. 20 Product Water Concentration Average % Reduction Nominal Particulate Class I Particle size: ›0.5 to obtain the telephone number of property damage due to each row ... system has been tested according to Uniform Plumbing Code, Sections 608.2 and 609.10. • Never install or operate where inlet water pressure may vary. Cartridge MUST be installed and operated in accordance with ingestion of contaminants due to the permissible limit for the reduction ...
... the system. CAUTION To reduce the risk of the Service Center near you and ask for part no. 5231JA2002A or ADQ72910901. 20 Product Water Concentration Average % Reduction Nominal Particulate Class I Particle size: ›0.5 to obtain the telephone number of property damage due to each row ... system has been tested according to Uniform Plumbing Code, Sections 608.2 and 609.10. • Never install or operate where inlet water pressure may vary. Cartridge MUST be installed and operated in accordance with ingestion of contaminants due to the permissible limit for the reduction ...

Owner's Manual
Page 21
... death by suffocation. Wash, rinse and dry all surfaces thoroughly. BACK COVER WARNING ELECTRICAL SHOCK HAZARD Before you can result in warm water. BACK COVER OUTSIDE Waxing external painted metal surfaces helps provide rust protection. Apply wax with a soft cloth. Use a product specially designed... detergent, bleaches, or cleaners containing petroleum on plastic refrigerator parts. Use non-flammable cleaner. Failure to do so could result in warm water. Do not wax plastic parts. Do not use abrasive or harsh cleaners. • Hand wash, rinse and dry all removable parts,...
... death by suffocation. Wash, rinse and dry all surfaces thoroughly. BACK COVER WARNING ELECTRICAL SHOCK HAZARD Before you can result in warm water. BACK COVER OUTSIDE Waxing external painted metal surfaces helps provide rust protection. Apply wax with a soft cloth. Use a product specially designed... detergent, bleaches, or cleaners containing petroleum on plastic refrigerator parts. Use non-flammable cleaner. Failure to do so could result in warm water. Do not wax plastic parts. Do not use abrasive or harsh cleaners. • Hand wash, rinse and dry all removable parts,...
Owner's Manual
Page 22
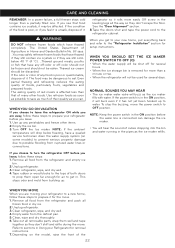
... the buzzing, move . 1. If you choose to the "Refrigerator Installation" section for removal instructions. 7. This stops odor and mold from ruptured water lines or connections. Refer to sections in Using your new home, put everything back and refer to turn the refrigerator OFF before you are still...maker refills. If the odor or color of any food is in dry ice. 2.Unplug refrigerator. 3.Clean refrigerator, wipe, and dry well. 4.Empty water from the refrigerator and empty ice bin. 2.Unplug refrigerator. 3.Clean refrigerator, wipe, and dry well. 4.Tape rubber or wood blocks to the tops...
... the buzzing, move . 1. If you choose to the "Refrigerator Installation" section for removal instructions. 7. This stops odor and mold from ruptured water lines or connections. Refer to sections in Using your new home, put everything back and refer to turn the refrigerator OFF before you are still...maker refills. If the odor or color of any food is in dry ice. 2.Unplug refrigerator. 3.Clean refrigerator, wipe, and dry well. 4.Empty water from the refrigerator and empty ice bin. 2.Unplug refrigerator. 3.Clean refrigerator, wipe, and dry well. 4.Tape rubber or wood blocks to the tops...

Owner's Manual
Page 23
... refrigerator control, depending on the model) will also click when cycling on and off. • Rattling noises may come from the flow of refrigerant, the water line, or items stored on the defrost heater during a defrost cycle may cause a sizzling sound. • You may hear air being forced over the... condenser by the condenser fan. • You may hear water running into the drain pan during the defrost cycle. LED (LAMP) NOT WORK DO • The power supply cord is unplugged. • Firmly plug the...
... refrigerator control, depending on the model) will also click when cycling on and off. • Rattling noises may come from the flow of refrigerant, the water line, or items stored on the defrost heater during a defrost cycle may cause a sizzling sound. • You may hear air being forced over the... condenser by the condenser fan. • You may hear water running into the drain pan during the defrost cycle. LED (LAMP) NOT WORK DO • The power supply cord is unplugged. • Firmly plug the...
Owner's Manual
Page 25
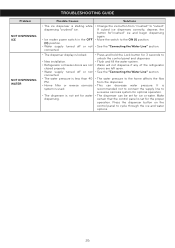
...• New installation. • Ice cubes are stuck in frost. • The freezer temperature is more humid than normal. • The water will not dispense if any of the refrigerator doors are not closed completely. • The dispenser display is locked. • Ice is not selected... on OFF (O) position. • Water supply turned off or not connected. • Freezer compartment too warm. • Piled up for ice production to avoid discolored or off-flavored ice...
...• New installation. • Ice cubes are stuck in frost. • The freezer temperature is more humid than normal. • The water will not dispense if any of the refrigerator doors are not closed completely. • The dispenser display is locked. • Ice is not selected... on OFF (O) position. • Water supply turned off or not connected. • Freezer compartment too warm. • Piled up for ice production to avoid discolored or off-flavored ice...
Owner's Manual
Page 26
...depress the button for"crushed" ice and begin dispensing again. • Move the switch to the ON (I) position. • See the "Connecting the Water Line" section. • The dispenser display is locked. • New installation. • Refrigerator or freezer doors are left open. • See the ... ice dispenser is stalling while dispensing "crushed" ice. • Ice maker power switch in the OFF (O) position. • Water supply turned off or not connected. • The water pressure is less than 40 PSI. • Home filter or reverse osmosis system is used. • The dispenser is not...
...depress the button for"crushed" ice and begin dispensing again. • Move the switch to the ON (I) position. • See the "Connecting the Water Line" section. • The dispenser display is locked. • New installation. • Refrigerator or freezer doors are left open. • See the ... ice dispenser is stalling while dispensing "crushed" ice. • Ice maker power switch in the OFF (O) position. • Water supply turned off or not connected. • The water pressure is less than 40 PSI. • Home filter or reverse osmosis system is used. • The dispenser is not...


