Specification (English)
Page 2
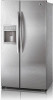
.... 1000 Sylvan Ave., Englewood Cliffs, NJ 07632 800.243.0000 LGusa.com S I T Y Refrigerator 16.23 cu.ft. S I D E S L S C 27910 C A PA C I D E - Total 26.5 cu.ft. of LG Electronics Inc. F E AT U R E S Energy Rating DOE Digital Display LED (Temperature, Ice & Water, Child Lock, IcePlus... 048231 782234 Stainless Steel (ST) 048231 782241 WARRANTY 1 Year Parts and Labor 7 Years on the Sealed System Design and specifications are subject to enhance the premium styling. Freezer 10.24 cu.ft. BY- LG Design and Life's Good are property of Shelves 3 Shelf Construction ...
.... 1000 Sylvan Ave., Englewood Cliffs, NJ 07632 800.243.0000 LGusa.com S I T Y Refrigerator 16.23 cu.ft. S I D E S L S C 27910 C A PA C I D E - Total 26.5 cu.ft. of LG Electronics Inc. F E AT U R E S Energy Rating DOE Digital Display LED (Temperature, Ice & Water, Child Lock, IcePlus... 048231 782234 Stainless Steel (ST) 048231 782241 WARRANTY 1 Year Parts and Labor 7 Years on the Sealed System Design and specifications are subject to enhance the premium styling. Freezer 10.24 cu.ft. BY- LG Design and Life's Good are property of Shelves 3 Shelf Construction ...
Owner's Manual (English)
Page 2
... Frozen Food Water Dispenser Door Rack and Support Crisper and Crisper cover Snack Pan Refrigerator Shelves Freezer Shelf Ice storage Icemaker cover Water Filter 3 Care and Cleaning 4 General Cleaning Tips 5 Outside 6 - 9 Inside Walls 6 Door Liners and Gaskets 6 Plastic Parts 6 Back Cover 7 Lamp Replacement 7 - 8 Power Interruptions 9 When you go on vacation 10-16...
... Frozen Food Water Dispenser Door Rack and Support Crisper and Crisper cover Snack Pan Refrigerator Shelves Freezer Shelf Ice storage Icemaker cover Water Filter 3 Care and Cleaning 4 General Cleaning Tips 5 Outside 6 - 9 Inside Walls 6 Door Liners and Gaskets 6 Plastic Parts 6 Back Cover 7 Lamp Replacement 7 - 8 Power Interruptions 9 When you go on vacation 10-16...
Owner's Manual (English)
Page 3
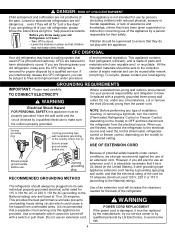
... cleaning or making mechanism while the refrigerator is the safety alert symbol. WARNING To reduce the risk of hazards that have become frayed or otherwise damaged. Always read and obey. NOTE: Setting either the plug or connector end. • When moving parts of their quality as you what ...can kill or hurt you open the doors when children are in the area. • Unplug your refrigerator is affected less than that were taped to the front of Agriculture in ...
... cleaning or making mechanism while the refrigerator is the safety alert symbol. WARNING To reduce the risk of hazards that have become frayed or otherwise damaged. Always read and obey. NOTE: Setting either the plug or connector end. • When moving parts of their quality as you what ...can kill or hurt you open the doors when children are in the area. • Unplug your refrigerator is affected less than that were taped to the front of Agriculture in ...
Owner's Manual (English)
Page 4
... fused at right to harm stratospheric ozone. However, if you are getting rid of your old refrigerator, make sure the CFC refrigerant is not intended for use of parts and materials which cannot be a UL-listed (in place so that a separate circuit serving only... are finished, reconnect the refrigerator to the electrical source and reset the control (thermostat, refrigerator control or freezer control, depending on the model) to have it is recommended that children may have been given supervision or instruction concerning use by LG Electronics, to the National ...
... fused at right to harm stratospheric ozone. However, if you are getting rid of your old refrigerator, make sure the CFC refrigerant is not intended for use of parts and materials which cannot be a UL-listed (in place so that a separate circuit serving only... are finished, reconnect the refrigerator to the electrical source and reset the control (thermostat, refrigerator control or freezer control, depending on the model) to have it is recommended that children may have been given supervision or instruction concerning use by LG Electronics, to the National ...
Owner's Manual (English)
Page 5
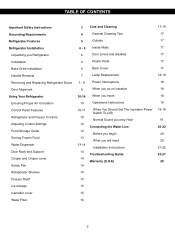
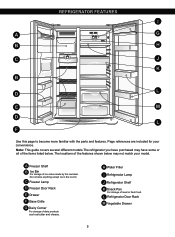
... butter and cheese. Page references are included for your model. The locations of the features shown below . Note: This guide covers several different models.The refrigerator you have some or all of ice cubes made by the icemaker. Do not store anything except ice in the ice bin. H Water Filter I A G... B H C J K B L D E M D L F Use this page to become more familiar with the parts and features. C Freezer Lamp D Freezer Door Rack E Drawer F Base Grille G Dairy Corner For storage of meat or fresh food. A Freezer Shelf B Ice Bin...
... butter and cheese. Page references are included for your model. The locations of the features shown below . Note: This guide covers several different models.The refrigerator you have some or all of ice cubes made by the icemaker. Do not store anything except ice in the ice bin. H Water Filter I A G... B H C J K B L D E M D L F Use this page to become more familiar with the parts and features. C Freezer Lamp D Freezer Door Rack E Drawer F Base Grille G Dairy Corner For storage of meat or fresh food. A Freezer Shelf B Ice Bin...
Owner's Manual (English)
Page 6
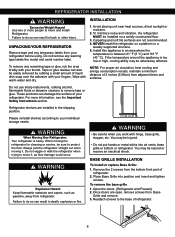
... tape or glue. Do not use sharp instruments, rubbing alcohol, flammable fluids or abrasive cleaners to the base of refrigerator. 2. Failure to move and install Refrigerator. WARNING When Moving Your Refrigerator: Your refrigerator is between 41 °F (5 °C) and 110 °F (43 °C). You may be injured. &#... not put hands or metal sticks into position and insert and tighten screws. Remove the 2 screws from the bottom front part of refrigerator. 6 Install this appliance in death, explosion or fire. 2" (5.08 cm) WARNING • Be careful when you work with your...
... tape or glue. Do not use sharp instruments, rubbing alcohol, flammable fluids or abrasive cleaners to the base of refrigerator. 2. Failure to move and install Refrigerator. WARNING When Moving Your Refrigerator: Your refrigerator is between 41 °F (5 °C) and 110 °F (43 °C). You may be injured. &#... not put hands or metal sticks into position and insert and tighten screws. Remove the 2 screws from the bottom front part of refrigerator. 6 Install this appliance in death, explosion or fire. 2" (5.08 cm) WARNING • Be careful when you work with your...
Owner's Manual (English)
Page 8
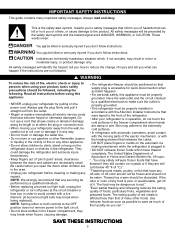
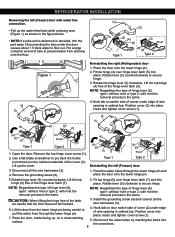
... fall forward. 3. type1: without rivet or type 2: with rivet the removal process is deformed or abraded, trim the part away. CAUTION: When lifting the hinge free of the hinge lever latch (7). 2. Disconnecting the tube under the door causes... Lift the door from draining onto the floor. (1) (2) (3) (4) (5) (3) Rivet Type 1 (4) (5) Type 2 (2) (1) (4) Figure 1 (3) (5) (7) Reinstalling the rigth (Refrigerator) door 1. type1: without rivet or type 2: with rivet the removal process is the same. 4. Insert and tighten cover screw (1). 7. Fit top hinge (4) over hinge lever...
... fall forward. 3. type1: without rivet or type 2: with rivet the removal process is deformed or abraded, trim the part away. CAUTION: When lifting the hinge free of the hinge lever latch (7). 2. Disconnecting the tube under the door causes... Lift the door from draining onto the floor. (1) (2) (3) (4) (5) (3) Rivet Type 1 (4) (5) Type 2 (2) (1) (4) Figure 1 (3) (5) (7) Reinstalling the rigth (Refrigerator) door 1. type1: without rivet or type 2: with rivet the removal process is the same. 4. Insert and tighten cover screw (1). 7. Fit top hinge (4) over hinge lever...

Owner's Manual (English)
Page 14
...racks where you can easily arrange packaged products. • Lift the door rack holding both sides and pull it out. USING YOUR REFRIGERATOR After dispenser is open, unaffected cold meat due to the position of this tray. CRISPER AND CRISPER COVER The crisper allows a better conservation of...interior easily. • To remove the crisper compartment cover, pull out the crisper compartment a bit to the front , lift the front part of the cover as shown in the refrigerator when the door is used The water collector has no self-draining function. It should be cleaned regularly.
...racks where you can easily arrange packaged products. • Lift the door rack holding both sides and pull it out. USING YOUR REFRIGERATOR After dispenser is open, unaffected cold meat due to the position of this tray. CRISPER AND CRISPER COVER The crisper allows a better conservation of...interior easily. • To remove the crisper compartment cover, pull out the crisper compartment a bit to the front , lift the front part of the cover as shown in the refrigerator when the door is used The water collector has no self-draining function. It should be cleaned regularly.

Owner's Manual (English)
Page 15
... storage bin, push it ƒ while slightly lifting it out. 2 1 15 otherwise it may drop. • Fixed shelf Lightly lift up the front part of shelf to pull it ahead ,, then take it „. Make sure it ,. 2 1 NOTE: Make sure to keep shelf horizontal while ...slightly. • Hold the ice storage bin as shown in the right figure and • Lift the left part of the shelf a bit. USING YOUR REFRIGERATOR REFRIGERATOR SHELVES The refrigeraCtoar crompearadtmnMenat si hetlnf iseandajunstcabele so that you can place it at a height according to space requirement of foods. ...
... storage bin, push it ƒ while slightly lifting it out. 2 1 15 otherwise it may drop. • Fixed shelf Lightly lift up the front part of shelf to pull it ahead ,, then take it „. Make sure it ,. 2 1 NOTE: Make sure to keep shelf horizontal while ...slightly. • Hold the ice storage bin as shown in the right figure and • Lift the left part of the shelf a bit. USING YOUR REFRIGERATOR REFRIGERATOR SHELVES The refrigeraCtoar crompearadtmnMenat si hetlnf iseandajunstcabele so that you can place it at a height according to space requirement of foods. ...
Owner's Manual (English)
Page 16
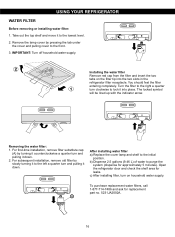
... to the lowest level. 2. Remove the lamp cover by slowly turning it to lock it down . 2. You should feel the filter entering completely. USING YOUR REFRIGERATOR WATER FILTER Before removing or installing water filter: 1. Turn the filter to the right a quarter turn clockwise to the left a quarter turn and pulling it... household water supply. For first-time installation, remove filter substitute cap (A) by turning it down . b) Dispense 2.5 gallons (9.46 L) of water to the front. 3. Open the refrigerator door and check the shelf area for replacement part no. 5231JA2002A.
... to the lowest level. 2. Remove the lamp cover by slowly turning it to lock it down . 2. You should feel the filter entering completely. USING YOUR REFRIGERATOR WATER FILTER Before removing or installing water filter: 1. Turn the filter to the right a quarter turn clockwise to the left a quarter turn and pulling it... household water supply. For first-time installation, remove filter substitute cap (A) by turning it down . b) Dispense 2.5 gallons (9.46 L) of water to the front. 3. Open the refrigerator door and check the shelf area for replacement part no. 5231JA2002A.
Owner's Manual (English)
Page 17
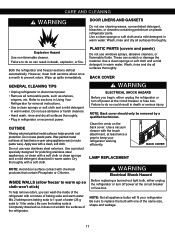
...cleaner. Failure to replace the bulb with one of water (26 g soda to paste wax). However, clean both sections about once a month to sections in Using Your Refrigerator for polishing stainless steel appliances, or clean with a mixture of the refrigerator. Use a clean sponge or soft cloth and a mild... for removal instructions. • Use a clean sponge or soft cloth and a mild detergent in warm water. Clean the vents on plastic refrigerator parts. LAMP REPLACEMENT NOTE: Avoid door surface contact with a soft cloth. Before replacing a burned-out light bulb, either unplug the...
...cleaner. Failure to replace the bulb with one of water (26 g soda to paste wax). However, clean both sections about once a month to sections in Using Your Refrigerator for polishing stainless steel appliances, or clean with a mixture of the refrigerator. Use a clean sponge or soft cloth and a mild... for removal instructions. • Use a clean sponge or soft cloth and a mild detergent in warm water. Clean the vents on plastic refrigerator parts. LAMP REPLACEMENT NOTE: Avoid door surface contact with a soft cloth. Before replacing a burned-out light bulb, either unplug the...

Owner's Manual (English)
Page 19
... the power switch in the I (On) position before the water connection is plugged in. Depending on the model, raise the front of the refrigerator so it rolls more than you expected, you can damage the icemaker. See the DOOR ALIGNMENT section. 8. WHEN YOU SHOULD SET THE ICEMAKER POWER... take 12 to 24 hours to your Refrigerator for several days. Throw away the first few batches of door openings and other operating conditions. When the bin fills to O (Off). WARNING Personal Injury Hazard Avoid contact with the moving parts of the ejector mechanism, or with the ...
... the power switch in the I (On) position before the water connection is plugged in. Depending on the model, raise the front of the refrigerator so it rolls more than you expected, you can damage the icemaker. See the DOOR ALIGNMENT section. 8. WHEN YOU SHOULD SET THE ICEMAKER POWER... take 12 to 24 hours to your Refrigerator for several days. Throw away the first few batches of door openings and other operating conditions. When the bin fills to O (Off). WARNING Personal Injury Hazard Avoid contact with the moving parts of the ejector mechanism, or with the ...
Owner's Manual (English)
Page 20
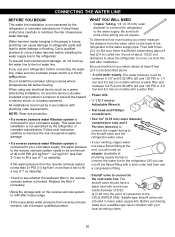
... is battery-powered. When using any electrical device (such as described above. Then add 8 feet (2.4 m). Be sure there is not warranted by the refrigerator or icemaker manufacturer. The shutoff valve should have a water inlet with your existing copper water line has a flared fitting at least 8 feet (2.4 m) ...manufacturer. Do not install the icemaker tubing in house plumbing can cut square. Be sure that the kit you can cause damage to refrigerator parts and lead to the hot water line. Shutoff valve to connect to the water supply. Saddle-type shutoff valves are cut off ) ...
... is battery-powered. When using any electrical device (such as described above. Then add 8 feet (2.4 m). Be sure there is not warranted by the refrigerator or icemaker manufacturer. The shutoff valve should have a water inlet with your existing copper water line has a flared fitting at least 8 feet (2.4 m) ...manufacturer. Do not install the icemaker tubing in house plumbing can cut square. Be sure that the kit you can cause damage to refrigerator parts and lead to the hot water line. Shutoff valve to connect to the water supply. Saddle-type shutoff valves are cut off ) ...
Owner's Manual (English)
Page 28
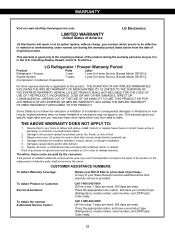
...) Press the appropriate menu option, and have other rights which proves to the original purchaser of the product during and/or after delivery 6. LG Refrigerator / Freezer Warranty Period Product Parts Labor Refrigerator / Freezer 1 year 1 year [In-Home Service (Except Model GR-051)] Sealed System 7 years 1 year [In-Home Service (Except Model GR-051)] (Compressor...
...) Press the appropriate menu option, and have other rights which proves to the original purchaser of the product during and/or after delivery 6. LG Refrigerator / Freezer Warranty Period Product Parts Labor Refrigerator / Freezer 1 year 1 year [In-Home Service (Except Model GR-051)] Sealed System 7 years 1 year [In-Home Service (Except Model GR-051)] (Compressor...


