Owner's Manual
Page 1
MFL62884306 www.lge.com Model Name **=color number, número de color, numéro de couleur LSC23924** P/No. ENGLISH ESPAÑOL FRANÇAIS OWNER´S MANUAL SIDE BY SIDE REFRIGERATOR Please read this manual carefully before operating your set and retain it for future reference.
MFL62884306 www.lge.com Model Name **=color number, número de color, numéro de couleur LSC23924** P/No. ENGLISH ESPAÑOL FRANÇAIS OWNER´S MANUAL SIDE BY SIDE REFRIGERATOR Please read this manual carefully before operating your set and retain it for future reference.
Owner's Manual
Page 2
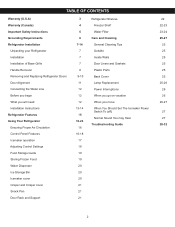
...Safety Instructions Grounding Requirements Refrigerator Installation Unpacking your Refrigerator Installation Installation of Base Grille Handle Removal Removing and Replacing Refrigerator Doors Door Alignment Connecting the Water Line Before you begin What you will need Installation Instructions Refrigerator Features Using Your Refrigerator Ensuring Proper Air ...9-10 11 12 12 12 13-14 15 16-24 16 16-18 17 18 19 19 20 20 20 21 21 21 Refrigerator Shelves Freezer Shelf Water Filter Care and Cleaning General Cleaning Tips Outside Inside Walls Door Liners and Gaskets Plastic Parts Back Cover Lamp ...
...Safety Instructions Grounding Requirements Refrigerator Installation Unpacking your Refrigerator Installation Installation of Base Grille Handle Removal Removing and Replacing Refrigerator Doors Door Alignment Connecting the Water Line Before you begin What you will need Installation Instructions Refrigerator Features Using Your Refrigerator Ensuring Proper Air ...9-10 11 12 12 12 13-14 15 16-24 16 16-18 17 18 19 19 20 20 20 21 21 21 Refrigerator Shelves Freezer Shelf Water Filter Care and Cleaning General Cleaning Tips Outside Inside Walls Door Liners and Gaskets Plastic Parts Back Cover Lamp ...
Owner's Manual
Page 3
...of purchase is required and must be submitted at its option replace, without charge, your product type (Refrigerator), model number, serial number, and ZIP/Postal Code ready. 3 LG ELECTRONICS SHALL NOT BE LIABLE FOR THE LOSS OF USE OF THE PRODUCT, INCONVIENCE, LOSS OR ANY... is applicable to the product caused by accident, pests, fire, floods, or acts of God. 3. including Alaska, Hawaii, and U.S. LG Refrigerator / Freezer Warranty Period Product Parts Labor Refrigerator / Freezer 1 year 1 year [In-Home Service (Except Model GR-051)] Sealed System 7 years 1 year [In-Home Service (...
...of purchase is required and must be submitted at its option replace, without charge, your product type (Refrigerator), model number, serial number, and ZIP/Postal Code ready. 3 LG ELECTRONICS SHALL NOT BE LIABLE FOR THE LOSS OF USE OF THE PRODUCT, INCONVIENCE, LOSS OR ANY... is applicable to the product caused by accident, pests, fire, floods, or acts of God. 3. including Alaska, Hawaii, and U.S. LG Refrigerator / Freezer Warranty Period Product Parts Labor Refrigerator / Freezer 1 year 1 year [In-Home Service (Except Model GR-051)] Sealed System 7 years 1 year [In-Home Service (...
Owner's Manual
Page 4
...visit our website Call 1-888-542-2623 (24 hours a day, 365 days a year) and select the appropriate option from your LG Refrigerator ("Product") fail due to the Product caused by leaky or broken water pipes, frozen water pipes, restricted drain lines, inadequate or interrupted...if it is installed in utility costs and additional utility expenses. 13. Damage or product failure caused by LG Canada or an authorized Canadian distributor. LG REFRIGERATOR LIMITED WARRANTY - Increases in an inaccessible location or is severable where it conflicts with published installation instructions, ...
...visit our website Call 1-888-542-2623 (24 hours a day, 365 days a year) and select the appropriate option from your LG Refrigerator ("Product") fail due to the Product caused by leaky or broken water pipes, frozen water pipes, restricted drain lines, inadequate or interrupted...if it is installed in utility costs and additional utility expenses. 13. Damage or product failure caused by LG Canada or an authorized Canadian distributor. LG REFRIGERATOR LIMITED WARRANTY - Increases in an inaccessible location or is severable where it conflicts with published installation instructions, ...

Owner's Manual
Page 5
... damage only. You can ". "Thawed ground meats, poultry, or fish that the supply plug is properly grounded. • This refrigerator must be discarded. Indicates an imminently hazardous situation which have become frayed or otherwise damaged. Do not use gasoline or other foods. ...be frozen and should be followed, including the following. The United States Department of this appliance: • NEVER unplug your refrigerator before using your product, basic safety precautions should not be killed or seriously injured if you do not follow instructions. Read ...
... damage only. You can ". "Thawed ground meats, poultry, or fish that the supply plug is properly grounded. • This refrigerator must be discarded. Indicates an imminently hazardous situation which have become frayed or otherwise damaged. Do not use gasoline or other foods. ...be frozen and should be followed, including the following. The United States Department of this appliance: • NEVER unplug your refrigerator before using your product, basic safety precautions should not be killed or seriously injured if you do not follow instructions. Read ...

Owner's Manual
Page 6
... accordance with a switch or pull chain. D A N G E R : CHILDREN MAY BECOME TRAPPED Children becoming trapped or suffocated is your old refrigerator, please follow the instructions below to the desired setting. 6 REQUIREMENTS FOR GROUND CONNECTION IMPORTANT: Attentively read the following. When you are a hazard,...by the person responsible for their safety. RECOMMENDED GROUNDING METHOD The refrigerator should be supervised to assure that they have it must be replaced by our service center or qualified LG technician to the grounding requirements). Do not use by children, ...
... accordance with a switch or pull chain. D A N G E R : CHILDREN MAY BECOME TRAPPED Children becoming trapped or suffocated is your old refrigerator, please follow the instructions below to the desired setting. 6 REQUIREMENTS FOR GROUND CONNECTION IMPORTANT: Attentively read the following. When you are a hazard,...by the person responsible for their safety. RECOMMENDED GROUNDING METHOD The refrigerator should be supervised to assure that they have it must be replaced by our service center or qualified LG technician to the grounding requirements). Do not use by children, ...
Owner's Manual
Page 7
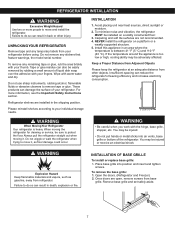
... direct sunlight or moisture. 2. Install this appliance in the shipping position. Do not wiggle or walk the refrigerator when trying to move and install the refrigerator. You may be injured. • Do not put hands or metal sticks into position and insert and ...according to do so can also be installed on a platform or a weakly supported structure. 5. Open the doors. (Refrigerator and Freezer) 2. Once doors are not recommended. 4. Refrigerator shelves are installed in an area where the temperature is heavy. INSTALLATION 1. Place base grille into air vents, base...
... direct sunlight or moisture. 2. Install this appliance in the shipping position. Do not wiggle or walk the refrigerator when trying to move and install the refrigerator. You may be injured. • Do not put hands or metal sticks into position and insert and ...according to do so can also be installed on a platform or a weakly supported structure. 5. Open the doors. (Refrigerator and Freezer) 2. Once doors are not recommended. 4. Refrigerator shelves are installed in an area where the temperature is heavy. INSTALLATION 1. Place base grille into air vents, base...
Owner's Manual
Page 8
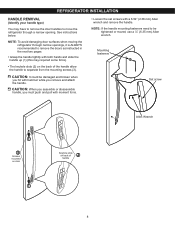
...door Keyhole slots on the back of handle 8 C A U T I O N : It could be tightened or moved, use a ¼" (6.35 mm) Allen wrench. REFRIGERATOR INSTALLATION HANDLE REMOVAL (Identify your handle type) You may required some force). • The keyhole slots (2) on back of the handle allow the handle to...from the mounting screws (3). • Loosen the set screws with moment force. NOTE: If the handle mounting fasteners need to move the refrigerator through narrow openings, it is ALWAYS recommended to remove the doors as instructed in the next two pages. • Grasp the handle ...
...door Keyhole slots on the back of handle 8 C A U T I O N : It could be tightened or moved, use a ¼" (6.35 mm) Allen wrench. REFRIGERATOR INSTALLATION HANDLE REMOVAL (Identify your handle type) You may required some force). • The keyhole slots (2) on back of the handle allow the handle to...from the mounting screws (3). • Loosen the set screws with moment force. NOTE: If the handle mounting fasteners need to move the refrigerator through narrow openings, it is ALWAYS recommended to remove the doors as instructed in the next two pages. • Grasp the handle ...
Owner's Manual
Page 9
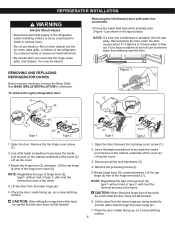
...process is the same. You may be injured. Disconnecting the tube under the door causes about 0.13 gallons (1.5 liters) water to the refrigerator before installing. Open the door. type1: without rivet or type 2: with rivet the removal process is deformed or abraded, trim the part... the hinge lever latch (5). C A U T I O N : When lifting the hinge free of the cover (2). C A U T I O N : When lifting the hinge free of the refrigerator. Remove the top hinge cover screw (1). 2. Failure to pry back the hooks (not shown) on the cabinet underside of the latch, be careful that the...
...process is the same. You may be injured. Disconnecting the tube under the door causes about 0.13 gallons (1.5 liters) water to the refrigerator before installing. Open the door. type1: without rivet or type 2: with rivet the removal process is deformed or abraded, trim the part... the hinge lever latch (5). C A U T I O N : When lifting the hinge free of the cover (2). C A U T I O N : When lifting the hinge free of the refrigerator. Remove the top hinge cover screw (1). 2. Failure to pry back the hooks (not shown) on the cabinet underside of the latch, be careful that the...
Owner's Manual
Page 10
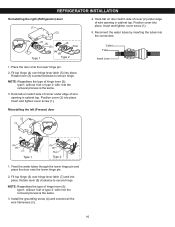
... (4) over hinge lever latch (7) and into place. Reinstalling the left (Freezer) door (2) (1) (4) (5) (6) (7) Type 1 (3) (7) (5) (6) Rivet Type 2 1. Place the door onto the lower hinge pin. 2. REFRIGERATOR INSTALLATION Reinstalling the rigth (Refrigerator) door (1) (2) (3) (4) (5) (3) Rivet Type 1 (4) (5) Type 2 4. Hook tab on switch side of corner under edge of hinge lever (3); Position cover into place. Collet Tube Insert...
... (4) over hinge lever latch (7) and into place. Reinstalling the left (Freezer) door (2) (1) (4) (5) (6) (7) Type 1 (3) (7) (5) (6) Rivet Type 2 1. Place the door onto the lower hinge pin. 2. REFRIGERATOR INSTALLATION Reinstalling the rigth (Refrigerator) door (1) (2) (3) (4) (5) (3) Rivet Type 1 (4) (5) Type 2 4. Hook tab on switch side of corner under edge of hinge lever (3); Position cover into place. Collet Tube Insert...
Owner's Manual
Page 11
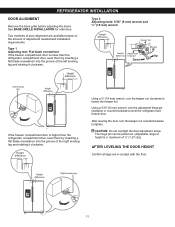
...mm) wrench, turn the keeper nut counterclockwise to tighten. The hinge pin can be pulled out. (Adjustable range of height is lower than the refrigerator compartment door, level them by inserting a flat blade screwdriver into the groove of the left leveling leg and rotating it clockwise. AFTER LEVELING THE DOOR... pin Down 9 Wrench Up Height difference Left leveling leg Height difference If the freezer compartment door is higher than the refrigerator compartment door, level them by inserting a flat blade screwdriver into the groove of door alignment are in contact with the floor...
...mm) wrench, turn the keeper nut counterclockwise to tighten. The hinge pin can be pulled out. (Adjustable range of height is lower than the refrigerator compartment door, level them by inserting a flat blade screwdriver into the groove of the left leveling leg and rotating it clockwise. AFTER LEVELING THE DOOR... pin Down 9 Wrench Up Height difference Left leveling leg Height difference If the freezer compartment door is higher than the refrigerator compartment door, level them by inserting a flat blade screwdriver into the groove of door alignment are in contact with the floor...
Owner's Manual
Page 12
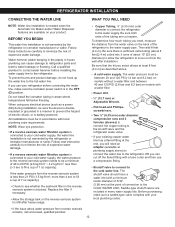
.... 12 A cold water supply. To determine how much tubing you need an adapter (available at the end, you can cause damage to refrigerator parts and lead to water leakage or flooding. Water hammer (water banging in the pipes) in the reverse osmosis system is blocked. All installations... sec to fill a cup of 7 oz capacity): • Check to see whether the sediment filter in house plumbing can cut square. REFRIGERATOR INSTALLATION CONNECTING THE WATER LINE WHAT YOU WILL NEED NOTE: Water line installation is needed when the Automatic Ice Maker and/or Water Dispenser features...
.... 12 A cold water supply. To determine how much tubing you need an adapter (available at the end, you can cause damage to refrigerator parts and lead to water leakage or flooding. Water hammer (water banging in the pipes) in the reverse osmosis system is blocked. All installations... sec to fill a cup of 7 oz capacity): • Check to see whether the sediment filter in house plumbing can cut square. REFRIGERATOR INSTALLATION CONNECTING THE WATER LINE WHAT YOU WILL NEED NOTE: Water line installation is needed when the Automatic Ice Maker and/or Water Dispenser features...
Owner's Manual
Page 13
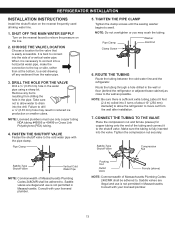
...Remove any sediment from drilling the hole in the pipe. Route the tubing through a hole drilled in the wall or floor (behind the refrigerator or adjacent base cabinet) as close to drill a ¼" (6.35 mm) hole may crush the tubing. Saddle valves are illegal and...pipe using a sharp bit. Packing Nut Outlet Valve Ferrule (sleeve) NOTE: Commonwealth of Massachusetts Plumbing Codes 248CMR shall be adhered to . REFRIGERATOR INSTALLATION INSTALLATION INSTRUCTIONS Install the shutoff valve on the line. 2. Pipe Clamp 5. TIGHTEN THE PIPE CLAMP Tighten the clamp screws until the ...
...Remove any sediment from drilling the hole in the pipe. Route the tubing through a hole drilled in the wall or floor (behind the refrigerator or adjacent base cabinet) as close to drill a ¼" (6.35 mm) hole may crush the tubing. Saddle valves are illegal and...pipe using a sharp bit. Packing Nut Outlet Valve Ferrule (sleeve) NOTE: Commonwealth of Massachusetts Plumbing Codes 248CMR shall be adhered to . REFRIGERATOR INSTALLATION INSTALLATION INSTRUCTIONS Install the shutoff valve on the line. 2. Pipe Clamp 5. TIGHTEN THE PIPE CLAMP Tighten the clamp screws until the ...

Owner's Manual
Page 14
... (ON) I O N : C h e c k t o m a k e s u r e that could clog the screen of refrigerator Tubing Clamp 1 ¼" (6.35 mm) Tubing ¼" (6.35 mm) Compression Nut 2 Ferrule (Sleeve) Part A Figure 1 Refrigerator Connection Fasten the tubing into the connection as far as possible. Finally, re-fasten the screw. 10. START... that leaks are not occurring in the (ON) I position. 14 While holding the tubing, tighten the fitting (Part A). REFRIGERATOR INSTALLATION 8. FLUSH OUT THE TUBING Turn the main water supply on and flush out the tubing until it does not vibrate against...
... (ON) I O N : C h e c k t o m a k e s u r e that could clog the screen of refrigerator Tubing Clamp 1 ¼" (6.35 mm) Tubing ¼" (6.35 mm) Compression Nut 2 Ferrule (Sleeve) Part A Figure 1 Refrigerator Connection Fasten the tubing into the connection as far as possible. Finally, re-fasten the screw. 10. START... that leaks are not occurring in the (ON) I position. 14 While holding the tubing, tighten the fitting (Part A). REFRIGERATOR INSTALLATION 8. FLUSH OUT THE TUBING Turn the main water supply on and flush out the tubing until it does not vibrate against...
Owner's Manual
Page 15
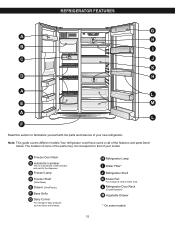
...Freezer Door Rack B Automatic Icemaker The ice is produced in the icemaker and sent to that of your new refrigerator. Note: This guide covers different models.Your refrigerator could have some models 15 C Freezer Lamp D Freezer Shelf (Wire/Glass) E Drawer (Wire/Plastic) ...(Crystal/Opaque) M Vegetable Drawer * On some or all of the features and parts listed below. REFRIGERATOR FEATURES G A H B I Water Filter* J Refrigerator Shelf K Snack Pan For storage of dairy products such as butter and cheese. H Refrigerator Lamp I C J K D H A L E M A L F Read this section to ...
...Freezer Door Rack B Automatic Icemaker The ice is produced in the icemaker and sent to that of your new refrigerator. Note: This guide covers different models.Your refrigerator could have some models 15 C Freezer Lamp D Freezer Shelf (Wire/Glass) E Drawer (Wire/Plastic) ...(Crystal/Opaque) M Vegetable Drawer * On some or all of the features and parts listed below. REFRIGERATOR FEATURES G A H B I Water Filter* J Refrigerator Shelf K Snack Pan For storage of dairy products such as butter and cheese. H Refrigerator Lamp I C J K D H A L E M A L F Read this section to ...

Owner's Manual
Page 16
...and temperature and moisture problems may see the freezer door open and close again due to pressure from internal air flow. USING YOUR REFRIGERATOR ENSURING PROPER AIR CIRCULATION In order to ensure proper temperatures, air must thorougly clean both sections, any of these vents with food ...transfer and drying out food, wrap or cover foods tightly. (See the Food Storage Guide section for use. Type 2 Refrigerator and Freezer controls: Initially set the refrigerator and freezer controls to ensure proper cooling. The rest of the air then flows through the top vent. CONTROL PANEL FEATURES...
...and temperature and moisture problems may see the freezer door open and close again due to pressure from internal air flow. USING YOUR REFRIGERATOR ENSURING PROPER AIR CIRCULATION In order to ensure proper temperatures, air must thorougly clean both sections, any of these vents with food ...transfer and drying out food, wrap or cover foods tightly. (See the Food Storage Guide section for use. Type 2 Refrigerator and Freezer controls: Initially set the refrigerator and freezer controls to ensure proper cooling. The rest of the air then flows through the top vent. CONTROL PANEL FEATURES...

Owner's Manual
Page 17
...same time for a couple of seconds after dispensing ice or water so the last few batches of on the automatic icemaking mechanism while the refrigerator is closed . Display Off Mode The display lights up to the water the icemaker will be stuck together. If you have Type 1 ...on freezer compartment temperature, room temperature, number of the feeler arm, the icemaker will become cloudy, taste stale, and shrink. A newly-installed refrigerator may take 12 to 24 hours to begin to operate when it cools to clear. The icemaker will repeat every 30 seconds until the freezing...
...same time for a couple of seconds after dispensing ice or water so the last few batches of on the automatic icemaking mechanism while the refrigerator is closed . Display Off Mode The display lights up to the water the icemaker will be stuck together. If you have Type 1 ...on freezer compartment temperature, room temperature, number of the feeler arm, the icemaker will become cloudy, taste stale, and shrink. A newly-installed refrigerator may take 12 to 24 hours to begin to operate when it cools to clear. The icemaker will repeat every 30 seconds until the freezing...

Owner's Manual
Page 18
...LOCK The Lock button deactivates the temperature controls and dispenser functions. Then all the display lights go off the filter status light. The refrigerator control functions as the thermostat for the temperature to make it is an indicator light for 5 seconds until the tone sounds. Press the...button again to activate the ice plus function runs the freezer compartment at least 24 hours between adjustments. ADJUSTING CONTROL SETTINGS Give the refrigerator time to increase ice making final adjustments. If you like and when ice cream is too warm or too cold, then adjust ...
...LOCK The Lock button deactivates the temperature controls and dispenser functions. Then all the display lights go off the filter status light. The refrigerator control functions as the thermostat for the temperature to make it is an indicator light for 5 seconds until the tone sounds. Press the...button again to activate the ice plus function runs the freezer compartment at least 24 hours between adjustments. ADJUSTING CONTROL SETTINGS Give the refrigerator time to increase ice making final adjustments. If you like and when ice cream is too warm or too cold, then adjust ...
Owner's Manual
Page 19
... STORAGE GUIDE Storing Fresh Food Wrap or store food in the refrigerator in the freezer for air to circulate around packages. Once opened butter in a covered dish or in bags or plastic containers inside the crisper. If ... containers with airtight lids can close and seal the package, it . This prevents food odor and taste transfer throughout the refrigerator. Ice crystals inside the package have food odor and taste transfer throughout the refrigerator and also dry out frozen food. Place in a plastic bag or plastic container and store in the...
... STORAGE GUIDE Storing Fresh Food Wrap or store food in the refrigerator in the freezer for air to circulate around packages. Once opened butter in a covered dish or in bags or plastic containers inside the crisper. If ... containers with airtight lids can close and seal the package, it . This prevents food odor and taste transfer throughout the refrigerator. Ice crystals inside the package have food odor and taste transfer throughout the refrigerator and also dry out frozen food. Place in a plastic bag or plastic container and store in the...

Owner's Manual
Page 20
...: Use both hands to remove the ice bin to your finger in the figure below. 2 1 20 Make sure it near the opening . USING YOUR REFRIGERATOR WATER DISPENSER Your refrigerator has a mechanism that is fully engaged into the auger drive … . If you need remove the Ice storage bin, please follow these steps...
...: Use both hands to remove the ice bin to your finger in the figure below. 2 1 20 Make sure it near the opening . USING YOUR REFRIGERATOR WATER DISPENSER Your refrigerator has a mechanism that is fully engaged into the auger drive … . If you need remove the Ice storage bin, please follow these steps...


