Owners Manual
Page 2
... Location 13 Removing/Assembling Doors 17 Connecting the Water Line 20 Leveling and Door Alignment 21 Turning on the Power 22 OPERATION 22 Before Use 23 Control Panel 25 Sabbath Mode 26 Ice and Water Dispenser 27 In-Door Ice Bin 28 Automatic Icemaker 29 Storing Food 31 Drawers 31 Refrigerator Shelves 31 InstaView 32 Door-in-Door 32 Door Bins 33 SMART FUNCTIONS 33 LG ThinQ Application 35 Smart Grid Function 36 Smart Diagnosis™ Feature 38 MAINTENANCE 38 Cleaning 38 Air Filter...
... Location 13 Removing/Assembling Doors 17 Connecting the Water Line 20 Leveling and Door Alignment 21 Turning on the Power 22 OPERATION 22 Before Use 23 Control Panel 25 Sabbath Mode 26 Ice and Water Dispenser 27 In-Door Ice Bin 28 Automatic Icemaker 29 Storing Food 31 Drawers 31 Refrigerator Shelves 31 InstaView 32 Door-in-Door 32 Door Bins 33 SMART FUNCTIONS 33 LG ThinQ Application 35 Smart Grid Function 36 Smart Diagnosis™ Feature 38 MAINTENANCE 38 Cleaning 38 Air Filter...

Owners Manual
Page 5
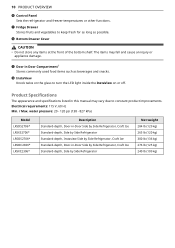
.... • Unplug the power plug before cleaning or repairing the refrigerator. • The refrigerator and freezer compartment lights are in the freezer compartment. Ensure the area is adequately ventilated and contact an authorized service center. • Keep flammable materials and vapors, such as gasoline, away from the refrigerator. • This appliance is properly grounded. Grounding Instructions • Improper connection of the equipment-grounding...
.... • Unplug the power plug before cleaning or repairing the refrigerator. • The refrigerator and freezer compartment lights are in the freezer compartment. Ensure the area is adequately ventilated and contact an authorized service center. • Keep flammable materials and vapors, such as gasoline, away from the refrigerator. • This appliance is properly grounded. Grounding Instructions • Improper connection of the equipment-grounding...
Owners Manual
Page 10
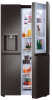
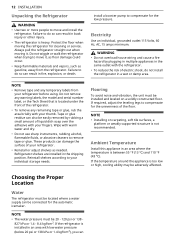
... the front of the bottom shelf. The items may vary due to turn the LED light inside the InstaView on or off. 10 PRODUCT OVERVIEW j Control Panel Sets the refrigerator and freezer temperatures or other functions. k Fridge Drawer Stores fruits and vegetables to keep fresh for as long as beverages and snacks. Product Specifications The appearance and specifications listed in this manual may fall and cause...
... the front of the bottom shelf. The items may vary due to turn the LED light inside the InstaView on or off. 10 PRODUCT OVERVIEW j Control Panel Sets the refrigerator and freezer temperatures or other functions. k Fridge Drawer Stores fruits and vegetables to keep fresh for as long as beverages and snacks. Product Specifications The appearance and specifications listed in this manual may fall and cause...
Owners Manual
Page 12
..., 15 amps minimum. WARNING • Do not overload house wiring and cause a fire hazard by rubbing a small amount of your refrigerator before using. Wipe with warm water and dry. • Do not use sharp instruments, rubbing alcohol, flammable fluids, or abrasive cleaners to move and install the refrigerator. Flooring To avoid noise and vibration, the unit must be located where a water supply can
..., 15 amps minimum. WARNING • Do not overload house wiring and cause a fire hazard by rubbing a small amount of your refrigerator before using. Wipe with warm water and dry. • Do not use sharp instruments, rubbing alcohol, flammable fluids, or abrasive cleaners to move and install the refrigerator. Flooring To avoid noise and vibration, the unit must be located where a water supply can
Owners Manual
Page 13
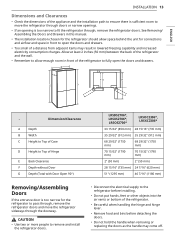
... to remove and install the refrigerator doors. • Disconnect the electrical supply to the refrigerator before installing. • Do not put hands, feet or other objects into the air vents or bottom of the refrigerator. • Be careful when handling the hinge and hinge lever. • Remove food and bins before detaching the doors. • Do not hold the handle when removing or replacing the doors as the handle may result in lowered freezing...
... to remove and install the refrigerator doors. • Disconnect the electrical supply to the refrigerator before installing. • Do not put hands, feet or other objects into the air vents or bottom of the refrigerator. • Be careful when handling the hinge and hinge lever. • Remove food and bins before detaching the doors. • Do not hold the handle when removing or replacing the doors as the handle may result in lowered freezing...
Owners Manual
Page 17
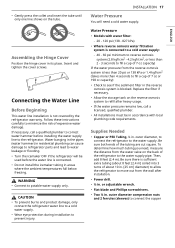
... these instructions carefully to refill after installation. • Power drill. • ½ in areas where the ambient temperatures fall below freezing. Replace the filter if necessary. • Allow the storage tank on the reverse osmosis system to minimize the risk of about 8 feet [2.4 m] coiled into 3 turns of expensive water damage. outer diameter compression nuts and 2 ferrules (sleeves) to potable water supply only. Connecting the Water Line Before...
... these instructions carefully to refill after installation. • Power drill. • ½ in areas where the ambient temperatures fall below freezing. Replace the filter if necessary. • Allow the storage tank on the reverse osmosis system to minimize the risk of about 8 feet [2.4 m] coiled into 3 turns of expensive water damage. outer diameter compression nuts and 2 ferrules (sleeves) to potable water supply only. Connecting the Water Line Before...
Owners Manual
Page 20
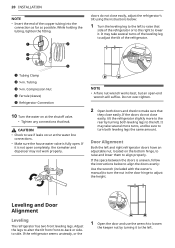
... suffice. While holding the tubing, tighten the fitting. If it to the left and right refrigerator doors have an adjustable nut, located on at the water line connections. • Make sure the house water valve is uneven, follow the instructions below : 1 Turn the leveling leg to the rear by turning it is not open completely, the icemaker and dispenser may not work properly. doors do not close easily. Door Alignment Both the...
... suffice. While holding the tubing, tighten the fitting. If it to the left and right refrigerator doors have an adjustable nut, located on at the water line connections. • Make sure the house water valve is uneven, follow the instructions below : 1 Turn the leveling leg to the rear by turning it is not open completely, the icemaker and dispenser may not work properly. doors do not close easily. Door Alignment Both the...
Owners Manual
Page 24
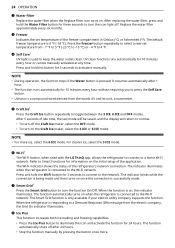
... then turns on . Replace the water filter approximately every six months. Press the Freezer button repeatedly to keep the water outlet clean. UV clean function runs automatically for 24 hours. NOTE • During operation, the function stops if the Water button is 0 °F (-18 °C). After 5 seconds of the refrigerator's network connection. The indicator blinks while the connection is being made . The function automatically turns on , the indicator illuminates. The default freezer temperature...
... then turns on . Replace the water filter approximately every six months. Press the Freezer button repeatedly to keep the water outlet clean. UV clean function runs automatically for 24 hours. NOTE • During operation, the function stops if the Water button is 0 °F (-18 °C). After 5 seconds of the refrigerator's network connection. The indicator blinks while the connection is being made . The function automatically turns on , the indicator illuminates. The default freezer temperature...
Owners Manual
Page 25
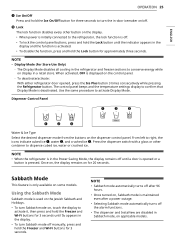
... refrigerator door opened or a button is only available on the dispenser control panel. Sabbath Mode This feature is pressed. NOTE • Display Mode (For Store Use Only) - Dispenser Control Panel Water & Ice Type Select the desired dispenser mode from the buttons on some models. Press the dispenser switch with a glass or other button on the display. • When power is initially connected to turn the in-door icemaker on display in a retail store. From left to activate it, then press and hold the Freezer...
... refrigerator door opened or a button is only available on the dispenser control panel. Sabbath Mode This feature is pressed. NOTE • Display Mode (For Store Use Only) - Dispenser Control Panel Water & Ice Type Select the desired dispenser mode from the buttons on some models. Press the dispenser switch with a glass or other button on the display. • When power is initially connected to turn the in-door icemaker on display in a retail store. From left to activate it, then press and hold the Freezer...
Owners Manual
Page 27
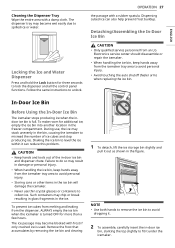
... remove the ice bin to fit it out as shown in the freezer compartment. Follow the same instructions to lock the dispenser and all the control panel functions. In-Door Ice Bin Before Using the In-Door Ice Bin The icemaker stops producing ice when the indoor ice bin is turned OFF for three seconds to unlock. CAUTION • Keep hands and tools out of ice cubes and stop producing ice. Detaching/Assembling the In-Door Ice Bin...
... remove the ice bin to fit it out as shown in the freezer compartment. Follow the same instructions to lock the dispenser and all the control panel functions. In-Door Ice Bin Before Using the In-Door Ice Bin The icemaker stops producing ice when the indoor ice bin is turned OFF for three seconds to unlock. CAUTION • Keep hands and tools out of ice cubes and stop producing ice. Detaching/Assembling the In-Door Ice Bin...
Owners Manual
Page 29
... time icemakers are opened or closed too often, warm air may penetrate the refrigerator and raise its temperature. For clearer ice, select the 3 ICE mode. • The time needed to make the first batch of ice, and the ice may not be round. If the icemakers are turned on the water quality in the Operation section. To turn icemakers On/Off, refer to Control Panel in the ice bin. • The Craft Ice icemaker produces...
... time icemakers are opened or closed too often, warm air may penetrate the refrigerator and raise its temperature. For clearer ice, select the 3 ICE mode. • The time needed to make the first batch of ice, and the ice may not be round. If the icemakers are turned on the water quality in the Operation section. To turn icemakers On/Off, refer to Control Panel in the ice bin. • The Craft Ice icemaker produces...
Owners Manual
Page 31
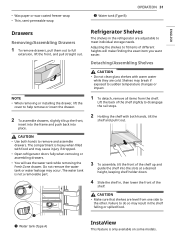
... remove and assemble drawers. Adjusting the shelves to meet individual storage needs. Shelves may cause injury if dropped. • Open refrigerator doors fully when removing or assembling drawers. • You will make finding the exact item you want easier. CAUTION • Make sure that shelves are adjustable to fit items of the shelf. a Water tank (Type A) InstaView This feature is heavy when filled with warm water while they are cold. Do not remove the water...
... remove and assemble drawers. Adjusting the shelves to meet individual storage needs. Shelves may cause injury if dropped. • Open refrigerator doors fully when removing or assembling drawers. • You will make finding the exact item you want easier. CAUTION • Make sure that shelves are adjustable to fit items of the shelf. a Water tank (Type A) InstaView This feature is heavy when filled with warm water while they are cold. Do not remove the water...
Owners Manual
Page 40
... top shelf, located below the water filter, is replaced, dispense 2.5 gallons of water (flush for cycles of its packing and remove the protective cover from the system. Replacing the Water Filter • Replace the water filter: - Search using "water filter" on . - Visit your local dealer or distributor - or 25 cc) to remove trapped air and contaminants from the orings. Press and release the dispenser pad for approximately 5 minutes) to drain. 6 After the water filter...
... top shelf, located below the water filter, is replaced, dispense 2.5 gallons of water (flush for cycles of its packing and remove the protective cover from the system. Replacing the Water Filter • Replace the water filter: - Search using "water filter" on . - Visit your local dealer or distributor - or 25 cc) to remove trapped air and contaminants from the orings. Press and release the dispenser pad for approximately 5 minutes) to drain. 6 After the water filter...
Owners Manual
Page 46
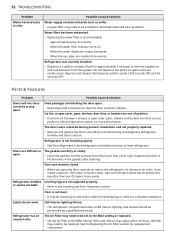
... the frequency and duration of each compartment. Possible Cause & Solution Refrigerator is opened leading to cool completely. In order to conserve energy, try to get everything you need out of time, warm, humid air enters the compartment. Interior moisture buildup. Defrost cycle recently completed. • During the defrost cycle, the temperature of door openings. Food is freezing in the home will run even more efficient technology.
... the frequency and duration of each compartment. Possible Cause & Solution Refrigerator is opened leading to cool completely. In order to conserve energy, try to get everything you need out of time, warm, humid air enters the compartment. Interior moisture buildup. Defrost cycle recently completed. • During the defrost cycle, the temperature of door openings. Food is freezing in the home will run even more efficient technology.
Owners Manual
Page 48
... water filter indicator turns on models with adequate pressure and turn the water shutoff valve fully open " section in a 24 hour period. When the water dispenser output decreases. - Lowering the refrigerator temperature can kink when the refrigerator is 0 °F (-18 °C). The temperature setting for the freezer is too warm. • The recommended temperature for the freezer compartment for long periods of time. • If the doors of ice may be affected. Ice Problem Icemaker...
... water filter indicator turns on models with adequate pressure and turn the water shutoff valve fully open " section in a 24 hour period. When the water dispenser output decreases. - Lowering the refrigerator temperature can kink when the refrigerator is 0 °F (-18 °C). The temperature setting for the freezer is too warm. • The recommended temperature for the freezer compartment for long periods of time. • If the doors of ice may be affected. Ice Problem Icemaker...
Owners Manual
Page 51
...; The tubing can be warm. Refrigerator is connected to the hot water supply. • Make sure that the control panel is replaced, dispense 2.5 gallons of the refrigerator doors are not closed properly. • Water will range from approximately 20 to house supply valve is clogged. • Connect the refrigerator to remove trapped air and contaminants from the system. The house water supply is not connected, the valve is not turned on your specific model, the water storage capacity...
...; The tubing can be warm. Refrigerator is connected to the hot water supply. • Make sure that the control panel is replaced, dispense 2.5 gallons of the refrigerator doors are not closed properly. • Water will range from approximately 20 to house supply valve is clogged. • Connect the refrigerator to remove trapped air and contaminants from the system. The house water supply is not connected, the valve is not turned on your specific model, the water storage capacity...
Owners Manual
Page 52
... Air Filter to eliminate taste and odor problems. Water filter has been exhausted. • Replacing the water filter is not level. • It may need to be installed to the MAX setting. When the ice cubes are dirty or sticky. • Clean the gaskets and the surfaces that they touch. Ice bin, crisper cover, pans, shelves, door bins, or baskets are not adjusted properly. • Refer to the Removing and Replacing Refrigerator Handles and Doors section. As the warm air cools, it opens...
... Air Filter to eliminate taste and odor problems. Water filter has been exhausted. • Replacing the water filter is not level. • It may need to be installed to the MAX setting. When the ice cubes are dirty or sticky. • Clean the gaskets and the surfaces that they touch. Ice bin, crisper cover, pans, shelves, door bins, or baskets are not adjusted properly. • Refer to the Removing and Replacing Refrigerator Handles and Doors section. As the warm air cools, it opens...
Owners Manual
Page 56
... LG. • Shelves, door bins, drawers, handle and accessories, except for repairs. • Replacement of light bulbs, filters, or any consumable parts. • The removal and reinstallation of the Product if it is installed in an inaccessible location or is used for other than the intended purpose, or any water leakage where the Product was not properly installed. • Damage or failure of the Product caused by incorrect electrical...
... LG. • Shelves, door bins, drawers, handle and accessories, except for repairs. • Replacement of light bulbs, filters, or any consumable parts. • The removal and reinstallation of the Product if it is installed in an inaccessible location or is used for other than the intended purpose, or any water leakage where the Product was not properly installed. • Damage or failure of the Product caused by incorrect electrical...
Owners Manual
Page 59
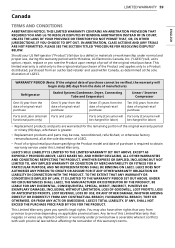
...: If the original date of purchase cannot be charged for labor) • Replacement products and parts are warranted for labor) be verified, the warranty will begin sixty (60) days from the date of manufacture) Refrigerator Sealed System (Condenser, Dryer, Connecting Tube and Evaporator) Linear / Inverter Compressor One (1) year from the date of original retail purchase One (1) year from...
...: If the original date of purchase cannot be charged for labor) • Replacement products and parts are warranted for labor) be verified, the warranty will begin sixty (60) days from the date of manufacture) Refrigerator Sealed System (Condenser, Dryer, Connecting Tube and Evaporator) Linear / Inverter Compressor One (1) year from the date of original retail purchase One (1) year from...
Owners Manual
Page 60
... in the Product's owner's manual; • Damage or failure to the instructions outlined in any way associated with the Product; • Any noises associated with normal operation of the Product; • Replacement of light bulbs, filters, fuses or any other causes beyond the control of LGECI or the manufacturer; • Damage or failure resulting from defects in -warranty, will be readily...
... in the Product's owner's manual; • Damage or failure to the instructions outlined in any way associated with the Product; • Any noises associated with normal operation of the Product; • Replacement of light bulbs, filters, fuses or any other causes beyond the control of LGECI or the manufacturer; • Damage or failure resulting from defects in -warranty, will be readily...


