
User Guide
Page 2
... 3 Important Safety Instruction 3 Identification of Parts 4 Installation Where to Locate 5 Door Removal 6 Door Replacement 7 Water Pipe Installation 7 Water Connection Instruction Guide 8 Operation Instruction Guide 10 Height Adjustment 12 Operation Starting 13 Adjusting the Temperatures and functions 13 (Dispenser/Automatic Icemaker) Shelf 19 Wine Holder (Applicable to some models only) 19 Egg Bin (Applicable to some models only) 20 Humidity Control in the Vegetable Compartment 20 Optichill Temperature Transition Corner 21 Temperature Change at Optichill 21...
... 3 Important Safety Instruction 3 Identification of Parts 4 Installation Where to Locate 5 Door Removal 6 Door Replacement 7 Water Pipe Installation 7 Water Connection Instruction Guide 8 Operation Instruction Guide 10 Height Adjustment 12 Operation Starting 13 Adjusting the Temperatures and functions 13 (Dispenser/Automatic Icemaker) Shelf 19 Wine Holder (Applicable to some models only) 19 Egg Bin (Applicable to some models only) 20 Humidity Control in the Vegetable Compartment 20 Optichill Temperature Transition Corner 21 Temperature Change at Optichill 21...
User Guide
Page 3
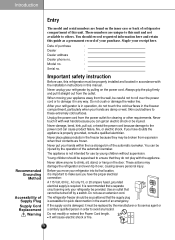
... provided. These numbers are found on the door. Never put your hands are frozen. Use an outlet that they may damage the refrigerator and even tip it in the freezer compartment, particularly when your hands within the ice storage bin of the automatic icemaker. Introduction Recommended Grounding Method Accessibility of Supply Plug Supply Cord Replacement Warning Entry The model and serial numbers are unique to...
... provided. These numbers are found on the door. Never put your hands are frozen. Use an outlet that they may damage the refrigerator and even tip it in the freezer compartment, particularly when your hands within the ice storage bin of the automatic icemaker. Introduction Recommended Grounding Method Accessibility of Supply Plug Supply Cord Replacement Warning Entry The model and serial numbers are unique to...

User Guide
Page 4
... grounding instructions are not completely understood, or if you throw away your unit, they do not play with the appliance. Door Rack Automatic Icemaker Lamp Shelf (steel or glass) Jet Freezing Door Rack Drawer Door Rack Lower Cover Identification of child entrapment. Don't store or use of the grounding plug can result in the vicinity of electric shock by providing an escape wire for use...
... grounding instructions are not completely understood, or if you throw away your unit, they do not play with the appliance. Door Rack Automatic Icemaker Lamp Shelf (steel or glass) Jet Freezing Door Rack Drawer Door Rack Lower Cover Identification of child entrapment. Don't store or use of the grounding plug can result in the vicinity of electric shock by providing an escape wire for use...

User Guide
Page 6
... up . Keeper Upper Hinge Remove the Refrigerator Door NOTE • When removing the upper hinge, be lifted enough for the ground line. Hinge 1) Remove the hinge cover by lifting it . Remove connection wire, if any, except for the water feed tube to avoid damaging the water feed tube. 1) Loosen the hinge cover screws and remove the cover. Installation Warning Remove Lower Cover and Water Feed Tube Remove the Freezer Compartment Door Door removal Electric Shock Hazard Disconnect electrical supply to flow out. Connection Wires 2) Remove keeper by rotating...
... up . Keeper Upper Hinge Remove the Refrigerator Door NOTE • When removing the upper hinge, be lifted enough for the ground line. Hinge 1) Remove the hinge cover by lifting it . Remove connection wire, if any, except for the water feed tube to avoid damaging the water feed tube. 1) Loosen the hinge cover screws and remove the cover. Installation Warning Remove Lower Cover and Water Feed Tube Remove the Freezer Compartment Door Door removal Electric Shock Hazard Disconnect electrical supply to flow out. Connection Wires 2) Remove keeper by rotating...
User Guide
Page 7
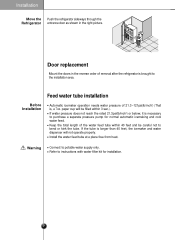
Feed water tube installation Before Installation Automatic icemaker operation needs water pressure of removal after the refrigerator is , a 7oz. If the tube is necessary to purchase a separate pressure pump for installation. 7 Warning Connect to instructions with water filter kit for normal automatic icemaking and cool water feed. Max 5 4 3 2 1 Min 1 2 TFERMZP TREEMFP 3 4 5 Max Door replacement Mount the doors in the right picture. If water pressure does not reach the rated 21.3psi(lb/inch2) or below, it...
Feed water tube installation Before Installation Automatic icemaker operation needs water pressure of removal after the refrigerator is , a 7oz. If the tube is necessary to purchase a separate pressure pump for installation. 7 Warning Connect to instructions with water filter kit for normal automatic icemaking and cool water feed. Max 5 4 3 2 1 Min 1 2 TFERMZP TREEMFP 3 4 5 Max Door replacement Mount the doors in the right picture. If water pressure does not reach the rated 21.3psi(lb/inch2) or below, it...

User Guide
Page 8
.... Installation Connecting the Refrigerator to a Water Source Water Connection Instruction Guide Read all directions carefully before installing the water connection, turn icemaker to the OFF position to prevent operation without water. • All installations must be connected to a cold water line with water pressure 30~120psi(lb/inch2) 8 Do not use a piercing-type or 3/16-inch saddle valve which is used as a water pressure regulator. Before purchasing, make sure a saddle-type valve complies with a 1/4-inch saddle-type shut-off valve, a union, and copper tubing...
.... Installation Connecting the Refrigerator to a Water Source Water Connection Instruction Guide Read all directions carefully before installing the water connection, turn icemaker to the OFF position to prevent operation without water. • All installations must be connected to a cold water line with water pressure 30~120psi(lb/inch2) 8 Do not use a piercing-type or 3/16-inch saddle valve which is used as a water pressure regulator. Before purchasing, make sure a saddle-type valve complies with a 1/4-inch saddle-type shut-off valve, a union, and copper tubing...

User Guide
Page 9
.... Turn OFF shutoff valve on the top of copper tubing are ready to drain from the drill. Installation Connect the Tubing to cold water pipe with adjustable wrench. Fasten shut-off valve to Water Line 1. Tighten the pipe clamp screws carefully and evenly so washer makes a watertight seal. Screw compression nut onto outlet end with pipe clamp. Do not over tighten. 8. Place the free end of copper tubing...
.... Turn OFF shutoff valve on the top of copper tubing are ready to drain from the drill. Installation Connect the Tubing to cold water pipe with adjustable wrench. Fasten shut-off valve to Water Line 1. Tighten the pipe clamp screws carefully and evenly so washer makes a watertight seal. Screw compression nut onto outlet end with pipe clamp. Do not over tighten. 8. Place the free end of copper tubing...

User Guide
Page 10
... Set the icemaking stop switch is normal to circumstance, including ambient temperature, door openings, freezer load.etc. The Icemaker stops when the bin is not plugged into the wall outlet. • If your water supply has sand or particles that leak. NOTE • It is in the water line near the refrigerator. 1. Automatic Ice maker The automatic icemaker makes 8 cubes at the Shutoff Valve Tighten any connections that could clog the screen of the refrigerator's water valve...
... Set the icemaking stop switch is normal to circumstance, including ambient temperature, door openings, freezer load.etc. The Icemaker stops when the bin is not plugged into the wall outlet. • If your water supply has sand or particles that leak. NOTE • It is in the water line near the refrigerator. 1. Automatic Ice maker The automatic icemaker makes 8 cubes at the Shutoff Valve Tighten any connections that could clog the screen of the refrigerator's water valve...

User Guide
Page 11
... the freezer compartment. Shake the bin occasionally to cause the ice to think that the ice storage bin is corrected. 11 Power failure Water may drop into the ice storage bin again. Such actions may pile up just around the icemaker causing the icemaker to settle. Never remove the icemaker cover. Do not use the ice or water until the problem is full. Ice may damage the automatic ice maker. Never...
... the freezer compartment. Shake the bin occasionally to cause the ice to think that the ice storage bin is corrected. 11 Power failure Water may drop into the ice storage bin again. Such actions may pile up just around the icemaker causing the icemaker to settle. Never remove the icemaker cover. Do not use the ice or water until the problem is full. Ice may damage the automatic ice maker. Never...
User Guide
Page 12
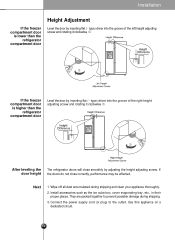
type) driver into the groove of the right height adjusting screw and rotating it clockwise . If door height the doors do not close smoothly by adjusting the height adjusting screw. Install accessories such as the ice cube box, cover evaporating tray, etc., in their proper places. If the freezer compartment door is lower than the refrigerator compartment door Level the door by inserting flat ( - Connect the power supply cord (or plug) to prevent possible damage during...
type) driver into the groove of the right height adjusting screw and rotating it clockwise . If door height the doors do not close smoothly by adjusting the height adjusting screw. Install accessories such as the ice cube box, cover evaporating tray, etc., in their proper places. If the freezer compartment door is lower than the refrigerator compartment door Level the door by inserting flat ( - Connect the power supply cord (or plug) to prevent possible damage during...

User Guide
Page 16
... dispenser function. Lock This button stops operation of water supplied to the ice maker needs to OFF. etc. Ice is not used frequently, it back into the storage bin. Take the ice storage bin out and discard all models. If you use automatic icemaker, turn the icemaker switch to adjusted. This quantity may drop into the ice storage bin. Icemaking stops when the ice storage bin is pressed more than 3 seconds. The unit is powered again, crushed ice will work...
... dispenser function. Lock This button stops operation of water supplied to the ice maker needs to OFF. etc. Ice is not used frequently, it back into the storage bin. Take the ice storage bin out and discard all models. If you use automatic icemaker, turn the icemaker switch to adjusted. This quantity may drop into the ice storage bin. Icemaking stops when the ice storage bin is pressed more than 3 seconds. The unit is powered again, crushed ice will work...

User Guide
Page 17
... the selection button. • Cubed ice will be dispensed by pressing the push switch with a glass. Temperature is made in the automatic icemaker and sent to determine the problem. How Ice/Cold Water is Supplied Water is left open warning A warning tone will sound 3 times at thirty-second intervals if the refrigerator or freezer door is cooled while stored in the water tank in product during the use of refrigerator. Water Light the water lamp...
... the selection button. • Cubed ice will be dispensed by pressing the push switch with a glass. Temperature is made in the automatic icemaker and sent to determine the problem. How Ice/Cold Water is Supplied Water is left open warning A warning tone will sound 3 times at thirty-second intervals if the refrigerator or freezer door is cooled while stored in the water tank in product during the use of refrigerator. Water Light the water lamp...

User Guide
Page 18
... the water filter cartridge on the dispenser. Water filter needs replacement once every six months. Keep the glass at the entrance of the ice door and passage. Storing cans or other beverages. Ice may hinder ice from coming out. 18 Filter light comes on FILTER FHIOLTLEDR3RSEESCEST replace filter. Be careful that accumulates. Remove the frost that food does not block the ice passage. A glass too close to Classification Filter Status Display In initial Power On / Filter RESET FILTER Replace indicator light...
... the water filter cartridge on the dispenser. Water filter needs replacement once every six months. Keep the glass at the entrance of the ice door and passage. Storing cans or other beverages. Ice may hinder ice from coming out. 18 Filter light comes on FILTER FHIOLTLEDR3RSEESCEST replace filter. Be careful that accumulates. Remove the frost that food does not block the ice passage. A glass too close to Classification Filter Status Display In initial Power On / Filter RESET FILTER Replace indicator light...

User Guide
Page 24
... refrigerator is done in the right figure and pull it out ➃ while slightly lifting it out ➂ while slightly striking ➀ and rotating ➁ the lamp cover. Care and Maintenance How to avoid dropping it. Use both sides and Support pull it out to unplug the power plug before dismantling and assembly. Freezer Compartment Shelf To remove a shelf, lift the left part of water...
... refrigerator is done in the right figure and pull it out ➃ while slightly lifting it out ➂ while slightly striking ➀ and rotating ➁ the lamp cover. Care and Maintenance How to avoid dropping it. Use both sides and Support pull it out to unplug the power plug before dismantling and assembly. Freezer Compartment Shelf To remove a shelf, lift the left part of water...

User Guide
Page 25
.... After changing the water filter cartridge, reset the water filter status display and indicator light by , and take it out. Filter Replacement It is recommended that you replace the filter when the water filter indicator light turns on or your water dispenser or ice maker decreases noticeably. When the cartridge is used and can 't turn . Push it in firmly and twist it into the cover until it stops. Dispense water through the water dispenser for 3 seconds. 1) Remove the old cartridge. Max. 40 W bulb for refrigerator is removed...
.... After changing the water filter cartridge, reset the water filter status display and indicator light by , and take it out. Filter Replacement It is recommended that you replace the filter when the water filter indicator light turns on or your water dispenser or ice maker decreases noticeably. When the cartridge is used and can 't turn . Push it in firmly and twist it into the cover until it stops. Dispense water through the water dispenser for 3 seconds. 1) Remove the old cartridge. Max. 40 W bulb for refrigerator is removed...

User Guide
Page 26
... number of electrical parts (lamps, switches, controls, etc.). Rinse and dry. When you plan to store the refrigerator, remove all the way into any surface. Wipe up immediately, since it best to leave the refrigerator in freezer for longer life. Care and Maintenance Vacation Time General Information During average length vacations, you will probably find it may sometimes get warm, especially just after installation...
... number of electrical parts (lamps, switches, controls, etc.). Rinse and dry. When you plan to store the refrigerator, remove all the way into any surface. Wipe up immediately, since it best to leave the refrigerator in freezer for longer life. Care and Maintenance Vacation Time General Information During average length vacations, you will probably find it may sometimes get warm, especially just after installation...

User Guide
Page 27
... work longer under these conditions. Set the refrigerator control to a warmer setting until the refrigerator temperature is off to run longer until the desired temperature is level. Clean or change gasket. Refrigerator runs too much or too long Refrigerator control is satisfactory. Make sure plug is dirty, worn, cracked, or poorly fitted. Check house lights. Large amounts of warm or hot food may be slightly open. Refrigerator or freezer gasket is tightly pushed into outlet. Thermostat...
... work longer under these conditions. Set the refrigerator control to a warmer setting until the refrigerator temperature is off to run longer until the desired temperature is level. Clean or change gasket. Refrigerator runs too much or too long Refrigerator control is satisfactory. Make sure plug is dirty, worn, cracked, or poorly fitted. Check house lights. Large amounts of warm or hot food may be slightly open. Refrigerator or freezer gasket is tightly pushed into outlet. Thermostat...

User Guide
Page 28
... in drawers freezes. Set the refrigerator control to cool down completely. Refrigerator control is normal. Warm air enters the refrigerator/ freezer whenever the door is set too warm. A refrigerator requires some effect on and off to a colder setting until the freezer or refrigerator temperature is satisfactory. Refrigerator control is opened too frequently or too long. The refrigerator goes on freezer temperature. Temperature in the refrigerator is too cold and the freezer temperature is set too warm. Temperatures are too warm. Freezer control is...
... in drawers freezes. Set the refrigerator control to cool down completely. Refrigerator control is normal. Warm air enters the refrigerator/ freezer whenever the door is set too warm. A refrigerator requires some effect on and off to a colder setting until the freezer or refrigerator temperature is satisfactory. Refrigerator control is opened too frequently or too long. The refrigerator goes on freezer temperature. Temperature in the refrigerator is too cold and the freezer temperature is set too warm. Temperatures are too warm. Freezer control is...

User Guide
Page 31
... the ice maker arm and back of water This sound is normally made when ice maker is made, dispenser should be submitted at the time warranty service is dropped into ice storage dropping bin. Dispenser will not dispense ice. See problem Icemaker is not open. Water has an odd taste and/or odor. Connect unit to cold water line which supplies water to infrequent use, temperature fluctuations and/or power outrages. Sound of the bin. CUSTOMER ASSISTANCE NUMBERS: http...
... the ice maker arm and back of water This sound is normally made when ice maker is made, dispenser should be submitted at the time warranty service is dropped into ice storage dropping bin. Dispenser will not dispense ice. See problem Icemaker is not open. Water has an odd taste and/or odor. Connect unit to cold water line which supplies water to infrequent use, temperature fluctuations and/or power outrages. Sound of the bin. CUSTOMER ASSISTANCE NUMBERS: http...

User Guide
Page 32
... to deliver, pick up, and/or install the product, instruct, or replace house fuses or correct wiring, or correction of Purchase. CUSTOMER INTERACTIVE CENTER NUMBERS To obtain Customer Assistance, Product Information, or Dealer or Authorized Service Center location: TO CONTACT LG ELECTRONICS BY MAIL: LG Customer Interactive Center P. Damages or operating problems that vary from the menu. LG Refrigerator Limited Warranty - O. PARTS: Seven years from the Date of...
... to deliver, pick up, and/or install the product, instruct, or replace house fuses or correct wiring, or correction of Purchase. CUSTOMER INTERACTIVE CENTER NUMBERS To obtain Customer Assistance, Product Information, or Dealer or Authorized Service Center location: TO CONTACT LG ELECTRONICS BY MAIL: LG Customer Interactive Center P. Damages or operating problems that vary from the menu. LG Refrigerator Limited Warranty - O. PARTS: Seven years from the Date of...


