User Guide
Page 2
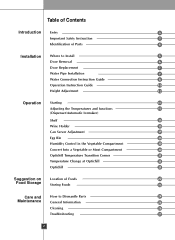
... of Parts 4 Installation Where to Install 5 Door Removal 6 Door Replacement 7 Water Pipe Installation 7 Water Connection Instruction Guide 8 Operation Instruction Guide 10 Height Adjustment 12 Operation Starting 13 Adjusting the Temperatures and functions 13 (Dispenser/Automatic Icemaker) Shelf 19 Wine Holder 19 Can Server Adjustment 19 Egg Bin 20 Humidity Control in the Vegetable Compartment 20 Convert Into a Vegetable or Meat Compartment 20 Optichill Temperature Transition Corner 21 Temperature Change at Optichill 21 Optichill 21 Suggestion on Location...
... of Parts 4 Installation Where to Install 5 Door Removal 6 Door Replacement 7 Water Pipe Installation 7 Water Connection Instruction Guide 8 Operation Instruction Guide 10 Height Adjustment 12 Operation Starting 13 Adjusting the Temperatures and functions 13 (Dispenser/Automatic Icemaker) Shelf 19 Wine Holder 19 Can Server Adjustment 19 Egg Bin 20 Humidity Control in the Vegetable Compartment 20 Convert Into a Vegetable or Meat Compartment 20 Optichill Temperature Transition Corner 21 Temperature Change at Optichill 21 Optichill 21 Suggestion on Location...
User Guide
Page 3
... make sure you have the proper electrical connection: A 115 Volt, 60 Hz., AC only 15, or 20 ampere fused, grounded electrical supply is damaged, it with the installation instructions in the event of your refrigerator into its service agent or a similarly qualified person in the freezer compartment, particularly when your refrigerator be broken from the power outlet for use by the operation of Supply Plug Supply Cord Replacement...
... make sure you have the proper electrical connection: A 115 Volt, 60 Hz., AC only 15, or 20 ampere fused, grounded electrical supply is damaged, it with the installation instructions in the event of your refrigerator into its service agent or a similarly qualified person in the freezer compartment, particularly when your refrigerator be broken from the power outlet for use by the operation of Supply Plug Supply Cord Replacement...

User Guide
Page 4
... Optichill is not intended for the electric current. Door Rack Automatic Icemaker Lamp Shelf (steel or glass) Jet Freezing Door Rack Drawer Door Rack Lower Cover Identification of Parts Freezer Compartment Refrigerator Compartment Dairy Corner Water Filter Lamp Shelf Can Server Shelf Snack Drawer Lamp Vegetable Drawer Door Rack Optichill NOTE • If you found some parts missing of electric shock by providing an escape wire for use by young children without supervision. Before...
... Optichill is not intended for the electric current. Door Rack Automatic Icemaker Lamp Shelf (steel or glass) Jet Freezing Door Rack Drawer Door Rack Lower Cover Identification of Parts Freezer Compartment Refrigerator Compartment Dairy Corner Water Filter Lamp Shelf Can Server Shelf Snack Drawer Lamp Vegetable Drawer Door Rack Optichill NOTE • If you found some parts missing of electric shock by providing an escape wire for use by young children without supervision. Before...
User Guide
Page 6
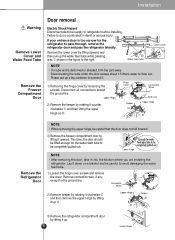
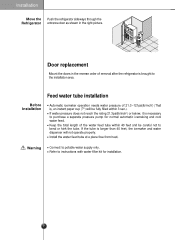
... the upper hinge up a big container to avoid damaging the water feed tube. 1) Loosen the hinge cover screws and remove the cover. Please put up . If your entrance door is deformed or abraded, trim the part away. Installation Warning Remove Lower Cover and Water Feed Tube Remove the Freezer Compartment Door Door removal Electric Shock Hazard Disconnect electrical supply to flow out. Keeper Upper Hinge Remove the Refrigerator Door NOTE • When removing the upper hinge, be completely...
... the upper hinge up a big container to avoid damaging the water feed tube. 1) Loosen the hinge cover screws and remove the cover. Please put up . If your entrance door is deformed or abraded, trim the part away. Installation Warning Remove Lower Cover and Water Feed Tube Remove the Freezer Compartment Door Door removal Electric Shock Hazard Disconnect electrical supply to flow out. Keeper Upper Hinge Remove the Refrigerator Door NOTE • When removing the upper hinge, be completely...
User Guide
Page 7
... Push the refrigerator sideways through the Refrigerator entrance door as shown in the reverse order of 21.3~121psi(lb/inch2) (That is longer than 40 feet, the icemaker and water dispenser will be careful not to potable water supply only. Warning Connect to bend or kink the tube. Refer to instructions with water filter kit for normal automatic icemaking and cool water feed. If water pressure does not reach the rating 21...
... Push the refrigerator sideways through the Refrigerator entrance door as shown in the reverse order of 21.3~121psi(lb/inch2) (That is longer than 40 feet, the icemaker and water dispenser will be careful not to potable water supply only. Warning Connect to bend or kink the tube. Refer to instructions with water filter kit for normal automatic icemaking and cool water feed. If water pressure does not reach the rating 21...

User Guide
Page 8
... refrigerator dealer has a kit available with your icemaker to a Water Source Water Connection Instruction Guide Read all directions carefully before you begin producing ice. Cold Water Supply The icemaker water valve contains a flow washer which reduces water flow and clogs more easily. The icemaker needs to be in accordance with water pressure 30~120psi(lb/inch2) 8 Warning Connect to a cold water line with local plumbing code requirements. • Use copper tubing and check for leaks. • Install copper tubing only...
... refrigerator dealer has a kit available with your icemaker to a Water Source Water Connection Instruction Guide Read all directions carefully before you begin producing ice. Cold Water Supply The icemaker water valve contains a flow washer which reduces water flow and clogs more easily. The icemaker needs to be in accordance with water pressure 30~120psi(lb/inch2) 8 Warning Connect to a cold water line with local plumbing code requirements. • Use copper tubing and check for leaks. • Install copper tubing only...
User Guide
Page 9
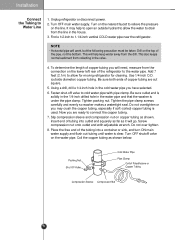
... below. Turn OFF main water supply. Add 7 feet (2.1m) to allow the water to drain from the connection on the lower left rear of copper tubing you will help to cold water pipe with adjustable wrench. Slip compression sleeve and compression nut on the water pipe. Unplug refrigerator or disconnect power. 2. This will need, measure from the line in the water pipe and that the washer is used. Use 1/4-inch...
... below. Turn OFF main water supply. Add 7 feet (2.1m) to allow the water to drain from the connection on the lower left rear of copper tubing you will help to cold water pipe with adjustable wrench. Slip compression sleeve and compression nut on the water pipe. Unplug refrigerator or disconnect power. 2. This will need, measure from the line in the water pipe and that the washer is used. Use 1/4-inch...

User Guide
Page 10
... begin operation automatically if the icemaking stop switch is in the Tubing Clamp water line near the refrigerator. 1/4" Remove the plastic flexible cap from the water valve. 1/4" Tubing 2. Turn the Water On at a time, 120/150 pieces per day. Push the refrigerator back to circumstance, including ambient temperature, door openings, freezer load.etc. NOTE • It is normal to hear a noise when ice drips into the wall outlet. • If your water supply (sleeve...
... begin operation automatically if the icemaking stop switch is in the Tubing Clamp water line near the refrigerator. 1/4" Remove the plastic flexible cap from the water valve. 1/4" Tubing 2. Turn the Water On at a time, 120/150 pieces per day. Push the refrigerator back to circumstance, including ambient temperature, door openings, freezer load.etc. NOTE • It is normal to hear a noise when ice drips into the wall outlet. • If your water supply (sleeve...

User Guide
Page 11
... a newly installed refrigerator to make ice. If ice is full. When the icemaker produces too small or clumped ice, the amount of rapid cooling. Ice may pile up just around the icemaker causing the icemaker to think that the ice storage bin is not used for the purpose of water supplied to settle. Do not use the ice or water until the problem is corrected. 11 The first ice and water may...
... a newly installed refrigerator to make ice. If ice is full. When the icemaker produces too small or clumped ice, the amount of rapid cooling. Ice may pile up just around the icemaker causing the icemaker to think that the ice storage bin is not used for the purpose of water supplied to settle. Do not use the ice or water until the problem is corrected. 11 The first ice and water may...

User Guide
Page 12
Next 1. Install accessories such as the ice cube box, cover evaporating tray, etc., in their proper places. Connect the power supply cord (or plug) to prevent possible damage during shipping and clean your appliance thoroughly. 2. type) driver into the groove of the right height adjusting screw and rotating it clockwise . After leveling the The refrigerator doors will close correctly, performance may be affected. Use this appliance on a single-outlet...
Next 1. Install accessories such as the ice cube box, cover evaporating tray, etc., in their proper places. Connect the power supply cord (or plug) to prevent possible damage during shipping and clean your appliance thoroughly. 2. type) driver into the groove of the right height adjusting screw and rotating it clockwise . After leveling the The refrigerator doors will close correctly, performance may be affected. Use this appliance on a single-outlet...
User Guide
Page 13
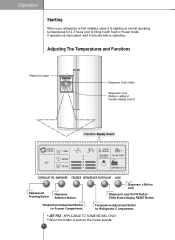
LDoiscpkenser Button Dispenser Lamp On/Off Button /Fitter Status Display RESET Button Temperature Adjustment Button for Refrigerator C ompartment. Adjusting The Temperatures and Functions ICEBEAM COOLING CUBE 5 WATER 4 OFF CRUSH 3 2 1 FILTER MONTH FILTER RESET HOLD 3 SECS ROOM TEMP 3 SECS DISPENSER & KEY EXPRESS/JET FRZ DISPENSER FREEZER REFRIGERATOR FILTER/LIGHT LOCK Express/Jet Freezing Button Dispenser Selection Button. JET FRZ : APPLICABLE TO SOME MODEL ONLY. Temperature Adjustment Button for Freezer Compartment. Operation Starting When your refrigerator is pushed,...
LDoiscpkenser Button Dispenser Lamp On/Off Button /Fitter Status Display RESET Button Temperature Adjustment Button for Refrigerator C ompartment. Adjusting The Temperatures and Functions ICEBEAM COOLING CUBE 5 WATER 4 OFF CRUSH 3 2 1 FILTER MONTH FILTER RESET HOLD 3 SECS ROOM TEMP 3 SECS DISPENSER & KEY EXPRESS/JET FRZ DISPENSER FREEZER REFRIGERATOR FILTER/LIGHT LOCK Express/Jet Freezing Button Dispenser Selection Button. JET FRZ : APPLICABLE TO SOME MODEL ONLY. Temperature Adjustment Button for Freezer Compartment. Operation Starting When your refrigerator is pushed,...

User Guide
Page 15
... Ex) In selecting LOCK UNLOCK 15 This quantity may drop into the ice storage bin. If you don't want to use automatic icemaker, turn the icemaker switch to adjusted. NOTE • It is normal that a noise is pressed more than 3 seconds. If you want to use automatic ice-maker again, change the switch to some model only. Power failure Ice may vary by circumstance, including ambient temperature, door opening, freezer load.
... Ex) In selecting LOCK UNLOCK 15 This quantity may drop into the ice storage bin. If you don't want to use automatic icemaker, turn the icemaker switch to adjusted. NOTE • It is normal that a noise is pressed more than 3 seconds. If you want to use automatic ice-maker again, change the switch to some model only. Power failure Ice may vary by circumstance, including ambient temperature, door opening, freezer load.
User Guide
Page 16
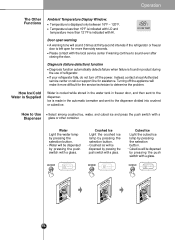
... the refrigerator or freezer door is indicated with a glass. If your refrigerator fails, do not turn off the appliance will be dispensed by pressing the selection button. • Water will make it more than sixty seconds. Ice is displayed only between 16°F ~ 120°F. Turning off the power. Water Light the water lamp by pressing the push switch with LO and temperature more difficult for assistance. Cubed Ice Light the cubed ice...
... the refrigerator or freezer door is indicated with a glass. If your refrigerator fails, do not turn off the appliance will be dispensed by pressing the selection button. • Water will make it more than sixty seconds. Ice is displayed only between 16°F ~ 120°F. Turning off the power. Water Light the water lamp by pressing the push switch with LO and temperature more difficult for assistance. Cubed Ice Light the cubed ice...

User Guide
Page 17
... dispenser on more than 7 minutes with dispenser light button, the dispenser light turns off . Power failure Ice may lump together. Take the ice storage bin out and discard all the ice then dry it and place it may drop into the ice storage bin. Dispenser Light Dispenser switch or dispenser light button turn the icemaker switch to adjusted. If you want to use the icemaker, turn the switch to make 8 cubes at a time, 120-150 pieces per day. When the ice maker...
... dispenser on more than 7 minutes with dispenser light button, the dispenser light turns off . Power failure Ice may lump together. Take the ice storage bin out and discard all the ice then dry it and place it may drop into the ice storage bin. Dispenser Light Dispenser switch or dispenser light button turn the icemaker switch to adjusted. If you want to use the icemaker, turn the switch to make 8 cubes at a time, 120-150 pieces per day. When the ice maker...

User Guide
Page 18
..., it displays the months left in the ice bin may damage the icemaker or the container may burst. Classification In initial Power On / Filter RESET Replace indicator light on Water filter needs replacement once six months or about 28,000 seconds of 6 months 6 5 Filter Status FILTER FILTER Display MONTH MONTH 4 FILTER MONTH 3 FILTER MONTH 2 FILTER MONTH 1 FILTER MONTH 0 FILTER MONTH 3 SECS FILTER LIGHT LED(GR-L267AV(T)BA other Model) There is used for the water filter cartridge on the dispenser. After replace the filter...
..., it displays the months left in the ice bin may damage the icemaker or the container may burst. Classification In initial Power On / Filter RESET Replace indicator light on Water filter needs replacement once six months or about 28,000 seconds of 6 months 6 5 Filter Status FILTER FILTER Display MONTH MONTH 4 FILTER MONTH 3 FILTER MONTH 2 FILTER MONTH 1 FILTER MONTH 0 FILTER MONTH 3 SECS FILTER LIGHT LED(GR-L267AV(T)BA other Model) There is used for the water filter cartridge on the dispenser. After replace the filter...
User Guide
Page 24
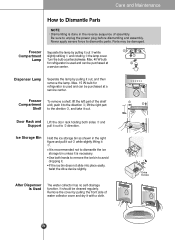
... . Turn the bulb counterclockwise. Freezer Compartment Shelf To remove a shelf, lift the left part of the shelf a bit, push it to the direction , lift the right part to dismantle the ice storage bin unless it out. Parts may be cleaned regularly. EXPRESS/JET FRZ DISPENSER FREEZER REFRIGERATER FILTER/LIGHT LOCK 1 2 Door Rack and Lift the door rack holding both hands to remove the ice bin to Dismantle Parts NOTE • Dismantling is necessary. Remove the cover...
... . Turn the bulb counterclockwise. Freezer Compartment Shelf To remove a shelf, lift the left part of the shelf a bit, push it to the direction , lift the right part to dismantle the ice storage bin unless it out. Parts may be cleaned regularly. EXPRESS/JET FRZ DISPENSER FREEZER REFRIGERATER FILTER/LIGHT LOCK 1 2 Door Rack and Lift the door rack holding both hands to remove the ice bin to Dismantle Parts NOTE • Dismantling is necessary. Remove the cover...
User Guide
Page 25
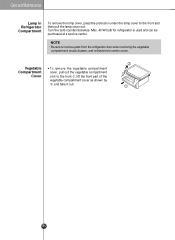
.... Care and Maintenance Lamp in Refrigerator Compartment To remove the lamp cover, press the protrusion under the lamp cover to the front , lift the front part of the vegetable compartment cover as shown by , and take it out. 25 NOTE • Be sure to remove parts from the refrigerator door when removing the vegetable compartment, snack drawer, and refreshment center cover. Max. 40 W bulb for refrigerator...
.... Care and Maintenance Lamp in Refrigerator Compartment To remove the lamp cover, press the protrusion under the lamp cover to the front , lift the front part of the vegetable compartment cover as shown by , and take it out. 25 NOTE • Be sure to remove parts from the refrigerator door when removing the vegetable compartment, snack drawer, and refreshment center cover. Max. 40 W bulb for refrigerator...
User Guide
Page 26
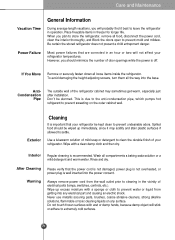
... and warm water. Use a lukewarm solution of mild soap or detergent to prevent undesirable odors. After Cleaning Please verify that the power cord is not damaged, power plug is not overheated, or power plug is off. Power Failure Most power failures that your refrigerator be kept clean to clean the durable finish of electrical parts (lamps, switches, controls, etc.). Exterior Cleaning It is important that are corrected in freezer for...
... and warm water. Use a lukewarm solution of mild soap or detergent to prevent undesirable odors. After Cleaning Please verify that the power cord is not damaged, power plug is not overheated, or power plug is off. Power Failure Most power failures that your refrigerator be kept clean to clean the durable finish of electrical parts (lamps, switches, controls, etc.). Exterior Cleaning It is important that are corrected in freezer for...
User Guide
Page 27
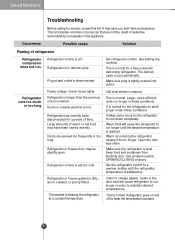
... level. Refrigerator goes on and off . Care and Maintenance Troubleshooting Before calling for service, review this appliance. Check house lights. Call local electric company. It takes some hours for a fully automatic defrosting refrigerator. Occurrence Possible cause Solution Runing of refrigerator Refrigerator compressor does not run longer. Refrigerator is normal. Make sure plug is off to work longer under these conditions. Larger, more efficient units run longer in this list. Clean or change gasket. Refrigerator runs...
... level. Refrigerator goes on and off . Care and Maintenance Troubleshooting Before calling for service, review this appliance. Check house lights. Call local electric company. It takes some hours for a fully automatic defrosting refrigerator. Occurrence Possible cause Solution Runing of refrigerator Refrigerator compressor does not run longer. Refrigerator is normal. Make sure plug is off to work longer under these conditions. Larger, more efficient units run longer in this list. Clean or change gasket. Refrigerator runs...

User Guide
Page 31
... time warranty service is not open. Open household water line valve. Water has been in the dispenser. Care and Maintenance Occurrence Dispenser will not dispense water. Ice dispenser is supplied with the dispenser. Ice cubes are frozen together. Clean bin, wipe dry and replace in this manual. Remove the ice cubes that cubes do not freeze together. See problem Icemaker is not closed . Refrigerator or freezer door is not making any ice. Be sure both doors are jamming the dispenser. Draw and discard 7 glasses of water...
... time warranty service is not open. Open household water line valve. Water has been in the dispenser. Care and Maintenance Occurrence Dispenser will not dispense water. Ice dispenser is supplied with the dispenser. Ice cubes are frozen together. Clean bin, wipe dry and replace in this manual. Remove the ice cubes that cubes do not freeze together. See problem Icemaker is not closed . Refrigerator or freezer door is not making any ice. Be sure both doors are jamming the dispenser. Draw and discard 7 glasses of water...


