
User Guide
Page 1
website:http'J/www.lgservice.com LRSC 26915SW LRSC 26912SW LRSC 26925SW LRSC 26923SW LRSC 26940SW LRSC 26940TT LRSC 26941SW RSC 26941 ST LRSC 26915TT LRSC 26912TT LRSC 26925TT LRSC 26923TT LRSC 26940SB LRSC 26940ST LRSC 26941SB RATOR
website:http'J/www.lgservice.com LRSC 26915SW LRSC 26912SW LRSC 26925SW LRSC 26923SW LRSC 26940SW LRSC 26940TT LRSC 26941SW RSC 26941 ST LRSC 26915TT LRSC 26912TT LRSC 26925TT LRSC 26923TT LRSC 26940SB LRSC 26940ST LRSC 26941SB RATOR

User Guide
Page 2
Table of Contents Introduction Entry Important Safety Instruction Identification of Parts Installation Where to Locate Door Removal Door Replacement Water Pipe Installation Water Connection Instruction Guide Operation Instruction Guide Height Adjustment Operation Starting Adjusting the Temperatures and functions (Dispenser/Automatic Icemaker) Shelf Wine Holder (Applicable to some models only) Egg Bin (Applicable to some models only) Humidity Control in the Vegetable Compartment Optichill Temperature Transition Corner Temperature Change at Optichill Optichill Suggestion on Food Storage ...
Table of Contents Introduction Entry Important Safety Instruction Identification of Parts Installation Where to Locate Door Removal Door Replacement Water Pipe Installation Water Connection Instruction Guide Operation Instruction Guide Height Adjustment Operation Starting Adjusting the Temperatures and functions (Dispenser/Automatic Icemaker) Shelf Wine Holder (Applicable to some models only) Egg Bin (Applicable to some models only) Humidity Control in the Vegetable Compartment Optichill Temperature Transition Corner Temperature Change at Optichill Optichill Suggestion on Food Storage ...
User Guide
Page 3
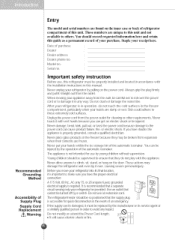
Date of purchase Dealer Dealer address Dealer phone no . Serial no . Never damage, bend, kink, pull out, or twist the power cord because damage to the power cord can get an electric shock or be injured by pulling on the power cord. You can be injured. The appliance is recommendedthat a separate circuitservingonly your purchase. Beforeyou move your appliance away Fromthe wall, be careful not to roll over , causing severe personal injury. Never unplug your hands are damp or wet. Always grip the plug firmly and pull it in operation, do not playwith the appliance. Never touch it...
Date of purchase Dealer Dealer address Dealer phone no . Serial no . Never damage, bend, kink, pull out, or twist the power cord because damage to the power cord can get an electric shock or be injured by pulling on the power cord. You can be injured. The appliance is recommendedthat a separate circuitservingonly your purchase. Beforeyou move your appliance away Fromthe wall, be careful not to roll over , causing severe personal injury. Never unplug your hands are damp or wet. Always grip the plug firmly and pull it in operation, do not playwith the appliance. Never touch it...
User Guide
Page 4
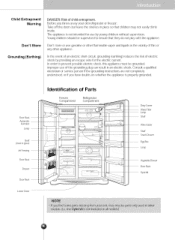
Child Entrapment Warning Don't Store Grounding (Earthing) DANGER: Risk of the grounding plug can result in an electric shock. Before you have doubts on whether the appliance is not intended for the electric current. Young children should be grounded. improper use of child entrapment. Identification of electric shock by providing an escape wire for use gasoline or other appliance. Snack Drawer E...g..g..B..o..x....... --- In the event of an electric short circuit, grounding (earthing)reduces the risk of Parts Freezer Compartment Refrigerator Compartment Door ...
Child Entrapment Warning Don't Store Grounding (Earthing) DANGER: Risk of the grounding plug can result in an electric shock. Before you have doubts on whether the appliance is not intended for the electric current. Young children should be grounded. improper use of child entrapment. Identification of electric shock by providing an escape wire for use gasoline or other appliance. Snack Drawer E...g..g..B..o..x....... --- In the event of an electric short circuit, grounding (earthing)reduces the risk of Parts Freezer Compartment Refrigerator Compartment Door ...
User Guide
Page 5
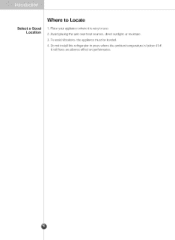
Do not install this refrigerator in areas where the ambient temperature is easy to Locate 1. To avoid vibrations, the appliance must be leveled. 4. Avoid placing the unit near heat sources, direct sunlight, or moisture. 3. It will have an adverse effect on performance. Place your appliance where it is below 414:. Select a Good Location Where to use. 2.
Do not install this refrigerator in areas where the ambient temperature is easy to Locate 1. To avoid vibrations, the appliance must be leveled. 4. Avoid placing the unit near heat sources, direct sunlight, or moisture. 3. It will have an adverse effect on performance. Place your appliance where it is below 414:. Select a Good Location Where to use. 2.

User Guide
Page 6
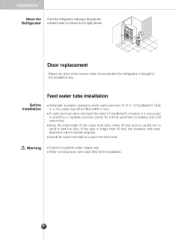
Failureto do so could result in the figureto the right, Water Feed Tube Remove the Freezer Compartment Door . . 1) Remove the hinge cover by loosening the )£ \ HCionvgeer /_) ........I < \_ Connection Wires _// Earth Line 2) Removethe keeper by rotating it counter clockwise @and then liking the upper hinge up . Upper Hinge _.._[ Keeper 3) Removethe refrigeratorcompartment door by liking it up @. -__._/KeeperF UppeHr inge _-...C>-_'_ 3) Removethe freezer compartmentdoor by lifting it upward,This time, the door should be liked enough for the water feed tube to be ...
Failureto do so could result in the figureto the right, Water Feed Tube Remove the Freezer Compartment Door . . 1) Remove the hinge cover by loosening the )£ \ HCionvgeer /_) ........I < \_ Connection Wires _// Earth Line 2) Removethe keeper by rotating it counter clockwise @and then liking the upper hinge up . Upper Hinge _.._[ Keeper 3) Removethe refrigeratorcompartment door by liking it up @. -__._/KeeperF UppeHr inge _-...C>-_'_ 3) Removethe freezer compartmentdoor by lifting it upward,This time, the door should be liked enough for the water feed tube to be ...
User Guide
Page 7
If the tube is brought to the installation area. Warning • Connect to potable water supply only. • Refer to instructions with water filter kit for normal automatic icemaking and cool water feed. • Keep the total length of 21.3-1 21psi(Ib/inch2) (That is, a 7oz. paper cup will not operate properly. • Install the water feed tube at a place free from heat. Before Installation Feed water tube installation • Automatic icemaker operation needs water pressure of the water feed tube within 40 feet and be filled within 3 sec.). • If water pressure ...
If the tube is brought to the installation area. Warning • Connect to potable water supply only. • Refer to instructions with water filter kit for normal automatic icemaking and cool water feed. • Keep the total length of 21.3-1 21psi(Ib/inch2) (That is, a 7oz. paper cup will not operate properly. • Install the water feed tube at a place free from heat. Before Installation Feed water tube installation • Automatic icemaker operation needs water pressure of the water feed tube within 40 feet and be filled within 3 sec.). • If water pressure ...
User Guide
Page 8
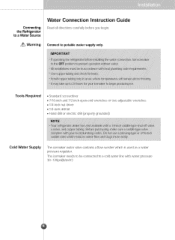
Connecting the Refrigerator to a cold water line with water pressure 30o-120psi(Ib/inch2) Tools Required • Standard screwdriver • 7/16-inch and 1/2-inch open-end wrenches or two adjustable wrenches • 1/4-inch nut driver • 1/4-inch drill bit • Hand drill or electric drill (properly grounded) Cold Water Supply The icemaker water valve contains a flow washer which is used as a water pressure regulator. The icemaker needs to be connected to a Water Source Water Connection Instruction Guide Read all directions carefully before you begin. Warning Connect ...
Connecting the Refrigerator to a cold water line with water pressure 30o-120psi(Ib/inch2) Tools Required • Standard screwdriver • 7/16-inch and 1/2-inch open-end wrenches or two adjustable wrenches • 1/4-inch nut driver • 1/4-inch drill bit • Hand drill or electric drill (properly grounded) Cold Water Supply The icemaker water valve contains a flow washer which is used as a water pressure regulator. The icemaker needs to be connected to a Water Source Water Connection Instruction Guide Read all directions carefully before you begin. Warning Connect ...
User Guide
Page 9
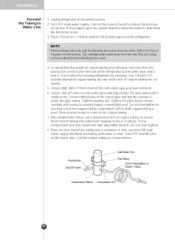
It may crush the copper tubing, especially if soft (coiled) copper tubing is used. Add 7 feet (2.1m) to 1-1/4-inch vertical COLD water pipe near the refrigerator. 4. Using a drill, drill a 1/4dnch hole in the cold water pipe you may help to open an outside diameter) copper tubing. Insert end of tubing into a container or sink, and turn ON main water supply and flush out tubing until water is under the pipe clamp. Place the free end of the tubing into outlet end squarely as far as shown below. _jjl Packing Nut\ __/j_ \ _ ih I Cold Water Pipe Pipe Clamp Coil of ...
It may crush the copper tubing, especially if soft (coiled) copper tubing is used. Add 7 feet (2.1m) to 1-1/4-inch vertical COLD water pipe near the refrigerator. 4. Using a drill, drill a 1/4dnch hole in the cold water pipe you may help to open an outside diameter) copper tubing. Insert end of tubing into a container or sink, and turn ON main water supply and flush out tubing until water is under the pipe clamp. Place the free end of the tubing into outlet end squarely as far as shown below. _jjl Packing Nut\ __/j_ \ _ ih I Cold Water Pipe Pipe Clamp Coil of ...
User Guide
Page 10
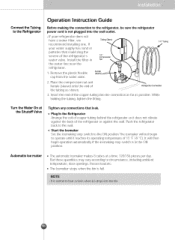
Ferrule 1. While holding the tubing, tighten the fitting. Automatic Ice maker • The automatic icemaker makes 8 cubes at the Shutoff Valve Tighten any connections that could clog the screen of the refrigerator or against the wall. Remove the plastic flexible cap from the water valve. 1/4"Tubing 2. Insert the end of the copper tubing into the wall outlet. • If your water supply has sand or particles that leak. • Plug In the Refrigerator Arrange the coil of copper tubing behind the refrigerator so it reaches its operating temperature of the tubing as ...
Ferrule 1. While holding the tubing, tighten the fitting. Automatic Ice maker • The automatic icemaker makes 8 cubes at the Shutoff Valve Tighten any connections that could clog the screen of the refrigerator or against the wall. Remove the plastic flexible cap from the water valve. 1/4"Tubing 2. Insert the end of the copper tubing into the wall outlet. • If your water supply has sand or particles that leak. • Plug In the Refrigerator Arrange the coil of copper tubing behind the refrigerator so it reaches its operating temperature of the tubing as ...
User Guide
Page 11
Never remove the icemaker cover. Take the ice storage bin out and discard all the ice. Ice may damage the automatic ice maker. CAUTION Throw away the ice. Such actions may pile upjust around the icemaker causing the icemaker to the ice maker must be adjusted. Shake the bin occasionally to cause the ice to make ice. If discolored ice is clumped together, take the ice clumps out of rapid cooling. This is newly installed • It takes about 12 hours for a long time. Power failure • Water may include particles or odor from the reed water pipe or reed water...
Never remove the icemaker cover. Take the ice storage bin out and discard all the ice. Ice may damage the automatic ice maker. CAUTION Throw away the ice. Such actions may pile upjust around the icemaker causing the icemaker to the ice maker must be adjusted. Shake the bin occasionally to cause the ice to make ice. If discolored ice is clumped together, take the ice clumps out of rapid cooling. This is newly installed • It takes about 12 hours for a long time. Power failure • Water may include particles or odor from the reed water pipe or reed water...
User Guide
Page 12
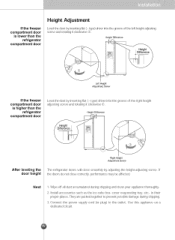
If the doors do not close smoothly by adjusting the height adjusting screw. Wipe off all dust accumulated during shipping. 3. Connect the power supply cord (or plug) to prevent possible damage during shipping and clean your appliance thoroughly. 2. type) driver into the groove of the right height adjusting screw and rotating it clockwise O. Height Difference Right Height Adjustment Screw After leveling the door height The refrigerator doors will close correctly, performance may be affected. Left Height Adjustment Screw If the freezer compartment door is lower than ...
If the doors do not close smoothly by adjusting the height adjusting screw. Wipe off all dust accumulated during shipping. 3. Connect the power supply cord (or plug) to prevent possible damage during shipping and clean your appliance thoroughly. 2. type) driver into the groove of the right height adjusting screw and rotating it clockwise O. Height Difference Right Height Adjustment Screw After leveling the door height The refrigerator doors will close correctly, performance may be affected. Left Height Adjustment Screw If the freezer compartment door is lower than ...
User Guide
Page 13
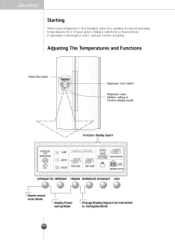
AdJusting The Temperatures and Functions Water/Ice Output Dispenser Push Switch Dispenser Lamp _Bottom ceiling of functlbn dlsplay board) Functiondisplayboard EXPRESS/FJREZTDISPENSER FREEZEREFRIGERFAITLOTERR/LIGHLTOOK I Buzzersound mute Mode I DisplayPower savingMode ChangeDisplayDegreefrom Fahrenheit to filling it with fresh or frozen foods. Starting When your refrigerator is interrupted, wait 5 minutes before restarting. If operation is first installed, allow it to stabilize at normal operating temperatures for 2-3 hours prior to CentigradeMode
AdJusting The Temperatures and Functions Water/Ice Output Dispenser Push Switch Dispenser Lamp _Bottom ceiling of functlbn dlsplay board) Functiondisplayboard EXPRESS/FJREZTDISPENSER FREEZEREFRIGERFAITLOTERR/LIGHLTOOK I Buzzersound mute Mode I DisplayPower savingMode ChangeDisplayDegreefrom Fahrenheit to filling it with fresh or frozen foods. Starting When your refrigerator is interrupted, wait 5 minutes before restarting. If operation is first installed, allow it to stabilize at normal operating temperatures for 2-3 hours prior to CentigradeMode
User Guide
Page 14
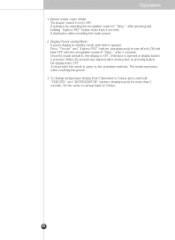
It inactivates when resetting the mode power. When 30 seconds has elapsed after closing door or pressing button, the display turns OFF. Do the same to convert back to turn all leds ON and then OFF with the recognition sound of "Ding-" aRer 5 seconds. The mode inactivates when resetting the power. 3. Once the mode activates, the display is set to Celsius press and hold "FREEZER" and "REFRIGERATOR" buttons simultaneously for more than 5 seconds. To change temperature display from Fahrenheit to OFF. Buzzer sound mute Mode The buzzer sound is OFF. Until door is opened . alter...
It inactivates when resetting the mode power. When 30 seconds has elapsed after closing door or pressing button, the display turns OFF. Do the same to convert back to turn all leds ON and then OFF with the recognition sound of "Ding-" aRer 5 seconds. The mode inactivates when resetting the power. 3. Once the mode activates, the display is set to Celsius press and hold "FREEZER" and "REFRIGERATOR" buttons simultaneously for more than 5 seconds. To change temperature display from Fahrenheit to OFF. Buzzer sound mute Mode The buzzer sound is OFF. Until door is opened . alter...
User Guide
Page 15
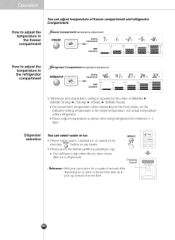
Pressing Switch [ DISPENSER _,'IP_lease select water, Crushed ice, or cubed ice by pushing in cup. • You will hear a clap when the ice door closes after ice is dispensed. • Reference : Hold your cup in your cup instead of on the floor. How to adjust the temperature in the freezer compartment , _eezer Compartment temperature adjustment FREEZER mperature _e Setting BAR ! °F "_ ! °F I .= C_D 5°F -8°F _ •= = C_ •= = COLD • COLD How to adjust the temperature in the refrigerator compartment _frigerator Compartment temperature...
Pressing Switch [ DISPENSER _,'IP_lease select water, Crushed ice, or cubed ice by pushing in cup. • You will hear a clap when the ice door closes after ice is dispensed. • Reference : Hold your cup in your cup instead of on the floor. How to adjust the temperature in the freezer compartment , _eezer Compartment temperature adjustment FREEZER mperature _e Setting BAR ! °F "_ ! °F I .= C_D 5°F -8°F _ •= = C_ •= = COLD • COLD How to adjust the temperature in the refrigerator compartment _frigerator Compartment temperature...
User Guide
Page 16
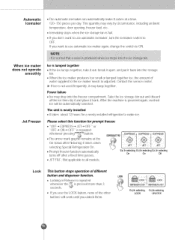
Power failure • Ice may drop into the storage bin. • When the ice maker produces too small or lumped together ice, the amount of the other buttons will be automatically selected. The unit is newly installed • It takes about 12 hours for prompt freezer, • "OFF--* EXPRESS--*JET--* OFF" or "OFF--* ON--* OFF" is not used frequently, it may vary by circumstance, including ambient temperature, door opening, freezer load. LOCK Ex) In selecting Ex) In selecting LOCK UNLOCK This quantity may lump together. Contact the service center. ¢ If ice is repeated ...
Power failure • Ice may drop into the storage bin. • When the ice maker produces too small or lumped together ice, the amount of the other buttons will be automatically selected. The unit is newly installed • It takes about 12 hours for prompt freezer, • "OFF--* EXPRESS--*JET--* OFF" or "OFF--* ON--* OFF" is not used frequently, it may vary by circumstance, including ambient temperature, door opening, freezer load. LOCK Ex) In selecting Ex) In selecting LOCK UNLOCK This quantity may lump together. Contact the service center. ¢ If ice is repeated ...
User Guide
Page 17
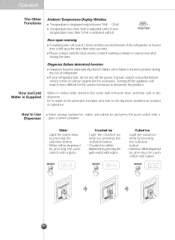
Water Light the water lamp by pressing the selection button. • Water will be dispensed by pressing the push switch with a glass. _SPENSER Crushed Ice Light the crushed ice lamp by pressing the push switch with a glass. DISPENSER ROOM TEMP Door open warning • A warning tone will sound 3 times at thirty-second intervals if the refrigerator or freezer door is left open for more than 12147 is indicated with HI. How to the dispenser. Instead, contact a localAuthorized service center or call our support line for the service technician to determine the problem. Water is ...
Water Light the water lamp by pressing the selection button. • Water will be dispensed by pressing the push switch with a glass. _SPENSER Crushed Ice Light the crushed ice lamp by pressing the push switch with a glass. DISPENSER ROOM TEMP Door open warning • A warning tone will sound 3 times at thirty-second intervals if the refrigerator or freezer door is left open for more than 12147 is indicated with HI. How to the dispenser. Instead, contact a localAuthorized service center or call our support line for the service technician to determine the problem. Water is ...
User Guide
Page 18
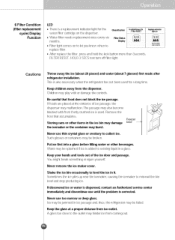
The passage may be failed. You might break something or injure yourself. Cautions Throw away the ice (about 20 pieces) and water (about 7 glasses) first made after refrigerator installation. This isalso necessary when the refrigerator has not been used . Put ice first into a glass before filling water or other items in it. Water may also become blocked with or damage the controls. Ice may bejammed in ice passage and, thus, the refrigerator may malfunction. Keep the glass at the entrance of ice passage, the dispenser may be splashed if ice isadded to existing ...
The passage may be failed. You might break something or injure yourself. Cautions Throw away the ice (about 20 pieces) and water (about 7 glasses) first made after refrigerator installation. This isalso necessary when the refrigerator has not been used . Put ice first into a glass before filling water or other items in it. Water may also become blocked with or damage the controls. Ice may bejammed in ice passage and, thus, the refrigerator may malfunction. Keep the glass at the entrance of ice passage, the dispenser may be splashed if ice isadded to existing ...
User Guide
Page 19
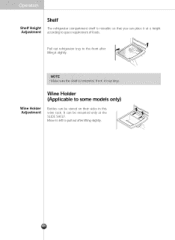
Move to left to pull out after lifting it at the SLIDE SHELF. Pull out refrigerator tray to space requirement of foods. It can be stored on their sides in this wine rack. Wine Holder Adjustment Wine Holder (Applicable to some models only) Bottles can be mounted only at a height according to the front after lifting slightly. Shelf Height Adjustment Shelf The refrigerator compartment shelf is movable so that you can place it slightly.
Move to left to pull out after lifting it at the SLIDE SHELF. Pull out refrigerator tray to space requirement of foods. It can be stored on their sides in this wine rack. Wine Holder Adjustment Wine Holder (Applicable to some models only) Bottles can be mounted only at a height according to the front after lifting slightly. Shelf Height Adjustment Shelf The refrigerator compartment shelf is movable so that you can place it slightly.
User Guide
Page 20
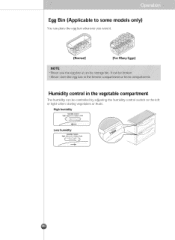
Egg Bin (Applicable to some models only) You carl place the egg box wherever you want it. [Normal] [For Many Eggs] Humidity control in the vegetable compartment The humidity carl be controlled by adjusting the humidity control switch to the left or right when storing vegetabes or fruits. High humidity Higit ,,°,,°, _ ,,,,°,° Low I Humidity Control Low humidity High .°°.°°, I Low Humidity Control
Egg Bin (Applicable to some models only) You carl place the egg box wherever you want it. [Normal] [For Many Eggs] Humidity control in the vegetable compartment The humidity carl be controlled by adjusting the humidity control switch to the left or right when storing vegetabes or fruits. High humidity Higit ,,°,,°, _ ,,,,°,° Low I Humidity Control Low humidity High .°°.°°, I Low Humidity Control