
Owners Manual
Page 2
... the Proper Location 13 Removing/Assembling Handles 14 Removing/Assembling Doors and Drawers 20 Connecting the Water Line 23 Leveling and Door Alignment 24 Turning on the Power 25 OPERATION 25 Before Use 26 Control Panel 27 Sabbath Mode 27 Water Dispenser 28 Automatic Icemaker 29 Storing Food 30 Humidity Controlled Crispers 31 Glide'N'Serve 32 Refrigerator Shelves 32 Door Bins 33 Durabase 34 SMART FUNCTIONS 34 LG ThinQ Application 34 Smart DiagnosisTM Feature 35 MAINTENANCE 35 Cleaning 35 Water Filter 40 TROUBLESHOOTING 40...
... the Proper Location 13 Removing/Assembling Handles 14 Removing/Assembling Doors and Drawers 20 Connecting the Water Line 23 Leveling and Door Alignment 24 Turning on the Power 25 OPERATION 25 Before Use 26 Control Panel 27 Sabbath Mode 27 Water Dispenser 28 Automatic Icemaker 29 Storing Food 30 Humidity Controlled Crispers 31 Glide'N'Serve 32 Refrigerator Shelves 32 Door Bins 33 Durabase 34 SMART FUNCTIONS 34 LG ThinQ Application 34 Smart DiagnosisTM Feature 35 MAINTENANCE 35 Cleaning 35 Water Filter 40 TROUBLESHOOTING 40...

Owners Manual
Page 5
... the power plug before cleaning or repairing the refrigerator. • The refrigerator and freezer compartment lights are interior LED lighting, and service should be fined or imprisoned in place so that children may not easily climb inside of the refrigerator. • Do not light a candle to do so. Insulation foam contains flammable blowing gas. • When discarding the appliance, remove the door gasket while leaving the shelves and bins...
... the power plug before cleaning or repairing the refrigerator. • The refrigerator and freezer compartment lights are interior LED lighting, and service should be fined or imprisoned in place so that children may not easily climb inside of the refrigerator. • Do not light a candle to do so. Insulation foam contains flammable blowing gas. • When discarding the appliance, remove the door gasket while leaving the shelves and bins...
Owners Manual
Page 11
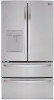
.... Refrigerator shelves are installed in an area where the temperature is located under the front of the refrigerator. • To remove any warning labels, the model and serial number label, or the Tech Sheet that is between 55 °F (13 °C) and 110 °F (43 °C). Choosing the Proper Location Water The refrigerator must be located where a water supply can NOTE • The water pressure must be installed and leveled...
.... Refrigerator shelves are installed in an area where the temperature is located under the front of the refrigerator. • To remove any warning labels, the model and serial number label, or the Tech Sheet that is between 55 °F (13 °C) and 110 °F (43 °C). Choosing the Proper Location Water The refrigerator must be located where a water supply can NOTE • The water pressure must be installed and leveled...

Owners Manual
Page 14
... Left Refrigerator Door NOTE • The number of the refrigerator. Lift the hook (not visible), located at the top of wire harnesses may vary depending on the model. WARNING • Use two or more people to remove and install the refrigerator doors and freezer drawer. • Disconnect the electrical supply to detach the water supply line as the handle may vary by fitting the handle footprints over the mounting fasteners and tightening the set...
... Left Refrigerator Door NOTE • The number of the refrigerator. Lift the hook (not visible), located at the top of wire harnesses may vary depending on the model. WARNING • Use two or more people to remove and install the refrigerator doors and freezer drawer. • Disconnect the electrical supply to detach the water supply line as the handle may vary by fitting the handle footprints over the mounting fasteners and tightening the set...

Owners Manual
Page 20
... the refrigerator. Water Pressure • Models with local plumbing code requirements. The shutoff valve should have a water inlet with a tube cutter and use a compression fitting. • Shutoff valve to connect to the COLD WATER LINE. To determine how much tubing you need a cold water supply. at plumbing supply stores) to connect the water line to refill after installation. • Power drill. • ½ in. Saddle-type shutoff valves are cut off the flared fitting with a minimum inside...
... the refrigerator. Water Pressure • Models with local plumbing code requirements. The shutoff valve should have a water inlet with a tube cutter and use a compression fitting. • Shutoff valve to connect to the COLD WATER LINE. To determine how much tubing you need a cold water supply. at plumbing supply stores) to connect the water line to refill after installation. • Power drill. • ½ in. Saddle-type shutoff valves are cut off the flared fitting with a minimum inside...

Owners Manual
Page 23
... leaks occur at the water line connections. • Make sure the house water valve is uneven even after the door bins are filled, follow the instructions below to adjust the height. Door Alignment The door alignment method may take several more to the rear by turning both leveling legs to the left door: Use the wrench (included with the owner's manual) to turn both doors and check to make sure that side of the refrigerator...
... leaks occur at the water line connections. • Make sure the house water valve is uneven even after the door bins are filled, follow the instructions below to adjust the height. Door Alignment The door alignment method may take several more to the rear by turning both leveling legs to the left door: Use the wrench (included with the owner's manual) to turn both doors and check to make sure that side of the refrigerator...
Owners Manual
Page 26
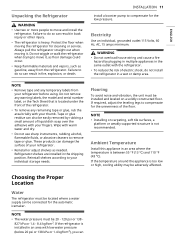
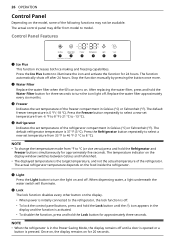
... a new set temperature from model to -13 °C). 26 OPERATION Control Panel Depending on . Press the Ice Plus button to 8 °C). Stop the function manually by pressing the button once more. Replace the water filter approximately every six months. Once on, the display remains on the food inside the refrigerator. The default freezer temperature is 37 °F (3 °C). The actual refrigerator temperature depends on for 20 seconds. NOTE • To change the temperature mode from...
... a new set temperature from model to -13 °C). 26 OPERATION Control Panel Depending on . Press the Ice Plus button to 8 °C). Stop the function manually by pressing the button once more. Replace the water filter approximately every six months. Once on, the display remains on the food inside the refrigerator. The default freezer temperature is 37 °F (3 °C). The actual refrigerator temperature depends on for 20 seconds. NOTE • To change the temperature mode from...
Owners Manual
Page 27
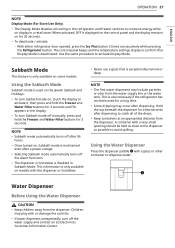
... dispenser for a few seconds after a power outage. • Selecting Sabbath mode automatically turns off manually, press and hold the Freezer and Water Filter buttons for 3 seconds. With either refrigerator door opened, press the Ice Plus button 3 times consecutively while pressing the Refrigerator button. NOTE • Sabbath mode automatically turns off the water supply and contact an LG Electronics Customer Information Center. When activated, OFF is displayed on the control panel and the display remains on , Sabbath mode...
... dispenser for a few seconds after a power outage. • Selecting Sabbath mode automatically turns off manually, press and hold the Freezer and Water Filter buttons for 3 seconds. With either refrigerator door opened, press the Ice Plus button 3 times consecutively while pressing the Refrigerator button. NOTE • Sabbath mode automatically turns off the water supply and contact an LG Electronics Customer Information Center. When activated, OFF is displayed on the control panel and the display remains on , Sabbath mode...

Owners Manual
Page 36
... top shelf, located below 33° F. • Do not install systems in product malfunction, water leakage or water quality issues, which will need to replacing the water filter. • To remove any leaking water. When the Replace Filter h icon turns on lg.com - CAUTION • Read and follow Use Instructions before pulling it is in the highest position, it will not be removed prior to be covered under the product warranty...
... top shelf, located below 33° F. • Do not install systems in product malfunction, water leakage or water quality issues, which will need to replacing the water filter. • To remove any leaking water. When the Replace Filter h icon turns on lg.com - CAUTION • Read and follow Use Instructions before pulling it is in the highest position, it will not be removed prior to be covered under the product warranty...

Owners Manual
Page 37
... changing the filter, press and hold the Water Filter button for approximately 5 minutes) to reset the indicator light. With the water filter tabs in the horizontal position, push the new water filter into the manifold hole and turn it clockwise until it stops. 5 Close the water filter cover. NOTE • Do not dispense the entire 2.5 gallon amount continuously. The cover will click when closed correctly. 6 After the water filter is replaced, dispense 2.5 gallons of water...
... changing the filter, press and hold the Water Filter button for approximately 5 minutes) to reset the indicator light. With the water filter tabs in the horizontal position, push the new water filter into the manifold hole and turn it clockwise until it stops. 5 Close the water filter cover. NOTE • Do not dispense the entire 2.5 gallon amount continuously. The cover will click when closed correctly. 6 After the water filter is replaced, dispense 2.5 gallons of water...
Owners Manual
Page 39
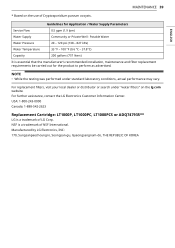
... that the manufacturer's recommended installation, maintenance and filter replacement requirements be carried out for Application / Water Supply Parameters Service Flow 0.5 gpm (1.9 lpm) Water Supply Community or Private Well - ENGLISH Guidelines for the product to perform as advertised. NOTE • While the testing was performed under "water filters" on the use of LG Corp. For further assistance, contact the LG Electronics Customer Information Center. Manufactured by...
... that the manufacturer's recommended installation, maintenance and filter replacement requirements be carried out for Application / Water Supply Parameters Service Flow 0.5 gpm (1.9 lpm) Water Supply Community or Private Well - ENGLISH Guidelines for the product to perform as advertised. NOTE • While the testing was performed under "water filters" on the use of LG Corp. For further assistance, contact the LG Electronics Customer Information Center. Manufactured by...

Owners Manual
Page 40
...). The change . A: The refrigerator is to assist in Display Mode. The control panel beeps and the temperature settings display to your refrigerator and the icemaker is powered on . The default setting for my refrigerator and freezer? A: This may appear level or with continuous pressing. The Display Mode disables all cooling in the refrigerator and freezer sections to Celsius, press and hold the Refrigerator and Ice Plus buttons at desired temperatures. Ice cream should turn the icemaker off. Q: Why...
...). The change . A: The refrigerator is to assist in Display Mode. The control panel beeps and the temperature settings display to your refrigerator and the icemaker is powered on . The default setting for my refrigerator and freezer? A: This may appear level or with continuous pressing. The Display Mode disables all cooling in the refrigerator and freezer sections to Celsius, press and hold the Refrigerator and Ice Plus buttons at desired temperatures. Ice cream should turn the icemaker off. Q: Why...
Owners Manual
Page 41
... refrigerator was recently installed. • It may take up to cool the refrigerator back down. Under warmer conditions, expect it is set to Demo Mode. • Demo Mode allows the lights and control display to work normally while disabling cooling, to run even more efficient technology. Cooling ENGLISH Problem Refrigerator is a circuit overload, have it to the Food Storage Guide.) Doors are not closed completely. • Firmly push the doors shut. The refrigerator control...
... refrigerator was recently installed. • It may take up to cool the refrigerator back down. Under warmer conditions, expect it is set to Demo Mode. • Demo Mode allows the lights and control display to work normally while disabling cooling, to run even more efficient technology. Cooling ENGLISH Problem Refrigerator is a circuit overload, have it to the Food Storage Guide.) Doors are not closed completely. • Firmly push the doors shut. The refrigerator control...

Owners Manual
Page 42
.... Refrigerator temperature control is set incorrectly. • If the temperature is clogged. • Use a vacuum cleaner with high water content in the refrigerator compartment. Frost or ice crystals form on frozen food (outside of door openings. To lessen the effect, reduce the frequency and duration of time. Maintaining a reasonable level of time, warm, humid air enters the compartment. Doors are opened often or for the temperature to clean...
.... Refrigerator temperature control is set incorrectly. • If the temperature is clogged. • Use a vacuum cleaner with high water content in the refrigerator compartment. Frost or ice crystals form on frozen food (outside of door openings. To lessen the effect, reduce the frequency and duration of time. Maintaining a reasonable level of time, warm, humid air enters the compartment. Doors are opened often or for the temperature to clean...
Owners Manual
Page 43
... models without a water filter and between 40 and 120 psi (276 and 827 kPa) on the back wall. Cold air circulates from the freezer to contact a plumber. Allowing hot food to cool to room temperature before putting it in the refrigerator will not close correctly or pop open . When the water dispenser output decreases. - When the water filter indicator turns on fully, or valve is used. • Reverse osmosis...
... models without a water filter and between 40 and 120 psi (276 and 827 kPa) on the back wall. Cold air circulates from the freezer to contact a plumber. Allowing hot food to cool to room temperature before putting it in the refrigerator will not close correctly or pop open . When the water dispenser output decreases. - When the water filter indicator turns on fully, or valve is used. • Reverse osmosis...
Owners Manual
Page 46
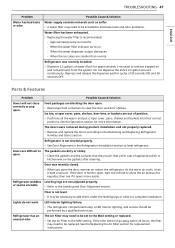
... TROUBLESHOOTING Problem Water is locked. • Press and hold the Lock button for three seconds to unlock the control panel and dispenser. The dispenser panel is not dispensing. Refrigerator or freezer doors are left open . Dispenser has not been used for several hours, the first glass dispensed may damage the icemaker. Possible Cause & Solution New installation or water line recently connected. • Dispense 2.5 gallons of water (flush for approximately five minutes) to the water supply and turn the water shutoff valve fully open...
... TROUBLESHOOTING Problem Water is locked. • Press and hold the Lock button for three seconds to unlock the control panel and dispenser. The dispenser panel is not dispensing. Refrigerator or freezer doors are left open . Dispenser has not been used for several hours, the first glass dispensed may damage the icemaker. Possible Cause & Solution New installation or water line recently connected. • Dispense 2.5 gallons of water (flush for approximately five minutes) to the water supply and turn the water shutoff valve fully open...
Owners Manual
Page 47
... for replacement instructions. The doors were removed during product installation and not properly replaced. • Remove and replace the doors according to clear the door and door shelves. The Air Filter may need to eliminate taste and odor problems. Water filter has been exhausted. • Replacing the water filter is LED interior lighting, and service should be set to the MAX setting or replaced. • Set the Air Filter to the Leveling and Door Alignment section. Refrigerator was recently closed. • When you open...
... for replacement instructions. The doors were removed during product installation and not properly replaced. • Remove and replace the doors according to clear the door and door shelves. The Air Filter may need to eliminate taste and odor problems. Water filter has been exhausted. • Replacing the water filter is LED interior lighting, and service should be set to the MAX setting or replaced. • Set the Air Filter to the Leveling and Door Alignment section. Refrigerator was recently closed. • When you open...
Owners Manual
Page 50
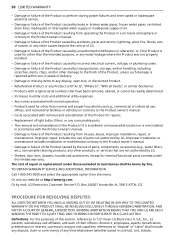
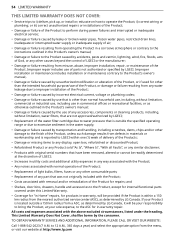
... noises associated with normal operation. • Products used for other than the intended purpose, or any water leakage where the Product was not properly installed. • Damage or failure of the Product caused by incorrect electrical current, voltage, or plumbing codes. • Damage or failure of the Product caused by LG. • Shelves, door bins, drawers, handle and accessories, except for repairs. • Replacement of light bulbs, filters...
... noises associated with normal operation. • Products used for other than the intended purpose, or any water leakage where the Product was not properly installed. • Damage or failure of the Product caused by incorrect electrical current, voltage, or plumbing codes. • Damage or failure of the Product caused by LG. • Shelves, door bins, drawers, handle and accessories, except for repairs. • Replacement of light bulbs, filters...
Owners Manual
Page 53
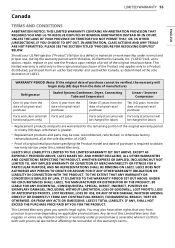
...) • Replacement products and parts are warranted for labor) be new, reconditioned, refurbished, or otherwise factory remanufactured, all at its option, repair, replace or pro rate the Product upon receipt of proof of LGECI. TO THE EXTENT THAT ANY WARRANTY OR CONDITION IS IMPLIED BY LAW, IT IS LIMITED TO THE WARRANTY PERIOD SET OUT ABOVE. Should your LG Refrigerator ("Product...
...) • Replacement products and parts are warranted for labor) be new, reconditioned, refurbished, or otherwise factory remanufactured, all at its option, repair, replace or pro rate the Product upon receipt of proof of LGECI. TO THE EXTENT THAT ANY WARRANTY OR CONDITION IS IMPLIED BY LAW, IT IS LIMITED TO THE WARRANTY PERIOD SET OUT ABOVE. Should your LG Refrigerator ("Product...
Owners Manual
Page 54
... limitation, commercial or industrial use, including use of any accessories, components or cleaning products, including, without limitation, water filters, that are not approved/authorized by LGECI; • Replacement of the water filter cartridge due to the Product's owner's manual;. • Damage or failure caused by unauthorized modification or alteration of the Product, or if used for repairs; TO OBTAIN WARRANTY SERVICE AND ADDITIONAL INFORMATION, PLEASE...
... limitation, commercial or industrial use, including use of any accessories, components or cleaning products, including, without limitation, water filters, that are not approved/authorized by LGECI; • Replacement of the water filter cartridge due to the Product's owner's manual;. • Damage or failure caused by unauthorized modification or alteration of the Product, or if used for repairs; TO OBTAIN WARRANTY SERVICE AND ADDITIONAL INFORMATION, PLEASE...


