Owners Manual
Page 2
... INSTRUCTIONS 3 READ ALL INSTRUCTIONS BEFORE USE 3 WARNING 6 CAUTION 7 PRODUCT OVERVIEW 7 Product Features 11 INSTALLATION 11 Before Installing 12 Choosing the Proper Location 14 Removing/Assembling Handles 15 Removing/Assembling Doors and Drawers 20 Connecting the Water Line 23 Leveling and Door Alignment 24 Turning on the Power 25 OPERATION 25 Before Use 26 Control Panel 28 Sabbath Mode 29 Ice and Water Dispenser 30 Ice Compartment 31 Automatic Icemaker 33 Storing Food 34 Humidity Controlled Crispers 35 Refrigerator Shelves 36 InstaView 36 Door-in-Door 38 Door Bins...
... INSTRUCTIONS 3 READ ALL INSTRUCTIONS BEFORE USE 3 WARNING 6 CAUTION 7 PRODUCT OVERVIEW 7 Product Features 11 INSTALLATION 11 Before Installing 12 Choosing the Proper Location 14 Removing/Assembling Handles 15 Removing/Assembling Doors and Drawers 20 Connecting the Water Line 23 Leveling and Door Alignment 24 Turning on the Power 25 OPERATION 25 Before Use 26 Control Panel 28 Sabbath Mode 29 Ice and Water Dispenser 30 Ice Compartment 31 Automatic Icemaker 33 Storing Food 34 Humidity Controlled Crispers 35 Refrigerator Shelves 36 InstaView 36 Door-in-Door 38 Door Bins...
Owners Manual
Page 5
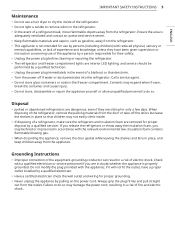
.... • Do not store glass containers or soda in a risk of electric shock. if it will not fit the outlet, have been given supervision or instruction concerning use of the appliance by a person responsible for their safety. • Unplug the power plug before cleaning or repairing the refrigerator. • The refrigerator and freezer compartment lights are interior LED lighting, and service should be fined or...
.... • Do not store glass containers or soda in a risk of electric shock. if it will not fit the outlet, have been given supervision or instruction concerning use of the appliance by a person responsible for their safety. • Unplug the power plug before cleaning or repairing the refrigerator. • The refrigerator and freezer compartment lights are interior LED lighting, and service should be fined or...
Owners Manual
Page 12
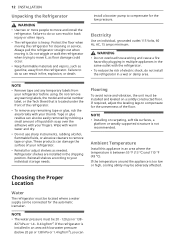
... for cleaning or service. 12 INSTALLATION Unpacking the Refrigerator WARNING • Use two or more people to compensate for the automatic icemaker. Reinstall shelves according to do so can damage the surface of the refrigerator. • To remove any temporary labels from the refrigerator. Do not remove any warning labels, the model and serial number label, or the Tech Sheet that is heavy. Ambient Temperature Install this...
... for cleaning or service. 12 INSTALLATION Unpacking the Refrigerator WARNING • Use two or more people to compensate for the automatic icemaker. Reinstall shelves according to do so can damage the surface of the refrigerator. • To remove any temporary labels from the refrigerator. Do not remove any warning labels, the model and serial number label, or the Tech Sheet that is heavy. Ambient Temperature Install this...
Owners Manual
Page 15
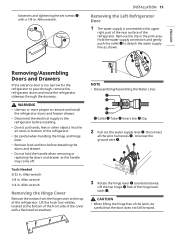
... the water supply connection and gently push the collet a to the refrigerator before installing. • Do not put hands, feet or other objects into the air vents or bottom of the latch, be careful that the door does not fall forward. WARNING • Use two or more people to remove and install the refrigerator doors and freezer drawer. • Disconnect the electrical supply to detach the water supply line as the handle...
... the water supply connection and gently push the collet a to the refrigerator before installing. • Do not put hands, feet or other objects into the air vents or bottom of the latch, be careful that the door does not fall forward. WARNING • Use two or more people to remove and install the refrigerator doors and freezer drawer. • Disconnect the electrical supply to detach the water supply line as the handle...
Owners Manual
Page 20
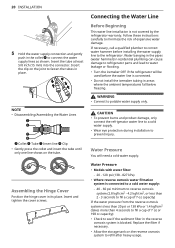
Assembling the Hinge Cover Position the hinge cover in residential plumbing can cause damage to refrigerator parts and lead to water leakage or flooding. • Turn the icemaker OFF if the refrigerator will need a cold water supply. Water Pressure • Models with water filter: - 20 - 120 psi (138 - 827 kPa) • Where reverse osmosis water filtration system is connected to a cold water supply: - 40 - 60 psi minimum to reverse osmosis system (2.8 kgf/cm2 - 4.2 kgf/cm2, or less...
Assembling the Hinge Cover Position the hinge cover in residential plumbing can cause damage to refrigerator parts and lead to water leakage or flooding. • Turn the icemaker OFF if the refrigerator will need a cold water supply. Water Pressure • Models with water filter: - 20 - 120 psi (138 - 827 kPa) • Where reverse osmosis water filtration system is connected to a cold water supply: - 40 - 60 psi minimum to reverse osmosis system (2.8 kgf/cm2 - 4.2 kgf/cm2, or less...
Owners Manual
Page 21
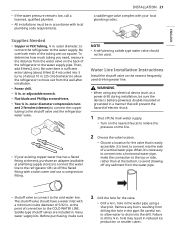
... local plumbing codes. Before purchasing, make the connection to the COLD WATER LINE. Failure to connect into the drill. outer diameter, to connect the refrigerator to the water supply pipe. Water Line Installation Instructions Install the shutoff valve on the back of a vertical water pipe. The shutoff valve should not be used drinking water line. Then, add 8 feet (2.4 m). It is necessary to drill a ¼ in . Remove any sediment from the wall after installation. • Power drill...
... local plumbing codes. Before purchasing, make the connection to the COLD WATER LINE. Failure to connect into the drill. outer diameter, to connect the refrigerator to the water supply pipe. Water Line Installation Instructions Install the shutoff valve on the back of a vertical water pipe. The shutoff valve should not be used drinking water line. Then, add 8 feet (2.4 m). It is necessary to drill a ¼ in . Remove any sediment from the wall after installation. • Power drill...
Owners Manual
Page 23
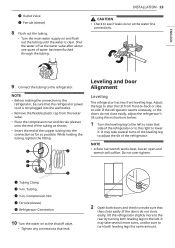
... turning both leveling legs the same amount. INSTALLATION 23 CAUTION • Check to see if leaks occur at the water line connections. 9 Connect the tubing to -back or sideto side. If the refrigerator seems unsteady, or the doors do not close easily, tilt the refrigerator slightly more turns, and be sure that they close easily, adjust the refrigerator's tilt using the instructions below: 1 Turn the leveling leg to the left...
... turning both leveling legs the same amount. INSTALLATION 23 CAUTION • Check to see if leaks occur at the water line connections. 9 Connect the tubing to -back or sideto side. If the refrigerator seems unsteady, or the doors do not close easily, tilt the refrigerator slightly more turns, and be sure that they close easily, adjust the refrigerator's tilt using the instructions below: 1 Turn the leveling leg to the left...
Owners Manual
Page 26
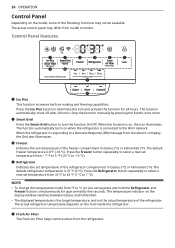
... electric company, the Grid text illuminates. The default refrigerator temperature is 0°F (-18 °C). The function automatically turns on the display window switches between Celsius and Fahrenheit. • The displayed temperature is on, the icon illuminates. 26 OPERATION Control Panel Depending on the food inside the refrigerator. The function automatically shuts off after 24 hours. Stop the function manually by pressing the button once more. c Freezer Indicates the set temperature from model...
... electric company, the Grid text illuminates. The default refrigerator temperature is 0°F (-18 °C). The function automatically turns on the display window switches between Celsius and Fahrenheit. • The displayed temperature is on, the icon illuminates. 26 OPERATION Control Panel Depending on the food inside the refrigerator. The function automatically shuts off after 24 hours. Stop the function manually by pressing the button once more. c Freezer Indicates the set temperature from model...
Owners Manual
Page 27
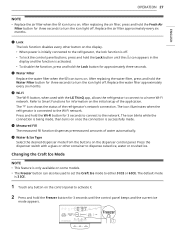
... the Lock button until the control panel beeps and the current ice mode appears. Changing the Craft Ice Mode NOTE • This feature is successfully made , then turns on the dispenser control panel. j Water & Ice Type Select the desired dispenser mode from the buttons on once the connection is only available on some models. • The Freezer button can also be used with a glass or other button on the initial setup of the application. Replace the air filter approximately...
... the Lock button until the control panel beeps and the current ice mode appears. Changing the Craft Ice Mode NOTE • This feature is successfully made , then turns on the dispenser control panel. j Water & Ice Type Select the desired dispenser mode from the buttons on once the connection is only available on some models. • The Freezer button can also be used with a glass or other button on the initial setup of the application. Replace the air filter approximately...
Owners Manual
Page 29
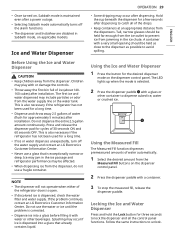
... or damage the controls. • Throw away the first bin full of the refrigerator doors is open. • If discolored ice is selected. 2 Press the dispenser paddle a with a glass or other beverages. If the problem continues, contact an LG Electronics Customer Information Center. The LED lights up when the mode is dispensed, check the water filter and water supply. Ice may jam in the ice passage and refrigerator performance may include...
... or damage the controls. • Throw away the first bin full of the refrigerator doors is open. • If discolored ice is selected. 2 Press the dispenser paddle a with a glass or other beverages. If the problem continues, contact an LG Electronics Customer Information Center. The LED lights up when the mode is dispensed, check the water filter and water supply. Ice may jam in the ice passage and refrigerator performance may include...
Owners Manual
Page 30
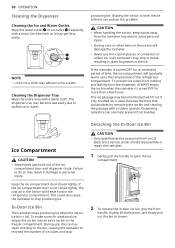
... freeze food in -door ice bin, grip the front handle, slightly lift the bottom, and slowly pull out the bin as it can also help prevent frost buildup. Cleaning the Dispenser Tray Wipe the entire area with a rubber spatula. Dispensing cubed ice can reduce this problem. During use, the ice may stack unevenly in the bin, causing the icemaker to open the ice compartment. 2 To remove the in the refrigerator...
... freeze food in -door ice bin, grip the front handle, slightly lift the bottom, and slowly pull out the bin as it can also help prevent frost buildup. Cleaning the Dispenser Tray Wipe the entire area with a rubber spatula. Dispensing cubed ice can reduce this problem. During use, the ice may stack unevenly in the bin, causing the icemaker to open the ice compartment. 2 To remove the in the refrigerator...
Owners Manual
Page 31
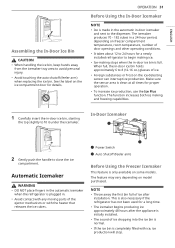
... clean at all times for a long time. • The icemaker begins producing ice approximately 48 hours after installation. This is completely filled with ice, ice production will stop. a Power Switch b Auto Shutoff (feeler arm) Before Using the Freezer Icemaker This feature is made in the automatic in -door ice bin holds approximately 6 to 8 (12-16 oz.) glasses of the ejector mechanism or with any moving parts of ice...
... clean at all times for a long time. • The icemaker begins producing ice approximately 48 hours after installation. This is completely filled with ice, ice production will stop. a Power Switch b Auto Shutoff (feeler arm) Before Using the Freezer Icemaker This feature is made in the automatic in -door ice bin holds approximately 6 to 8 (12-16 oz.) glasses of the ejector mechanism or with any moving parts of ice...
Owners Manual
Page 32
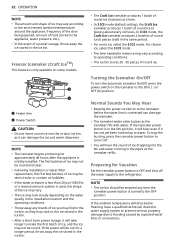
... installation location and the operating conditions. • Throw away any time the icemaker power button is turned to the icemaker before the water line is used, the shape of ice, and the ice may not be round. In 6 ICE mode, the Craft Ice icemaker produces 2 batches of round ice (3 pieces) about every 24 hours. To stop the buzzing, press the icemaker power button to turn the automatic icemaker On/Off, press the power switch on some models...
... installation location and the operating conditions. • Throw away any time the icemaker power button is turned to the icemaker before the water line is used, the shape of ice, and the ice may not be round. In 6 ICE mode, the Craft Ice icemaker produces 2 batches of round ice (3 pieces) about every 24 hours. To stop the buzzing, press the icemaker power button to turn the automatic icemaker On/Off, press the power switch on some models...

Owners Manual
Page 47
... the Replace Filter h icon turns on a water system, a device for three seconds to reset the indicator light. 6 After the water filter is removed, to thermal expansion must be installed. • Ensure all tubing and fittings are secure and free from the system. MAINTENANCE 47 4 Replace the door bin. 5 After changing the filter, press and hold the Water Filter button for controlling pressure due to prevent any leaking water. Swing the filter back into the filter head...
... the Replace Filter h icon turns on a water system, a device for three seconds to reset the indicator light. 6 After the water filter is removed, to thermal expansion must be installed. • Ensure all tubing and fittings are secure and free from the system. MAINTENANCE 47 4 Replace the door bin. 5 After changing the filter, press and hold the Water Filter button for controlling pressure due to prevent any leaking water. Swing the filter back into the filter head...

Owners Manual
Page 52
...; Use a vacuum cleaner with high water content away from air vents. At normal room temperatures (70 °F or 21 °C) expect your compressor to run longer in or power restored. • The refrigerator will help to more often. Condenser / back cover is replacing an older model. • Modern refrigerators require more operating time but use less energy due to control the amount of time, warm, humid air enters...
...; Use a vacuum cleaner with high water content away from air vents. At normal room temperatures (70 °F or 21 °C) expect your compressor to run longer in or power restored. • The refrigerator will help to more often. Condenser / back cover is replacing an older model. • Modern refrigerators require more operating time but use less energy due to control the amount of time, warm, humid air enters...
Owners Manual
Page 54
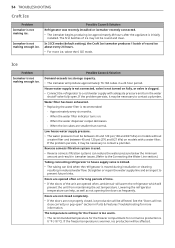
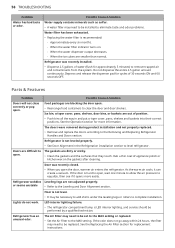
... as not opening the doors as frequently. Straighten or repair the water supply line and arrange it may be necessary to house supply valve is used. • Reverse osmosis filtration systems can reduce the water pressure below the minimum amount and result in a 24 hour period. In 3 ICE mode (default setting), the Craft Ice icemaker produces 1 batch of ice may be necessary to a cold water supply with a water filter. When the ice cubes...
... as not opening the doors as frequently. Straighten or repair the water supply line and arrange it may be necessary to house supply valve is used. • Reverse osmosis filtration systems can reduce the water pressure below the minimum amount and result in a 24 hour period. In 3 ICE mode (default setting), the Craft Ice icemaker produces 1 batch of ice may be necessary to a cold water supply with a water filter. When the ice cubes...
Owners Manual
Page 57
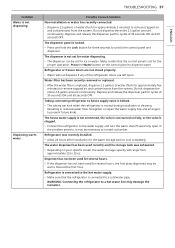
... dispenser panel is set for the proper operation. Make certain that the refrigerator is moved during installation or cleaning. Dispensing warm water. The dispenser is not set for water dispensing. • The dispenser can kink when the refrigerator is connected to cool completely. Straighten or repair the water supply line and arrange it may be set for ice or water. The water dispenser has been used for approximately five minutes) to house supply valve is clogged. • Connect the refrigerator to dispense water. Tubing connecting refrigerator to remove trapped air...
... dispenser panel is set for the proper operation. Make certain that the refrigerator is moved during installation or cleaning. Dispensing warm water. The dispenser is not set for water dispensing. • The dispenser can kink when the refrigerator is connected to cool completely. Straighten or repair the water supply line and arrange it may be set for ice or water. The water dispenser has been used for approximately five minutes) to house supply valve is clogged. • Connect the refrigerator to dispense water. Tubing connecting refrigerator to remove trapped air...
Owners Manual
Page 58
... Operation section for replacement instructions. As the warm air cools, it opens more information. Refrigerator was recently closed. • When you open . Depress and release the dispenser pad for approximately 5 minutes) to clear the door and door shelves. The Air Filter may need to be set to the MAX setting or replaced. • Set the Air Filter to equalize, then see if it can create a vacuum. When the water filter indicator turns on the gaskets after cleaning. Parts & Features Problem...
... Operation section for replacement instructions. As the warm air cools, it opens more information. Refrigerator was recently closed. • When you open . Depress and release the dispenser pad for approximately 5 minutes) to clear the door and door shelves. The Air Filter may need to be set to the MAX setting or replaced. • Set the Air Filter to equalize, then see if it can create a vacuum. When the water filter indicator turns on the gaskets after cleaning. Parts & Features Problem...
Owners Manual
Page 62
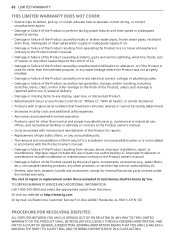
... the Product was not properly installed. • Damage or failure of the Product caused by incorrect electrical current, voltage, or plumbing codes. • Damage or failure of the Product caused by mail: LG Electronics Customer Service P.O. Improper repair includes the use of parts, components, accessories (e.g., water filters, etc.), consumable cleaning products, any other products, or services that have been removed, altered, or cannot be...
... the Product was not properly installed. • Damage or failure of the Product caused by incorrect electrical current, voltage, or plumbing codes. • Damage or failure of the Product caused by mail: LG Electronics Customer Service P.O. Improper repair includes the use of parts, components, accessories (e.g., water filters, etc.), consumable cleaning products, any other products, or services that have been removed, altered, or cannot be...
Owners Manual
Page 66
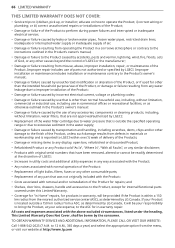
... water filter cartridge due to water pressure that is reported to improper installation of the Product; • Damage or failure caused by incorrect electrical current, voltage or plumbing codes; • Damage or failure caused by use that is other causes beyond the control of parts not authorized or specified by leaky or broken water pipes, frozen water pipes, restricted drain lines, inadequate or interrupted water supply...
... water filter cartridge due to water pressure that is reported to improper installation of the Product; • Damage or failure caused by incorrect electrical current, voltage or plumbing codes; • Damage or failure caused by use that is other causes beyond the control of parts not authorized or specified by leaky or broken water pipes, frozen water pipes, restricted drain lines, inadequate or interrupted water supply...


