Owners Manual
Page 3
... INSTRUCTIONS BEFORE USE 4 WARNING 7 CAUTION 8 PRODUCT OVERVIEW 8 Product Features 12 INSTALLATION 12 Before Installing 13 Choosing the Proper Location 15 Removing/Assembling the Handles 16 Removing/Assembling the Doors and Drawers 21 Connecting the Water Line 25 Leveling and Door Alignment 26 Turning on the Power 27 OPERATION 27 Before Use 28 Control Panel 30 Sabbath Mode 30 Ice and Water Dispenser 31 Ice Compartment 32 Automatic Icemaker 33 Storing Food 35 Humidity Controlled Crispers 36 Glide'N'Serve 36 Refrigerator Shelves 37 Door-in-Door...
... INSTRUCTIONS BEFORE USE 4 WARNING 7 CAUTION 8 PRODUCT OVERVIEW 8 Product Features 12 INSTALLATION 12 Before Installing 13 Choosing the Proper Location 15 Removing/Assembling the Handles 16 Removing/Assembling the Doors and Drawers 21 Connecting the Water Line 25 Leveling and Door Alignment 26 Turning on the Power 27 OPERATION 27 Before Use 28 Control Panel 30 Sabbath Mode 30 Ice and Water Dispenser 31 Ice Compartment 32 Automatic Icemaker 33 Storing Food 35 Humidity Controlled Crispers 36 Glide'N'Serve 36 Refrigerator Shelves 37 Door-in-Door...

Owners Manual
Page 6
.... • Unplug the power plug before cleaning or repairing the refrigerator. • The refrigerator and freezer compartment lights are interior LED lighting, and service should be fined or imprisoned in accordance with the appliance; Do not modify the plug provided with the relevant environmental law. • When discarding the appliance, remove the door gasket while leaving the shelves and baskets in the freezer compartment. Failure to do...
.... • Unplug the power plug before cleaning or repairing the refrigerator. • The refrigerator and freezer compartment lights are interior LED lighting, and service should be fined or imprisoned in accordance with the appliance; Do not modify the plug provided with the relevant environmental law. • When discarding the appliance, remove the door gasket while leaving the shelves and baskets in the freezer compartment. Failure to do...

Owners Manual
Page 13
... the refrigerator is located under the front of electric shock, do not install the refrigerator in fire, explosion, or death. Do not remove any warning labels, the model and serial number label, or the Tech Sheet that is installed in an area with your refrigerator. • Reinstall or adjust shelves as gasoline, away from your refrigerator before using. Failure to compensate for cleaning or service. NOTE • Remove tape...
... the refrigerator is located under the front of electric shock, do not install the refrigerator in fire, explosion, or death. Do not remove any warning labels, the model and serial number label, or the Tech Sheet that is installed in an area with your refrigerator. • Reinstall or adjust shelves as gasoline, away from your refrigerator before using. Failure to compensate for cleaning or service. NOTE • Remove tape...

Owners Manual
Page 15
.... INSTALLATION 15 Assembling the Refrigerator Handles 1 Assemble the mounting fasteners a at both ends of the door. Allen wrench • 1/4 in . Allen wrench and remove the handle. 2 Loosen the mounting fasteners b with a ⅛ in . Tools Needed • 3/32 in . Removing the Freezer Drawer Handle 1 Loosen the set screws a located on the door by fitting the handle footprints over the mounting fasteners and tightening the set screws to the refrigerator door and handle using...
.... INSTALLATION 15 Assembling the Refrigerator Handles 1 Assemble the mounting fasteners a at both ends of the door. Allen wrench • 1/4 in . Allen wrench and remove the handle. 2 Loosen the mounting fasteners b with a ⅛ in . Tools Needed • 3/32 in . Removing the Freezer Drawer Handle 1 Loosen the set screws a located on the door by fitting the handle footprints over the mounting fasteners and tightening the set screws to the refrigerator door and handle using...

Owners Manual
Page 16
... set screws b with a ¼ in. Hold the water supply connection and gently push the collet a to the upper right part of the rear surface of the refrigerator. WARNING • Use two or more people to remove and install the refrigerator doors and freezer drawer. • Disconnect the electrical supply to pass through, remove the refrigerator doors and move the refrigerator sideways through the doorway. Removing the Hinge Cover Remove the screws from the hinge cover...
... set screws b with a ¼ in. Hold the water supply connection and gently push the collet a to the upper right part of the rear surface of the refrigerator. WARNING • Use two or more people to remove and install the refrigerator doors and freezer drawer. • Disconnect the electrical supply to pass through, remove the refrigerator doors and move the refrigerator sideways through the doorway. Removing the Hinge Cover Remove the screws from the hinge cover...

Owners Manual
Page 22
... water valve on the back of the refrigerator to move out from the reverse osmosis system is blocked. To determine how much tubing you need a cold water supply. Saddle-type shutoff valves are cut off the flared fitting with local plumbing code requirements. Water Line Installation Instructions WARNING • When using any electrical device (such as a power drill) during installation, be sure the device is sufficient extra tubing (about 8 feet [2.4 m] coiled into 3 turns...
... water valve on the back of the refrigerator to move out from the reverse osmosis system is blocked. To determine how much tubing you need a cold water supply. Saddle-type shutoff valves are cut off the flared fitting with local plumbing code requirements. Water Line Installation Instructions WARNING • When using any electrical device (such as a power drill) during installation, be sure the device is sufficient extra tubing (about 8 feet [2.4 m] coiled into 3 turns...
Owners Manual
Page 29
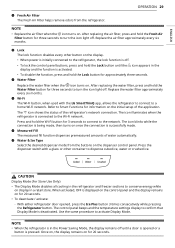
... the Water Filter button for approximately three seconds. The control panel beeps and the temperature settings display to turn the icon light off . Use the same procedure to conserve energy while on display in a retail store. CAUTION Display Mode (For Store Use Only) • The Display Mode disables all cooling in the refrigerator and freezer sections to activate Display Mode. ENGLISH OPERATION 29 e Fresh Air Filter The Fresh Air Filter helps remove odors from the buttons on the dispenser control panel. Replace the air filter approximately...
... the Water Filter button for approximately three seconds. The control panel beeps and the temperature settings display to turn the icon light off . Use the same procedure to conserve energy while on display in a retail store. CAUTION Display Mode (For Store Use Only) • The Display Mode disables all cooling in the refrigerator and freezer sections to activate Display Mode. ENGLISH OPERATION 29 e Fresh Air Filter The Fresh Air Filter helps remove odors from the buttons on the dispenser control panel. Replace the air filter approximately...

Owners Manual
Page 30
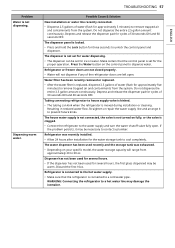
... stop the measured fill, release the dispenser switch. 30 OPERATION Sabbath Mode • Sabbath mode is dispensed, check the water filter and water supply. A container with or damage the controls. • Throw away the first few batches of the refrigerator doors is open. • If discolored ice is used for a long time. • The dispenser will not operate when either of ice (about 140 - 160 cubes) after a power outage. - If the problem...
... stop the measured fill, release the dispenser switch. 30 OPERATION Sabbath Mode • Sabbath mode is dispensed, check the water filter and water supply. A container with or damage the controls. • Throw away the first few batches of the refrigerator doors is open. • If discolored ice is used for a long time. • The dispenser will not operate when either of ice (about 140 - 160 cubes) after a power outage. - If the problem...

Owners Manual
Page 31
... icemaker to stop producing ice. During use thin crystal glasses or containers to misread the number of the refrigerator compartment. Remove the frost that accumulates by removing the ice bin and clearing the passage with frost if only crushed ice is used. CAUTION • When handling the ice bin, keep hands away from the icemaker tray area to the temperature of ice cubes and stop producing ice. Follow the same instructions to open the ice...
... icemaker to stop producing ice. During use thin crystal glasses or containers to misread the number of the refrigerator compartment. Remove the frost that accumulates by removing the ice bin and clearing the passage with frost if only crushed ice is used. CAUTION • When handling the ice bin, keep hands away from the icemaker tray area to the temperature of ice cubes and stop producing ice. Follow the same instructions to open the ice...
Owners Manual
Page 33
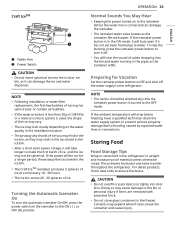
... are removed with water. Turning the Automatic Icemaker On To turn it can damage the icemaker. • The icemaker water valve buzzes as the icemaker fills with excessive force. • Do not store glass containers in the freezer. If the icemaker power button is connected can damage the ice and water dispenser. Craft IceTM a Feeler Arm b Power Switch CAUTION • Do not insert spherical ice into the in-door ice bin, as it off the water supply...
... are removed with water. Turning the Automatic Icemaker On To turn it can damage the icemaker. • The icemaker water valve buzzes as the icemaker fills with excessive force. • Do not store glass containers in the freezer. If the icemaker power button is connected can damage the ice and water dispenser. Craft IceTM a Feeler Arm b Power Switch CAUTION • Do not insert spherical ice into the in-door ice bin, as it off the water supply...
Owners Manual
Page 46
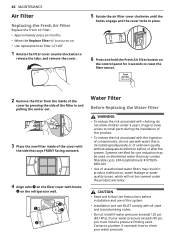
... must install a pressure limiting valve. 46 MAINTENANCE Air Filter Replacing the Fresh Air Filter Replace the Fresh Air Filter: • Approximately every six months. • When the Replace Filter g icon turns on. • Use replacement air filter: LT120F 1 Rotate the filter cover counterclockwise to release the tabs, and remove the cover. 5 Rotate the air filter cover clockwise until the hooks engage and the cover locks in place. 6 Press and hold the Fresh Air Filter button on the control panel for cyst...
... must install a pressure limiting valve. 46 MAINTENANCE Air Filter Replacing the Fresh Air Filter Replace the Fresh Air Filter: • Approximately every six months. • When the Replace Filter g icon turns on. • Use replacement air filter: LT120F 1 Rotate the filter cover counterclockwise to release the tabs, and remove the cover. 5 Rotate the air filter cover clockwise until the hooks engage and the cover locks in place. 6 Press and hold the Fresh Air Filter button on the control panel for cyst...
Owners Manual
Page 47
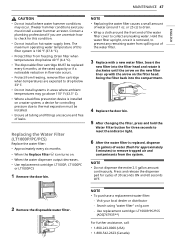
...; Do not dispense the entire 2.5 gallon amount continuously. Visit your local dealer or distributor - Search using "water filter" on the filter head. The maximum operating water temperature of the water filter cover to collect any remaining water from freezing, remove filter cartridge when temperatures are expected to drain. • Wrap a cloth around 1 oz. Insert the new filter into the compartment. 4 Replace the door bin. 5 After changing the filter, press and hold the Water Filter button for three seconds...
...; Do not dispense the entire 2.5 gallon amount continuously. Visit your local dealer or distributor - Search using "water filter" on the filter head. The maximum operating water temperature of the water filter cover to collect any remaining water from freezing, remove filter cartridge when temperatures are expected to drain. • Wrap a cloth around 1 oz. Insert the new filter into the compartment. 4 Replace the door bin. 5 After changing the filter, press and hold the Water Filter button for three seconds...
Owners Manual
Page 51
... cover is replacing an older model. • Modern refrigerators require more operating time but use less energy due to cool the refrigerator back down. Refrigerator is clogged. • Use a vacuum cleaner with an attachment to find, and close correctly or pop open" section in order to more often. The door is set to Demo Mode. • Demo Mode allows the lights and control display to work normally while disabling cooling, to save you need...
... cover is replacing an older model. • Modern refrigerators require more operating time but use less energy due to cool the refrigerator back down. Refrigerator is clogged. • Use a vacuum cleaner with an attachment to find, and close correctly or pop open" section in order to more often. The door is set to Demo Mode. • Demo Mode allows the lights and control display to work normally while disabling cooling, to save you need...

Owners Manual
Page 53
... defrost cycle has completed. Incorrect temperature control settings. • If the temperature is too warm, adjust the control one increment at a time and wait for the temperature to stabilize. Frost or ice crystals form on the back wall. To lessen the effect, reduce the frequency and duration of door openings. Doors are opened frequently or for the temperature to reach the desired temperature. Refrigerator or Freezer section is installed...
... defrost cycle has completed. Incorrect temperature control settings. • If the temperature is too warm, adjust the control one increment at a time and wait for the temperature to stabilize. Frost or ice crystals form on the back wall. To lessen the effect, reduce the frequency and duration of door openings. Doors are opened frequently or for the temperature to reach the desired temperature. Refrigerator or Freezer section is installed...
Owners Manual
Page 54
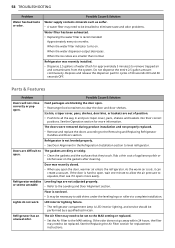
... unit are opened often, ambient air will warm the refrigerator which will produce approximately 70-184 cubes in icemaker issues. (Refer to the Connecting the Water Line section.) Tubing connecting refrigerator to contact a plumber. If the problem persists, it to a cold water supply with a water filter. Water filter has been exhausted. • Replacing the water filter is moved during installation or cleaning resulting in Parts & Features Troubleshooting for normal ice production is not making enough ice. See the "Doors will...
... unit are opened often, ambient air will warm the refrigerator which will produce approximately 70-184 cubes in icemaker issues. (Refer to the Connecting the Water Line section.) Tubing connecting refrigerator to contact a plumber. If the problem persists, it to a cold water supply with a water filter. Water filter has been exhausted. • Replacing the water filter is moved during installation or cleaning resulting in Parts & Features Troubleshooting for normal ice production is not making enough ice. See the "Doors will...
Owners Manual
Page 57
... button for ice or water. The water dispenser has been used for the proper operation. Refrigerator is kinked. • The tubing can be set for several hours, the first glass dispensed may be necessary to a hot water line may be warm. TROUBLESHOOTING 57 Possible Cause & Solution New installation or water line recently connected. • Dispense 2.5 gallons of water (flush for approximately five minutes) to remove trapped air and contaminants from approximately 20 to house supply valve is connected...
... button for ice or water. The water dispenser has been used for the proper operation. Refrigerator is kinked. • The tubing can be set for several hours, the first glass dispensed may be necessary to a hot water line may be warm. TROUBLESHOOTING 57 Possible Cause & Solution New installation or water line recently connected. • Dispense 2.5 gallons of water (flush for approximately five minutes) to remove trapped air and contaminants from approximately 20 to house supply valve is connected...
Owners Manual
Page 58
... interior lighting, and service should be necessary to add shims under the leveling legs or rollers to eliminate taste and odor problems. Water filter has been exhausted. • Replacing the water filter is hard to equalize, then see if it can create a vacuum. Refrigerator was recently closed. • When you open the door, warmer air enters the refrigerator. As the warm air cools, it opens more information. The Air Filter may need...
... interior lighting, and service should be necessary to add shims under the leveling legs or rollers to eliminate taste and odor problems. Water filter has been exhausted. • Replacing the water filter is hard to equalize, then see if it can create a vacuum. Refrigerator was recently closed. • When you open the door, warmer air enters the refrigerator. As the warm air cools, it opens more information. The Air Filter may need...
Owners Manual
Page 62
... instructions outlined in the Product's owner's manual. • Costs associated with normal operation. • Use of accessories (e.g., water filters, etc.), components, or consumable cleaning products that is used for internal/functional parts covered under these excluded circumstances shall be readily determined. • Increases in utility costs and additional utility expenses. • Any noises associated with removal and reinstallation of your Product for repairs. • Shelves, door bins, drawers, handle...
... instructions outlined in the Product's owner's manual. • Costs associated with normal operation. • Use of accessories (e.g., water filters, etc.), components, or consumable cleaning products that is used for internal/functional parts covered under these excluded circumstances shall be readily determined. • Increases in utility costs and additional utility expenses. • Any noises associated with removal and reinstallation of your Product for repairs. • Shelves, door bins, drawers, handle...
Owners Manual
Page 65
... water pipes, restricted drain lines, inadequate or interrupted water supply or inadequate supply of air; • Damage or failure resulting from operating the Product in a corrosive atmosphere or contrary to the instructions outlined in -warranty repair. All costs and expenses associated with removal and/or reinstallation of the Product for repairs; educate on how to i) deliver, pick up, or install or; and • Shelves, door bins, drawers, handle and...
... water pipes, restricted drain lines, inadequate or interrupted water supply or inadequate supply of air; • Damage or failure resulting from operating the Product in a corrosive atmosphere or contrary to the instructions outlined in -warranty repair. All costs and expenses associated with removal and/or reinstallation of the Product for repairs; educate on how to i) deliver, pick up, or install or; and • Shelves, door bins, drawers, handle and...

Specification
Page 1
...Refrigerator (cu.ft.) Freezer (cu.ft.) Total Capacity (cu.ft.) ENERGY Energy Consumption (kWh/Year) ENERGY STAR® Qualified WATER & ICE SYSTEM Ice & Water Dispenser Dispenser Type Measure Fill Daily Ice Production (lbs) IcePlus™ Production (lbs) Ice Storage Capacity (lbs) Ice System Dual Ice Dispenser Light Water Filter COOLING Linear Compressor Smart Cooling Plus™ System Door Cooling+ Multi-Air Flow™ System Temperature Sensors Fresh Air Filter Evaporator CONVENIENCE Display Type Temperature Controls Door Alarm Child Lock Auto Closing Door Hinge ADA Compliant Sabbath Mode...
...Refrigerator (cu.ft.) Freezer (cu.ft.) Total Capacity (cu.ft.) ENERGY Energy Consumption (kWh/Year) ENERGY STAR® Qualified WATER & ICE SYSTEM Ice & Water Dispenser Dispenser Type Measure Fill Daily Ice Production (lbs) IcePlus™ Production (lbs) Ice Storage Capacity (lbs) Ice System Dual Ice Dispenser Light Water Filter COOLING Linear Compressor Smart Cooling Plus™ System Door Cooling+ Multi-Air Flow™ System Temperature Sensors Fresh Air Filter Evaporator CONVENIENCE Display Type Temperature Controls Door Alarm Child Lock Auto Closing Door Hinge ADA Compliant Sabbath Mode...


