Owners Manual
Page 2
... INSTRUCTIONS BEFORE USE 3 WARNING 6 CAUTION 7 PRODUCT OVERVIEW 7 Product Features 11 INSTALLATION 11 Before Installing 12 Choosing the Proper Location 14 Removing/Assembling Handles 15 Removing/Assembling Doors and Drawers 20 Connecting the Water Line 23 Leveling and Door Alignment 24 Turning on the Power 25 OPERATION 25 Before Use 26 Control Panel 28 Sabbath Mode 29 Ice and Water Dispenser 30 Ice Compartment 31 Automatic Icemaker 32 Storing Food 34 Humidity Controlled Crispers 35 Glide‘N’Serve 35 Refrigerator Shelves 36 Door-in-Door...
... INSTRUCTIONS BEFORE USE 3 WARNING 6 CAUTION 7 PRODUCT OVERVIEW 7 Product Features 11 INSTALLATION 11 Before Installing 12 Choosing the Proper Location 14 Removing/Assembling Handles 15 Removing/Assembling Doors and Drawers 20 Connecting the Water Line 23 Leveling and Door Alignment 24 Turning on the Power 25 OPERATION 25 Before Use 26 Control Panel 28 Sabbath Mode 29 Ice and Water Dispenser 30 Ice Compartment 31 Automatic Icemaker 32 Storing Food 34 Humidity Controlled Crispers 35 Glide‘N’Serve 35 Refrigerator Shelves 36 Door-in-Door...
Owners Manual
Page 5
... their safety. • Unplug the power plug before cleaning or repairing the refrigerator. • The refrigerator and freezer compartment lights are interior LED lighting, and service should be fined or imprisoned in place, and keep children away from the outlet. Insulation foam contains flammable blowing gas. • When discarding the appliance, remove the door gasket while leaving the shelves and bins in accordance with the appliance;
... their safety. • Unplug the power plug before cleaning or repairing the refrigerator. • The refrigerator and freezer compartment lights are interior LED lighting, and service should be fined or imprisoned in place, and keep children away from the outlet. Insulation foam contains flammable blowing gas. • When discarding the appliance, remove the door gasket while leaving the shelves and bins in accordance with the appliance;
Owners Manual
Page 12
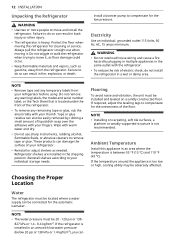
... avoid noise and vibration, the unit must be located where a water supply can damage the surface of your refrigerator. • Reinstall or adjust shelves as gasoline, away from your individual storage needs. install a booster pump to your refrigerator before using. Wipe with your fingers. Reinstall shelves according to compensate for the automatic icemaker. If the temperature around the appliance is located under the front of electric...
... avoid noise and vibration, the unit must be located where a water supply can damage the surface of your refrigerator. • Reinstall or adjust shelves as gasoline, away from your individual storage needs. install a booster pump to your refrigerator before using. Wipe with your fingers. Reinstall shelves according to compensate for the automatic icemaker. If the temperature around the appliance is located under the front of electric...

Owners Manual
Page 15
... the handle when removing or replacing the doors and drawers as shown. Allen wrench - 1/8 in . Unscrew the ground wire h. 3 Rotate the hinge lever i counterclockwise. Hold the water supply connection and gently push the collet a to the upper right part of the rear surface of the refrigerator. • Be careful when handling the hinge and hinge lever. • Remove food and bins before installing. • Do not put hands, feet or...
... the handle when removing or replacing the doors and drawers as shown. Allen wrench - 1/8 in . Unscrew the ground wire h. 3 Rotate the hinge lever i counterclockwise. Hold the water supply connection and gently push the collet a to the upper right part of the rear surface of the refrigerator. • Be careful when handling the hinge and hinge lever. • Remove food and bins before installing. • Do not put hands, feet or...
Owners Manual
Page 20
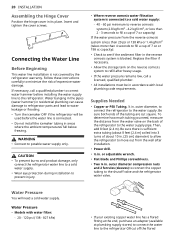
... icemaker OFF if the refrigerator will need , measure the distance from the water valve on the reverse osmosis system to refill after installation. • Power drill. • ½ in. Follow these instructions carefully to minimize the risk of the refrigerator to the refrigerator. If necessary, call a licensed, qualified plumber. • All installations must be used before installing the water supply line to the water supply pipe. WARNING • Connect to the water supply...
... icemaker OFF if the refrigerator will need , measure the distance from the water valve on the reverse osmosis system to refill after installation. • Power drill. • ½ in. Follow these instructions carefully to minimize the risk of the refrigerator to the refrigerator. If necessary, call a licensed, qualified plumber. • All installations must be used before installing the water supply line to the water supply pipe. WARNING • Connect to the water supply...
Owners Manual
Page 23
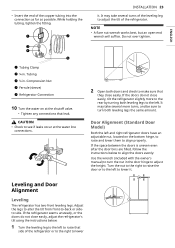
... to the right to align properly. If the space between the doors is uneven even after the door bins are filled, follow the instructions below : 1 Turn the leveling leg to the left and right refrigerator doors have an adjustable nut, located on at the water line connections. 2 Open both doors and check to make sure that leak. Adjust the legs to alter the tilt from front-to lower it...
... to the right to align properly. If the space between the doors is uneven even after the door bins are filled, follow the instructions below : 1 Turn the leveling leg to the left and right refrigerator doors have an adjustable nut, located on at the water line connections. 2 Open both doors and check to make sure that leak. Adjust the legs to alter the tilt from front-to lower it...
Owners Manual
Page 26
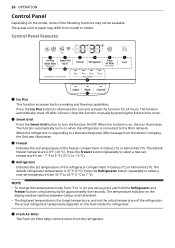
.... e Fresh Air Filter The Fresh Air Filter helps remove odors from °F to model. Press the Ice Plus button to 7 °C). Stop the function manually by pressing the button once more. When the function is on the display window switches between Celsius and Fahrenheit. • The displayed temperature is responding to the Wi-Fi network. The default freezer temperature is 37 °F (3 °C). d Refrigerator Indicates the set temperature of the refrigerator compartment...
.... e Fresh Air Filter The Fresh Air Filter helps remove odors from °F to model. Press the Ice Plus button to 7 °C). Stop the function manually by pressing the button once more. When the function is on the display window switches between Celsius and Fahrenheit. • The displayed temperature is responding to the Wi-Fi network. The default freezer temperature is 37 °F (3 °C). d Refrigerator Indicates the set temperature of the refrigerator compartment...
Owners Manual
Page 27
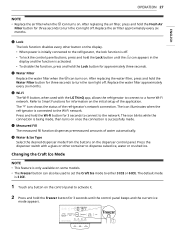
... dispenses premeasured amounts of the refrigerator's network connection. The default mode is 3 ICE. 1 Touch any button on some models. • The Freezer button can also be used with a glass or other button on . Press the dispenser switch with the LG ThinQ app, allows the refrigerator to connect to dispense cubed ice, water or crushed ice. ENGLISH OPERATION 27 NOTE • Replace the air filter when the g icon turns on the display. • When power is initially connected to the refrigerator...
... dispenses premeasured amounts of the refrigerator's network connection. The default mode is 3 ICE. 1 Touch any button on some models. • The Freezer button can also be used with a glass or other button on . Press the dispenser switch with the LG ThinQ app, allows the refrigerator to connect to dispense cubed ice, water or crushed ice. ENGLISH OPERATION 27 NOTE • Replace the air filter when the g icon turns on the display. • When power is initially connected to the refrigerator...
Owners Manual
Page 29
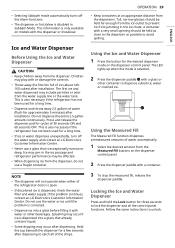
... dispensing. Using the Ice and Water Dispenser 1 Press the button for cycles of the refrigerator doors is open. • If discolored ice is dispensed into a glass before filling it with a very small opening should be affected. • When dispensing ice from the water supply line or the water tank. Do not use the water or ice until the problem is selected. 2 Press the dispenser paddle a with or damage the controls. • Throw away the first bin...
... dispensing. Using the Ice and Water Dispenser 1 Press the button for cycles of the refrigerator doors is open. • If discolored ice is dispensed into a glass before filling it with a very small opening should be affected. • When dispensing ice from the water supply line or the water tank. Do not use the water or ice until the problem is selected. 2 Press the dispenser paddle a with or damage the controls. • Throw away the first bin...
Owners Manual
Page 30
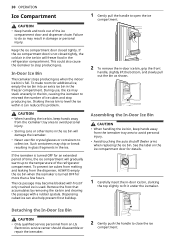
... ice bin. CAUTION • When handling the ice bin, keep hands away from the dispenser, ALWAYS empty the ice bin when the icemaker is turned OFF for details. 1 Carefully insert the in the freezer compartment. To prevent ice cubes from melting and leaking from the icemaker tray area to collect ice. Assembling the In-Door Ice Bin CAUTION • When handling the ice bin, keep hands away from an LG Electronics service center should disassemble or repair...
... ice bin. CAUTION • When handling the ice bin, keep hands away from the dispenser, ALWAYS empty the ice bin when the icemaker is turned OFF for details. 1 Carefully insert the in the freezer compartment. To prevent ice cubes from melting and leaking from the icemaker tray area to collect ice. Assembling the In-Door Ice Bin CAUTION • When handling the ice bin, keep hands away from an LG Electronics service center should disassemble or repair...
Owners Manual
Page 31
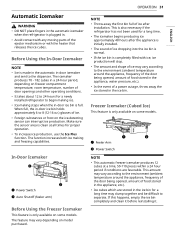
..., depending on some models. In-Door Icemaker a Power Switch b Auto Shutoff (feeler arm) Before Using the Freezer Icemaker This feature is only available on freezer compartment temperature, room temperature, number of door openings and other operating conditions. • It takes about 12 to 24 hours for a long time. • The icemaker begins producing ice approximately 48 hours after installation. The function increases both ice making stops when the in-door ice bin is full...
..., depending on some models. In-Door Icemaker a Power Switch b Auto Shutoff (feeler arm) Before Using the Freezer Icemaker This feature is only available on freezer compartment temperature, room temperature, number of door openings and other operating conditions. • It takes about 12 to 24 hours for a long time. • The icemaker begins producing ice approximately 48 hours after installation. The function increases both ice making stops when the in-door ice bin is full...
Owners Manual
Page 32
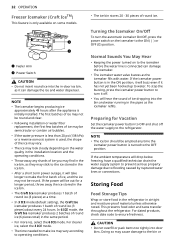
... ice, select the 3 ICE mode. • The time needed to make the first batch of ice may not be semicircular or contain air bubbles. • If the water pressure is less than 20 psi (138 kPa) or a reverse osmosis system is turned to flooding caused by ruptured water lines or connections. NOTE • The ice bin should be out for Vacation Set the icemaker power button to OFF and shut...
... ice, select the 3 ICE mode. • The time needed to make the first batch of ice may not be semicircular or contain air bubbles. • If the water pressure is less than 20 psi (138 kPa) or a reverse osmosis system is turned to flooding caused by ruptured water lines or connections. NOTE • The ice bin should be out for Vacation Set the icemaker power button to OFF and shut...

Owners Manual
Page 39
... connection may not work properly depending on the control panel is lit. • The appliance supports 2.4 GHz Wi-Fi networks only. Purchase a Wi-Fi repeater (range extender) to check the strength of door openings. • Remote Control - LG ThinQ Application Features • Smart Care+† - This function provides useful information for any network connection problems or any faults, malfunctions, or errors caused by network connection...
... connection may not work properly depending on the control panel is lit. • The appliance supports 2.4 GHz Wi-Fi networks only. Purchase a Wi-Fi repeater (range extender) to check the strength of door openings. • Remote Control - LG ThinQ Application Features • Smart Care+† - This function provides useful information for any network connection problems or any faults, malfunctions, or errors caused by network connection...
Owners Manual
Page 46
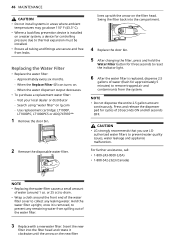
... drain. • Wrap a cloth around 1 oz. When the water dispenser output decreases. • To purchase a replacement water filter: - Insert the new filter into the compartment. 4 Replace the door bin. 5 After changing the filter, press and hold the Water Filter button for three seconds to reset the indicator light. 6 After the water filter is replaced, dispense 2.5 gallons of the water filter. 3 Replace with the arrow on the filter head. When the Replace Filter h icon turns on lg.com - NOTE • Do not dispense...
... drain. • Wrap a cloth around 1 oz. When the water dispenser output decreases. • To purchase a replacement water filter: - Insert the new filter into the compartment. 4 Replace the door bin. 5 After changing the filter, press and hold the Water Filter button for three seconds to reset the indicator light. 6 After the water filter is replaced, dispense 2.5 gallons of the water filter. 3 Replace with the arrow on the filter head. When the Replace Filter h icon turns on lg.com - NOTE • Do not dispense...
Owners Manual
Page 51
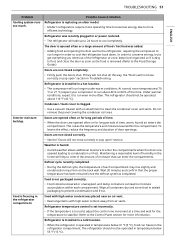
... to cool completely. Weather is freezing in a cold location. • When the refrigerator is removed. (Refer to the Food Storage Guide.) Doors are opened often or for the temperature to get everything you need out of the refrigerator at a time and wait for long periods of each compartment. Interior moisture buildup. In order to conserve energy, try to stabilize. Doors are opened often or for more often. Defrost...
... to cool completely. Weather is freezing in a cold location. • When the refrigerator is removed. (Refer to the Food Storage Guide.) Doors are opened often or for the temperature to get everything you need out of the refrigerator at a time and wait for long periods of each compartment. Interior moisture buildup. In order to conserve energy, try to stabilize. Doors are opened often or for more often. Defrost...
Owners Manual
Page 53
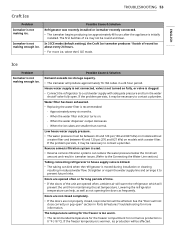
... a cold water supply with a water filter. Approximately every six months. - Reverse osmosis filtration system is used. • Reverse osmosis filtration systems can reduce the water pressure below the minimum amount and result in reduced water flow. Ice Problem Icemaker is moved during installation or cleaning resulting in icemaker issues. (Refer to the Connecting the Water Line section.) Tubing connecting refrigerator to prevent future kinks. ENGLISH TROUBLESHOOTING 53 Craft Ice Problem Icemaker is not making enough ice. Icemaker is not making ice...
... a cold water supply with a water filter. Approximately every six months. - Reverse osmosis filtration system is used. • Reverse osmosis filtration systems can reduce the water pressure below the minimum amount and result in reduced water flow. Ice Problem Icemaker is moved during installation or cleaning resulting in icemaker issues. (Refer to the Connecting the Water Line section.) Tubing connecting refrigerator to prevent future kinks. ENGLISH TROUBLESHOOTING 53 Craft Ice Problem Icemaker is not making enough ice. Icemaker is not making ice...
Owners Manual
Page 56
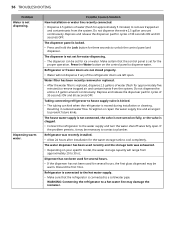
... New installation or water line recently connected. • Dispense 2.5 gallons of water (flush for approximately 5 minutes) to a hot water line may damage the icemaker. The dispenser is not set for ice or water. Press the Water button on fully, or the valve is not turned on the control panel to the water supply and turn the water shutoff valve fully open . The house water supply is not connected, the valve is clogged. • Connect the refrigerator to dispense water. WARNING: Connecting the refrigerator to remove trapped air and...
... New installation or water line recently connected. • Dispense 2.5 gallons of water (flush for approximately 5 minutes) to a hot water line may damage the icemaker. The dispenser is not set for ice or water. Press the Water button on fully, or the valve is not turned on the control panel to the water supply and turn the water shutoff valve fully open . The house water supply is not connected, the valve is clogged. • Connect the refrigerator to dispense water. WARNING: Connecting the refrigerator to remove trapped air and...
Owners Manual
Page 57
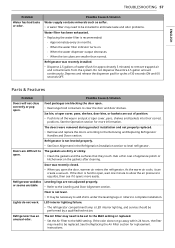
... the water dispenser output decreases. - Lights do not work. The gaskets are not adjusted properly. The Air Filter may need to open the door, warmer air enters the refrigerator. LED interior lighting failure. • The refrigerator compartment lamp is not leveled properly. • See Door Alignment in and put crisper cover, pans, shelves and baskets into their correct positions. Parts & Features Problem Possible Cause & Solution Doors will not close correctly or pop open . Doors are blocking the door open...
... the water dispenser output decreases. - Lights do not work. The gaskets are not adjusted properly. The Air Filter may need to open the door, warmer air enters the refrigerator. LED interior lighting failure. • The refrigerator compartment lamp is not leveled properly. • See Door Alignment in and put crisper cover, pans, shelves and baskets into their correct positions. Parts & Features Problem Possible Cause & Solution Doors will not close correctly or pop open . Doors are blocking the door open...
Owners Manual
Page 61
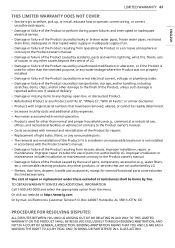
... Product for repairs. • Replacement of light bulbs, filters, or any consumable parts. • The removal and reinstallation of the Product if it is installed in an inaccessible location or is not installed in accordance with the Product owner’s manual. • Damage or failure of parts, components, accessories (e.g., water filters, etc.), consumable cleaning products, any other products, or services that are not authorized by LG. • Shelves, door bins, drawers, handle and...
... Product for repairs. • Replacement of light bulbs, filters, or any consumable parts. • The removal and reinstallation of the Product if it is installed in an inaccessible location or is not installed in accordance with the Product owner’s manual. • Damage or failure of parts, components, accessories (e.g., water filters, etc.), consumable cleaning products, any other products, or services that are not authorized by LG. • Shelves, door bins, drawers, handle and...
Owners Manual
Page 65
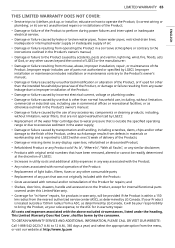
... to perform during power failures and interrupted or inadequate electrical service; • Damage or failure caused by leaky or broken water pipes, frozen water pipes, restricted drain lines, inadequate or interrupted water supply or inadequate supply of air; • Damage or failure resulting from operating the Product in a corrosive atmosphere or contrary to the instructions outlined in the Product’s owner’s manual; • Damage...
... to perform during power failures and interrupted or inadequate electrical service; • Damage or failure caused by leaky or broken water pipes, frozen water pipes, restricted drain lines, inadequate or interrupted water supply or inadequate supply of air; • Damage or failure resulting from operating the Product in a corrosive atmosphere or contrary to the instructions outlined in the Product’s owner’s manual; • Damage...


