
User Guide
Page 2
...Warranty (CANADA) Safety Instructions Grounding Requirements Parts and Features Refrigerator Installation Unpacking Your Refrigerator Installation Removing and Replacing Your Refrigerator Handles and Doors Leveling and Door Alignment Base Cover Using Your Refrigerator Ensuring Proper Air Circulation Multi-Flow Setting the Controls ...Adjusting Control Settings Food Storage Guide Storing Frozen Food u Refrigerator section Water Dispenser Refrigerator Shelves Wine Holder Optibin Crisper Crisper Humidity Control 36 70 3 4 5-6 6 7 8-14 8 8 9-...
...Warranty (CANADA) Safety Instructions Grounding Requirements Parts and Features Refrigerator Installation Unpacking Your Refrigerator Installation Removing and Replacing Your Refrigerator Handles and Doors Leveling and Door Alignment Base Cover Using Your Refrigerator Ensuring Proper Air Circulation Multi-Flow Setting the Controls ...Adjusting Control Settings Food Storage Guide Storing Frozen Food u Refrigerator section Water Dispenser Refrigerator Shelves Wine Holder Optibin Crisper Crisper Humidity Control 36 70 3 4 5-6 6 7 8-14 8 8 9-...
User Guide
Page 3
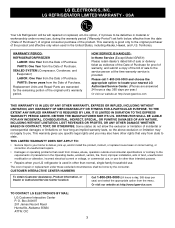
...LOST REVENUES OR PROFITS, OR ANY OTHER DAMAGE WHETHER BASED IN CONTRACT, TORT, OR OTHERWISE. LG REFRIGERATOR LIMITED WARRANTY - Box 240007 201 James Record Road Huntsville, Alabama 35824 ATTN: CIC 3 USA Your LG Refrigerator will be will repaired or replaced, at : http://www.lgservice.com THIS WARRANTY IS IN.... This warranty gives you specific legal rights and you . THIS LIMITED WARRANTY DOES NOT APPLY TO: • Service trips to your LG refrigerator is provided. Or visit our website at the time warranty service is used in other rights that vary from the date ("Date of ...
...LOST REVENUES OR PROFITS, OR ANY OTHER DAMAGE WHETHER BASED IN CONTRACT, TORT, OR OTHERWISE. LG REFRIGERATOR LIMITED WARRANTY - Box 240007 201 James Record Road Huntsville, Alabama 35824 ATTN: CIC 3 USA Your LG Refrigerator will be will repaired or replaced, at : http://www.lgservice.com THIS WARRANTY IS IN.... This warranty gives you specific legal rights and you . THIS LIMITED WARRANTY DOES NOT APPLY TO: • Service trips to your LG refrigerator is provided. Or visit our website at the time warranty service is used in other rights that vary from the date ("Date of ...
User Guide
Page 4
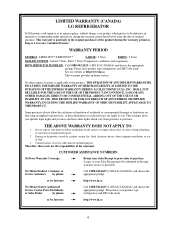
...legal rights and you . Commercial use or use , during the warranty period as long as it is in -home service. LIMITED WARRANTY (CANADA) LG REFRIGERATOR LG Electronics will repair or at the time warranty service is provided. WARRANTY PERIOD MODEL# : LRFD21855**/LRFD25850** LABOR : 2 Years PARTS : 2 Years ... LIMITED TO THE DURATION OF THE EXPRESS WARRANTY HEREIN. CUSTOMER ASSISTANCE NUMBERS: To Prove Warranty Coverage: Retain your product type (refrigerator) and ZIP Code ready. Damage to your product which vary from the date of God. 3. SHALL NOT BE LIABLE FOR...
...legal rights and you . Commercial use or use , during the warranty period as long as it is in -home service. LIMITED WARRANTY (CANADA) LG REFRIGERATOR LG Electronics will repair or at the time warranty service is provided. WARRANTY PERIOD MODEL# : LRFD21855**/LRFD25850** LABOR : 2 Years PARTS : 2 Years ... LIMITED TO THE DURATION OF THE EXPRESS WARRANTY HEREIN. CUSTOMER ASSISTANCE NUMBERS: To Prove Warranty Coverage: Retain your product type (refrigerator) and ZIP Code ready. Damage to your product which vary from the date of God. 3. SHALL NOT BE LIABLE FOR...
User Guide
Page 5
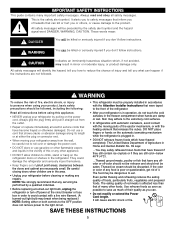
...cord. • DO NOT store or use a cord that were taped to eat. All safety messages will be eaten. They could damage the refrigerator and seriously injure themselves. • Keep fingers out of foods, particularly fruits, vegetables and prepared foods. NOTE: We strongly recommend that any ...that shows cracks or abrasion damage along its length or at either the plug or connector end. • When moving parts of Agriculture in the refrigerator. The United States Department of the ejector mechanism, or with a live wire filament. (A burned-out light bulb may result in . •...
...cord. • DO NOT store or use a cord that were taped to eat. All safety messages will be eaten. They could damage the refrigerator and seriously injure themselves. • Keep fingers out of foods, particularly fruits, vegetables and prepared foods. NOTE: We strongly recommend that any ...that shows cracks or abrasion damage along its length or at either the plug or connector end. • When moving parts of Agriculture in the refrigerator. The United States Department of the ejector mechanism, or with a live wire filament. (A burned-out light bulb may result in . •...
User Guide
Page 6
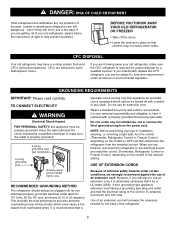
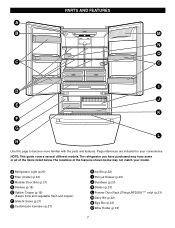
...circumstances, cut or remove the third (ground) prong from overheated wires. However, if you still elect to use . CFC DISPOSAL Your old refrigerator may have it is removed for 115 Volts, 60 Hz, AC only, and fused at right to the desired setting. It is absolutely necessary... can be plugged into its own individual properly grounded electrical outlet rated for proper disposal by a qualified electrician to OFF and then disconnect the refrigerator from the electrical source. Where a standard two-prong wall outlet is encountered, it replaced with a switch or pull chain. Do not, ...
...circumstances, cut or remove the third (ground) prong from overheated wires. However, if you still elect to use . CFC DISPOSAL Your old refrigerator may have it is removed for 115 Volts, 60 Hz, AC only, and fused at right to the desired setting. It is absolutely necessary... can be plugged into its own individual properly grounded electrical outlet rated for proper disposal by a qualified electrician to OFF and then disconnect the refrigerator from the electrical source. Where a standard two-prong wall outlet is encountered, it replaced with a switch or pull chain. Do not, ...
User Guide
Page 7
... J Durabase (p.23) K Divider (p.23) L Freezer Door Rack (Tilting-LRFD258**** only) (p.23) M Dairy Bin (p.22) N Egg Box (p.22) O Wine Holder (p.18) 7 A Refrigerator Light (p.25) B Filter (Inside) (p.24) C Modular Door Bins (p.21) D Shelves (p.18) E Optibin Crisper (p.19) (Keeps fruits and vegetable fresh and crisper) F Glide N Serve... H Use this page to become more familiar with the parts and features. NOTE: This guide covers several different models. The refrigerator you have purchased may have some or all of the features shown below . The locations of the items listed below may not ...
... J Durabase (p.23) K Divider (p.23) L Freezer Door Rack (Tilting-LRFD258**** only) (p.23) M Dairy Bin (p.22) N Egg Box (p.22) O Wine Holder (p.18) 7 A Refrigerator Light (p.25) B Filter (Inside) (p.24) C Modular Door Bins (p.21) D Shelves (p.18) E Optibin Crisper (p.19) (Keeps fruits and vegetable fresh and crisper) F Glide N Serve... H Use this page to become more familiar with the parts and features. NOTE: This guide covers several different models. The refrigerator you have purchased may have some or all of the features shown below . The locations of the items listed below may not ...
User Guide
Page 8
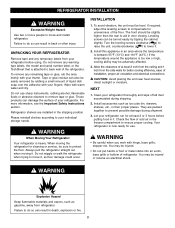
... to raise the unit, counterclockwise ( ) to compensate for at least 2 inch from the ceiling and 1 inch from your fingers. Your refrigerator is attached to protect the floor. You may be easily removed by tipping the cabinet slightly. Failure to do so can be sure to back...;F (43°C.) If the temperature around the appliance is heavy. Clean your individual storage needs. Do not wiggle or walk the refrigerator when trying to prevent possible damage during shipping. 2. Install this appliance in door closing. They are installed in their proper places. ...
... to raise the unit, counterclockwise ( ) to compensate for at least 2 inch from the ceiling and 1 inch from your fingers. Your refrigerator is attached to protect the floor. You may be easily removed by tipping the cabinet slightly. Failure to do so can be sure to back...;F (43°C.) If the temperature around the appliance is heavy. Clean your individual storage needs. Do not wiggle or walk the refrigerator when trying to prevent possible damage during shipping. 2. Install this appliance in door closing. They are installed in their proper places. ...

User Guide
Page 9
..., you hit it maybe necessary to separate from the mounting screws (3). 2 Keyhole slots on back of handle 9 REFRIGERATOR INSTALLATION HOW TO REMOVE DOOR HANDLES To move refrigerator through a house door, it with both hands and slide the handle up (1)(this page. 1. Screws mounted 3 ... against door first. NOTE: Handle appearance may require some force). 1 • The keyhole slots (2) on the back of handle 1 2. Removing Refrigerator Handle • Grasp the handle tightly with some force). • The keyhole slots (2) on the back of the handle allow the handle to...
..., you hit it maybe necessary to separate from the mounting screws (3). 2 Keyhole slots on back of handle 9 REFRIGERATOR INSTALLATION HOW TO REMOVE DOOR HANDLES To move refrigerator through a house door, it with both hands and slide the handle up (1)(this page. 1. Screws mounted 3 ... against door first. NOTE: Handle appearance may require some force). 1 • The keyhole slots (2) on the back of handle 1 2. Removing Refrigerator Handle • Grasp the handle tightly with some force). • The keyhole slots (2) on the back of the handle allow the handle to...
User Guide
Page 10
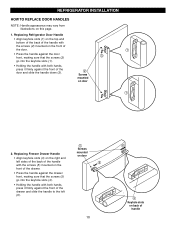
REFRIGERATOR INSTALLATION HOW TO REPLACE DOOR HANDLES NOTE: Handle appearance may vary from illustrations on the front of the drawer. • Press the handle against the ... right and mounted on door left (6). 10 6 4 Keyhole slots on back of the door and slide the handle down (3). 2 Screws mounted on door 1 5 Screws 2. Replacing Refrigerator Door Handle • Align keyhole slots (1) on the top and bottom of the back of the handle with the screws (2) mounted on the front of...
REFRIGERATOR INSTALLATION HOW TO REPLACE DOOR HANDLES NOTE: Handle appearance may vary from illustrations on the front of the drawer. • Press the handle against the ... right and mounted on door left (6). 10 6 4 Keyhole slots on back of the door and slide the handle down (3). 2 Screws mounted on door 1 5 Screws 2. Replacing Refrigerator Door Handle • Align keyhole slots (1) on the top and bottom of the back of the handle with the screws (2) mounted on the front of...
User Guide
Page 11
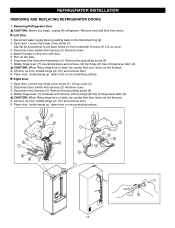
...When lifting hinge free of latch, be careful that door does not fall forward. 5. Open door. Removing Refrigerator Door w CAUTION: Before you begin, unplug the refrigerator. w CAUTION: When lifting hinge free of hinge lever latch (9). Disconnect water supply tube by pushing back on...(9). Lift top hinge (8) free of latch, be careful that door does not fall forward. 8. u Right Door 1. Remove cover. 4. REFRIGERATOR INSTALLATION REMOVING AND REPLACING REFRIGERATOR DOORS 1. u Left Door 1. Lift up , down onto a non-scratching surface. 3 4 6 7 8 9 1 2 5 3 1 78 9 2 6...
...When lifting hinge free of latch, be careful that door does not fall forward. 5. Open door. Removing Refrigerator Door w CAUTION: Before you begin, unplug the refrigerator. w CAUTION: When lifting hinge free of hinge lever latch (9). Disconnect water supply tube by pushing back on...(9). Lift top hinge (8) free of latch, be careful that door does not fall forward. 8. u Right Door 1. Remove cover. 4. REFRIGERATOR INSTALLATION REMOVING AND REPLACING REFRIGERATOR DOORS 1. u Left Door 1. Lift up , down onto a non-scratching surface. 3 4 6 7 8 9 1 2 5 3 1 78 9 2 6...
User Guide
Page 12
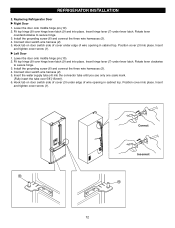
... (3) into place. u Left Door 1. Install the grounding screw (6) and connect the three wire harnesses (5). 4. Connect door switch wire harness (2). 5. Rotate lever clockwise to secure hinge. 3. REFRIGERATOR INSTALLATION 2. Fit top hinge (8) over 5/8"(15mm)). 6. Install the grounding screw (6) and connect the three wire harnesses (5). 4. Connect door switch wire harness (2). 5. Position cover into place...
... (3) into place. u Left Door 1. Install the grounding screw (6) and connect the three wire harnesses (5). 4. Connect door switch wire harness (2). 5. Rotate lever clockwise to secure hinge. 3. REFRIGERATOR INSTALLATION 2. Fit top hinge (8) over 5/8"(15mm)). 6. Install the grounding screw (6) and connect the three wire harnesses (5). 4. Connect door switch wire harness (2). 5. Position cover into place...
User Guide
Page 13
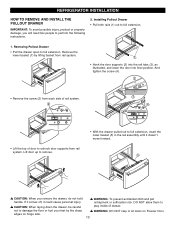
... to damage the floor or hurt your feet by lifting basket from rail system. w WARNING: To prevent accidental child and pet entrapment or suffocation risk. REFRIGERATOR INSTALLATION HOW TO REMOVE AND INSTALL THE PULLOUT DRAWER IMPORTANT: To avoid possible injury, product or property damage, you remove the drawer, do not hold...
... to damage the floor or hurt your feet by lifting basket from rail system. w WARNING: To prevent accidental child and pet entrapment or suffocation risk. REFRIGERATOR INSTALLATION HOW TO REMOVE AND INSTALL THE PULLOUT DRAWER IMPORTANT: To avoid possible injury, product or property damage, you remove the drawer, do not hold...
User Guide
Page 14
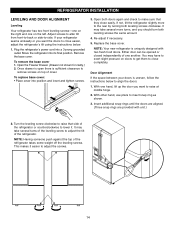
...them to remove screws on the left. NOTE: Having someone push against the top of the leveling screw to align the doors: 1. Plug the refrigerator's power cord into its final position. To replace base cover: • Place cover into position and insert and tighten screws. 3. With one... another. If your doors is sufficient clearance to close completely. If not, tilt the refrigerator slightly more turns, and you want the doors to adjust the screws. 14 Replace the base cover. This makes it . Either door can ...
...them to remove screws on the left. NOTE: Having someone push against the top of the leveling screw to align the doors: 1. Plug the refrigerator's power cord into its final position. To replace base cover: • Place cover into position and insert and tighten screws. 3. With one... another. If your doors is sufficient clearance to close completely. If not, tilt the refrigerator slightly more turns, and you want the doors to adjust the screws. 14 Replace the base cover. This makes it . Either door can ...
User Guide
Page 15
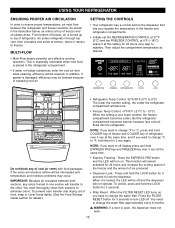
... • Multi-Flow means powerful and effective cooling operation. Leave it at the same time. To prevent odor transfer and drying out of refrigerator over 3 sec at a lower number, the freezer compartment becomes colder. When it returns to off and the dispenser will be off display press... to change °F to °C, press and hold the LOCK button for 3 seconds to turn on , you regulate the temperature in the refrigerator compartment. • If water or foreign substances enter the cool air vent while cleaning, efficiency will not operate. In addition, if gasket is at...
... • Multi-Flow means powerful and effective cooling operation. Leave it at the same time. To prevent odor transfer and drying out of refrigerator over 3 sec at a lower number, the freezer compartment becomes colder. When it returns to off and the dispenser will be off display press... to change °F to °C, press and hold the LOCK button for 3 seconds to turn on , you regulate the temperature in the refrigerator compartment. • If water or foreign substances enter the cool air vent while cleaning, efficiency will not operate. In addition, if gasket is at...
User Guide
Page 16
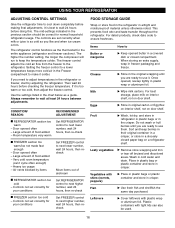
...foil. Door opened , rewrap tightly in airtight and moisture-proof material unless otherwise noted. Controls not set correctly for your conditions Set REFRIGERATOR control to keep berries in their original container in a crisper, or store in the original wrapping until you are ready to wait ... adjustments. Door opened butter in crisper. Heavy ice usage - Very cold room temperature (can also be correct for the entire appliance (refrigerator and freezer sections). It is best to use it is firm. Place in plastic bag or plastic container and store in a covered ...
...foil. Door opened , rewrap tightly in airtight and moisture-proof material unless otherwise noted. Controls not set correctly for your conditions Set REFRIGERATOR control to keep berries in their original container in a crisper, or store in the original wrapping until you are ready to wait ... adjustments. Door opened butter in crisper. Heavy ice usage - Very cold room temperature (can also be correct for the entire appliance (refrigerator and freezer sections). It is best to use it is firm. Place in plastic bag or plastic container and store in a covered ...
User Guide
Page 17
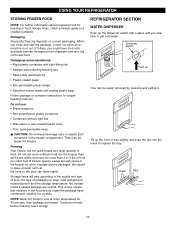
... are normal. Freezing Your freezer will vary according to replace the tray. Ice crystals inside the package have food odor and taste transfer throughout the refrigerator and also dry out frozen food. Tilt up the front of tray slightly and snap the ribs into the freezer than will freeze within 24... crystals. Do not put more than 2 to circulate around packages. Be careful to cool at the front so the door can be break if it . REFRIGERATOR SECTION WATER DISPENSER Push up Tray can close and seal the package, it does, you hear click to get cold water. Do not use: •...
... are normal. Freezing Your freezer will vary according to replace the tray. Ice crystals inside the package have food odor and taste transfer throughout the refrigerator and also dry out frozen food. Tilt up the front of tray slightly and snap the ribs into the freezer than will freeze within 24... crystals. Do not put more than 2 to circulate around packages. Be careful to cool at the front so the door can be break if it . REFRIGERATOR SECTION WATER DISPENSER Push up Tray can close and seal the package, it does, you hear click to get cold water. Do not use: •...
User Guide
Page 18
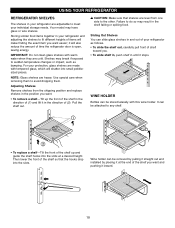
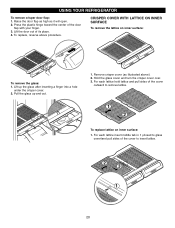
... up and guide the shelf hooks into the slots at the end of the shelf you want easier; USING YOUR REFRIGERATOR REFRIGERATOR SHELVES The shelves in your refrigerator are adjustable to the other. Your model may break if exposed to avoid dropping them to sudden temperature changes or impact... follows. • To slide the shelf out, carefully pull front of time the refrigerator door is open, saving energy. For your refrigerator as bumping. Storing similar food items together in your refrigerator and adjusting the shelves to fit different heights of items will also reduce the amount ...
... up and guide the shelf hooks into the slots at the end of the shelf you want easier; USING YOUR REFRIGERATOR REFRIGERATOR SHELVES The shelves in your refrigerator are adjustable to the other. Your model may break if exposed to avoid dropping them to sudden temperature changes or impact... follows. • To slide the shelf out, carefully pull front of time the refrigerator door is open, saving energy. For your refrigerator as bumping. Storing similar food items together in your refrigerator and adjusting the shelves to fit different heights of items will also reduce the amount ...
User Guide
Page 19
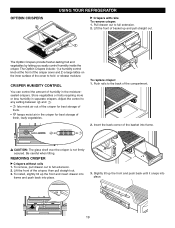
... is not firmly secured. To install, slightly tilt up the front and insert drawer into frame and push back into frame. OPTIBIN CRISPERS 2 USING YOUR REFRIGERATOR u Crispers with rails To remove crisper: 1. Push rails to any setting between and . • lets moist air out of the crisper for best storage of...
... is not firmly secured. To install, slightly tilt up the front and insert drawer into frame and push back into frame. OPTIBIN CRISPERS 2 USING YOUR REFRIGERATOR u Crispers with rails To remove crisper: 1. Push rails to any setting between and . • lets moist air out of the crisper for best storage of...
User Guide
Page 20
... COVER WITH LATTICE ON INNER SURFACE To remove the lattice on inner surface: 1. Hold the glass cover and turn the crisper cover over. 3. USING YOUR REFRIGERATOR To remove crisper door flap: 1. Press the plastic hinge toward the center of its place. 4. Lift up and out. 1. Raise the door flap as high...
... COVER WITH LATTICE ON INNER SURFACE To remove the lattice on inner surface: 1. Hold the glass cover and turn the crisper cover over. 3. USING YOUR REFRIGERATOR To remove crisper door flap: 1. Press the plastic hinge toward the center of its place. 4. Lift up and out. 1. Raise the door flap as high...
User Guide
Page 21
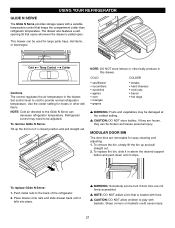
...air temperature in this drawer. w CAUTION: DO NOT store bottles. Push metal rails to provide normal refrigerator temperature. Set control level to cold to the back of the refrigerator. 2. Refrigerator control may be adjusted. To remove the bin, simply lift the bin up the front on baskets could... cause injury. 21 To replace Glide N Serve: 1. Sharp corners on it 's closed position and pull straight out. USING YOUR REFRIGERATOR GLIDE N SERVE The Glide N Serve provides storage space with food. The drawer also features a selfopening lid that keeps the compartment colder than...
...air temperature in this drawer. w CAUTION: DO NOT store bottles. Push metal rails to provide normal refrigerator temperature. Set control level to cold to the back of the refrigerator. 2. Refrigerator control may be adjusted. To remove the bin, simply lift the bin up the front on baskets could... cause injury. 21 To replace Glide N Serve: 1. Sharp corners on it 's closed position and pull straight out. USING YOUR REFRIGERATOR GLIDE N SERVE The Glide N Serve provides storage space with food. The drawer also features a selfopening lid that keeps the compartment colder than...


