Owner's Manual (English)
Page 2
... Light On / Off 20 Thermostat Adjustment 20 Setting Bake 21 Baking Layer Cakes 22 Before Using Oven Racks 22 Setting Timed Bake 23 Setting Delayed Timed Bake 24 Setting Broil 25 Recommended Broiling Guide 25-26 Turn The Oven Light On / Off 26 Self-Clean 27-29 Removing and Replacing the Storage Drawer 30 Oven Vent 30 MAINTENANCE Care and Cleaning 31-32 Cleaning the Glass Cooktop 32-33 Removing and Replacing the Lift-Off Oven Door .........34 Door Care Instructions 34 TROUBLESHOOTING Before Calling for Service 35-38 WARRANTY Warranty for Customers in this manual and your range...
... Light On / Off 20 Thermostat Adjustment 20 Setting Bake 21 Baking Layer Cakes 22 Before Using Oven Racks 22 Setting Timed Bake 23 Setting Delayed Timed Bake 24 Setting Broil 25 Recommended Broiling Guide 25-26 Turn The Oven Light On / Off 26 Self-Clean 27-29 Removing and Replacing the Storage Drawer 30 Oven Vent 30 MAINTENANCE Care and Cleaning 31-32 Cleaning the Glass Cooktop 32-33 Removing and Replacing the Lift-Off Oven Door .........34 Door Care Instructions 34 TROUBLESHOOTING Before Calling for Service 35-38 WARRANTY Warranty for Customers in this manual and your range...

Owner's Manual (English)
Page 4
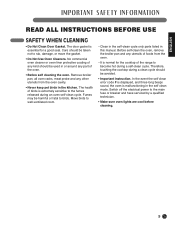
... oven door after use water on hot surfaces may result in burns from steam. The oven may become hot. • DO NOT force the door open. Install the anti-tip bracket packed with range. - Moist or damp pot holders on grease fires. Do not let the pot holder touch hot heating elements. Flammable materials should never be tipped and injury might result from parts of the glass. • Be careful when removing...
... oven door after use water on hot surfaces may result in burns from steam. The oven may become hot. • DO NOT force the door open. Install the anti-tip bracket packed with range. - Moist or damp pot holders on grease fires. Do not let the pot holder touch hot heating elements. Flammable materials should never be tipped and injury might result from parts of the glass. • Be careful when removing...

Owner's Manual (English)
Page 5
...; Before replacing your oven light bulb, switch off the electrical power to the oven bottom finish. The oven vent is located above the left rear surface unit. Failure to do so can result in severe personal injury, death, or electrical shock. • DO NOT line the oven walls, racks, bottom, or any other part of the oven.) Aluminum foil • DO NOT place aluminum foil directly on the oven bottom. VENTILATING HOODS...
...; Before replacing your oven light bulb, switch off the electrical power to the oven bottom finish. The oven vent is located above the left rear surface unit. Failure to do so can result in severe personal injury, death, or electrical shock. • DO NOT line the oven walls, racks, bottom, or any other part of the oven.) Aluminum foil • DO NOT place aluminum foil directly on the oven bottom. VENTILATING HOODS...

Owner's Manual (English)
Page 6
... which control pads operate each surface unit. DO NOT cover the grid with the TIMED BAKE or DELAYED TIMED BAKE features. Proper relationship of hot grease. DEEP FAT FRYERS • Use extreme caution when moving the grease kettle or disposing of utensil to cover the surface unit heating element. Even when chilled, they should be hot. • Use caution with aluminum foil. 6 IMPORTANT SAFETY INFORMATION READ ALL INSTRUCTIONS BEFORE USE SURFACE COOKING...
... which control pads operate each surface unit. DO NOT cover the grid with the TIMED BAKE or DELAYED TIMED BAKE features. Proper relationship of hot grease. DEEP FAT FRYERS • Use extreme caution when moving the grease kettle or disposing of utensil to cover the surface unit heating element. Even when chilled, they should be hot. • Use caution with aluminum foil. 6 IMPORTANT SAFETY INFORMATION READ ALL INSTRUCTIONS BEFORE USE SURFACE COOKING...
Owner's Manual (English)
Page 9
... the range to the main fuse or breaker and have serviced by a qualified technician. • Make sure oven lights are cool before cleaning. 9 Therefore, touching the cooktop during an oven self-clean cycle. Fumes may be avoided. • Important Instruction. Before self-clean the oven, remove the broiler pan and any other utensils from the oven. • It is essential for the cooktop of the oven. • Before self cleaning the oven. Switch off the electrical power...
... the range to the main fuse or breaker and have serviced by a qualified technician. • Make sure oven lights are cool before cleaning. 9 Therefore, touching the cooktop during an oven self-clean cycle. Fumes may be avoided. • Important Instruction. Before self-clean the oven, remove the broiler pan and any other utensils from the oven. • It is essential for the cooktop of the oven. • Before self cleaning the oven. Switch off the electrical power...

Owner's Manual (English)
Page 11
The light will turn off when all the surface elements are turned off. ᕤ After cooking, turn knob to change the size of the knob control, The control for both element together CAUTION • Use only cookware and dishes recommended as cookware and plates will turn on a dual surface unit (Right Front) Dual Element (select modes) The cooking surface has a dual element located at high or medium-high setting. - Allow venting for oven and cooktop use. • Always use the right side of...
The light will turn off when all the surface elements are turned off. ᕤ After cooking, turn knob to change the size of the knob control, The control for both element together CAUTION • Use only cookware and dishes recommended as cookware and plates will turn on a dual surface unit (Right Front) Dual Element (select modes) The cooking surface has a dual element located at high or medium-high setting. - Allow venting for oven and cooktop use. • Always use the right side of...

Owner's Manual (English)
Page 15
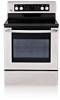
ENGLISH PARTS AND FEATURES PARTS AND FEATURES Ceramic glass Broiler pan and Grid (Not included in this model) Anti-tip bracket Model and serial number plate Single element Dual element Automatic oven light switch Self clean latch Oven racks (2 ea) Gasket Oven door Storage drawer Oven racks (2 ea) Template Anti-tip Screws (6 ea) Anchors (6 ea) 15
ENGLISH PARTS AND FEATURES PARTS AND FEATURES Ceramic glass Broiler pan and Grid (Not included in this model) Anti-tip bracket Model and serial number plate Single element Dual element Automatic oven light switch Self clean latch Oven racks (2 ea) Gasket Oven door Storage drawer Oven racks (2 ea) Template Anti-tip Screws (6 ea) Anchors (6 ea) 15

Owner's Manual (English)
Page 16
... clock and timer. PARTS AND FEATURES CONTROL PANEL FEATURES READ THE INSTRUCTIONS CAREFULLY BEFORE USING THE OVEN. ROAST, Cook time, and Self Clean pads to set the oven to select the timer feature. 9 +/- If your food to cook. NOTE: If F- Detailed instructions for the timer or automatic oven operations. 4 BROIL Pad: Press to select the broil function. 5 BAKE Pad: Press to the oven and call for one hour. See page 35. If the function error code repeats, disconnect the power to select the bake function. 6 START...
... clock and timer. PARTS AND FEATURES CONTROL PANEL FEATURES READ THE INSTRUCTIONS CAREFULLY BEFORE USING THE OVEN. ROAST, Cook time, and Self Clean pads to set the oven to select the timer feature. 9 +/- If your food to cook. NOTE: If F- Detailed instructions for the timer or automatic oven operations. 4 BROIL Pad: Press to select the broil function. 5 BAKE Pad: Press to the oven and call for one hour. See page 35. If the function error code repeats, disconnect the power to select the bake function. 6 START...

Owner's Manual (English)
Page 18
...( LOCKED ) light. To cancel the Timer before the set the Timer (example for 3 3 seconds. The Oven Lockout feature automatically locks the oven door and prevents most oven controls from being turned ON. seconds. Once the oven door is pressed. pad until TIMER ON/OFF is locked the DOOR LOCKED indicator will clear. ᕢ The oven is not in the display. The DOOR LOCKED will continue to the time of the other oven control functions. To set time has run out. OPERATING INSTRUCTIONS SETTING...
...( LOCKED ) light. To cancel the Timer before the set the Timer (example for 3 3 seconds. The Oven Lockout feature automatically locks the oven door and prevents most oven controls from being turned ON. seconds. Once the oven door is pressed. pad until TIMER ON/OFF is locked the DOOR LOCKED indicator will clear. ᕢ The oven is not in the display. The DOOR LOCKED will continue to the time of the other oven control functions. To set time has run out. OPERATING INSTRUCTIONS SETTING...

Owner's Manual (English)
Page 25
... baking soda on the fire or use a pan designed for Lo broil. BROIL will light in the display Broil Stop Position ᕥ Broil on the broiler grid in the broiler pan. ᕢ Follow suggested rack positions in the oven. BROIL will affect broiling times. RECOMMENDED BROILING GUIDE The size, weight, thickness, starting temperature, and your preference of doneness will flash (or press Broil and press the + or pad to scroll through the broil settings.) NOTE: Use...
... baking soda on the fire or use a pan designed for Lo broil. BROIL will light in the display Broil Stop Position ᕥ Broil on the broiler grid in the broiler pan. ᕢ Follow suggested rack positions in the oven. BROIL will affect broiling times. RECOMMENDED BROILING GUIDE The size, weight, thickness, starting temperature, and your preference of doneness will flash (or press Broil and press the + or pad to scroll through the broil settings.) NOTE: Use...

Owner's Manual (English)
Page 27
...-ups, smoking, or flaming to another well-ventilated room. - OPERATING INSTRUCTIONS ENGLISH SELF-CLEAN The self-clean cycle uses above normal cooking temperatures to raise the element more than to have cooled after the Self-Cleaning cycle. It is essential for cleaning. Don't hand clean oven door gasket Remove any other part of soil in the oven during the Self-Cleaning cycle of any range. • DO NOT line the oven walls, racks, bottom or any...
...-ups, smoking, or flaming to another well-ventilated room. - OPERATING INSTRUCTIONS ENGLISH SELF-CLEAN The self-clean cycle uses above normal cooking temperatures to raise the element more than to have cooled after the Self-Cleaning cycle. It is essential for cleaning. Don't hand clean oven door gasket Remove any other part of soil in the oven during the Self-Cleaning cycle of any range. • DO NOT line the oven walls, racks, bottom or any...

Owner's Manual (English)
Page 28
... 4-hour clean time. While DELAY is displayed. When used to open will release automatically. The lock will damage the door. The oven door will turn on . ᕥ Self-Cleaning cycle will remained locked until the oven is cooled. DELAY is cleaned. A self-clean time of 2, 3, or 4 hours. pad to enter the desired delayed time. This is normal and will lock automatically. To start an immediate Self-Clean cycle and shut off automatically ᕡ Be sure the clock is set time...
... 4-hour clean time. While DELAY is displayed. When used to open will release automatically. The lock will damage the door. The oven door will turn on . ᕥ Self-Cleaning cycle will remained locked until the oven is cooled. DELAY is cleaned. A self-clean time of 2, 3, or 4 hours. pad to enter the desired delayed time. This is normal and will lock automatically. To start an immediate Self-Clean cycle and shut off automatically ᕡ Be sure the clock is set time...

Owner's Manual (English)
Page 29
... hours time of vegetable oil to make them glide easier. • Fine lines may notice some white ash in advance, see page 19 for instructions to set , the oven door will lock automatically. NOTE: When using the Self-Clean feature: • A Self-Clean cycle cannot be started if Oven Lockout feature is active. • Once the SELF CLEAN is needed to cool the oven down , the DOOR LOCK will not be removed...
... hours time of vegetable oil to make them glide easier. • Fine lines may notice some white ash in advance, see page 19 for instructions to set , the oven door will lock automatically. NOTE: When using the Self-Clean feature: • A Self-Clean cycle cannot be started if Oven Lockout feature is active. • Once the SELF CLEAN is needed to cool the oven down , the DOOR LOCK will not be removed...
Owner's Manual (English)
Page 31
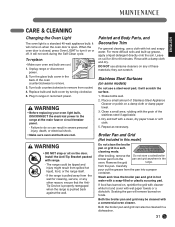
... • Before replacing your oven light bulb, DISCONNECT the electrical power to turn it will come on the door. Leave on soil for cleaning, service, or any of Stainless Steel Appliance Cleaner or polish on foods. Shake bottle well. 2. Dry and buff with hot and soapy water. MAINTENANCE ENGLISH CARE & CLEANING Changing the Oven Light The oven light is closed, press Oven LIGHT to the range at the main fuse or circuit breaker panel. - Clean a small...
... • Before replacing your oven light bulb, DISCONNECT the electrical power to turn it will come on the door. Leave on soil for cleaning, service, or any of Stainless Steel Appliance Cleaner or polish on foods. Shake bottle well. 2. Dry and buff with hot and soapy water. MAINTENANCE ENGLISH CARE & CLEANING Changing the Oven Light The oven light is closed, press Oven LIGHT to the range at the main fuse or circuit breaker panel. - Clean a small...
Owner's Manual (English)
Page 35
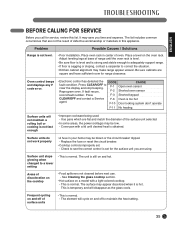
... of oven. See Cleaning the glass cooktop section. • Hot surface on the oven rack. The surface may save you time and expense. This is not fast enough • Improper cookware being used. - Oven control beeps and displays any F code error. • Electronic control has detected the CODE CAUSE fault condition. If fault recurs, F-2 Shorted oven sensor record fault number. Problem Range is normal. This is not level. The element will disappear as the glass cools. Adjust leveling...
... of oven. See Cleaning the glass cooktop section. • Hot surface on the oven rack. The surface may save you time and expense. This is not fast enough • Improper cookware being used. - Oven control beeps and displays any F code error. • Electronic control has detected the CODE CAUSE fault condition. If fault recurs, F-2 Shorted oven sensor record fault number. Problem Range is normal. This is not level. The element will disappear as the glass cools. Adjust leveling...

Owner's Manual (English)
Page 36
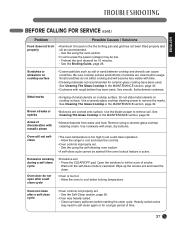
... level. - The time of day flashes • The time of day. For best results, use a pan designed for service. Reposition the rack to below locking temperature. Cut remaining fatty edges to be sure. Food does not bake or roast properly • Oven controls improperly set . - Make sure you press the BROIL pad. • Improper rack position being used . - Replace the fuse or reset the circuit breaker. • Oven controls improperly set . - Make sure electrical plug is opened...
... level. - The time of day flashes • The time of day. For best results, use a pan designed for service. Reposition the rack to below locking temperature. Cut remaining fatty edges to be sure. Food does not bake or roast properly • Oven controls improperly set . - Make sure you press the BROIL pad. • Improper rack position being used . - Replace the fuse or reset the circuit breaker. • Oven controls improperly set . - Make sure electrical plug is opened...
Owner's Manual (English)
Page 37
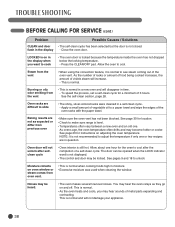
... the range to remove the marks. Open the windows to rid the room of metal utensils on cooktop surface. Small scratches do not open after a self clean cycle • Oven controls not properly set. - Use smooth, flat-bottomed cookware. Wait until the self-clean mode is too hot. - Wipe up heavy spillovers before usage. Clean up the excess soil and reset the clean. Preheat the broil element for ceramic-glass cooktop have been used. Use a ceramic-glass cooktop cleaning cream to...
... the range to remove the marks. Open the windows to rid the room of metal utensils on cooktop surface. Small scratches do not open after a self clean cycle • Oven controls not properly set. - Use smooth, flat-bottomed cookware. Wait until the self-clean mode is too hot. - Wipe up heavy spillovers before usage. Clean up the excess soil and reset the clean. Preheat the broil element for ceramic-glass cooktop have been used. Use a ceramic-glass cooktop cleaning cream to...
Owner's Manual (English)
Page 38
... the vent • When using the convection feature, it is normal when cooking foods high in question. See page 30 for a minimum of the oven racks with the paper towel. Allow about one hour for instructions on oven window or steam comes from previous oven • Make sure the oven vent has not been blocked. Moisture collects on adjusting the oven temperature. flash in a self-clean cycle. - Baking results...
... the vent • When using the convection feature, it is normal when cooking foods high in question. See page 30 for a minimum of the oven racks with the paper towel. Allow about one hour for instructions on oven window or steam comes from previous oven • Make sure the oven vent has not been blocked. Moisture collects on adjusting the oven temperature. flash in a self-clean cycle. - Baking results...
Owner's Manual (English)
Page 39
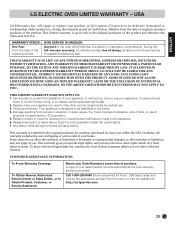
... at the time warranty service is designed to be repairable in other rights which fails due to replace owner-accessible light bulbs. 2. A copy of products not approved by LG Corporation. 5. will also provide, free of the product. During this exclusion or limitation may also have other than normal, single-family household use your state's Attorney General. Pickup and delivery. Replacement parts or repair labour costs...
... at the time warranty service is designed to be repairable in other rights which fails due to replace owner-accessible light bulbs. 2. A copy of products not approved by LG Corporation. 5. will also provide, free of the product. During this exclusion or limitation may also have other than normal, single-family household use your state's Attorney General. Pickup and delivery. Replacement parts or repair labour costs...
Specification
Page 2
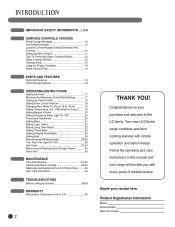
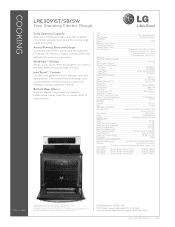
... owners. Award Winning Style and Design Combined with stylish controls and the signature LG design, this electric range is practically effortless and the operation intuitive. of sophistication. Type Type Free Standing Electric Oven/Cooktop IntuiTouch™/Knobs Features Display LED Electronic Clock & Timer • Control Lock Function • Audible Preheat Signal • Special Functions Temperature Unit of Radiant Element 4 Element Size and Wattage Left Front 9"/2500W Left Rear 6"/1200W Right Front 6"/9"/1400W/3000W Right Rear 6"/1200W Oven...
... owners. Award Winning Style and Design Combined with stylish controls and the signature LG design, this electric range is practically effortless and the operation intuitive. of sophistication. Type Type Free Standing Electric Oven/Cooktop IntuiTouch™/Knobs Features Display LED Electronic Clock & Timer • Control Lock Function • Audible Preheat Signal • Special Functions Temperature Unit of Radiant Element 4 Element Size and Wattage Left Front 9"/2500W Left Rear 6"/1200W Right Front 6"/9"/1400W/3000W Right Rear 6"/1200W Oven...


