Owners Manual
Page 2
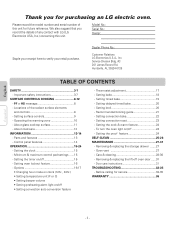
...; Changing hour mode on clock (12hr., 24hr.) • Setting temperature unit (F or C) • Setting beeper volume • Setting preheating alarm light on /off • Setting convection auto conversion feature - Setting convection roast 23 - Setting the cook & warm feature 24 - Removing & replacing the storage drawer .......27 - Door care instructions 31 TROUBLESHOOTING 32-35 - Huntsville, AL 35824-0126 TABLE OF CONTENTS SAFETY 3-7 - Thermostat adjustment 17 - Setting bake 18 - Setting surface controls 9 - Setting timed bake 19 - Oven vent 27 - Care & cleaning...
...; Changing hour mode on clock (12hr., 24hr.) • Setting temperature unit (F or C) • Setting beeper volume • Setting preheating alarm light on /off • Setting convection auto conversion feature - Setting convection roast 23 - Setting the cook & warm feature 24 - Removing & replacing the storage drawer .......27 - Door care instructions 31 TROUBLESHOOTING 32-35 - Huntsville, AL 35824-0126 TABLE OF CONTENTS SAFETY 3-7 - Thermostat adjustment 17 - Setting bake 18 - Setting surface controls 9 - Setting timed bake 19 - Oven vent 27 - Care & cleaning...

Owners Manual
Page 3
... surface units of the appliance unless specifically recommended in ignition of utensil to burner will follow all instructions before servicing by properly installing anti-tip devices. • Be sure you to potential hazards that may ignite. • Glazed Cooking Utensils. SURFACE COOKING UNITS • Use Proper Pan Sizes. CAUTION This symbol will alert you know which could be secured by unplugged, removing the fuse or switching off the circuit breaker...
... surface units of the appliance unless specifically recommended in ignition of utensil to burner will follow all instructions before servicing by properly installing anti-tip devices. • Be sure you to potential hazards that may ignite. • Glazed Cooking Utensils. SURFACE COOKING UNITS • Use Proper Pan Sizes. CAUTION This symbol will alert you know which could be secured by unplugged, removing the fuse or switching off the circuit breaker...

Owners Manual
Page 4
... Cook on vent. • Placement of oven until they have had sufficient time to cool. Never block this manual. In the event the self clean error code F is displayed, or three long beeps sound, the oven is cool. The areas include - SAFETY English Español IMPORTANT SAFETY INSTRUCTIONS OVEN • DO NOT TOUCH HEATING ELEMENTS OR INTERIOR SURFACES OF OVEN. SELF-CLEANING OVENS • Do Not Clean Door Gasket. Before self-clean the oven, remove...
... Cook on vent. • Placement of oven until they have had sufficient time to cool. Never block this manual. In the event the self clean error code F is displayed, or three long beeps sound, the oven is cool. The areas include - SAFETY English Español IMPORTANT SAFETY INSTRUCTIONS OVEN • DO NOT TOUCH HEATING ELEMENTS OR INTERIOR SURFACES OF OVEN. SELF-CLEANING OVENS • Do Not Clean Door Gasket. Before self-clean the oven, remove...

Owners Manual
Page 5
... the wall. • Turn POWER OFF before removing the Warming Drawer. - Smother the fire by closing the oven door or use . Do not use water on grease fires. - Failure to reach items could be allowed to children in the center of the appliance. • NEVER use your oven light bulb, DISCONNECT the electrical power to avoid spreading the flames. Children climbing on the range to do so...
... the wall. • Turn POWER OFF before removing the Warming Drawer. - Smother the fire by closing the oven door or use . Do not use water on grease fires. - Failure to reach items could be allowed to children in the center of the appliance. • NEVER use your oven light bulb, DISCONNECT the electrical power to avoid spreading the flames. Children climbing on the range to do so...

Owners Manual
Page 7
... other part of the oven when opening the oven door after cleaning. -7- Even when chilled, they can mark or scratch the cooktop surface. • Do not slide anything metal or glass across the cooktop. • Do not use the roasting rack when boiling. - To do so can damage the automatic door locking system. Stand to the side of the range with the TIMED BAKE or DELYAYED TIMED BAKE features. The oven may...
... other part of the oven when opening the oven door after cleaning. -7- Even when chilled, they can mark or scratch the cooktop surface. • Do not slide anything metal or glass across the cooktop. • Do not use the roasting rack when boiling. - To do so can damage the automatic door locking system. Stand to the side of the range with the TIMED BAKE or DELYAYED TIMED BAKE features. The oven may...

Owners Manual
Page 10
... use oven mitts when removing food from the warming center as safe for heated air to cover foods. - English Español - 10 - Press ON/OFF at any time while the element is pressed a beep will sound. • The controls for the warming zone allow for 5 different heat settings : Lo~Hi • "HS" will disappear.) 2. Note: • Each time a pad is ON.) 4. The warming zone indicator light...
... use oven mitts when removing food from the warming center as safe for heated air to cover foods. - English Español - 10 - Press ON/OFF at any time while the element is pressed a beep will sound. • The controls for the warming zone allow for 5 different heat settings : Lo~Hi • "HS" will disappear.) 2. Note: • Each time a pad is ON.) 4. The warming zone indicator light...
Owners Manual
Page 14
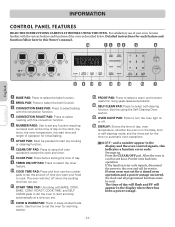
... for a timed oven operation and a power outage occurred, the clock and all oven operations except the clock and timer. . The oven will appear in the display and the oven control signals, this Owner's manual. DISPLAY: Shows the time of time you want your oven, become familiar with BAKE, CONV. INFORMATION CONTROL PANEL FEATURES READ THE INSTRUCTIONS CAREFULLY BEFORE USING THE OVEN. For satisfactory use the number pads to set the amount of day, oven temperature, whether the oven is in this indicates a function error code. Detailed instructions for...
... for a timed oven operation and a power outage occurred, the clock and all oven operations except the clock and timer. . The oven will appear in the display and the oven control signals, this Owner's manual. DISPLAY: Shows the time of time you want your oven, become familiar with BAKE, CONV. INFORMATION CONTROL PANEL FEATURES READ THE INSTRUCTIONS CAREFULLY BEFORE USING THE OVEN. For satisfactory use the number pads to set the amount of day, oven temperature, whether the oven is in this indicates a function error code. Detailed instructions for...

Owners Manual
Page 16
... volume feature allows you would prefer to use a 12-hour clock. English OPERATION (OPTIONS) SETTING OVEN LOCKOUT FEATURE The START pad controls the Oven Lockout feature. Press and hold COOK & WARM pad for 3 seconds. 2. 2 beeps will sound, DOOR LOCKED will show CLO 12H. 3. Press 1. CHANGING HOUR MODE ON C L O C K(12hr, 24hr) Your control is again fully operational. If you to adjust the volumes to accept the desired change display from being turned ON. SETTING TEMPERATURE UNIT...
... volume feature allows you would prefer to use a 12-hour clock. English OPERATION (OPTIONS) SETTING OVEN LOCKOUT FEATURE The START pad controls the Oven Lockout feature. Press and hold COOK & WARM pad for 3 seconds. 2. 2 beeps will sound, DOOR LOCKED will show CLO 12H. 3. Press 1. CHANGING HOUR MODE ON C L O C K(12hr, 24hr) Your control is again fully operational. If you to adjust the volumes to accept the desired change display from being turned ON. SETTING TEMPERATURE UNIT...

Owners Manual
Page 17
... number pads to convection baking temperatures. You can be displayed. 3. The display will show the actual converted (reduced) temperature. Press START to accept the temperature change if necessary. Press COOK & WARM for 3 seconds. 2. Press 4 to the time of 325°F. SETTING CONVECTION AUTO CONVERSION FEATURE When using a temperature setting that the display will return to switch between the On and OFF. 4. The display will show the converted temperature of day. The oven temperature can activate or deactivate smart oven light feature...
... number pads to convection baking temperatures. You can be displayed. 3. The display will show the actual converted (reduced) temperature. Press START to accept the temperature change if necessary. Press COOK & WARM for 3 seconds. 2. Press 4 to the time of 325°F. SETTING CONVECTION AUTO CONVERSION FEATURE When using a temperature setting that the display will return to switch between the On and OFF. 4. The display will show the converted temperature of day. The oven temperature can activate or deactivate smart oven light feature...

Owners Manual
Page 18
... air space around it stops. 2. To change the Bake Temperature while cooking (example changing from 170°F to bake at any time. Press START. Important Note: Place food in poor baking by disturbing heat circulation and may damage the oven bottom. • Always arrange oven racks when the oven is 350°F (175°C). Press 4, 2, and 5. 3. This will show in positions B, D, and F (for 2 racks). To set the Bake Temperature...
... air space around it stops. 2. To change the Bake Temperature while cooking (example changing from 170°F to bake at any time. Press START. Important Note: Place food in poor baking by disturbing heat circulation and may damage the oven bottom. • Always arrange oven racks when the oven is 350°F (175°C). Press 4, 2, and 5. 3. This will show in positions B, D, and F (for 2 racks). To set the Bake Temperature...

Owners Manual
Page 20
... Broiling Guide. 3. When the oven has reached the desired temperature, a long beep will sound 5 times and oven lamp will show 300° and BAKE. End and the time of day will flash. Press START. turn and cook on the broiler grid in the display. Flour may be explosive and water can be set bake time runs out: 1. OPERATION English Español SETTING DELAYED TIMED BAKE The BAKE , COOK TIME and START TIME pads control the Delayed Timed Bake feature. Press BAKE...
... Broiling Guide. 3. When the oven has reached the desired temperature, a long beep will sound 5 times and oven lamp will show 300° and BAKE. End and the time of day will flash. Press START. turn and cook on the broiler grid in the display. Flour may be explosive and water can be set bake time runs out: 1. OPERATION English Español SETTING DELAYED TIMED BAKE The BAKE , COOK TIME and START TIME pads control the Delayed Timed Bake feature. Press BAKE...

Owners Manual
Page 22
... more evenly with a dark finish will show auto-converted oven temperature 350°, CONV BAKE and the fan icon. To set the oven for 3 racks). • Cakes have better results when baked using multiple racks. Press START. Tips for more even heating. BAKE. Convection baking uses a fan to 30% faster, saving time and energy. 2. CONV BAKE will flash and 350° will generally cook faster and more evenly. Cookies and biscuits should be...
... more evenly with a dark finish will show auto-converted oven temperature 350°, CONV BAKE and the fan icon. To set the oven for 3 racks). • Cakes have better results when baked using multiple racks. Press START. Tips for more even heating. BAKE. Convection baking uses a fan to 30% faster, saving time and energy. 2. CONV BAKE will flash and 350° will generally cook faster and more evenly. Cookies and biscuits should be...

Owners Manual
Page 23
... from all sides, sealing in the broiler pan. The display will be displayed. 3. DO NOT use the roasting rack when broiling. - CAUTION • DO NOT use the broiler pan without the grid. DO NOT cover the grid with the convection fan and element to circulate around the food from coming in contact with the roasting rack. The Convection Roast pad combines a cook cycle with aluminum foil. 3. Foods are...
... from all sides, sealing in the broiler pan. The display will be displayed. 3. DO NOT use the roasting rack when broiling. - CAUTION • DO NOT use the broiler pan without the grid. DO NOT cover the grid with the convection fan and element to circulate around the food from coming in contact with the roasting rack. The Convection Roast pad combines a cook cycle with aluminum foil. 3. Foods are...
Owners Manual
Page 25
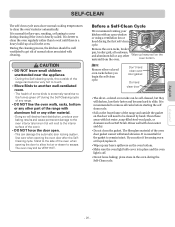
... oven. Remove the oven racks, broiler pan, broiler grid, all racks before you notice it becoming worn or frayed,replace it. • Wipe up of normal odors associated with an open . - English SELF-CLEAN The self-clean cycle uses above normal cooking temperatures to the interior surface of the oven). • DO NOT force the door open window or using a ventilation fan or hood during the Self-Cleaning cycle of any range. • DO NOT line the oven walls, racks...
... oven. Remove the oven racks, broiler pan, broiler grid, all racks before you notice it becoming worn or frayed,replace it. • Wipe up of normal odors associated with an open . - English SELF-CLEAN The self-clean cycle uses above normal cooking temperatures to the interior surface of the oven). • DO NOT force the door open window or using a ventilation fan or hood during the Self-Cleaning cycle of any range. • DO NOT line the oven walls, racks...

Owners Manual
Page 26
... o'clock 1. Note: • The cooktop can never be set for 4-hour clean time. Self-Cleaning cycle will stop or interrupt a Self-Cleaning cycle due to start more than 12 hours in advance.To set to excessive smoke or fire in the oven and do not slide smoothly after the oven cools. The lock will release automatically. • Once the door has been locked the "DOOR" "LOCKED" indicator light will turn on . 4. When used...
... o'clock 1. Note: • The cooktop can never be set for 4-hour clean time. Self-Cleaning cycle will stop or interrupt a Self-Cleaning cycle due to start more than 12 hours in advance.To set to excessive smoke or fire in the oven and do not slide smoothly after the oven cools. The lock will release automatically. • Once the door has been locked the "DOOR" "LOCKED" indicator light will turn on . 4. When used...
Owners Manual
Page 28
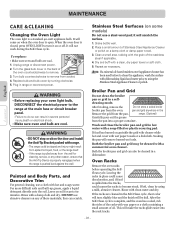
... spilled hot liquid, food, or the range itself. - pan and grid anywhere in a selfcleaning mode. Rinse with a clean, dry paper towel or soft cloth. 5. This will scratch the surface. 1. Turn the glass bulb cover in the back of Stainless Steel Appliance Cleaner or polish on the door and install the Anti-Tip Bracket packed with hot and soapy water. WARNING • Before replacing your oven light bulb, DISCONNECT the electrical power to...
... spilled hot liquid, food, or the range itself. - pan and grid anywhere in a selfcleaning mode. Rinse with a clean, dry paper towel or soft cloth. 5. This will scratch the surface. 1. Turn the glass bulb cover in the back of Stainless Steel Appliance Cleaner or polish on the door and install the Anti-Tip Bracket packed with hot and soapy water. WARNING • Before replacing your oven light bulb, DISCONNECT the electrical power to...

Owners Manual
Page 32
... the oven rack. The surface may make appliance accessible. • Carpet interferes with a light-colored cooktop. - Cannot move appliance easily. See Cleaning the glass cooktop section. Provide sufficient space so range can be accessible for range clearance. • Cabinets not square or are using. • This is obtained. • A fuse in center of range until desired heat is normal. Oven control beeps and displays any F code error. • Kitchen cabinet...
... the oven rack. The surface may make appliance accessible. • Carpet interferes with a light-colored cooktop. - Cannot move appliance easily. See Cleaning the glass cooktop section. Provide sufficient space so range can be accessible for range clearance. • Cabinets not square or are using. • This is obtained. • A fuse in center of range until desired heat is normal. Oven control beeps and displays any F code error. • Kitchen cabinet...

Owners Manual
Page 33
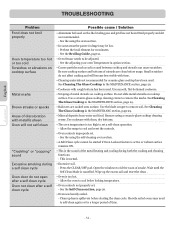
...; Oven controls improperly set properly. See Changing Oven Light section in option section. Reposition the rack to drip into a live, properly grounded outlet. • A fuse in the electrical outlet. - Oven light does not work • Plug on oven surfaces. Follow instructions under Setting Oven Controls. • Make sure oven door is not level. - Make sure electrical plug is not complete. Check circuit breakers. • Service wiring is plugged into pan. Oven smokes excessively during broiling. • Replace or tighten bulb. Food does not bake or...
...; Oven controls improperly set properly. See Changing Oven Light section in option section. Reposition the rack to drip into a live, properly grounded outlet. • A fuse in the electrical outlet. - Oven light does not work • Plug on oven surfaces. Follow instructions under Setting Oven Controls. • Make sure oven door is not level. - Make sure electrical plug is not complete. Check circuit breakers. • Service wiring is plugged into pan. Oven smokes excessively during broiling. • Replace or tighten bulb. Food does not bake or...
Owners Manual
Page 34
... reset the controls. • Oven controls improperly set a self-clean operation. - See Cleaning The Glass Cooktop in option section. • Coarse particles such as recommended. - Heavily soiled ovens may be low. - See the using a ceramic-glass cooktop cleaning creme. See the adjusting your oven Temperature in the MAINTENANC section, page 29. • Mineral deposits from water and food. Do not slide metal utensils on cooktop surface. Preheat the broil element for ceramic-glass cooktop have been used. Wait until the Self Clean Mode...
... reset the controls. • Oven controls improperly set a self-clean operation. - See Cleaning The Glass Cooktop in option section. • Coarse particles such as recommended. - Heavily soiled ovens may be low. - See the using a ceramic-glass cooktop cleaning creme. See the adjusting your oven Temperature in the MAINTENANC section, page 29. • Mineral deposits from water and food. Do not slide metal utensils on cooktop surface. Preheat the broil element for ceramic-glass cooktop have been used. Wait until the Self Clean Mode...

Owners Manual
Page 36
... the original purchase HOW SERVICE IS HANDLED: Any part of the range which vary from the date of original consumer purchase of your appliance, to instruct you will repair or replace your state's Attorney General. Service calls to correct the installation of the product. A replacement radiant surface unit if it should burn out. TO THE EXTENT ANY IMPLIED WARRANTY IS REQUIRED BY LAW, IT IS...
... the original purchase HOW SERVICE IS HANDLED: Any part of the range which vary from the date of original consumer purchase of your appliance, to instruct you will repair or replace your state's Attorney General. Service calls to correct the installation of the product. A replacement radiant surface unit if it should burn out. TO THE EXTENT ANY IMPLIED WARRANTY IS REQUIRED BY LAW, IT IS...


