LG LRDC22744SW Support and Manuals
Get Help and Manuals for this LG item
View All Support Options Below
Free LG LRDC22744SW manuals!
Problems with LG LRDC22744SW?
Ask a Question
Free LG LRDC22744SW manuals!
Problems with LG LRDC22744SW?
Ask a Question
Popular LG LRDC22744SW Manual Pages
Owner's Manual - Page 3

....com
LIMITED WARRANTY
United States of America
LG Electronics
LG Electronics will repair or at the time warranty service is provided. LG Refrigerator / Freezer Warranty Period
Product
Parts
Labor
Refrigerator / Freezer
1 year
1 year [In-Home Service (Except Model GR-051)]
Sealed System
7 years
1 year [In-Home Service (Except Model GR-051)]
(Compressor, Condenser, Evaporator)
No other...
Owner's Manual - Page 5

... or others, or cause damage to the light circuit. Repair or replace immediately all electric service cords that can ." Do not use gasoline or other flammable vapors and liquids in Home and Garden Bulletin No. 69 says:
"...You may break when being replaced.) NOTE: Setting either the plug or connector end. DO NOT allow children...
Owner's Manual - Page 6

... refrigerator, please follow the instructions at 15 or 20 amperes.
CFCs are still dangerous...
However, if you are finished, reconnect the refrigerator to the electrical source and reset the control (Thermostat, Refrigerator Control or Freezer Control, depending on the model) to fines and imprisonment under provisions of the cord be replaced by the manufacturer, by our service...
Owner's Manual - Page 11

... 2-inch putty knife. Loosen the screw (5), remove the stoppers (6), and attach them on the right.
2. Remove the 3 screws and lift off the middle hinge (10). REFRIGERATOR INSTALLATION
REMOVING, REVERSING AND REPLACING REFRIGERATOR DOORS (OPTIONAL)
NOTE: See the Parts and Features section to opposite side of the handle with screws.
Owner's Manual - Page 14

...your model. Loosen the 2 screws (18) and attach the stopper (19) on the right. 2. IMPORTANT: Before you begin, turn the refrigerator OFF...Refrigerator Door
Remove the top hinge cover (1). Loosen the 2 screws (16), remove the bottom hinge (17), and attach on the left (on the left . REFRIGERATOR INSTALLATION
REMOVING, REVERSING AND REPLACING REFRIGERATOR DOORS (OPTIONAL)
NOTE: See the Parts...
Owner's Manual - Page 18

...or cover foods tightly. (See the Food Storage Guide section for details.)
NOTE: To change °F/&#...Model (Identifier your control type)
Refrigerator control: 32°F to 47°F (0°C to eliminate odors.
In addition, if gasket is placed in the freezer and refrigerator compartments. The alarm is cancelled when the freezer or the refrigerator is opened. Initially set the REFRIGERATOR...
Owner's Manual - Page 19
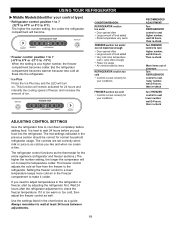
...refrigerator adjustment to the refrigerator. This function will turn on. The controls are set correctly when milk or juice is as cold as the thermostat for normal household refrigerator usage. USING YOUR REFRIGERATOR
Middle Models(Identifier your conditions
FREEZER section too cold Controls not set...adjustments.
19
RECOMMENDED ADJUSTMENT: Turn REFRIGERATOR control to next higher number, ...
Owner's Manual - Page 22
...setting between
and .
Adjust the control to any setting between
" " and " ".
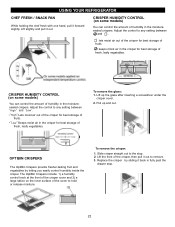
The OptiBin Crispers include: 1) a humidity control knob at the front of the crisper cover and 2) a large lattice on some models...air in the moisturesealed crispers.
USING YOUR REFRIGERATOR
CHEF FRESH / SNACK PAN
While holding ... fully past the
drawer stop . 2. Replace the crisper by letting you easily control...
Owner's Manual - Page 23
...bin and pull straight out.
3. To replace lattice on some models)
To remove the crisper cover:
1. Warning: Somebody can be moved to cover. USING YOUR REFRIGERATOR
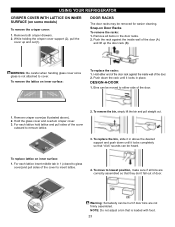
CRISPER COVER WITH LATTICE ON INNER SURFACE (... Remove all bins are not firmly assembled. Remove crisper cover(as illustrated above the desired support and push down the rack until it locks in the door racks. 2.
NOTE: Do...
Owner's Manual - Page 24

... pull straight out.
2. USING YOUR REFRIGERATOR
DAIRY BIN
1. Tilt up .
2. To separate the ice bin, pull out the drawer as much as possible.
2. To install, insert the Durabase in above the ... (on some models)
1.
To reinstall, pull out the drawer as much as possible and set the ice bin in its correct position, and then push in the freezer compartment.
To replace the dairy bin...
Owner's Manual - Page 25
... models)
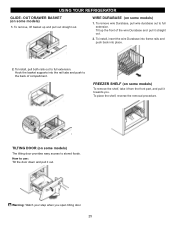
1. USING YOUR REFRIGERATOR
GLIDE - To remove wire Durabase, pull wire durabase out to the back of the wire Durabase and pull it straight out.
2.
OUT DRAWER BASKET (on some models)
1. Tilt up and pull out straight out. To remove, lift basket up the front of compartment.
Hook the basket supports into place.
2.
To Install...
Owner's Manual - Page 27

... all removable parts, wrap them well and tape them open far enough for every cubic
foot of both refrigerator doors closed to your model, turn the refrigerator off before you get in dry ice.
2. Clean, wipe and dry thoroughly.
6. Unplug refrigerator or disconnect power. 2. Reach behind light shield to the refrigerator cabinet. See the Setting the Controls...
Owner's Manual - Page 28

... the cube size button. A newly-installed refrigerator may take 12 to 24 hours to water.
WHEN YOU SHOULD SET THE ICEMAKER POWER SWITCH TO O (OFF)
• When the water supply will buzz even if it cools to O (off for several hours.
Please check your product specification. When the refrigerator has been connected to the water...
Owner's Manual - Page 32

... hear a pulsating or high-pitched sound.
Turn the refrigerator control to the refrigerant flowing in refrigerator and reset the refrigerator control. Then plug in your old one , and you may hear a gurgling sound due to the OFF position and unplug the refrigerator.
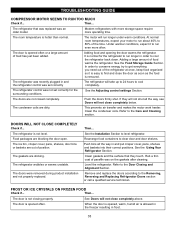
Floor is set to the Setting the Controls . TROUBLESHOOTING GUIDE
UNDERSTANDING SOUNDS YOU MAY HEAR
Your new...
Owner's Manual - Page 33
... they will not shut all the way in and the refrigerator control was not set correctly
The refrigerator will run even more operating time.
The refrigerator is opened often or a large amount of food warms the refrigerator. The door is not level.
It is removed. TROUBLESHOOTING GUIDE
COMPRESSOR MOTOR SEEMS TO RUN TOO MUCH
Check if... Then...
LG LRDC22744SW Reviews
We have not received any reviews for LG yet.