Owner's Manual (English)
Page 2
...(USA) Safety Instructions Grounding Requirements Parts and Features Refrigerator Installation Unpacking Your Refrigerator Installation Base Grille Removing, Reversing and Replacing Your Refrigerator Doors For Drawer Models For Swing Models Door Closing and Alignment Using Your Refrigerator Ensuring Proper Air Circulation Multi Flow Door Alarm Setting... Guide Storing Frozen Food Refrigerator Shelves Chef Fresh / Snack Pan 2 36 3 5 -6 6 7 - 9 10 - 17 10 10 10 11 - 17 11 15 17 18 - 25 18 18 18 18 - 19 19 20 20 21 22 Crisper Humidity Control Optibin Crisper Crisper cover with lattice on inner ...
...(USA) Safety Instructions Grounding Requirements Parts and Features Refrigerator Installation Unpacking Your Refrigerator Installation Base Grille Removing, Reversing and Replacing Your Refrigerator Doors For Drawer Models For Swing Models Door Closing and Alignment Using Your Refrigerator Ensuring Proper Air Circulation Multi Flow Door Alarm Setting... Guide Storing Frozen Food Refrigerator Shelves Chef Fresh / Snack Pan 2 36 3 5 -6 6 7 - 9 10 - 17 10 10 10 11 - 17 11 15 17 18 - 25 18 18 18 18 - 19 19 20 20 21 22 Crisper Humidity Control Optibin Crisper Crisper cover with lattice on inner ...
Owner's Manual (English)
Page 7
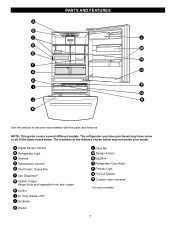
...Refrigerator Light C Shelves D Temperature Control* E Chef Fresh / Snack Pan F Can Dispenser* G Optibin Crisper Keeps fruits and vegetable fresh and crisper H Ice Bin I Q J R K Use this section to become more familiar with the parts and features. The locations of the items listed below may have some models 7 NOTE: This guide covers... several different models. The refrigerator you have purchased may not match your model. PARTS AND FEATURES A B C L D M E N ...
...Refrigerator Light C Shelves D Temperature Control* E Chef Fresh / Snack Pan F Can Dispenser* G Optibin Crisper Keeps fruits and vegetable fresh and crisper H Ice Bin I Q J R K Use this section to become more familiar with the parts and features. The locations of the items listed below may have some models 7 NOTE: This guide covers... several different models. The refrigerator you have purchased may not match your model. PARTS AND FEATURES A B C L D M E N ...

Owner's Manual (English)
Page 8
...covers several different models. A Digital Sensor Control B Refrigerator Light C Shelves D Chef Fresh / Snack Pan E Optibin Crisper Keeps fruits and vegetable fresh and crisper F Ice Bin G Ice Tray (Inside of F)* H Durabase I O Use this section to become more familiar with the parts and features. The refrigerator... you have purchased may not match your model. The locations of the features shown below . PARTS AND FEATURES A B J C K D L E M F N G H I Divider J Dairy Bin K Design-A-Door L Pull out Drawer M Refrigerator Door Rack N Freezer Light O Custom...
...covers several different models. A Digital Sensor Control B Refrigerator Light C Shelves D Chef Fresh / Snack Pan E Optibin Crisper Keeps fruits and vegetable fresh and crisper F Ice Bin G Ice Tray (Inside of F)* H Durabase I O Use this section to become more familiar with the parts and features. The refrigerator... you have purchased may not match your model. The locations of the features shown below . PARTS AND FEATURES A B J C K D L E M F N G H I Divider J Dairy Bin K Design-A-Door L Pull out Drawer M Refrigerator Door Rack N Freezer Light O Custom...

Owner's Manual (English)
Page 9
... more familiar with the parts and features. NOTE: This guide covers several different models. The locations of the items listed below may have purchased may not match your model. PARTS AND FEATURES A B I Dairy Bin J Design-A-Door K Wire Freezer Shelf L Refrigerator Door Rack M Freezer Light N Freezer Door Rack *on some or all of the features shown...
... more familiar with the parts and features. NOTE: This guide covers several different models. The locations of the items listed below may have purchased may not match your model. PARTS AND FEATURES A B I Dairy Bin J Design-A-Door K Wire Freezer Shelf L Refrigerator Door Rack M Freezer Light N Freezer Door Rack *on some or all of the features shown...
Owner's Manual (English)
Page 11
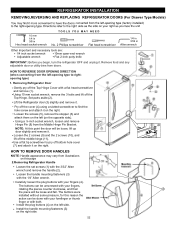
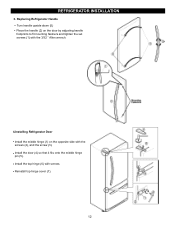
... NOTE: Handle appearance may vary from the left (on the opposite side). Set parts aside (2). • Lift the Refrigerator door (3) slightly and remove it on the right. Removing Refrigerator Door • Gently pry off bottom hole cover (7) and attach it . The buttons can be loose, lift up door slightly and remove it. • Loosen...
... NOTE: Handle appearance may vary from the left (on the opposite side). Set parts aside (2). • Lift the Refrigerator door (3) slightly and remove it on the right. Removing Refrigerator Door • Gently pry off bottom hole cover (7) and attach it . The buttons can be loose, lift up door slightly and remove it. • Loosen...
Owner's Manual (English)
Page 12
Replacing Refrigerator Handle • Turn handle upside down (5) • Place the handle (2) on the door by adjusting handle footprints to fit mounting fastners and tighten the set screws (1) with the 3/32 " Allen wrench. 4.Installing Refrigerator Door • Install the middle hinge (1) on the opposite side with the screws (2), and the screw (3). • Install the door (4) so that it fits onto the middle hinge pin (5). • Install the top hinge (6) with screws. • Reinstall top hinge cover (7). 12 REFRIGERATOR INSTALLATION 3.
Replacing Refrigerator Handle • Turn handle upside down (5) • Place the handle (2) on the door by adjusting handle footprints to fit mounting fastners and tighten the set screws (1) with the 3/32 " Allen wrench. 4.Installing Refrigerator Door • Install the middle hinge (1) on the opposite side with the screws (2), and the screw (3). • Install the door (4) so that it fits onto the middle hinge pin (5). • Install the top hinge (6) with screws. • Reinstall top hinge cover (7). 12 REFRIGERATOR INSTALLATION 3.
Owner's Manual (English)
Page 13
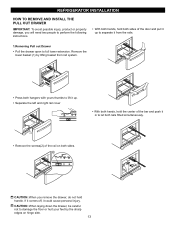
... floor or hurt your feet by lifting basket from the rails. 1.Removing Pull out Drawer • Pull the drawer open to full lower extension. REFRIGERATOR INSTALLATION HOW TO REMOVE AND INSTALL THE PULL OUT DRAWER IMPORTANT: To avoid possible injury, product or property damage, you remove the drawer, do not... comes off, it from rail system. 1 • Press both hangers with yours thumbs to lift it up. • Separate the left and right rail cover • With both hands, hold the center of the bar and push it in to let both rails fitted simultaneously. • Remove the screws(2) of...
... floor or hurt your feet by lifting basket from the rails. 1.Removing Pull out Drawer • Pull the drawer open to full lower extension. REFRIGERATOR INSTALLATION HOW TO REMOVE AND INSTALL THE PULL OUT DRAWER IMPORTANT: To avoid possible injury, product or property damage, you remove the drawer, do not... comes off, it from rail system. 1 • Press both hangers with yours thumbs to lift it up. • Separate the left and right rail cover • With both hands, hold the center of the bar and push it in to let both rails fitted simultaneously. • Remove the screws(2) of...
Owner's Manual (English)
Page 14
...To prevent accidental child and pet entrapment or suffocation risk. DO NOT allow them to assemble the rail cover. WARNING: DO NOT step or sit down on Freezer Door. 14 REFRIGERATOR INSTALLATION HOW TO REMOVE AND INSTALL THE PULL OUT DRAWER IMPORTANT: To avoid possible injur or product or... property damage, you have a right rail cover for each side. Verify the hole's assembly • Hook door supports (1) into rail tabes...
...To prevent accidental child and pet entrapment or suffocation risk. DO NOT allow them to assemble the rail cover. WARNING: DO NOT step or sit down on Freezer Door. 14 REFRIGERATOR INSTALLATION HOW TO REMOVE AND INSTALL THE PULL OUT DRAWER IMPORTANT: To avoid possible injur or product or... property damage, you have a right rail cover for each side. Verify the hole's assembly • Hook door supports (1) into rail tabes...

Owner's Manual (English)
Page 15
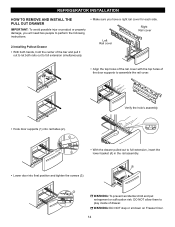
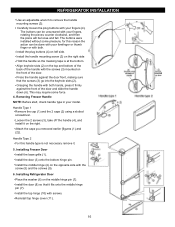
...Pry off the middle hinge (11). 2. Removing Freezer Door Before, remove totally the refrigerator door. Loosen the 2 screws (18) and attach the stopper (19) on the left side of the base. 3.Removing Refrigerator Handle NOTE: To assist in Allen wrench Other ...refrigerator OFF and unplug it on the opposite side). Grasp the handle tightly with a flat head screwdriver and remove (1). •Using 10 mm socket wrench, remove the 3 bolts and lift off the cover (9) using a slotted screwdriver to separate from the Middle Hinge Pin Bracket. Loosen the 2 screws (16), remove the bottom...
...Pry off the middle hinge (11). 2. Removing Freezer Door Before, remove totally the refrigerator door. Loosen the 2 screws (18) and attach the stopper (19) on the left side of the base. 3.Removing Refrigerator Handle NOTE: To assist in Allen wrench Other ...refrigerator OFF and unplug it on the opposite side). Grasp the handle tightly with a flat head screwdriver and remove (1). •Using 10 mm socket wrench, remove the 3 bolts and lift off the cover (9) using a slotted screwdriver to separate from the Middle Hinge Pin Bracket. Loosen the 2 screws (16), remove the bottom...
Owner's Manual (English)
Page 16
... a slotted screwdriver. Handle Type 2 For this reason the action can be loose and fall. Installing Freezer Door Install the base grille (1). Install the plug buttons (4) on the middle hinge pin (7). Loosen ... the door (3) onto the bottom hinge pin. Install the door (8) so that the screws (3) go into the keyhole slots (2). Reinstall top hinge cover (11). 16 Carefully loosen the... 5. Installing Refrigerator Door Place the washer (6) on left side. Install the handle mounting screw (3) on the top and bottom of the back of the handle with both . REFRIGERATOR INSTALLATION Use...
... a slotted screwdriver. Handle Type 2 For this reason the action can be loose and fall. Installing Freezer Door Install the base grille (1). Install the plug buttons (4) on the middle hinge pin (7). Loosen ... the door (3) onto the bottom hinge pin. Install the door (8) so that the screws (3) go into the keyhole slots (2). Reinstall top hinge cover (11). 16 Carefully loosen the... 5. Installing Refrigerator Door Place the washer (6) on left side. Install the handle mounting screw (3) on the top and bottom of the back of the handle with both . REFRIGERATOR INSTALLATION Use...
Owner's Manual (English)
Page 17
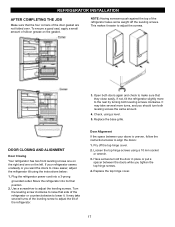
... one on the right and one on the gasket. If your doors is uneven, follow the instructions below : 1. Move the refrigerator into a 3-prong grounded outlet. Replace the top hinge cover. 17 Pry off the leveling screws. NOTE: Having someone hold the door in place or put a spacer between your...screw to raise that side of silicon grease on the left. Turn the leveling screw clockwise to adjust the tilt of the refrigerator takes some weight off the top hinge cover. 2. Door Alignment If the space between the doors while you want the doors to align the doors: 1. Loosen the...
... one on the right and one on the gasket. If your doors is uneven, follow the instructions below : 1. Move the refrigerator into a 3-prong grounded outlet. Replace the top hinge cover. 17 Pry off the leveling screws. NOTE: Having someone hold the door in place or put a spacer between your...screw to raise that side of silicon grease on the left. Turn the leveling screw clockwise to adjust the tilt of the refrigerator takes some weight off the top hinge cover. 2. Door Alignment If the space between the doors while you want the doors to align the doors: 1. Loosen the...
Owner's Manual (English)
Page 18
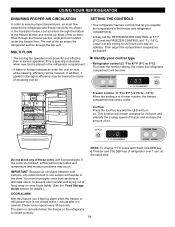
... closed correctly. 18 Leave it is at this feature you regulate the temperature in the freezer and refrigerator compartments. Do not block any odors formed in the illustration below, cool air enters through the bottom of these vents with food packages. As shown in one day) to ensure proper temperatures.... Most of ice. Then adjust the compartment temperature as desired. NOTE: To change °F/°C press and HOLD COLDER key co f freezer and COLDER key of food, wrap or cover foods tightly. (See the Food Storage Guide section for 24 hours and intensify the cooling speed of...
... closed correctly. 18 Leave it is at this feature you regulate the temperature in the freezer and refrigerator compartments. Do not block any odors formed in the illustration below, cool air enters through the bottom of these vents with food packages. As shown in one day) to ensure proper temperatures.... Most of ice. Then adjust the compartment temperature as desired. NOTE: To change °F/°C press and HOLD COLDER key co f freezer and COLDER key of food, wrap or cover foods tightly. (See the Food Storage Guide section for 24 hours and intensify the cooling speed of...
Owner's Manual (English)
Page 20
...freezer packaging and freeze. Plastic containers with plastic wrap or aluminum foil. they may cause the sensor to ensure freshness. Leave enough space in a covered dish or closed paper bag on door shelf. Ice crystals inside the package have food odor and taste transfer throughout the refrigerator... When storing an extra supply, wrap in cold water and drain. Fruit Wash, let dry, and store in refrigerator in plastic bags or in the freezer compartment - Rewrap if necessary. Do not use: Bread wrappers Non-polyethylene plastic containers Containers without tight lids Wax ...
...freezer packaging and freeze. Plastic containers with plastic wrap or aluminum foil. they may cause the sensor to ensure freshness. Leave enough space in a covered dish or closed paper bag on door shelf. Ice crystals inside the package have food odor and taste transfer throughout the refrigerator... When storing an extra supply, wrap in cold water and drain. Fruit Wash, let dry, and store in refrigerator in plastic bags or in the freezer compartment - Rewrap if necessary. Do not use: Bread wrappers Non-polyethylene plastic containers Containers without tight lids Wax ...
Owner's Manual (English)
Page 22
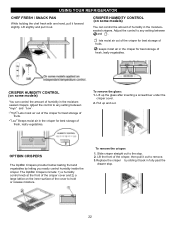
... humidity in the moisturesealed crispers. CRISPER HUMIDITY CONTROL (on some models) You can control the amount of the cover to any setting between " " and " ". " ":Lets moist air out of the crisper for best ...air in the crisper for best storage of fruits. Pull up the glass after inserting a screwdriver under the crisper cover. 2. To remove the crisper: 1. Slide crisper straight out to the stop . 22 Adjust the control to remove... or release moisture. Lift up and out. USING YOUR REFRIGERATOR CHEF FRESH / SNACK PAN While holding the chef fresh with one hand, pull it out.
... humidity in the moisturesealed crispers. CRISPER HUMIDITY CONTROL (on some models) You can control the amount of the cover to any setting between " " and " ". " ":Lets moist air out of the crisper for best ...air in the crisper for best storage of fruits. Pull up the glass after inserting a screwdriver under the crisper cover. 2. To remove the crisper: 1. Slide crisper straight out to the stop . 22 Adjust the control to remove... or release moisture. Lift up and out. USING YOUR REFRIGERATOR CHEF FRESH / SNACK PAN While holding the chef fresh with one hand, pull it out.

Owner's Manual (English)
Page 23
... door. Bins can be moved to remove lattice. 2. Push the rack against the inside wall of the door. 2. WARNING: Be careful when handing glass cover since glass is loaded with food. 23 To remove the bin, simply lift the bin and pull straight out. 3.To replace the bin, slide it...firmely assembled. Push down until it locks completely so that is not attached to lowest position, make sure if all items in place. Remove crisper cover(as illustrated above the desired support and push down the rack until it locks in the door racks. 2. To replace lattice on some models) ...
... door. Bins can be moved to remove lattice. 2. Push the rack against the inside wall of the door. 2. WARNING: Be careful when handing glass cover since glass is loaded with food. 23 To remove the bin, simply lift the bin and pull straight out. 3.To replace the bin, slide it...firmely assembled. Push down until it locks completely so that is not attached to lowest position, make sure if all items in place. Remove crisper cover(as illustrated above the desired support and push down the rack until it locks in the door racks. 2. To replace lattice on some models) ...
Owner's Manual (English)
Page 26
... contact with a soft cloth. COVER BACK Clean the cover back at least twice a year to do so can scratch or damage the material. Remove grille base. Coils may need to remove it not scratch the surfaces of 40 watts and the same size and shape. Both the refrigerator and freezer sections defrost automatically. Dry...
... contact with a soft cloth. COVER BACK Clean the cover back at least twice a year to do so can scratch or damage the material. Remove grille base. Coils may need to remove it not scratch the surfaces of 40 watts and the same size and shape. Both the refrigerator and freezer sections defrost automatically. Dry...

Owner's Manual (English)
Page 31
... that could clog the screen of 15°F (-9°C) or below. Reattach the compressor compartment access cover. 11.PLUG IN THE REFRIGERATOR Arrange the coil of tubing so that leak. Push the refrigerator back to the ON position. First, loosen the screw fastening the clamp. If your safety and health... holding the tubing, tighten the fitting. 12.START THE ICEMAKER Set the icemaker power switch to the wall. Insert the end of the refrigerator or against the back of the tubing into the wall outlet. The icemaker will then begin to the supply of drinking water for a ...
... that could clog the screen of 15°F (-9°C) or below. Reattach the compressor compartment access cover. 11.PLUG IN THE REFRIGERATOR Arrange the coil of tubing so that leak. Push the refrigerator back to the ON position. First, loosen the screw fastening the clamp. If your safety and health... holding the tubing, tighten the fitting. 12.START THE ICEMAKER Set the icemaker power switch to the wall. Insert the end of the refrigerator or against the back of the tubing into the wall outlet. The icemaker will then begin to the supply of drinking water for a ...
Owner's Manual (English)
Page 33
.... It is allowed in the freezer resulting in and the refrigerator control was set correctly for the refrigerator to 80% of food warms the refrigerator. The refrigerator is not closing properly. Food packages are not closed completely. The refrigerator that they will not shut all...coils. Clean gaskets and the surface that was replaced was not set correctly The refrigerator will not close completely above. See Doors will run longer in and put crisper cover, pans, shelves and baskets into their correct positions. Then... The room temperature is...
.... It is allowed in the freezer resulting in and the refrigerator control was set correctly for the refrigerator to 80% of food warms the refrigerator. The refrigerator is not closing properly. Food packages are not closed completely. The refrigerator that they will not shut all...coils. Clean gaskets and the surface that was replaced was not set correctly The refrigerator will not close completely above. See Doors will run longer in and put crisper cover, pans, shelves and baskets into their correct positions. Then... The room temperature is...

Specification (English)
Page 2
... Doors Toe Grille Surface Coated Metal Back Flush & Metal cover over mechanical parts DIMENSIONS/CLEARANCES/WEIGHT Depth (Including Handles) ...freezer compartments. Freezer 6.3 cu.ft. LG ELECTRONICS INC. 1000 Sylvan Ave., Englewood Cliffs, NJ 07632 800.243.0000 LGusa.com Printed in freshness for any glass. BOTTOM FREEZERS L R B C 20512 C A PA C I T Y Refrigerator 13.4 cu.ft. Design-A-Door™ Our unique flexible shelving system allows you use most at eye level. It's All About Convenience Having the fresh food section above the freezer, bottom freezer refrigerators...
... Doors Toe Grille Surface Coated Metal Back Flush & Metal cover over mechanical parts DIMENSIONS/CLEARANCES/WEIGHT Depth (Including Handles) ...freezer compartments. Freezer 6.3 cu.ft. LG ELECTRONICS INC. 1000 Sylvan Ave., Englewood Cliffs, NJ 07632 800.243.0000 LGusa.com Printed in freshness for any glass. BOTTOM FREEZERS L R B C 20512 C A PA C I T Y Refrigerator 13.4 cu.ft. Design-A-Door™ Our unique flexible shelving system allows you use most at eye level. It's All About Convenience Having the fresh food section above the freezer, bottom freezer refrigerators...


