Owners Manual
Page 1
... and damage from misuse or improper installation. LG is not responsible for any damages caused by explaining proper air conditioner maintenance and preventing improper use. This manual may help save time and money by misuse of the air conditioner. ENGLISH ESPAÑOL website http://www.lgservice.com e-mail http://www.lgeservice.com/techsup.html LG Window-Type Air Conditioner LG OWNER'S MANUAL MODELS: LP6000ER LP7000R IMPORTANT Please read through...
... and damage from misuse or improper installation. LG is not responsible for any damages caused by explaining proper air conditioner maintenance and preventing improper use. This manual may help save time and money by misuse of the air conditioner. ENGLISH ESPAÑOL website http://www.lgservice.com e-mail http://www.lgeservice.com/techsup.html LG Window-Type Air Conditioner LG OWNER'S MANUAL MODELS: LP6000ER LP7000R IMPORTANT Please read through...
Owners Manual
Page 2
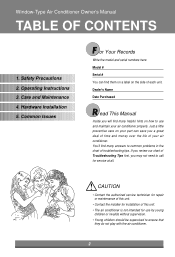
... 2. Window-Type Air Conditioner Owner's Manual TABLE OF CONTENTS 1. Hardware Installation 5. If you review our chart of this unit. • Contact the installer for installation of Troubleshooting Tips first, you will find many answers to ensure that they do not play with the air conditioner. 2 Just a little preventive care on your air conditioner properly. Care and Maintenance 4. Operating Instructions 3. Dealer's Name Date Purchased R ead This Manual Inside you may not need to...
... 2. Window-Type Air Conditioner Owner's Manual TABLE OF CONTENTS 1. Hardware Installation 5. If you review our chart of this unit. • Contact the installer for installation of Troubleshooting Tips first, you will find many answers to ensure that they do not play with the air conditioner. 2 Just a little preventive care on your air conditioner properly. Care and Maintenance 4. Operating Instructions 3. Dealer's Name Date Purchased R ead This Manual Inside you may not need to...
Owners Manual
Page 3
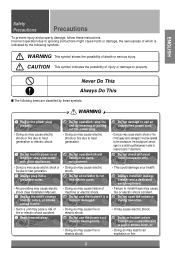
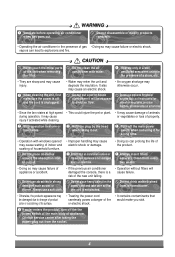
... not use the power cord close to install these symbols. Do not operate or stop the unit by the manufacturer, the manufacturer's service agent, or a similarly qualified person in the power plug properly. • Doing so may cause electric shock (See Installation Manual). Do not use an unspecified power cord. • Doing so may cause fire or electric shock. Always install air leakage breaker and a dedicated switching board. • Failure to heating tools...
... not use the power cord close to install these symbols. Do not operate or stop the unit by the manufacturer, the manufacturer's service agent, or a similarly qualified person in the power plug properly. • Doing so may cause electric shock (See Installation Manual). Do not use an unspecified power cord. • Doing so may cause fire or electric shock. Always install air leakage breaker and a dedicated switching board. • Failure to heating tools...
Owners Manual
Page 4
... power-plug out from air conditioner. • Otherwise, the products appearance may cause failure or electric shock. Always use appliance for special purpose such as climate control for a long time. • Operation with water. If water enters the product, turn off the the power switch of the main body of the unit when removing the filter. Do not use a soft cloth. Ensure that an installation console of household furniture. Contact service...
... power-plug out from air conditioner. • Otherwise, the products appearance may cause failure or electric shock. Always use appliance for special purpose such as climate control for a long time. • Operation with water. If water enters the product, turn off the the power switch of the main body of the unit when removing the filter. Do not use a soft cloth. Ensure that an installation console of household furniture. Contact service...
Owners Manual
Page 5
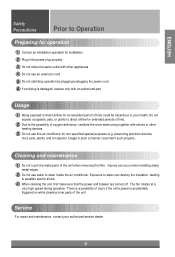
Usage in the power plug properly. 3 Do not share the same outlet with other heating devices. 3 Do not use this air conditioner for an extended period of the unit when removing the filter. The fan rotates at a very high speed during operation. Injuries can destroy the insulation, leading to clean inside the air conditioner. Do not expose occupants, pets, or plants to direct airflow for extended periods...
Usage in the power plug properly. 3 Do not share the same outlet with other heating devices. 3 Do not use this air conditioner for an extended period of the unit when removing the filter. The fan rotates at a very high speed during operation. Injuries can destroy the insulation, leading to clean inside the air conditioner. Do not expose occupants, pets, or plants to direct airflow for extended periods...
Owners Manual
Page 6
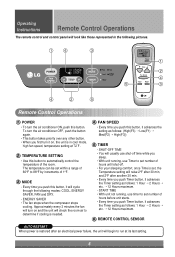
... CONTROL SENSOR AUTO RESTART When power is set, the Temperature setting will raise 2°F after 30 min, and 2°F after an electrical power failure, the unit will begin to run at 72˚F. 2 TEMPERATURE SETTING • Use this button to automatically control the temperature of the room. ENERGY SAVER • The fan stops when the compressor stops cooling. START TIME • With unit not running , use timer to set within a range of 60°F to set number of 1°F. 3 MODE - Operating Instructions Remote Control Operations The remote control and control panel...
... CONTROL SENSOR AUTO RESTART When power is set, the Temperature setting will raise 2°F after 30 min, and 2°F after an electrical power failure, the unit will begin to run at 72˚F. 2 TEMPERATURE SETTING • Use this button to automatically control the temperature of the room. ENERGY SAVER • The fan stops when the compressor stops cooling. START TIME • With unit not running , use timer to set within a range of 60°F to set number of 1°F. 3 MODE - Operating Instructions Remote Control Operations The remote control and control panel...

Owners Manual
Page 7
..., remove the batteries from the remote control if the air conditioner is not going to polarity and insert two new AAA 1.5V batteries. 3 Reattach the cover. ENGLISH Inserting the Remote Control Batteries 1 Push out the cover on a wall using the mountable holder. 7 NOTE: Do not use rechargeable batteries. To maintain optimal operation of the remote control, the remote sensor should not be exposed to direct sunlight. • The remote control can be used...
..., remove the batteries from the remote control if the air conditioner is not going to polarity and insert two new AAA 1.5V batteries. 3 Reattach the cover. ENGLISH Inserting the Remote Control Batteries 1 Push out the cover on a wall using the mountable holder. 7 NOTE: Do not use rechargeable batteries. To maintain optimal operation of the remote control, the remote sensor should not be exposed to direct sunlight. • The remote control can be used...
Owners Manual
Page 8
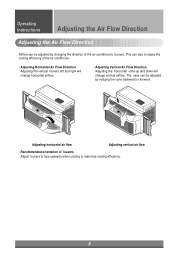
... down will change vertical airflow. Adjusting horizontal air flow Adjusting vertical air flow • Recommended orientation of the air conditioner's louvers. This can be adjusted by nudging the vane backward or forward. Operating Instructions Adjusting the Air Flow Direction Adjusting the Air Flow Direction Airflow can be adjusted by changing the direction of louvers Adjust louvers to face upwards when cooling to maximize cooling efficiency. 8
... down will change vertical airflow. Adjusting horizontal air flow Adjusting vertical air flow • Recommended orientation of the air conditioner's louvers. This can be adjusted by nudging the vane backward or forward. Operating Instructions Adjusting the Air Flow Direction Adjusting the Air Flow Direction Airflow can be adjusted by changing the direction of louvers Adjust louvers to face upwards when cooling to maximize cooling efficiency. 8
Owners Manual
Page 9
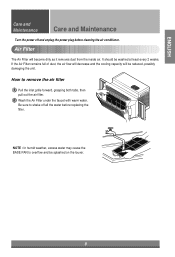
... Care and Maintenance Care and Maintenance Turn the power off all the water before cleaning the air conditioner. It should be reduced, possibly damaging the unit. If the Air Filter remains full of dust, the air flow will decrease and the cooling capacity will become dirty as it removes dust from the inside air. F3FF2H1IMGLEHODW 2 Wash the Air Filter under the faucet with warm water. Air Filter The Air Filter will be washed...
... Care and Maintenance Care and Maintenance Turn the power off all the water before cleaning the air conditioner. It should be reduced, possibly damaging the unit. If the Air Filter remains full of dust, the air flow will decrease and the cooling capacity will become dirty as it removes dust from the inside air. F3FF2H1IMGLEHODW 2 Wash the Air Filter under the faucet with warm water. Air Filter The Air Filter will be washed...
Owners Manual
Page 10
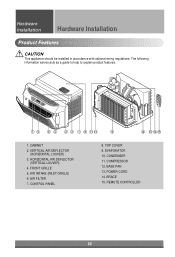
... (INLET GRILLE) 6. TOP COVER 9. POWER CORD 14. BASE PAN 13. COMPRESSOR 12. The following information serves acts as a guide to help to explain product features. HORIZONTAL AIR DEFLECTOR (VERTICAL LOUVER) 4. AIR FILTER 7. EVAPORATOR 10. REMOTE CONTROLLER 10 CABINET 2. FRONT GRILLE 5. Hardware Installation Hardware Installation PRreomdoutcet CFeoantturorel sOperations CAUTION This appliance should be installed in accordance with national wiring regulations. Power Temp Fan Speed Sleep Mode 75 64 2 3 1 8 11 13 9 12 10 14 15 1. CONTROL PANEL...
... (INLET GRILLE) 6. TOP COVER 9. POWER CORD 14. BASE PAN 13. COMPRESSOR 12. The following information serves acts as a guide to help to explain product features. HORIZONTAL AIR DEFLECTOR (VERTICAL LOUVER) 4. AIR FILTER 7. EVAPORATOR 10. REMOTE CONTROLLER 10 CABINET 2. FRONT GRILLE 5. Hardware Installation Hardware Installation PRreomdoutcet CFeoantturorel sOperations CAUTION This appliance should be installed in accordance with national wiring regulations. Power Temp Fan Speed Sleep Mode 75 64 2 3 1 8 11 13 9 12 10 14 15 1. CONTROL PANEL...
Owners Manual
Page 11
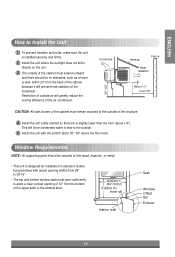
... Interior wall Sash Window Offset Sill Exterior 11 Restriction of outside air will greatly reduce the cooling efficiency of the air conditioner. 30"~60" Cooled air Awning Fence Heat radiation About 1/4" Over 20" CAUTION: All side louvers of the cabinet must remain exposed to Install the Unit 1 To prevent vibration and noise, make sure the unit is installed securely and firmly. 2 Install the unit where the...
... Interior wall Sash Window Offset Sill Exterior 11 Restriction of outside air will greatly reduce the cooling efficiency of the air conditioner. 30"~60" Cooled air Awning Fence Heat radiation About 1/4" Over 20" CAUTION: All side louvers of the cabinet must remain exposed to Install the Unit 1 To prevent vibration and noise, make sure the unit is installed securely and firmly. 2 Install the unit where the...
Owners Manual
Page 12
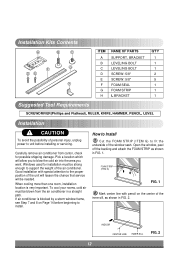
... L BRACKET Q'TY 1 1 1 2 5 1 1 1 Suggested Tool Requirements SCREWDRIVER(Phillips and Flathead), RULER, KNIFE, HAMMER, PENCIL, LEVEL Installation CAUTION To avoid the possibility of personal injury, unplug power to blow the cold air into the area you want. Pick a location which will be strong enough to install. Good installation with pencil on Page 14 before installing or servicing. To cool your rooms, cold air must be needed. When cooling more...
... L BRACKET Q'TY 1 1 1 2 5 1 1 1 Suggested Tool Requirements SCREWDRIVER(Phillips and Flathead), RULER, KNIFE, HAMMER, PENCIL, LEVEL Installation CAUTION To avoid the possibility of personal injury, unplug power to blow the cold air into the area you want. Pick a location which will be strong enough to install. Good installation with pencil on Page 14 before installing or servicing. To cool your rooms, cold air must be needed. When cooling more...
Owners Manual
Page 13
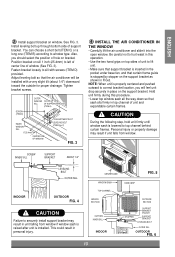
... bolt so that the air conditioner will feel unit drop securely in place on the support bracket. SCREW INNER SILL SUPPORT BRACKET ABOUT 1/4" LEVELING BOLT OUTER SILL CENTER LINE WINDOW SASH HAND GRIP FIG. 5 INDOOR OUTDOOR FIG. 4 CAUTION Failure to hurt waist in this procedure. • Lower top window sash all the way down so that curtain frame guide is lowered to sill...
... bolt so that the air conditioner will feel unit drop securely in place on the support bracket. SCREW INNER SILL SUPPORT BRACKET ABOUT 1/4" LEVELING BOLT OUTER SILL CENTER LINE WINDOW SASH HAND GRIP FIG. 5 INDOOR OUTDOOR FIG. 4 CAUTION Failure to hurt waist in this procedure. • Lower top window sash all the way down so that curtain frame guide is lowered to sill...
Owners Manual
Page 14
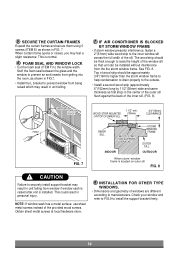
... glass and the window to prevent air and insects from getting into the room, as shown in unit falling from window if window sash is raised after unit is normal. 6 FOAM SEAL AND WINDOW LOCK • Cut the foam seal (ITEM F) to install the support bracket firmly. 14 Obtain sheet metal screws at local hardware store. 8 INSTALLATION FOR OTHER TYPE WINDOWS. • Dimensions and geometry of...
... glass and the window to prevent air and insects from getting into the room, as shown in unit falling from window if window sash is raised after unit is normal. 6 FOAM SEAL AND WINDOW LOCK • Cut the foam seal (ITEM F) to install the support bracket firmly. 14 Obtain sheet metal screws at local hardware store. 8 INSTALLATION FOR OTHER TYPE WINDOWS. • Dimensions and geometry of...
Owners Manual
Page 15
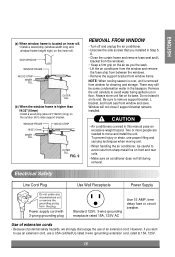
... support bracket from sharp metal fins on the air as you wish to raise support bracket. SASH WINDOW WINDOW FRAME WOOD STRIP INNER SILL OUTER SILL (b) When the window frame is removed from the plug. Power supply cord with 3-prong grounding plug Standard 125V, 3-wire grounding receptacle rated 15A, 125V AC Use 15 AMP, time delay fuse or circuit breaker. NOTE: When cooling season is over, unit is higher than 19/32"(15mm) • Install...
... support bracket from sharp metal fins on the air as you wish to raise support bracket. SASH WINDOW WINDOW FRAME WOOD STRIP INNER SILL OUTER SILL (b) When the window frame is removed from the plug. Power supply cord with 3-prong grounding plug Standard 125V, 3-wire grounding receptacle rated 15A, 125V AC Use 15 AMP, time delay fuse or circuit breaker. NOTE: When cooling season is over, unit is higher than 19/32"(15mm) • Install...

Owners Manual
Page 16
... Because of potential safety hazards, we strongly discourage the use a CSA certified/UL-listed 3-wire (grounding) extension cord, rated at 15A, 125V. Unplugging the power cord frequently can lead to use FIG. 10 DO NOT CUT OR REMOVE THE THIRD (GROUND) PRONG FROM THE POWER PLUG. However, if you wish to the wall receptacle cover screw does not ground the appliance unless the...
... Because of potential safety hazards, we strongly discourage the use a CSA certified/UL-listed 3-wire (grounding) extension cord, rated at 15A, 125V. Unplugging the power cord frequently can lead to use FIG. 10 DO NOT CUT OR REMOVE THE THIRD (GROUND) PRONG FROM THE POWER PLUG. However, if you wish to the wall receptacle cover screw does not ground the appliance unless the...
Owners Manual
Page 17
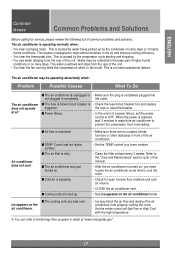
... reset the breaker. This feature is completely plugged into not plugged in front of the unit. s The air filter is turned on, you need to give the air conditioner some time to cool the room. • Check for service, please review the following list of the manual. • After the air conditioner is dirty. Refer to the Energy Star program in the air and improve cooling efficiency. • You hear the thermostat click. Set the mode control...
... reset the breaker. This feature is completely plugged into not plugged in front of the unit. s The air filter is turned on, you need to give the air conditioner some time to cool the room. • Check for service, please review the following list of the manual. • After the air conditioner is dirty. Refer to the Energy Star program in the air and improve cooling efficiency. • You hear the thermostat click. Set the mode control...


