Owner's Manual
Page 2
... Window Vent Panel and Extensions 15 Installation in Vertical Sliding Windows 16, 17 Installation in this manual, your purchase and welcome to the LG family. Congratulations on your air conditioner will provide you with portable convenience. Your new LG Air Conditioner combines high-efficiency operation with many years of reliable service. 2 INTRODUCTION IMPORTANT SAFETY INSTRUCTIONS Basic Safety Precautions 3, 4 Electrical Safety 4, 5 PARTS AND FEATURES Key Parts and Components 6 Control Panel and Remote 7 HOW TO USE Before Using Your Air Conditioner 8, 9 Using...
... Window Vent Panel and Extensions 15 Installation in Vertical Sliding Windows 16, 17 Installation in this manual, your purchase and welcome to the LG family. Congratulations on your air conditioner will provide you with portable convenience. Your new LG Air Conditioner combines high-efficiency operation with many years of reliable service. 2 INTRODUCTION IMPORTANT SAFETY INSTRUCTIONS Basic Safety Precautions 3, 4 Electrical Safety 4, 5 PARTS AND FEATURES Key Parts and Components 6 Control Panel and Remote 7 HOW TO USE Before Using Your Air Conditioner 8, 9 Using...
Owner's Manual
Page 3
... outlet. it is specifically recommended in personal injury. • Do not disassemble or modify the air conditioner or the power cord. It can overload the circuit and cause a fire or electric shock. • Do not remove the round grounding prong from the air conditioner before cleaning to personswhenusing genuine replacement parts. • The air conditioner should be plugged into its own grounded...
... outlet. it is specifically recommended in personal injury. • Do not disassemble or modify the air conditioner or the power cord. It can overload the circuit and cause a fire or electric shock. • Do not remove the round grounding prong from the air conditioner before cleaning to personswhenusing genuine replacement parts. • The air conditioner should be plugged into its own grounded...
Owner's Manual
Page 4
... protectedbya15amptimedelayfuse orcircuitbreaker. • Thisairconditionermust be sure to cool. Do not use for most efficient operation. • To prevent damage to clean the air conditioner. Do not use the remote if the batteries have leaked. The chemicals in the risk of...
... protectedbya15amptimedelayfuse orcircuitbreaker. • Thisairconditionermust be sure to cool. Do not use for most efficient operation. • To prevent damage to clean the air conditioner. Do not use the remote if the batteries have leaked. The chemicals in the risk of...
Owner's Manual
Page 5
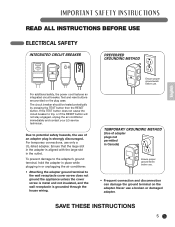
...;hazards,theuse only a UL-listed adapter. The circuit breaker should be tested periodically by pressing the TEST button then the RESET button. SAVETHESEINSTRUCTIONS 5 Dueto trip, or if the RESET button will not stay engaged, unplug the air conditioner immediately and contact your LG service technician. For temporary connections, use of adapter plugsnot permitted...
...;hazards,theuse only a UL-listed adapter. The circuit breaker should be tested periodically by pressing the TEST button then the RESET button. SAVETHESEINSTRUCTIONS 5 Dueto trip, or if the RESET button will not stay engaged, unplug the air conditioner immediately and contact your LG service technician. For temporary connections, use of adapter plugsnot permitted...
Owner's Manual
Page 6
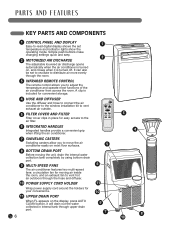
... the room. 3 INFRARED REMOTE CONTROL The remote control allows you to move the air conditioner easily on the display, press AUTO CLEAN button, it is included for convenient storage. 4 HOSE AND DIFFUSER Use the diffuser and hose to connect the air conditioner to the window installation kit to vent exhaust air outside. 5 FILTER COVER AND FILTER Filter cover clips in internal tank through upper drain port. 7 8 6 10 PARTS AND FEATURES KEY PARTS AND COMPONENTS 1 CONTROL PANEL AND DISPLAY 1 Easy-to adjust the temperature and operate...
... the room. 3 INFRARED REMOTE CONTROL The remote control allows you to move the air conditioner easily on the display, press AUTO CLEAN button, it is included for convenient storage. 4 HOSE AND DIFFUSER Use the diffuser and hose to connect the air conditioner to the window installation kit to vent exhaust air outside. 5 FILTER COVER AND FILTER Filter cover clips in internal tank through upper drain port. 7 8 6 10 PARTS AND FEATURES KEY PARTS AND COMPONENTS 1 CONTROL PANEL AND DISPLAY 1 Easy-to adjust the temperature and operate...
Owner's Manual
Page 7
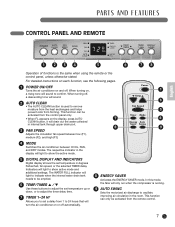
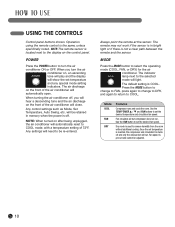
... set temperature in the room. Power 1 Temp 6 Fan Speed 3 Timer Mode 4 Energy Auto Saver Swing 9 4 MODE Switches the air conditioner between low (F1), medium (F2), and high (F3). The WATER FULL indicator will light to indicate when the internal water drain tank needs to be activated from the remote control. 7 PARTS AND FEATURES CONTROL PANEL AND REMOTE English 1 234 5 6 78 Operation of functions is used to remove moisture from the heat exchangers and helps prevent odor from forming. When turning off automatically. 8 ENERGY SAVER...
... set temperature in the room. Power 1 Temp 6 Fan Speed 3 Timer Mode 4 Energy Auto Saver Swing 9 4 MODE Switches the air conditioner between low (F1), medium (F2), and high (F3). The WATER FULL indicator will light to indicate when the internal water drain tank needs to be activated from the remote control. 7 PARTS AND FEATURES CONTROL PANEL AND REMOTE English 1 234 5 6 78 Operation of functions is used to remove moisture from the heat exchangers and helps prevent odor from forming. When turning off automatically. 8 ENERGY SAVER...
Owner's Manual
Page 8
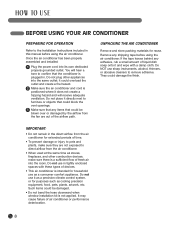
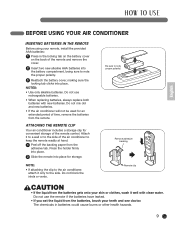
... remove adhesive. HOW TO USE BEFORE USING YOUR AIR CONDITIONER PREPARING FOR OPERATION Refer to the Installation Instructions included in this manual before using the air conditioner. Do not plug other combustion devices, make sure they are out of the airflow path. it and wipe with these types of liquid dish soap onto it could be damaged. • Do not bend the hose downward when window installation kit...
... remove adhesive. HOW TO USE BEFORE USING YOUR AIR CONDITIONER PREPARING FOR OPERATION Refer to the Installation Instructions included in this manual before using the air conditioner. Do not plug other combustion devices, make sure they are out of the airflow path. it and wipe with these types of liquid dish soap onto it could be damaged. • Do not bend the hose downward when window installation kit...
Owner's Manual
Page 9
... to the air conditioner, attach it to a wall or to keep the remote readily at hand. 1 Peel off the backing paper from the adhesive tab. ATTACHING THE REMOTE CLIP Your air conditioner includes a storage clip for storage. Do not use rechargeable batteries. • When replacing batteries, always replace both batteries with cleanwater. Do not use the remote if the batteries have leaked. •...
... to the air conditioner, attach it to a wall or to keep the remote readily at hand. 1 Peel off the backing paper from the adhesive tab. ATTACHING THE REMOTE CLIP Your air conditioner includes a storage clip for storage. Do not use rechargeable batteries. • When replacing batteries, always replace both batteries with cleanwater. Do not use the remote if the batteries have leaked. •...
Owner's Manual
Page 10
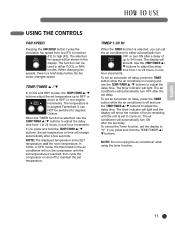
... mode will automatically reset to COOL mode, with a temperature setting of 72°F. Mode COOL FAN DRY Features Compressor runs and cools the room. NOTE:When turned on the front of the air conditioner will automatically open. Use the FAN button to remove humidity from the room without additional cooling. The default setting is used to set the desired temperature and circulation fan speed. POWER Press the POWER button to the display on the front of the air conditioner will close. Dry mode is COOL. Any settings...
... mode will automatically reset to COOL mode, with a temperature setting of 72°F. Mode COOL FAN DRY Features Compressor runs and cools the room. NOTE:When turned on the front of the air conditioner will automatically open. Use the FAN button to remove humidity from the room without additional cooling. The default setting is used to set the desired temperature and circulation fan speed. POWER Press the POWER button to the display on the front of the air conditioner will close. Dry mode is COOL. Any settings...
Owner's Manual
Page 11
... increments. Use the TEMP/TIMER L / M buttons to adjust the delay time from low (F1) to medium (F2) to high (F3). TEMP/TIMER L / M In COOL and DRY modes, the TEMP/TIMER L / M buttons adjust the set temperature. To set an automatic off to maintain the set temperature up to 24 hours. To set delay. NOTE:The displayed temperature is a brief delay before the fan motor changes speed. The display will automatically turn ON after the set an...
... increments. Use the TEMP/TIMER L / M buttons to adjust the delay time from low (F1) to medium (F2) to high (F3). TEMP/TIMER L / M In COOL and DRY modes, the TEMP/TIMER L / M buttons adjust the set temperature. To set an automatic off to maintain the set temperature up to 24 hours. To set delay. NOTE:The displayed temperature is a brief delay before the fan motor changes speed. The display will automatically turn ON after the set an...
Owner's Manual
Page 12
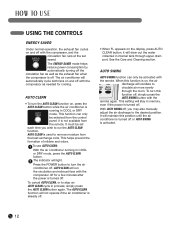
... the air conditioner running in internal tank through the room. When this function is on the display, press AUTO CLEAN button, it is turned off. This function can only be selected from the remote. it will oscillate to Energy Auto Saver Swing circulate air more evenly through upper drain Tepmoprt. AUTO CLEAN is used to stop an AUTO CLEAN cycle in memory, even if the power is not available from the control panel...
... the air conditioner running in internal tank through the room. When this function is on the display, press AUTO CLEAN button, it is turned off. This function can only be selected from the remote. it will oscillate to Energy Auto Saver Swing circulate air more evenly through upper drain Tepmoprt. AUTO CLEAN is used to stop an AUTO CLEAN cycle in memory, even if the power is not available from the control panel...
Owner's Manual
Page 13
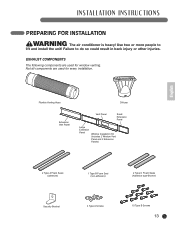
EXHAUST COMPONENTS The following components are used for every installation. Not all components are used for window venting. English Flexible Venting Hose Diffuser Extension Vent Panel Vent Panel Small Extension Panel Large Extension Panel Window Installation Kit (includes 2 Window Vent Panel and 2 Extension Panels) 2 Type A Foam Seals (adhesive) 1 Type B Foam Seal (non-adhesive) 2 Type C Foam Seals (Adhesive type-Shorter) Security Bracket 4 Type A Screws 10 Type B Screws 13 INSTALLATION INSTRUCTIONS PREPARING FOR INSTALLATION WARNING Theairconditioner&#...
EXHAUST COMPONENTS The following components are used for every installation. Not all components are used for window venting. English Flexible Venting Hose Diffuser Extension Vent Panel Vent Panel Small Extension Panel Large Extension Panel Window Installation Kit (includes 2 Window Vent Panel and 2 Extension Panels) 2 Type A Foam Seals (adhesive) 1 Type B Foam Seal (non-adhesive) 2 Type C Foam Seals (Adhesive type-Shorter) Security Bracket 4 Type A Screws 10 Type B Screws 13 INSTALLATION INSTRUCTIONS PREPARING FOR INSTALLATION WARNING Theairconditioner&#...
Owner's Manual
Page 15
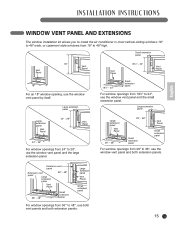
... extension panel Vent Panel 181⁄4" − 24" Vent Panel 181⁄4" − 24" Small extension panel For window openings from 181⁄4" to 29", use the window vent panel and the large extension panel. Large extension panel Large extension panel Vent Panel 24" − 29" Vent Panel 24" − 29" For window openings from 24" to 24", use the window vent panel and the small extension panel. INSTALLATION INSTRUCTIONS English WINDOW VENT PANEL AND EXTENSIONS The window installation kit allows you to install the air conditioner...
... extension panel Vent Panel 181⁄4" − 24" Vent Panel 181⁄4" − 24" Small extension panel For window openings from 181⁄4" to 29", use the window vent panel and the large extension panel. Large extension panel Large extension panel Vent Panel 24" − 29" Vent Panel 24" − 29" For window openings from 24" to 24", use the window vent panel and the small extension panel. INSTALLATION INSTRUCTIONS English WINDOW VENT PANEL AND EXTENSIONS The window installation kit allows you to install the air conditioner...

Owner's Manual
Page 18
... for each extension: Vent panel only: 4 type B screws Vent panel and one extension: 5 type B screws Vent panel and two extensions: 6 type B screws Two vent panels and two extensions: 9 type B screws 18 4 Cut the foam seal B(Non-adhesive Jtoyipntes )ento the window height. más corto) Foam seal B (Non-adhesive type) 3 Carefully close the window. Sellado con espuma C (tipo adhesivo- INSTALLATION INSTRUCTIONS INSTALLATION IN CASEMENT STYLE WINDOWS NOTE: The window installation kit can be used .
... for each extension: Vent panel only: 4 type B screws Vent panel and one extension: 5 type B screws Vent panel and two extensions: 6 type B screws Two vent panels and two extensions: 9 type B screws 18 4 Cut the foam seal B(Non-adhesive Jtoyipntes )ento the window height. más corto) Foam seal B (Non-adhesive type) 3 Carefully close the window. Sellado con espuma C (tipo adhesivo- INSTALLATION INSTRUCTIONS INSTALLATION IN CASEMENT STYLE WINDOWS NOTE: The window installation kit can be used .
Owner's Manual
Page 20
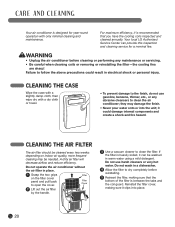
.... Filter Filter Cover 2 Lift out the air filter by the handle. 3 Use a vacuum cleaner to open the cover. CLEANING THE AIR FILTER The air filter should be needed. CLEANING THE CASE Wipe the case with a slightly damp cloth, then wipe dry with only minimal cleaning and maintenance. Reinstall the filter cover, making sure that you have the cooling coils inspected and cleaned annually. For maximum efficiency, it can provide this inspection and cleaning service for year...
.... Filter Filter Cover 2 Lift out the air filter by the handle. 3 Use a vacuum cleaner to open the cover. CLEANING THE AIR FILTER The air filter should be needed. CLEANING THE CASE Wipe the case with a slightly damp cloth, then wipe dry with only minimal cleaning and maintenance. Reinstall the filter cover, making sure that you have the cooling coils inspected and cleaned annually. For maximum efficiency, it can provide this inspection and cleaning service for year...
Owner's Manual
Page 21
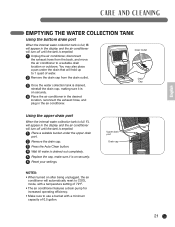
... unplugged, the air conditioner will turn off until the tank is full. NOTES: •When turned on securely. 6 Reset your settings. FL will appear in the display and the air conditioner will automatically reset to COOL mode, with a temperature setting of 72°F. •The air conditioner features a drain pump for increased operating efficiency. • Make sure to use a bucket with a minimum capacity of water. 2 Remove the drain cap from...
... unplugged, the air conditioner will turn off until the tank is full. NOTES: •When turned on securely. 6 Reset your settings. FL will appear in the display and the air conditioner will automatically reset to COOL mode, with a temperature setting of 72°F. •The air conditioner features a drain pump for increased operating efficiency. • Make sure to use a bucket with a minimum capacity of water. 2 Remove the drain cap from...
Owner's Manual
Page 22
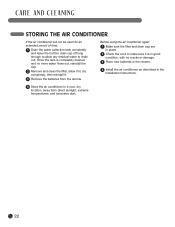
... a cool, dry location, away from the remote. Before using the air conditioner again: 1 Make sure the filter and drain cap are in place. 2 Check the cord to make sure it is completely drained and no cracks or damage. 3 Place new batteries in the remote. 4 Install the air conditioner as described in the Installation Instructions. 4 Store the air conditioner in good condition, with no more water flows out, reinstall the cap. 2 Remove and clean the filter...
... a cool, dry location, away from the remote. Before using the air conditioner again: 1 Make sure the filter and drain cap are in place. 2 Check the cord to make sure it is completely drained and no cracks or damage. 3 Place new batteries in the remote. 4 Install the air conditioner as described in the Installation Instructions. 4 Store the air conditioner in good condition, with no more water flows out, reinstall the cap. 2 Remove and clean the filter...
Owner's Manual
Page 23
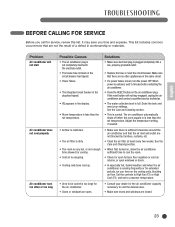
... service, review this list. See the Care and Cleaning section. • When first turned on the same circuit. • If a power failure occurs, turn the power OFF. Set the controls to cool the room. • Check for the air conditioner. • Doors or windows are not the result of a defect in the display. • Room temperature is restored, wait 3 minutes before restarting the air conditioner. • Press the RESET button on the cooling coils, blocking air...
... service, review this list. See the Care and Cleaning section. • When first turned on the same circuit. • If a power failure occurs, turn the power OFF. Set the controls to cool the room. • Check for the air conditioner. • Doors or windows are not the result of a defect in the display. • Room temperature is restored, wait 3 minutes before restarting the air conditioner. • Press the RESET button on the cooling coils, blocking air...
Owner's Manual
Page 24
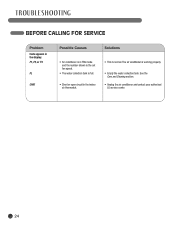
The air conditioner is normal. See the Care and Cleaning section. • Unplug the air conditioner and contact your authorized LG service center. 24 TROUbLESHOOTING BEFORE CALLING FOR SERVICE Problem Code appears in the display: F1, F2, or F3 FL CH01 PossibleCauses Solutions • Air conditioner is in FAN mode and the number shown is the set fan speed. • The water collection tank is full. • Short or open circuit in the indoor air thermostat. • This is working properly. • Empty the water collection tank.
The air conditioner is normal. See the Care and Cleaning section. • Unplug the air conditioner and contact your authorized LG service center. 24 TROUbLESHOOTING BEFORE CALLING FOR SERVICE Problem Code appears in the display: F1, F2, or F3 FL CH01 PossibleCauses Solutions • Air conditioner is in FAN mode and the number shown is the set fan speed. • The water collection tank is full. • Short or open circuit in the indoor air thermostat. • This is working properly. • Empty the water collection tank.
Owner's Manual
Page 25
... Road Huntsville, Alabama 35824 ATTN: CIC 9. Replacement parts are fan motors, switches, thermostats, heater, heater protectors, compressor overload, solenoids, circuit boards, auxiliary controls, thermistors, frost controls, ICR pump, capacitors, varistors, and indoor blower bearing. During this full one-year warranty, LGE will also provide, free of charge, all labor and on the side of repair or replacement under normal use during power failures and interruptions or inadequate electrical service. 3. DISTRIBUTOR SHALL BE LIABLE FOR ANY INCIDENTAL...
... Road Huntsville, Alabama 35824 ATTN: CIC 9. Replacement parts are fan motors, switches, thermostats, heater, heater protectors, compressor overload, solenoids, circuit boards, auxiliary controls, thermistors, frost controls, ICR pump, capacitors, varistors, and indoor blower bearing. During this full one-year warranty, LGE will also provide, free of charge, all labor and on the side of repair or replacement under normal use during power failures and interruptions or inadequate electrical service. 3. DISTRIBUTOR SHALL BE LIABLE FOR ANY INCIDENTAL...


