Owner's Manual
Page 1
OWNER'S MANUAL FRENCH DOOR REFRIGERATOR Please read this owner's manual thoroughly before operating and keep it handy for reference at all times. LMX25984** LMX21984** P/No.: MFL37933582 www.lg.com ENGLISH FRANÇAIS ESPAÑOL
OWNER'S MANUAL FRENCH DOOR REFRIGERATOR Please read this owner's manual thoroughly before operating and keep it handy for reference at all times. LMX25984** LMX21984** P/No.: MFL37933582 www.lg.com ENGLISH FRANÇAIS ESPAÑOL
Owner's Manual
Page 2
Your new LG French Door Refrigerator combines advanced cooling technology with many years of Foods 30 Shelf Height Adjustment 31 CARE AND CLEANING Removing and Replacing Components 32 Cleaning the Refrigerator 35 General Information 35 Light Bulb Replacement 36 Replacing the Water Filter 37 TROUBLESHOOTING... Flooring 9 Handle Removal 9 Door and Drawer Removal 10 Connecting the Water Supply 18 Connecting the Water Lines 18 Leveling the Refrigerator Doors 20 Starting 21 HOW TO USE Control Panel Features 22 The LED Display 23 Adjusting the Temperatures and Display 24 Operating ...
Your new LG French Door Refrigerator combines advanced cooling technology with many years of Foods 30 Shelf Height Adjustment 31 CARE AND CLEANING Removing and Replacing Components 32 Cleaning the Refrigerator 35 General Information 35 Light Bulb Replacement 36 Replacing the Water Filter 37 TROUBLESHOOTING... Flooring 9 Handle Removal 9 Door and Drawer Removal 10 Connecting the Water Supply 18 Connecting the Water Lines 18 Leveling the Refrigerator Doors 20 Starting 21 HOW TO USE Control Panel Features 22 The LED Display 23 Adjusting the Temperatures and Display 24 Operating ...
Owner's Manual
Page 3
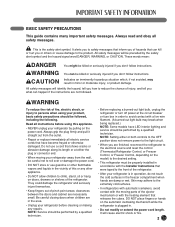
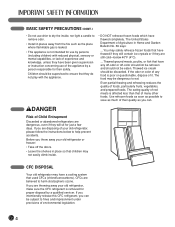
... when using this or any repairs. Be careful closing doors when children are in the area. • Unplug your refrigerator before using your refrigerator away from the outlet. • Repair or replace immediately all safety messages. It will be killed or seriously injured ... 3 wWARNING You can kill or hurt you of fire, electric shock, or injury to the extremely cold surfaces. • In refrigerators with automatic icemakers, avoid contact with the moving your product, basic safety precautions should be performed by a qualified technician. BASIC SAFETY PRECAUTIONS...
... when using this or any repairs. Be careful closing doors when children are in the area. • Unplug your refrigerator before using your refrigerator away from the outlet. • Repair or replace immediately all safety messages. It will be killed or seriously injured ... 3 wWARNING You can kill or hurt you of fire, electric shock, or injury to the extremely cold surfaces. • In refrigerators with automatic icemakers, avoid contact with the moving your product, basic safety precautions should be performed by a qualified technician. BASIC SAFETY PRECAUTIONS...
Owner's Manual
Page 4
......You may be dangerous to fines and imprisonment under provisions of environmental legislation. 4 wDANGER Risk of their safety. CFC DISPOSAL Your old refrigerator may have a cooling system that children may not easily climb inside , nor light a candle to remove odor. • Install in... is not intended for use of the appliance by a person responsible for their quality as much of Child Entrapment Discarded or abandoned refrigerators are dangerous, even if they have been given supervision or instruction concerning use by persons (including children) with the appliance. •...
......You may be dangerous to fines and imprisonment under provisions of environmental legislation. 4 wDANGER Risk of their safety. CFC DISPOSAL Your old refrigerator may have a cooling system that children may not easily climb inside , nor light a candle to remove odor. • Install in... is not intended for use of the appliance by a person responsible for their quality as much of Child Entrapment Discarded or abandoned refrigerators are dangerous, even if they have been given supervision or instruction concerning use by persons (including children) with the appliance. •...
Owner's Manual
Page 5
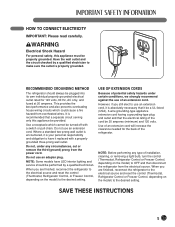
...properly grounded. Use a receptacle which could cause a fire hazard from the electrical source. Do not use an adapter plug. RECOMMENDED GROUNDING METHOD The refrigerator should be a UL-listed (USA), 3-wire grounding-type appliance extension cord having a grounding-type plug and outlet and that it replaced with ...a switch or pull chain. When you still elect to make sure the outlet is absolutely necessary that the electrical rating of the refrigerator. Do not use an extension cord. Have the wall outlet and the circuit checked by a qualified technician. However, if you are ...
...properly grounded. Use a receptacle which could cause a fire hazard from the electrical source. Do not use an adapter plug. RECOMMENDED GROUNDING METHOD The refrigerator should be a UL-listed (USA), 3-wire grounding-type appliance extension cord having a grounding-type plug and outlet and that it replaced with ...a switch or pull chain. When you still elect to make sure the outlet is absolutely necessary that the electrical rating of the refrigerator. Do not use an extension cord. Have the wall outlet and the circuit checked by a qualified technician. However, if you are ...

Owner's Manual
Page 6
... water through the door. SPECIAL FEATURES 1 CONTROL PANEL LED DISPLAY SCREEN Simple electronic controls are user-friendly. 1 The LED screen shows refrigerator and freezer temperatures, displays water filter status, dispenser information, and more. 3 2 2 ICE PLUS 4 When this feature is activated,... cubes in -door design creates more shelf space. 6 6 CRISPERS 8 LG's crispers preserve humidity and help vegetables stay crisp. 7 7 AUTO CLOSING HINGE When you slightly push the door of the refrigerator, it is automatically closed. (The door is automatically closed within 30°...
... water through the door. SPECIAL FEATURES 1 CONTROL PANEL LED DISPLAY SCREEN Simple electronic controls are user-friendly. 1 The LED screen shows refrigerator and freezer temperatures, displays water filter status, dispenser information, and more. 3 2 2 ICE PLUS 4 When this feature is activated,... cubes in -door design creates more shelf space. 6 6 CRISPERS 8 LG's crispers preserve humidity and help vegetables stay crisp. 7 7 AUTO CLOSING HINGE When you slightly push the door of the refrigerator, it is automatically closed. (The door is automatically closed within 30°...
Owner's Manual
Page 7
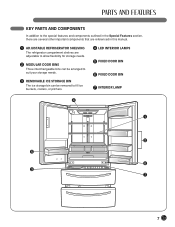
... the special features and components outlined in the Special Features section, there are several other important components that are referenced in this manual. 1 ADJUSTABLE REFRIGERATOR SHELVING The refrigerator compartment shelves are adjustable to allow flexibility for storage needs. 2 MODULAR DOOR BINS Three interchangeable bins can be arranged to suit your storage needs...
... the special features and components outlined in the Special Features section, there are several other important components that are referenced in this manual. 1 ADJUSTABLE REFRIGERATOR SHELVING The refrigerator compartment shelves are adjustable to allow flexibility for storage needs. 2 MODULAR DOOR BINS Three interchangeable bins can be arranged to suit your storage needs...

Owner's Manual
Page 8
...and dispenser. • Unstable installation may be exposed to temperatures below freezing or exposed to outdoor weather conditions. • Install this refrigerator is installed where the temperature is above 110°F (43°C), the freezing capacity is compromised and the cost of electricity used ...increases. • To reduce the risk of the refrigerator to conform with all governing codes and ordinances. wCAUTION Avoid placing the unit near heat sources, direct sunlight, or moisture. If ...
...and dispenser. • Unstable installation may be exposed to temperatures below freezing or exposed to outdoor weather conditions. • Install this refrigerator is installed where the temperature is above 110°F (43°C), the freezing capacity is compromised and the cost of electricity used ...increases. • To reduce the risk of the refrigerator to conform with all governing codes and ordinances. wCAUTION Avoid placing the unit near heat sources, direct sunlight, or moisture. If ...
Owner's Manual
Page 9
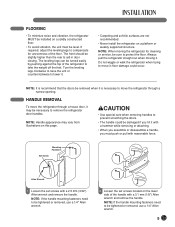
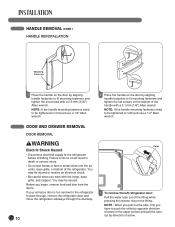
... handle mounting fasteners need to be tightened or removed, use a 1/4" Allen wrench. 9 FLOORING • To minimize noise and vibration, the refrigerator MUST be installed on a solidly constructed floor. • To avoid vibration, the unit must push or pull with reasonable force. The front... should be necessary to be level. HANDLE REMOVAL To move the refrigerator through a narrow opening. NOTE: If the handle mounting fasteners need to remove the refrigerator door handles. If required, adjust the leveling legs to prevent scratching the doors. •...
... handle mounting fasteners need to be tightened or removed, use a 1/4" Allen wrench. 9 FLOORING • To minimize noise and vibration, the refrigerator MUST be installed on a solidly constructed floor. • To avoid vibration, the unit must push or pull with reasonable force. The front... should be necessary to be level. HANDLE REMOVAL To move the refrigerator through a narrow opening. NOTE: If the handle mounting fasteners need to remove the refrigerator door handles. If required, adjust the leveling legs to prevent scratching the doors. •...
Owner's Manual
Page 10
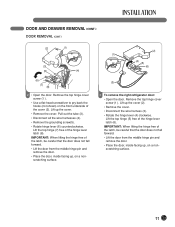
...If the handle mounting fasteners need to do so could result in the upper picture and pull the tube out by direction of the refrigerator. DOOR AND DRAWER REMOVAL DOOR REMOVAL wWARNING Collet Electric Shock Hazard • Disconnect electrical supply to fit mounting fasteners and tighten the.... Before you have to be injured. NOTE: If the handle mounting fasteners need to push the collet by aligning handle footprints to the refrigerator before installing. You may be tightened or removed use a 1/4" Allen wrench 2 Place the handle on the door by opposite direction of arrow...
...If the handle mounting fasteners need to do so could result in the upper picture and pull the tube out by direction of the refrigerator. DOOR AND DRAWER REMOVAL DOOR REMOVAL wWARNING Collet Electric Shock Hazard • Disconnect electrical supply to fit mounting fasteners and tighten the.... Before you have to be injured. NOTE: If the handle mounting fasteners need to push the collet by aligning handle footprints to the refrigerator before installing. You may be tightened or removed use a 1/4" Allen wrench 2 Place the handle on the door by opposite direction of arrow...
Owner's Manual
Page 11
Remove the top hinge cover screw (1 ). • Use a flat-head screwdriver to pry back the hooks (not shown) on a nonscratching surface. (2) (1) (4) (5) (6) (3) 3 To remove the right refrigerator door: • Open the door. Pull out the tube (3). • Disconnect all the wire harnesses (4). • Remove the grounding screw(5). • Rotate hinge lever (6) counterclockwise. ...
Remove the top hinge cover screw (1 ). • Use a flat-head screwdriver to pry back the hooks (not shown) on a nonscratching surface. (2) (1) (4) (5) (6) (3) 3 To remove the right refrigerator door: • Open the door. Pull out the tube (3). • Disconnect all the wire harnesses (4). • Remove the grounding screw(5). • Rotate hinge lever (6) counterclockwise. ...
Owner's Manual
Page 18
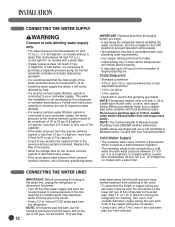
... . Do not use is not permitted in . CONNECTING THE WATER LINES IMPORTANT: Before connecting the tubing to the water line, unplug the refrigerator or disconnect the power. • Turn off the main water supply and open -end wrenches or two adjustable wrenches • 1/4-in areas...qualified plumber. Before purchasing, make sure a saddletype valve complies with your cold water supply, This water line installation is not warranted by the refrigerator or icemaker manufacturer. open the nearest faucet to see whether the sediment filter in the valve. • To determine the length of the...
... . Do not use is not permitted in . CONNECTING THE WATER LINES IMPORTANT: Before connecting the tubing to the water line, unplug the refrigerator or disconnect the power. • Turn off the main water supply and open -end wrenches or two adjustable wrenches • 1/4-in areas...qualified plumber. Before purchasing, make sure a saddletype valve complies with your cold water supply, This water line installation is not warranted by the refrigerator or icemaker manufacturer. open the nearest faucet to see whether the sediment filter in the valve. • To determine the length of the...
Owner's Manual
Page 19
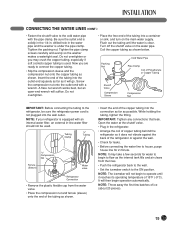
...of 15°F (-9°C). Do not overtighten. • Place the free end of ice (about 20 pieces). 19 NOTE: If your refrigerator is used . Tighten the pipe clamp screws carefully and evenly so the washer makes a watertight seal. While holding the tubing, tighten the ... NOTE: Throw away the first few seconds for 2 minute. CONNECTING THE WATER LINES (CONT.) • Fasten the shutoff valve to the refrigerator, be used . drilled hole in . Insert the end of Polyethelyne or Copper Tubing Shutoff Valve Compression Sleeve Compression Nut IMPORTANT: Before connecting ...
...of 15°F (-9°C). Do not overtighten. • Place the free end of ice (about 20 pieces). 19 NOTE: If your refrigerator is used . Tighten the pipe clamp screws carefully and evenly so the washer makes a watertight seal. While holding the tubing, tighten the ... NOTE: Throw away the first few seconds for 2 minute. CONNECTING THE WATER LINES (CONT.) • Fasten the shutoff valve to the refrigerator, be used . drilled hole in . Insert the end of Polyethelyne or Copper Tubing Shutoff Valve Compression Sleeve Compression Nut IMPORTANT: Before connecting ...
Owner's Manual
Page 20
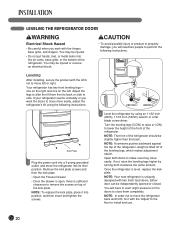
.... wCAUTION • To avoid possible injury or product or property damage, you want the doors to make sure they close more easily, adjust the refrigerator's tilt using an 11/32 inch (8mm), 11/16 inch (18mm) wrench or a flat blade screw driver. Adjust the legs to alter the... replace the kickplate. Open both clockwise the same amount. NOTE: The front of the leveling legs, which makes adjustment easier. Once the refrigerator is lifted off of the refrigerator should be injured. • Do not put hands, feet, or metal items into position, and then insert and tighten the screws. ...
.... wCAUTION • To avoid possible injury or product or property damage, you want the doors to make sure they close more easily, adjust the refrigerator's tilt using an 11/32 inch (8mm), 11/16 inch (18mm) wrench or a flat blade screw driver. Adjust the legs to alter the... replace the kickplate. Open both clockwise the same amount. NOTE: The front of the leveling legs, which makes adjustment easier. Once the refrigerator is lifted off of the refrigerator should be injured. • Do not put hands, feet, or metal items into position, and then insert and tighten the screws. ...
Owner's Manual
Page 21
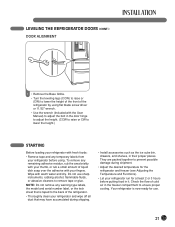
... any remaining adhesive residue, rub the area briskly with your thumb, or rub a small amount of liquid dish soap over the adhesive with your refrigerator run for at least 2 or 3 hours before using flat blade screw driver or 11/32" wrench. • Use the wrench (Included with...cleaners to prevent possible damage during shipping. • Install accessories such as the ice cube bin, drawers, and shelves, in their proper places. LEVELING THE REFRIGERATOR DOORS (CONT.) DOOR ALIGNMENT 1 • Remove the Base Grillie. • Turn the leveling legs (CCW) to raise or (CW) to lower the...
... any remaining adhesive residue, rub the area briskly with your thumb, or rub a small amount of liquid dish soap over the adhesive with your refrigerator run for at least 2 or 3 hours before using flat blade screw driver or 11/32" wrench. • Use the wrench (Included with...cleaners to prevent possible damage during shipping. • Install accessories such as the ice cube bin, drawers, and shelves, in their proper places. LEVELING THE REFRIGERATOR DOORS (CONT.) DOOR ALIGNMENT 1 • Remove the Base Grillie. • Turn the leveling legs (CCW) to raise or (CW) to lower the...
Owner's Manual
Page 22
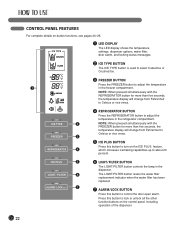
... PLUS BUTTON Press this button to Celsius or vice versa. feature, which increases icemaking capabilities up to adjust the temperature in the refrigerator compartment. NOTE: When pressed simultaneously with the REFRIGERATOR button for more than five seconds, the temperature display will change from Fahrenheit to turn on button functions, see pages 24...
... PLUS BUTTON Press this button to Celsius or vice versa. feature, which increases icemaking capabilities up to adjust the temperature in the refrigerator compartment. NOTE: When pressed simultaneously with the REFRIGERATOR button for more than five seconds, the temperature display will change from Fahrenheit to turn on button functions, see pages 24...
Owner's Manual
Page 23
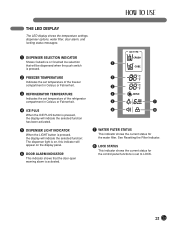
...is activated. ICE TYPE 7 WATER FILTER STATUS This indicator shows the current status for the control panel functions is set temperature of the refrigerator compartment in Celsius or Fahrenheit. 4 ICE PLUS When the ICE PLUS button is pressed, the display will indicate the selected function has... door-open warning alarm is pressed. 2 FREEZER TEMPERATURE Indicates the set temperature of the freezer compartment in Celsius or Fahrenheit. 3 REFRIGERATOR TEMPERATURE Indicates the set to LOCK. 23 See Resetting the Filter Indicator. 8 LOCK STATUS This indicator shows the current status for the ...
...is activated. ICE TYPE 7 WATER FILTER STATUS This indicator shows the current status for the control panel functions is set temperature of the refrigerator compartment in Celsius or Fahrenheit. 4 ICE PLUS When the ICE PLUS button is pressed, the display will indicate the selected function has... door-open warning alarm is pressed. 2 FREEZER TEMPERATURE Indicates the set temperature of the freezer compartment in Celsius or Fahrenheit. 3 REFRIGERATOR TEMPERATURE Indicates the set to LOCK. 23 See Resetting the Filter Indicator. 8 LOCK STATUS This indicator shows the current status for the ...
Owner's Manual
Page 24
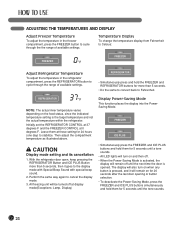
...Display mode setting and its cancellation 1. ADJUSTING THE TEMPERATURES AND DISPLAY Adjust Freezer Temperature To adjust the temperature in the refrigerator compartment, press the REFRIGERATOR button to the display mode with Special Beep Sound with special beep sound. 2. Then adjust the compartment temperature as...Do the same to convert back to cancel the display mode. 3. Perform the same way again to Fahrenheit. Initially set the REFRIGERATOR CONTROL at 37 degrees F and the FREEZER CONTROL at display mode(Exceptions: Lamp, Display) Display Power-Saving Mode This function places...
...Display mode setting and its cancellation 1. ADJUSTING THE TEMPERATURES AND DISPLAY Adjust Freezer Temperature To adjust the temperature in the refrigerator compartment, press the REFRIGERATOR button to the display mode with Special Beep Sound with special beep sound. 2. Then adjust the compartment temperature as...Do the same to convert back to cancel the display mode. 3. Perform the same way again to Fahrenheit. Initially set the REFRIGERATOR CONTROL at 37 degrees F and the FREEZER CONTROL at display mode(Exceptions: Lamp, Display) Display Power-Saving Mode This function places...
Owner's Manual
Page 25
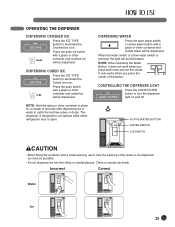
... ICE ICE TYPE Press the ICE TYPE button to catch the last few cubes or drops. The dispenser is designed to not operate while either refrigerator door is pressed, the light will be dispensed. DISPENSING WATER Press the push water switch or active water button with a small opening of the water...
... ICE ICE TYPE Press the ICE TYPE button to catch the last few cubes or drops. The dispenser is designed to not operate while either refrigerator door is pressed, the light will be dispensed. DISPENSING WATER Press the push water switch or active water button with a small opening of the water...
Owner's Manual
Page 26
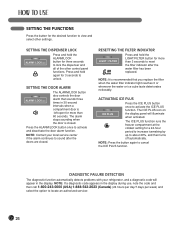
... the doors are closed . Press and hold the ALARM/LOCK button for three seconds to about 20%, and then turns off automatically. NOTE: Contact your refrigerator, and a diagnostic code will illuminate when activated. RESETTING THE FILTER INDICATOR LIGHT / FILTER Press and hold the LIGHT/FILTER button for a 24-hour period to...
... the doors are closed . Press and hold the ALARM/LOCK button for three seconds to about 20%, and then turns off automatically. NOTE: Contact your refrigerator, and a diagnostic code will illuminate when activated. RESETTING THE FILTER INDICATOR LIGHT / FILTER Press and hold the LIGHT/FILTER button for a 24-hour period to...


