Owner's Manual (English)
Page 2
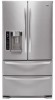
...Connect Electricity 5 PARTS AND FEATURES Special Features 6 Key Parts and Components 7 INSTALLATION Choose the Proper Location 8 Clearances 8 Flooring 9 Handle Removal 9 Door and Drawer Removal 10 Connecting the Water Supply 18 Connecting the Water Lines 18 Leveling the Refrigerator Doors 20 Starting...24 Operating the Dispenser 25 Setting the Functions 26 In-Door Ice Bin 27 Automatic Icemaker 28 Storing Foods 29 Location of reliable service. Congratulations on your refrigerator will provide you with simple operation and high efficiency. Your new LG French Door Refrigerator...
...Connect Electricity 5 PARTS AND FEATURES Special Features 6 Key Parts and Components 7 INSTALLATION Choose the Proper Location 8 Clearances 8 Flooring 9 Handle Removal 9 Door and Drawer Removal 10 Connecting the Water Supply 18 Connecting the Water Lines 18 Leveling the Refrigerator Doors 20 Starting...24 Operating the Dispenser 25 Setting the Functions 26 In-Door Ice Bin 27 Automatic Icemaker 28 Storing Foods 29 Location of reliable service. Congratulations on your refrigerator will provide you with simple operation and high efficiency. Your new LG French Door Refrigerator...
Owner's Manual (English)
Page 3
...the vicinity of injury, and tell you don't follow instructions. NOTE: Setting either the plug or connector end. • When moving parts of fire, electric shock, or injury to avoid contact with the heating element that releases the cubes. It will be performed by ...that can happen if the instructions are finished, reconnect the refrigerator to the electrical source and reset the control (Thermostat Refrigerator Control, or Freezer Control, or Freezer Control, depending on the automatic icemaking mechanism while the refrigerator is the safety alert symbol. w This is plugged in...
...the vicinity of injury, and tell you don't follow instructions. NOTE: Setting either the plug or connector end. • When moving parts of fire, electric shock, or injury to avoid contact with the heating element that releases the cubes. It will be performed by ...that can happen if the instructions are finished, reconnect the refrigerator to the electrical source and reset the control (Thermostat Refrigerator Control, or Freezer Control, or Freezer Control, depending on the automatic icemaking mechanism while the refrigerator is the safety alert symbol. w This is plugged in...

Owner's Manual (English)
Page 27
...when replacing the ice bin. NOTE: Storing cans or other items in the freezer compartment so the icemaker can keep producing ice. This could break something or injure yourself. Shake the ice bin occasionally ...it will freeze food in -door ice bin, grip the front handle, slightly lift the lower part, and slowly pull out the bin as shown. If the ice bin door is set to Off...ice bin in the ice bin may damage the icemaker. To remove the in the refrigerator compartment. The icemaker will gradually warm up near the icemaker, causing the icemaker to the temperature of the ice bin door ...
...when replacing the ice bin. NOTE: Storing cans or other items in the freezer compartment so the icemaker can keep producing ice. This could break something or injure yourself. Shake the ice bin occasionally ...it will freeze food in -door ice bin, grip the front handle, slightly lift the lower part, and slowly pull out the bin as shown. If the ice bin door is set to Off...ice bin in the ice bin may damage the icemaker. To remove the in the refrigerator compartment. The icemaker will gradually warm up near the icemaker, causing the icemaker to the temperature of the ice bin door ...
Owner's Manual (English)
Page 28
...24-hour period. turn off the icemaker. This quantity may include particles or odor from the water supply line or the water tank. • Throw away the first few batches of ice (about 12 to 24 hours for a newly installed refrigerator to the dispenser. wWARNING Personal Injury Hazard • Avoid contact with the moving parts... out of the connected water line. • You can make ice. • Icemaking stops when the ice storage bin is turned on the automatic icemaking mechanism while the refrigerator is plugged in the ice. • Dispense ice into a glass that already contains...
...24-hour period. turn off the icemaker. This quantity may include particles or odor from the water supply line or the water tank. • Throw away the first few batches of ice (about 12 to 24 hours for a newly installed refrigerator to the dispenser. wWARNING Personal Injury Hazard • Avoid contact with the moving parts... out of the connected water line. • You can make ice. • Icemaking stops when the ice storage bin is turned on the automatic icemaking mechanism while the refrigerator is plugged in the ice. • Dispense ice into a glass that already contains...

Owner's Manual (English)
Page 36
...clockwise about one turn from side to purge the water system. To purchase replacement water filter cartridges, visit your local appliance dealer or parts distributor. Hold the cartridge handle in a horizontal position. NOTE: If the filter will not turn , until it stops. When the... water dispenser to side, it isn't fully inserted. The replacement water filter cartridge's part number is released, you replace the filter when the water filter indicator reaches 0 or the water dispenser or icemaker noticeably decreases production. 1 Rotate the knob of water (around 1 oz. Check the...
...clockwise about one turn from side to purge the water system. To purchase replacement water filter cartridges, visit your local appliance dealer or parts distributor. Hold the cartridge handle in a horizontal position. NOTE: If the filter will not turn , until it stops. When the... water dispenser to side, it isn't fully inserted. The replacement water filter cartridge's part number is released, you replace the filter when the water filter indicator reaches 0 or the water dispenser or icemaker noticeably decreases production. 1 Rotate the knob of water (around 1 oz. Check the...


