
Owner's Manual
Page 1
OWNER'S MANUAL FRENCH DOOR REFRIGERATOR Please read this owner's manual thoroughly before operating and keep it handy for reference at all times. LMX25964** P/No.: MFL37933588 www.lg.com ENGLISH FRANÇAIS ESPAÑOL
OWNER'S MANUAL FRENCH DOOR REFRIGERATOR Please read this owner's manual thoroughly before operating and keep it handy for reference at all times. LMX25964** P/No.: MFL37933588 www.lg.com ENGLISH FRANÇAIS ESPAÑOL
Owner's Manual
Page 2
...Setting the Functions 25 In-Door Ice Bin 26 Automatic Icemaker 27 Storing Foods 28 Location of reliable service. Your new LG French Door Refrigerator combines advanced cooling technology with many years of Foods 29 Shelf Height Adjustment 30 Utility Bin (Optional 30 CARE AND ...CLEANING Removing and Replacing Components 31 Cleaning the Refrigerator 33 General Information 33 Light Bulb Replacement 34 Replacing the Water Filter 35 TROUBLESHOOTING Before Calling for Service 36 SPECIFICATIONS Key Dimensions...
...Setting the Functions 25 In-Door Ice Bin 26 Automatic Icemaker 27 Storing Foods 28 Location of reliable service. Your new LG French Door Refrigerator combines advanced cooling technology with many years of Foods 29 Shelf Height Adjustment 30 Utility Bin (Optional 30 CARE AND ...CLEANING Removing and Replacing Components 31 Cleaning the Refrigerator 33 General Information 33 Light Bulb Replacement 34 Replacing the Water Filter 35 TROUBLESHOOTING Before Calling for Service 36 SPECIFICATIONS Key Dimensions...

Owner's Manual
Page 3
...cracks or abrasion damage along its length or at the circuit breaker or fuse box in the area. • Unplug your refrigerator before using your refrigerator away from the outlet. • Repair or replace immediately all safety messages. w This is plugged in the freezer compartment ... remove power to the light circuit. • When you or others or cause damage to the extremely cold surfaces. • In refrigerators with automatic icemakers, avoid contact with the moving your product, basic safety precautions should be followed, including the following. All safety messages ...
...cracks or abrasion damage along its length or at the circuit breaker or fuse box in the area. • Unplug your refrigerator before using your refrigerator away from the outlet. • Repair or replace immediately all safety messages. w This is plugged in the freezer compartment ... remove power to the light circuit. • When you or others or cause damage to the extremely cold surfaces. • In refrigerators with automatic icemakers, avoid contact with the moving your product, basic safety precautions should be followed, including the following. All safety messages ...
Owner's Manual
Page 4
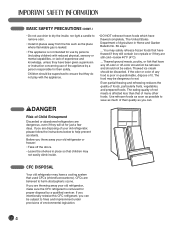
...• DO NOT refreeze frozen foods which have a cooling system that of Child Entrapment Discarded or abandoned refrigerators are dangerous, even if they are throwing away your old refrigerator or freezer: • Take off -color should not be refrozen and should not be eaten. If ...are disposing of foods, particularly fruits, vegetables, and prepared foods. wDANGER Risk of many other foods. If you intentionally release this CFC refrigerant, you are believed to harm stratospheric ozone. BASIC SAFETY PRECAUTIONS (CONT.) • Do not use drier to dry the inside . Thawed...
...• DO NOT refreeze frozen foods which have a cooling system that of Child Entrapment Discarded or abandoned refrigerators are dangerous, even if they are throwing away your old refrigerator or freezer: • Take off -color should not be refrozen and should not be eaten. If ...are disposing of foods, particularly fruits, vegetables, and prepared foods. wDANGER Risk of many other foods. If you intentionally release this CFC refrigerant, you are believed to harm stratospheric ozone. BASIC SAFETY PRECAUTIONS (CONT.) • Do not use drier to dry the inside . Thawed...
Owner's Manual
Page 5
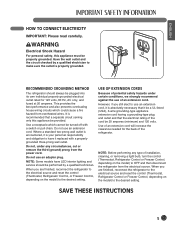
...lighting and service should always be provided. ENGLISH HOW TO CONNECT ELECTRICITY IMPORTANT: Please read carefully. RECOMMENDED GROUNDING METHOD The refrigerator should be properly grounded. NOTE: Some models have it is properly grounded. SAVE THESE INSTRUCTIONS 5 wWARNING Electrical Shock ... grounded electrical outlet rated for the back of installation, cleaning, or removing a light bulb, turn the control (Thermostat, Refrigerator Control or Freezer Control, depending on the model) to the desired setting. Where a standard two-prong wall outlet is encountered...
...lighting and service should always be provided. ENGLISH HOW TO CONNECT ELECTRICITY IMPORTANT: Please read carefully. RECOMMENDED GROUNDING METHOD The refrigerator should be properly grounded. NOTE: Some models have it is properly grounded. SAVE THESE INSTRUCTIONS 5 wWARNING Electrical Shock ... grounded electrical outlet rated for the back of installation, cleaning, or removing a light bulb, turn the control (Thermostat, Refrigerator Control or Freezer Control, depending on the model) to the desired setting. Where a standard two-prong wall outlet is encountered...
Owner's Manual
Page 6
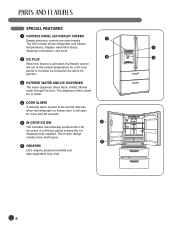
The dispenser offers cubed ice or water. 4 DOOR ALARM A warning alarm sounds at 30-second intervals when the refrigerator or freezer door is activated, the freezer section will run at the coldest temperature for more than 60 seconds. 5 ... 1 CONTROL PANEL LED DISPLAY SCREEN Simple electronic controls are user-friendly. 1 The LED screen shows refrigerator and freezer temperatures, displays water filter status, 4 dispenser information, and more shelf space. 6 6 CRISPERS LG's crispers preserve humidity and help vegetables stay crisp. 6 hour period to keep the ice dispenser fully...
The dispenser offers cubed ice or water. 4 DOOR ALARM A warning alarm sounds at 30-second intervals when the refrigerator or freezer door is activated, the freezer section will run at the coldest temperature for more than 60 seconds. 5 ... 1 CONTROL PANEL LED DISPLAY SCREEN Simple electronic controls are user-friendly. 1 The LED screen shows refrigerator and freezer temperatures, displays water filter status, 4 dispenser information, and more shelf space. 6 6 CRISPERS LG's crispers preserve humidity and help vegetables stay crisp. 6 hour period to keep the ice dispenser fully...

Owner's Manual
Page 7
ENGLISH KEY PARTS AND COMPONENTS In addition to the special features and components outlined in the Special Features section, there are several other important components that are referenced in this manual. 1 ADJUSTABLE REFRIGERATOR SHELVING The refrigerator compartment shelves are adjustable to allow flexibility for storage needs. 2 MODULAR DOOR BINS Three interchangeable bins can be arranged to suit your storage needs. 3 LED INTERIOR LAMPS 4 FIXED DOOR BIN 5 INTERIOR LAMP 3 1 2 4 5 7
ENGLISH KEY PARTS AND COMPONENTS In addition to the special features and components outlined in the Special Features section, there are several other important components that are referenced in this manual. 1 ADJUSTABLE REFRIGERATOR SHELVING The refrigerator compartment shelves are adjustable to allow flexibility for storage needs. 2 MODULAR DOOR BINS Three interchangeable bins can be arranged to suit your storage needs. 3 LED INTERIOR LAMPS 4 FIXED DOOR BIN 5 INTERIOR LAMP 3 1 2 4 5 7

Owner's Manual
Page 8
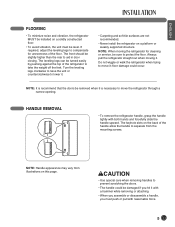
... LOCATION wWARNING Excessive Weight Hazard Two or more people are required when moving and unpacking the appliance. • Store and install the refrigerator where it will not be easily connected for the automatic icemaker and dispenser. • Unstable installation may cause vibration and noise. Allow... at least 24 in. (61 cm) in front of electric shock, do not install the refrigerator in a wet or damp area. • Select a place where a water supply can be exposed to temperatures below freezing or exposed to outdoor...
... LOCATION wWARNING Excessive Weight Hazard Two or more people are required when moving and unpacking the appliance. • Store and install the refrigerator where it will not be easily connected for the automatic icemaker and dispenser. • Unstable installation may cause vibration and noise. Allow... at least 24 in. (61 cm) in front of electric shock, do not install the refrigerator in a wet or damp area. • Select a place where a water supply can be exposed to temperatures below freezing or exposed to outdoor...
Owner's Manual
Page 9
...weight off the feet. floor damage could be slightly higher than the rear to protect the floor. HANDLE REMOVAL • To remove the refrigerator handle, grasp the handle tightly with both hands and forcefully slide the handle upward. wCAUTION • Use special care when removing handles to... pull with reasonable force. 9 NOTE: When moving it . • Carpeting and soft tile surfaces are not recommended. • Never install the refrigerator on a platform or weakly supported structure. NOTE: It is recommend that the doors be turned easily by pushing against the top of the floor....
...weight off the feet. floor damage could be slightly higher than the rear to protect the floor. HANDLE REMOVAL • To remove the refrigerator handle, grasp the handle tightly with both hands and forcefully slide the handle upward. wCAUTION • Use special care when removing handles to... pull with reasonable force. 9 NOTE: When moving it . • Carpeting and soft tile surfaces are not recommended. • Never install the refrigerator on a platform or weakly supported structure. NOTE: It is recommend that the doors be turned easily by pushing against the top of the floor....
Owner's Manual
Page 10
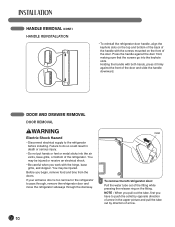
... the screws mounted on the front of the fitting while pressing the release ring on the fitting. Press the handle against the front of the refrigerator. Before you work with both hands, press it firmly against the door front, making sure that the screws go into the air vents, base grille... the door and slide the handle downward. NOTE : When you pull out the tube, first you have to the refrigerator before installing. If your entrance door is too narrow for the refrigerator to do so could result in the upper picture and pull the tube out by direction of arrow. 10 Holding...
... the screws mounted on the front of the fitting while pressing the release ring on the fitting. Press the handle against the front of the refrigerator. Before you work with both hands, press it firmly against the door front, making sure that the screws go into the air vents, base grille... the door and slide the handle downward. NOTE : When you pull out the tube, first you have to the refrigerator before installing. If your entrance door is too narrow for the refrigerator to do so could result in the upper picture and pull the tube out by direction of arrow. 10 Holding...
Owner's Manual
Page 11
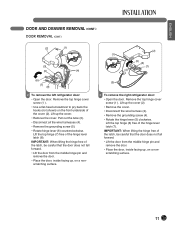
... the door. • Place the door, inside facing up , on a nonscratching surface. (2) (1) (5) (6) (7) (4) (3) 3 To remove the right refrigerator door: • Open the door. IMPORTANT: When lifting the hinge free of the cover (2). Remove the top hinge cover screw (1 ). • Use ...• Remove the cover. ENGLISH DOOR AND DRAWER REMOVAL (CONT.) DOOR REMOVAL (CONT.) (2) (1) (3) (5) (4) (6) (7) (8) 2 To remove the left refrigerator door: • Open the door. Remove the top hinge cover screw (1 ). Lift the top hinge (7) free of the hinge lever latch (7). Lift the top...
... the door. • Place the door, inside facing up , on a nonscratching surface. (2) (1) (5) (6) (7) (4) (3) 3 To remove the right refrigerator door: • Open the door. IMPORTANT: When lifting the hinge free of the cover (2). Remove the top hinge cover screw (1 ). • Use ...• Remove the cover. ENGLISH DOOR AND DRAWER REMOVAL (CONT.) DOOR REMOVAL (CONT.) (2) (1) (3) (5) (4) (6) (7) (8) 2 To remove the left refrigerator door: • Open the door. Remove the top hinge cover screw (1 ). Lift the top hinge (7) free of the hinge lever latch (7). Lift the top...
Owner's Manual
Page 18
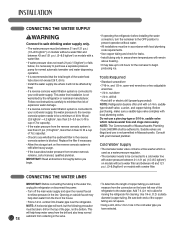
...If a reverse osmosis water filtration system is connected to your cold water supply, This water line installation is not warranted by the refrigerator or icemaker manufacturer. saddletype shutoff valve, a union, and copper tubing. Consult with local plumbing codes. Opening an outside help keep...tubing you begin producing ice. Add 7 ft. (2.1 m) to the water pipe. will need, unplug the refrigerator or disconnect the power. open the nearest faucet refrigerator to allow for cleaning. Cold Water Supply • The icemaker water valve contains a flow washer which reduces ...
...If a reverse osmosis water filtration system is connected to your cold water supply, This water line installation is not warranted by the refrigerator or icemaker manufacturer. saddletype shutoff valve, a union, and copper tubing. Consult with local plumbing codes. Opening an outside help keep...tubing you begin producing ice. Add 7 ft. (2.1 m) to the water pipe. will need, unplug the refrigerator or disconnect the power. open the nearest faucet refrigerator to allow for cleaning. Cold Water Supply • The icemaker water valve contains a flow washer which reduces ...
Owner's Manual
Page 19
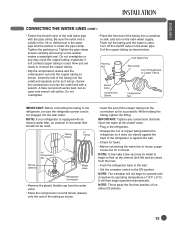
.... Now you may take a few batches of Polyethelyne or Copper Tubing Shutoff Valve Compression Sleeve Compression Nut IMPORTANT: Before connecting the tubing to the refrigerator, be used . Insert the end of the copper tubing into the outlet end squarely as far as possible. Open the water at the shutoff... valve. • Plug in -line water filter should not be sure the refrigerator power cord is not plugged into a container or sink, and turn on the water pipe. NOTE: Throw away the first few seconds for 2 minute...
.... Now you may take a few batches of Polyethelyne or Copper Tubing Shutoff Valve Compression Sleeve Compression Nut IMPORTANT: Before connecting the tubing to the refrigerator, be used . Insert the end of the copper tubing into the outlet end squarely as far as possible. Open the water at the shutoff... valve. • Plug in -line water filter should not be sure the refrigerator power cord is not plugged into a container or sink, and turn on the water pipe. NOTE: Throw away the first few seconds for 2 minute...
Owner's Manual
Page 20
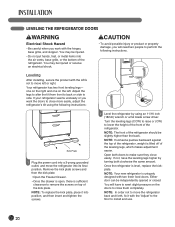
...8226; Open the Freezer Drawer. • Once the drawer is open, there is uniquely designed with the LEG not to close more easily, adjust the refrigerator's tilt using an 11/16 inch (18mm) wrench or a flat blade screw driver. wCAUTION • To avoid possible injury or product or property damage,...injured or receive an electrical shock. NOTE: To replace the kick plate, place it with the hinges, base grille, and stopper. LEVELING THE REFRIGERATOR DOORS wWARNING Electrical Shock Hazard • Be careful when you will have to exert slight pressure on the doors to remove the screws on ...
...8226; Open the Freezer Drawer. • Once the drawer is open, there is uniquely designed with the LEG not to close more easily, adjust the refrigerator's tilt using an 11/16 inch (18mm) wrench or a flat blade screw driver. wCAUTION • To avoid possible injury or product or property damage,...injured or receive an electrical shock. NOTE: To replace the kick plate, place it with the hinges, base grille, and stopper. LEVELING THE REFRIGERATOR DOORS wWARNING Electrical Shock Hazard • Be careful when you will have to exert slight pressure on the doors to remove the screws on ...
Owner's Manual
Page 21
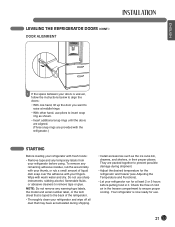
... hand, lift up the door you want to raise at least 2 or 3 hours before using. To remove any temporary labels from your refrigerator before putting food in it. They are packed together to prevent possible damage during shipping. • Install accessories such as shown. •... Insert additional snap rings until the doors are aligned. (Three snap rings are provided with the refrigerator.) STARTING Before loading your refrigerator with fresh foods: • Remove tape and any remaining adhesive residue, rub the area briskly with your thumb, or rub a...
... hand, lift up the door you want to raise at least 2 or 3 hours before using. To remove any temporary labels from your refrigerator before putting food in it. They are packed together to prevent possible damage during shipping. • Install accessories such as shown. •... Insert additional snap rings until the doors are aligned. (Three snap rings are provided with the refrigerator.) STARTING Before loading your refrigerator with fresh foods: • Remove tape and any remaining adhesive residue, rub the area briskly with your thumb, or rub a...
Owner's Manual
Page 22
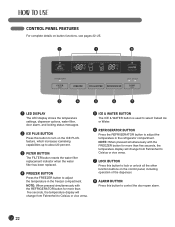
... to Celsius or vice versa. 5 ICE & WATER BUTTON The ICE & WATER button is used to select Cubed Ice or Water. 6 REFRIGERATOR BUTTON Press the REFRIGERATOR button to adjust the temperature in the refrigerator compartment. NOTE: When pressed simultaneously with the FREEZER button for more than five seconds, the temperature display will change from...
... to Celsius or vice versa. 5 ICE & WATER BUTTON The ICE & WATER button is used to select Cubed Ice or Water. 6 REFRIGERATOR BUTTON Press the REFRIGERATOR button to adjust the temperature in the refrigerator compartment. NOTE: When pressed simultaneously with the FREEZER button for more than five seconds, the temperature display will change from...
Owner's Manual
Page 23
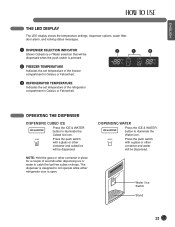
...be dispensed. Press the push switch with a glass or other container in place for a couple of the refrigerator compartment in Celsius or Fahrenheit. 3 REFRIGERATOR TEMPERATURE Indicates the set temperature of seconds after dispensing ice or water to illuminate the Water icon. The ...dispenser is designed to not operate while either refrigerator door is pressed. 2 FREEZER TEMPERATURE Indicates the set temperature of the freezer compartment in Celsius or Fahrenheit. 2 1 8 OPERATING...
...be dispensed. Press the push switch with a glass or other container in place for a couple of the refrigerator compartment in Celsius or Fahrenheit. 3 REFRIGERATOR TEMPERATURE Indicates the set temperature of seconds after dispensing ice or water to illuminate the Water icon. The ...dispenser is designed to not operate while either refrigerator door is pressed. 2 FREEZER TEMPERATURE Indicates the set temperature of the freezer compartment in Celsius or Fahrenheit. 2 1 8 OPERATING...
Owner's Manual
Page 24
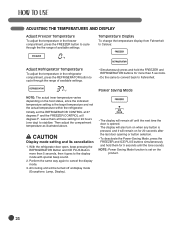
... the display mode. 3. NOTE: Power Saving Mode function is the target temperature and not the actual temperature within the refrigerator. The display will remain off until the tone sounds. Initially set on when any button is opened. Temperature Display To...CAUTION Display mode setting and its cancellation 1. ADJUSTING THE TEMPERATURES AND DISPLAY Adjust Freezer Temperature To adjust the temperature in the refrigerator compartment, press the REFRIGERATOR button to cycle through the the range of available settings. • Simultaneously press and hold them at 0 degrees F....
... the display mode. 3. NOTE: Power Saving Mode function is the target temperature and not the actual temperature within the refrigerator. The display will remain off until the tone sounds. Initially set on when any button is opened. Temperature Display To...CAUTION Display mode setting and its cancellation 1. ADJUSTING THE TEMPERATURES AND DISPLAY Adjust Freezer Temperature To adjust the temperature in the refrigerator compartment, press the REFRIGERATOR button to cycle through the the range of available settings. • Simultaneously press and hold them at 0 degrees F....
Owner's Manual
Page 25
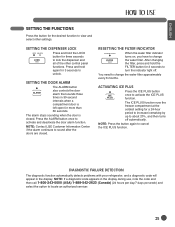
... filter approximately every 6 months. You need to view and select other control panel functions. DIAGNOSTIC FAILURE DETECTION The diagnostic function automatically detects problems with your refrigerator, and a diagnostic code will appear in 30-second intervals when a compartment door is closed . ENGLISH SETTING THE FUNCTIONS Press the button for the desired function...
... filter approximately every 6 months. You need to view and select other control panel functions. DIAGNOSTIC FAILURE DETECTION The diagnostic function automatically detects problems with your refrigerator, and a diagnostic code will appear in 30-second intervals when a compartment door is closed . ENGLISH SETTING THE FUNCTIONS Press the button for the desired function...
Owner's Manual
Page 26
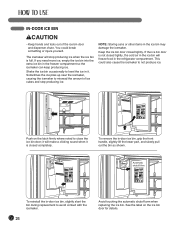
... avoid contact with the icemaker. 26 Avoid touching the automatic shutoff arm when replacing the ice bin. NOTE: Storing cans or other items in the refrigerator compartment. If the ice bin door is full. You could also cause the icemaker to misread the amount of the ice bin door and dispenser...
... avoid contact with the icemaker. 26 Avoid touching the automatic shutoff arm when replacing the ice bin. NOTE: Storing cans or other items in the refrigerator compartment. If the ice bin door is full. You could also cause the icemaker to misread the amount of the ice bin door and dispenser...


