
Owner's Manual
Page 3
... ENERGY 2 TABLE OF CONTENTS 3 SAFETY 4 Important Safety Instructions 4 UNDERSTANDING YOUR MICROWAVE OVEN ...... 6 Location of Model Number 6 Oven Specifications 6 Electrical Requirements 6 Grounding Instructions 6 Microwave Oven Features 7 Control Panel Features 8 USING YOUR MICROWAVE OVEN 10 Learn About Your Microwave Oven 10 Clock 10 Vent Auto Time Set 10 Vent Fan 10 Light Hi/Low...
... ENERGY 2 TABLE OF CONTENTS 3 SAFETY 4 Important Safety Instructions 4 UNDERSTANDING YOUR MICROWAVE OVEN ...... 6 Location of Model Number 6 Oven Specifications 6 Electrical Requirements 6 Grounding Instructions 6 Microwave Oven Features 7 Control Panel Features 8 USING YOUR MICROWAVE OVEN 10 Learn About Your Microwave Oven 10 Clock 10 Vent Auto Time Set 10 Vent Fan 10 Light Hi/Low...
Owner's Manual
Page 7
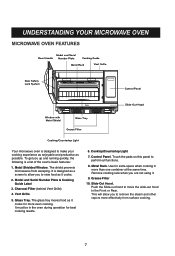
...5. Metal Rack. Model and Serial Door Handle Number Plate Cooking Guide Metal Rack Vent Grille Door Safety Lock System Control Panel PUSH Slide-Out Hood Window with Metal Shield Glass Tray Grease Filter Cooktop/Countertop Light Your microwave oven is designed to... Light 7. This will allow you to remove the steam and other vapors more effectively from escaping. The shield prevents microwaves from surface cooking. Control Panel. Metal Shielded Window. Model and Serial Number Plate & Cooking Guide Label 3. The glass tray moves food as possible. Glass Tray. Grease...
...5. Metal Rack. Model and Serial Door Handle Number Plate Cooking Guide Metal Rack Vent Grille Door Safety Lock System Control Panel PUSH Slide-Out Hood Window with Metal Shield Glass Tray Grease Filter Cooktop/Countertop Light Your microwave oven is designed to... Light 7. This will allow you to remove the steam and other vapors more effectively from escaping. The shield prevents microwaves from surface cooking. Control Panel. Metal Shielded Window. Model and Serial Number Plate & Cooking Guide Label 3. The glass tray moves food as possible. Glass Tray. Grease...

Owner's Manual
Page 8
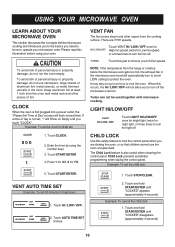
For more information on the control panel. The following is touch the necessary Command pad. All you select the desired cooking function quickly and easily. CONTROL PANEL FEATURES Your microwave oven control panel lets you have to do is a list of all the Command and Number pads located on these features, see the USING YOUR MICROWAVE OVEN section. 8
For more information on the control panel. The following is touch the necessary Command pad. All you select the desired cooking function quickly and easily. CONTROL PANEL FEATURES Your microwave oven control panel lets you have to do is a list of all the Command and Number pads located on these features, see the USING YOUR MICROWAVE OVEN section. 8
Owner's Manual
Page 10
... for AM, 2 for high level. 1. Touch this safety feature to protect the oven. Child Lock prevents accidental programming when wiping the control panel. To avoid risk of personal injury or property damage, do not use the oven unsupervised. Enter the time by using your microwave oven.... (approximately 4 seconds). CLOCK When the oven is first plugged into a power outlet, the "Please Set Time of day is also useful when cleaning the control panel. Touch CLOCK. 2. NOTE: If the temperature from the cooking surface. Touch HI / LOW / OFF. 2. Touch START/ENTER. Touch START/ENTER 4....
... for AM, 2 for high level. 1. Touch this safety feature to protect the oven. Child Lock prevents accidental programming when wiping the control panel. To avoid risk of personal injury or property damage, do not use the oven unsupervised. Enter the time by using your microwave oven.... (approximately 4 seconds). CLOCK When the oven is first plugged into a power outlet, the "Please Set Time of day is also useful when cleaning the control panel. Touch CLOCK. 2. NOTE: If the temperature from the cooking surface. Touch HI / LOW / OFF. 2. Touch START/ENTER. Touch START/ENTER 4....
Owner's Manual
Page 29
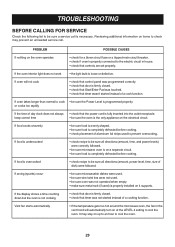
...may stay on the electrical circuit. Reviewing additional information on items to the electric circuit in the vent hood will not cook • check that control panel was programmed correctly. • check that timer wasn't started instead of aluminum foil strips used ) is properly installed on the oven operates •...; check for a blown circuit fuse or a tripped main circuit breaker. • check if oven is firmly closed . • check that controls are set properly. If the oven interior light does not work • the light bulb is programmed properly.
...may stay on the electrical circuit. Reviewing additional information on items to the electric circuit in the vent hood will not cook • check that control panel was programmed correctly. • check that timer wasn't started instead of aluminum foil strips used ) is properly installed on the oven operates •...; check for a blown circuit fuse or a tripped main circuit breaker. • check if oven is firmly closed . • check that controls are set properly. If the oven interior light does not work • the light bulb is programmed properly.


