Installation Instructions
Page 5
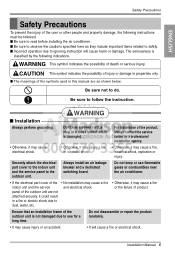
.... Do not disassemble or repair the product randomly. • It may cause a fire indoor unit and the service and electrical shock. Installation Manual 5 CAUTION This symbol indicates the possibility of the outdoor unit is classified by the following instructions must be followed.... cause harm or damage. I Installation Always perform grounding. Be sure not to follow the instruction. panel of the product, always contact the service center or a professional installation agency. • Otherwise, it may cause electrical shock. • Otherwise, it may cause a fire or ...
.... Do not disassemble or repair the product randomly. • It may cause a fire indoor unit and the service and electrical shock. Installation Manual 5 CAUTION This symbol indicates the possibility of the outdoor unit is classified by the following instructions must be followed.... cause harm or damage. I Installation Always perform grounding. Be sure not to follow the instruction. panel of the product, always contact the service center or a professional installation agency. • Otherwise, it may cause electrical shock. • Otherwise, it may cause a fire or ...
Installation Instructions
Page 17
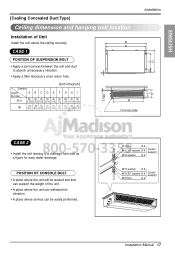
...dimension and hanging bolt location Installation of the unit. • A place where the unit can withstand its vibration. • A place where service can support the weight of Unit Install the unit above the ceiling correctly. POSITION OF CONSOLE BOLT • A place where the unit will... be leveled and that can be easily performed. washer X 4 (Local supply) M10 Nut X 4 Installation Manual 17 B A CASE 1 D C E POSITION OF SUSPENSION BOLT • Apply a joint-canvas between the unit and duct to a drainage hole side as a ...
...dimension and hanging bolt location Installation of the unit. • A place where the unit can withstand its vibration. • A place where service can support the weight of Unit Install the unit above the ceiling correctly. POSITION OF CONSOLE BOLT • A place where the unit will... be leveled and that can be easily performed. washer X 4 (Local supply) M10 Nut X 4 Installation Manual 17 B A CASE 1 D C E POSITION OF SUSPENSION BOLT • Apply a joint-canvas between the unit and duct to a drainage hole side as a ...
Installation Instructions
Page 43
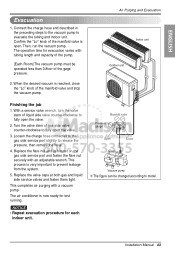
... to the vacuum pump to release the pressure, then remove the hose. 4. Replace the flare nut and its bonnet on the gas side service port and fasten the flare nut securely with a vacuum pump. Replace the valve caps at both gas and liquid side... system. 5. Air Purging and Evacuation Indoor unit Outdoor unit Finishing the job 1. The air conditioner is very important to fully open the valve. 3. Installation Manual 43 ENGLISH Evacuation 1. NOTICE : Repeat evacuation procedure for test running. This process is now ready for each indoor unit. Then, run the vacuum pump. ...
... to the vacuum pump to release the pressure, then remove the hose. 4. Replace the flare nut and its bonnet on the gas side service port and fasten the flare nut securely with a vacuum pump. Replace the valve caps at both gas and liquid side... system. 5. Air Purging and Evacuation Indoor unit Outdoor unit Finishing the job 1. The air conditioner is very important to fully open the valve. 3. Installation Manual 43 ENGLISH Evacuation 1. NOTICE : Repeat evacuation procedure for test running. This process is now ready for each indoor unit. Then, run the vacuum pump. ...

Service Manual
Page 1
Only for authorized service personnel. Internal Use Only http://biz.lgservice.com Multi Air Conditioner SVC MANUAL(Exploded View) MODEL : AMNW12GTRA0(LMCN125HV) AMNW18GTQA0(LMCN185HV) CAUTION Before Servicing the unit, read the safety precautions in General SVC manual.
Only for authorized service personnel. Internal Use Only http://biz.lgservice.com Multi Air Conditioner SVC MANUAL(Exploded View) MODEL : AMNW12GTRA0(LMCN125HV) AMNW18GTQA0(LMCN185HV) CAUTION Before Servicing the unit, read the safety precautions in General SVC manual.


