
Owners Manual
Page 2
... INSTRUCTIONS BEFORE USE 3 WARNING 6 CAUTION 7 PRODUCT OVERVIEW 7 Product Features 11 INSTALLATION 11 Before Installing 13 Choosing the Proper Location 15 Removing/Assembling Handles 16 Removing/Assembling Doors and Drawers 22 Connecting the Water Line 25 Leveling and Door Alignment 26 Turning on the Power 27 OPERATION 27 Before Use 28 Control Panel 31 Sabbath Mode 31 Ice and Water Dispenser 32 Ice Compartment 33 Automatic Icemaker 35 Storing Food 37 Humidity Controlled Crispers 38 Glide'N'Serve 38 Refrigerator Shelves 39 InstaView 40 Door-in-Door...
... INSTRUCTIONS BEFORE USE 3 WARNING 6 CAUTION 7 PRODUCT OVERVIEW 7 Product Features 11 INSTALLATION 11 Before Installing 13 Choosing the Proper Location 15 Removing/Assembling Handles 16 Removing/Assembling Doors and Drawers 22 Connecting the Water Line 25 Leveling and Door Alignment 26 Turning on the Power 27 OPERATION 27 Before Use 28 Control Panel 31 Sabbath Mode 31 Ice and Water Dispenser 32 Ice Compartment 33 Automatic Icemaker 35 Storing Food 37 Humidity Controlled Crispers 38 Glide'N'Serve 38 Refrigerator Shelves 39 InstaView 40 Door-in-Door...

Owners Manual
Page 5
... discarding the appliance, remove the door gasket while leaving the shelves and bins in the freezer compartment. Disposal • Junked or abandoned refrigerators are dangerous, even if they have a proper outlet installed by a qualified electrician. • Have a certified electrician check the wall outlet and wiring for proper disposal by pulling on the power cord. Grounding Instructions • Improper connection of the equipment...
... discarding the appliance, remove the door gasket while leaving the shelves and bins in the freezer compartment. Disposal • Junked or abandoned refrigerators are dangerous, even if they have a proper outlet installed by a qualified electrician. • Have a certified electrician check the wall outlet and wiring for proper disposal by pulling on the power cord. Grounding Instructions • Improper connection of the equipment...
Owners Manual
Page 9
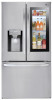
... cold air in the refrigerator from the freezer icemaker. h Auto-Closing Hinge† The refrigerator doors and freezer drawers close automatically when pushed slightly. (The door only closes automatically when it is only available on some models. l Glide'N'Serve Stores food items at a different temperature than 30°.) i Door-in before closing the left-hand door. • The door alarm will sound every 30 seconds if the door remains open...
... cold air in the refrigerator from the freezer icemaker. h Auto-Closing Hinge† The refrigerator doors and freezer drawers close automatically when pushed slightly. (The door only closes automatically when it is only available on some models. l Glide'N'Serve Stores food items at a different temperature than 30°.) i Door-in before closing the left-hand door. • The door alarm will sound every 30 seconds if the door remains open...
Owners Manual
Page 16
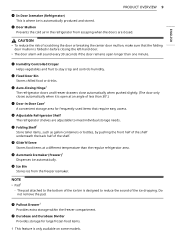
...; Use two or more people to remove and install the refrigerator doors and freezer drawer. • Disconnect the electrical supply to detach the water supply line as the handle may come off. Removing/Assembling Doors and Drawers If the entrance door is connected to pass through, remove the refrigerator doors and move the refrigerator sideways through the doorway. Type A† Type B† Type C† NOTE • Disassembling/Assembling the Water Lines b Collet c Tube d Insert line e Clip 2 Remove the screw f from the hinge cover at...
...; Use two or more people to remove and install the refrigerator doors and freezer drawer. • Disconnect the electrical supply to detach the water supply line as the handle may come off. Removing/Assembling Doors and Drawers If the entrance door is connected to pass through, remove the refrigerator doors and move the refrigerator sideways through the doorway. Type A† Type B† Type C† NOTE • Disassembling/Assembling the Water Lines b Collet c Tube d Insert line e Clip 2 Remove the screw f from the hinge cover at...
Owners Manual
Page 22
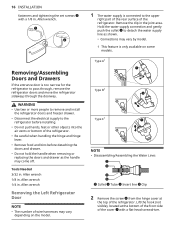
... need , measure the distance from the reverse osmosis system is connected. • Do not install the icemaker tubing in many water supply kits. Before purchasing, make sure Then, add 8 feet (2.4 m). Water Pressure • Models with a tube cutter and use a compression fitting. • Shutoff valve to connect to see if the sediment filter in . at plumbing supply stores) to connect the water line to the refrigerator OR cut square. 22 INSTALLATION Connecting the Water Line Before Beginning This water line installation...
... need , measure the distance from the reverse osmosis system is connected. • Do not install the icemaker tubing in many water supply kits. Before purchasing, make sure Then, add 8 feet (2.4 m). Water Pressure • Models with a tube cutter and use a compression fitting. • Shutoff valve to connect to see if the sediment filter in . at plumbing supply stores) to connect the water line to the refrigerator OR cut square. 22 INSTALLATION Connecting the Water Line Before Beginning This water line installation...
Owners Manual
Page 25
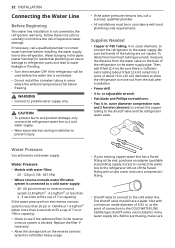
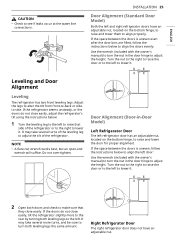
.... INSTALLATION 25 Door Alignment (Standard Door Model) Both the left to lower it . If the doors do not close easily, adjust the refrigerator's tilt using the instructions below: 1 Turn the leveling leg to the left door: Use the wrench (included with the owner's manual) to turn the nut in the door hinge to adjust the height. Turn the nut to the right to raise the door or to the left to the left refrigerator door has an adjustable nut, located...
.... INSTALLATION 25 Door Alignment (Standard Door Model) Both the left to lower it . If the doors do not close easily, adjust the refrigerator's tilt using the instructions below: 1 Turn the leveling leg to the left door: Use the wrench (included with the owner's manual) to turn the nut in the door hinge to adjust the height. Turn the nut to the right to raise the door or to the left to the left refrigerator door has an adjustable nut, located...
Owners Manual
Page 29
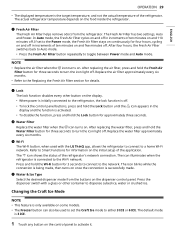
... connected to toggle between Power mode and Auto mode. Replace the water filter approximately every six months. The f icon shows the status of ten minutes on some models. • The Freezer button can also be used with a glass or other button on the display. • When power is off . Changing the Craft Ice Mode NOTE • This feature is successfully made , then turns on the food inside the refrigerator. The actual refrigerator temperature...
... connected to toggle between Power mode and Auto mode. Replace the water filter approximately every six months. The f icon shows the status of ten minutes on some models. • The Freezer button can also be used with a glass or other button on the display. • When power is off . Changing the Craft Ice Mode NOTE • This feature is successfully made , then turns on the food inside the refrigerator. The actual refrigerator temperature...

Owners Manual
Page 32
... lights up when the mode is turned OFF for the desired dispenser mode on the dispenser control panel. Keep the ice compartment door closed tightly, the cold air in the ice bin will freeze food in the bin, causing the icemaker to do so may stack unevenly in the refrigerator compartment. Failure to misread the number of the ice compartment door and dispenser chute. Cleaning the Dispenser Tray Wipe the entire area with a very small opening...
... lights up when the mode is turned OFF for the desired dispenser mode on the dispenser control panel. Keep the ice compartment door closed tightly, the cold air in the ice bin will freeze food in the bin, causing the icemaker to do so may stack unevenly in the refrigerator compartment. Failure to misread the number of the ice compartment door and dispenser chute. Cleaning the Dispenser Tray Wipe the entire area with a very small opening...

Owners Manual
Page 33
..., depending on freezer compartment temperature, room temperature, number of ice. • Foreign substances or frost on the ice compartment door for a newly installed refrigerator to begin making ice. • Ice-making stops when the in-door ice bin is made in the automatic in the automatic icemaker when the refrigerator is used. Dispensing cubed ice can interrupt ice production. Before Using the In-Door Icemaker NOTE • Ice is full. Assembling the In-Door Ice Bin CAUTION • When handling the ice bin, keep...
..., depending on freezer compartment temperature, room temperature, number of ice. • Foreign substances or frost on the ice compartment door for a newly installed refrigerator to begin making ice. • Ice-making stops when the in-door ice bin is made in the automatic in the automatic icemaker when the refrigerator is used. Dispensing cubed ice can interrupt ice production. Before Using the In-Door Icemaker NOTE • Ice is full. Assembling the In-Door Ice Bin CAUTION • When handling the ice bin, keep...
Owners Manual
Page 35
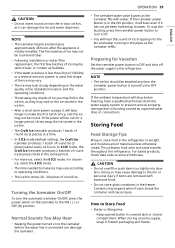
... supply, wrap in freezer packaging and freeze. How to flooding caused by ruptured water lines or connections. If the icemaker power button is initially installed. CAUTION • Do not overfill or pack items too tightly into door bins. Normal Sounds You May Hear • Keeping the power turned on the water quality in the installation location and the operating conditions. • Throw away any time the icemaker power button is turned to water...
... supply, wrap in freezer packaging and freeze. How to flooding caused by ruptured water lines or connections. If the icemaker power button is initially installed. CAUTION • Do not overfill or pack items too tightly into door bins. Normal Sounds You May Hear • Keeping the power turned on the water quality in the installation location and the operating conditions. • Throw away any time the icemaker power button is turned to water...
Owners Manual
Page 42
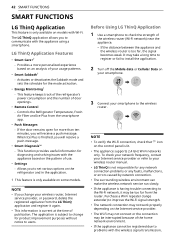
... control panel is finished, you change for product improvement purposes without notice to users. When Ice Plus is lit. • The appliance supports 2.4 GHz Wi-Fi networks only. NOTE • If you will receive a push message. LG ThinQ Application Features • Smart Care+† - Provides a more than ten minutes, you to communicate with Wi-Fi. Controls the Refrigerator Temperature, Fresh Air Filter and Ice...
... control panel is finished, you change for product improvement purposes without notice to users. When Ice Plus is lit. • The appliance supports 2.4 GHz Wi-Fi networks only. NOTE • If you will receive a push message. LG ThinQ Application Features • Smart Care+† - Provides a more than ten minutes, you to communicate with Wi-Fi. Controls the Refrigerator Temperature, Fresh Air Filter and Ice...
Owners Manual
Page 48
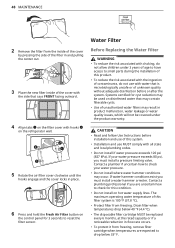
... center out. 3 Place the new filter inside of unknown quality without adequate disinfection before installation and use MUST comply with hooks b on the refrigerator wall. 5 Rotate the air filter cover clockwise until the hooks engage and the cover locks in place. 6 Press and hold the Fresh Air Filter button on the filter cover with all state and local plumbing codes. • Do not install if water pressure exceeds 120 psi...
... center out. 3 Place the new filter inside of unknown quality without adequate disinfection before installation and use MUST comply with hooks b on the refrigerator wall. 5 Rotate the air filter cover clockwise until the hooks engage and the cover locks in place. 6 Press and hold the Fresh Air Filter button on the filter cover with all state and local plumbing codes. • Do not install if water pressure exceeds 120 psi...
Owners Manual
Page 49
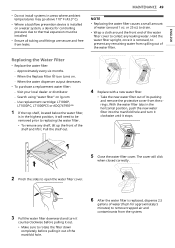
... removed, to prevent any remaining water from spilling out of the water filter. When the Replace Filter h icon turns on lg.com - Visit your local dealer or distributor - Use replacement cartridge: LT1000P, LT1000PC, LT1000PCS or ADQ747935** 1 If the top shelf, located below the water filter, is installed on a water system, a device for approximately 5 minutes) to open the water filter cover. 3 Pull the water filter downward and turn it clockwise until it stops. 5 Close the water filter cover. Search using "water filter...
... removed, to prevent any remaining water from spilling out of the water filter. When the Replace Filter h icon turns on lg.com - Visit your local dealer or distributor - Use replacement cartridge: LT1000P, LT1000PC, LT1000PCS or ADQ747935** 1 If the top shelf, located below the water filter, is installed on a water system, a device for approximately 5 minutes) to open the water filter cover. 3 Pull the water filter downward and turn it clockwise until it stops. 5 Close the water filter cover. Search using "water filter...

Owners Manual
Page 53
... appear level or with continuous pressing. The change . A: The refrigerator is turned on and the controls are the best temperature settings for my refrigerator and freezer? Milk should be firm and ice cubes should turn the icemaker off. Ice cream should be cold when stored on the control panel until you should not melt in Display Mode. A: Continually press the Refrigerator or Freezer button on the inner shelf of the refrigerator. The numbers will...
... appear level or with continuous pressing. The change . A: The refrigerator is turned on and the controls are the best temperature settings for my refrigerator and freezer? Milk should be firm and ice cubes should turn the icemaker off. Ice cream should be cold when stored on the control panel until you should not melt in Display Mode. A: Continually press the Refrigerator or Freezer button on the inner shelf of the refrigerator. The numbers will...

Owners Manual
Page 55
... defrost cycle has completed. Refer to cool completely. Refrigerator is installed in a cold location. • When the refrigerator is removed. (Refer to the Food Storage Guide.) Doors are opened leading to cool the refrigerator back down. Under warmer conditions, expect it is clogged. • Use a vacuum cleaner with high water content away from air vents. Condenser / back cover is easy to stabilize. Refrigerator temperature control is set incorrectly. • If the temperature...
... defrost cycle has completed. Refer to cool completely. Refrigerator is installed in a cold location. • When the refrigerator is removed. (Refer to the Food Storage Guide.) Doors are opened leading to cool the refrigerator back down. Under warmer conditions, expect it is clogged. • Use a vacuum cleaner with high water content away from air vents. Condenser / back cover is easy to stabilize. Refrigerator temperature control is set incorrectly. • If the temperature...

Owners Manual
Page 57
... smaller than normal. The temperature setting for the freezer is too warm. • The recommended temperature for the freezer compartment for more information. TROUBLESHOOTING 57 Ice ENGLISH Problem Icemaker is 0 °F (-18 °C). Doors are opened often, ambient air will warm the refrigerator which will be necessary to a cold water supply with a water filter. If the problem persists, it to contact a plumber. When the water dispenser output decreases. - If the problem persists, it may...
... smaller than normal. The temperature setting for the freezer is too warm. • The recommended temperature for the freezer compartment for more information. TROUBLESHOOTING 57 Ice ENGLISH Problem Icemaker is 0 °F (-18 °C). Doors are opened often, ambient air will warm the refrigerator which will be necessary to a cold water supply with a water filter. If the problem persists, it to contact a plumber. When the water dispenser output decreases. - If the problem persists, it may...
Owners Manual
Page 60
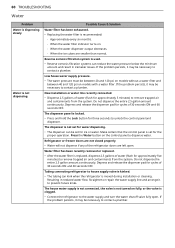
... water supply pressure. • The water pressure must be between 20 and 120 psi on models without a water filter and between 40 and 120 psi on fully, or the valve is set for water dispensing. • The dispenser can kink when the refrigerator is not turned on models with a water filter. Make certain that the control panel is clogged. • Connect the refrigerator to unlock the control panel and dispenser. The dispenser is not dispensing. Refrigerator or freezer doors...
... water supply pressure. • The water pressure must be between 20 and 120 psi on models without a water filter and between 40 and 120 psi on fully, or the valve is set for water dispensing. • The dispenser can kink when the refrigerator is not turned on models with a water filter. Make certain that the control panel is clogged. • Connect the refrigerator to unlock the control panel and dispenser. The dispenser is not dispensing. Refrigerator or freezer doors...
Owners Manual
Page 61
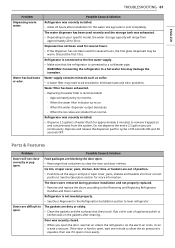
... refrigerator to a hot water line may need to a cold water pipe. Water supply contains minerals such as sulfur. • A water filter may damage the icemaker. Approximately every six months. - When the ice cubes are dirty or sticky. • Clean the gaskets and the surfaces that the refrigerator is recommended: - Depress and release the dispenser pad for approximately 5 minutes) to remove trapped air and contaminants from approximately 20 to level refrigerator. Ice bin, crisper cover, pans, shelves, door bins...
... refrigerator to a hot water line may need to a cold water pipe. Water supply contains minerals such as sulfur. • A water filter may damage the icemaker. Approximately every six months. - When the ice cubes are dirty or sticky. • Clean the gaskets and the surfaces that the refrigerator is recommended: - Depress and release the dispenser pad for approximately 5 minutes) to remove trapped air and contaminants from approximately 20 to level refrigerator. Ice bin, crisper cover, pans, shelves, door bins...
Owners Manual
Page 65
... accordance with original serial numbers that are not authorized by LG. • Shelves, door bins, drawers, handle and accessories, except for repairs. • Replacement of light bulbs, filters, or any consumable parts. • The removal and reinstallation of the Product if it is installed in an inaccessible location or is reported within one (1) week of delivery. • Damage or missing items to the Product owner's manual. • Damage or...
... accordance with original serial numbers that are not authorized by LG. • Shelves, door bins, drawers, handle and accessories, except for repairs. • Replacement of light bulbs, filters, or any consumable parts. • The removal and reinstallation of the Product if it is installed in an inaccessible location or is reported within one (1) week of delivery. • Damage or missing items to the Product owner's manual. • Damage or...
Owners Manual
Page 69
... operation of the Product; • Replacement of light bulbs, filters, fuses or any other causes beyond the control of the Product to perform during power failures and interrupted or inadequate electrical service; • Damage or failure caused by transportation and handling, including scratches, dents, chips and/or other damage to the instructions outlined in -warranty repair. and • Shelves, door bins, drawers, handle and accessories to the Product's owner's manual...
... operation of the Product; • Replacement of light bulbs, filters, fuses or any other causes beyond the control of the Product to perform during power failures and interrupted or inadequate electrical service; • Damage or failure caused by transportation and handling, including scratches, dents, chips and/or other damage to the instructions outlined in -warranty repair. and • Shelves, door bins, drawers, handle and accessories to the Product's owner's manual...


