
Owners Manual
Page 1
ENGLISH ESPAÑOL FRANÇAIS LFXS26973* / LFXC22526* / LFXS28968* / LMXS28626* / LMXS28636* / LMRS28626* / LFXS26566* / LFXS28566* MFL70761734 Rev.02_072120 www.lg.com Copyright © 2020 LG Electronics Inc. All Rights Reserved. OWNER'S MANUAL FRENCH DOOR REFRIGERATOR Read this owner's manual thoroughly before operating the appliance and keep it handy for reference at all times.
ENGLISH ESPAÑOL FRANÇAIS LFXS26973* / LFXC22526* / LFXS28968* / LMXS28626* / LMXS28636* / LMRS28626* / LFXS26566* / LFXS28566* MFL70761734 Rev.02_072120 www.lg.com Copyright © 2020 LG Electronics Inc. All Rights Reserved. OWNER'S MANUAL FRENCH DOOR REFRIGERATOR Read this owner's manual thoroughly before operating the appliance and keep it handy for reference at all times.
Owners Manual
Page 2
... Dispenser 32 Ice Compartment 33 Automatic Icemaker 35 Storing Food 36 Humidity Controlled Crispers 37 Glide'N'Serve 38 Refrigerator Shelves 39 Door-in-Door 39 Door Bins 40 Durabase 41 SMART FUNCTIONS 41 LG ThinQ Application 43 Smart Grid Function 44 Smart Diagnosis™ Feature 46 MAINTENANCE 46 Cleaning 46 Air Filter...
... Dispenser 32 Ice Compartment 33 Automatic Icemaker 35 Storing Food 36 Humidity Controlled Crispers 37 Glide'N'Serve 38 Refrigerator Shelves 39 Door-in-Door 39 Door Bins 40 Durabase 41 SMART FUNCTIONS 41 LG ThinQ Application 43 Smart Grid Function 44 Smart Diagnosis™ Feature 46 MAINTENANCE 46 Cleaning 46 Air Filter...
Owners Manual
Page 3
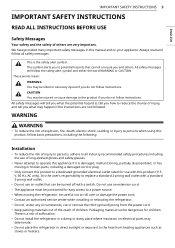
...is the user's responsibility to roll over or damage the power cord. • Contact an authorized service center when installing or relocating the refrigerator. • Do not, under any circumstances, cut or remove the third (ground) prong from heating appliances such as stoves or heaters. ... safety procedures including the use an outlet that can kill or injure you what may deteriorate. • Do not place the refrigerator in direct sunlight or expose it is the safety alert symbol. ENGLISH IMPORTANT SAFETY INSTRUCTIONS 3 IMPORTANT SAFETY INSTRUCTIONS READ ALL INSTRUCTIONS ...
...is the user's responsibility to roll over or damage the power cord. • Contact an authorized service center when installing or relocating the refrigerator. • Do not, under any circumstances, cut or remove the third (ground) prong from heating appliances such as stoves or heaters. ... safety procedures including the use an outlet that can kill or injure you what may deteriorate. • Do not place the refrigerator in direct sunlight or expose it is the safety alert symbol. ENGLISH IMPORTANT SAFETY INSTRUCTIONS 3 IMPORTANT SAFETY INSTRUCTIONS READ ALL INSTRUCTIONS ...
Owners Manual
Page 4
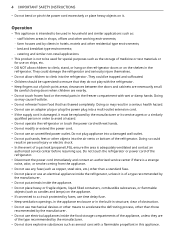
... place heavy or fragile objects, liquid filled containers, combustible substances, or flammable objects (such as aerosol cans with a flammable propellant in the refrigerator. bed and breakfast type environments; - staff kitchen areas in shops, offices and other than a standard fuse. • Do not place ...or use an electrical appliance inside the refrigerator, unless it is adequately ventilated and contact an authorized service center before resuming use on ships, etc. • DO NOT allow children...
... place heavy or fragile objects, liquid filled containers, combustible substances, or flammable objects (such as aerosol cans with a flammable propellant in the refrigerator. bed and breakfast type environments; - staff kitchen areas in shops, offices and other than a standard fuse. • Do not place ...or use an electrical appliance inside the refrigerator, unless it is adequately ventilated and contact an authorized service center before resuming use on ships, etc. • DO NOT allow children...
Owners Manual
Page 5
...and knowledge, unless they are sitting for their safety. • Unplug the power plug before cleaning or repairing the refrigerator. • The refrigerator and freezer compartment lights are in doubt whether the appliance is not intended for use by persons (including children) with ...IMPORTANT SAFETY INSTRUCTIONS 5 Maintenance • Do not use a hair dryer to dry the inside . • If disposing of a refrigerator, make sure the refrigerant and insulation foam are dangerous, even if they have a proper outlet installed by a qualified electrician. • Have a certified electrician ...
...and knowledge, unless they are sitting for their safety. • Unplug the power plug before cleaning or repairing the refrigerator. • The refrigerator and freezer compartment lights are in doubt whether the appliance is not intended for use by persons (including children) with ...IMPORTANT SAFETY INSTRUCTIONS 5 Maintenance • Do not use a hair dryer to dry the inside . • If disposing of a refrigerator, make sure the refrigerant and insulation foam are dangerous, even if they have a proper outlet installed by a qualified electrician. • Have a certified electrician ...
Owners Manual
Page 6
...installing the appliance, care should be taken to be 10.8 square feet (1 square meter) in which is shown on the amount of the refrigerator. • Do not clean glass shelves or covers with the Installation Instructions. Operation • Do not use strong detergents like wax or thinners... for several minutes. Clean with excessive force. • Do not hang on the refrigerator's dispenser. If in domestic and similar applications. • Do not strike or apply excessive force to or place heavy objects on to any ...
...installing the appliance, care should be taken to be 10.8 square feet (1 square meter) in which is shown on the amount of the refrigerator. • Do not clean glass shelves or covers with the Installation Instructions. Operation • Do not use strong detergents like wax or thinners... for several minutes. Clean with excessive force. • Do not hang on the refrigerator's dispenser. If in domestic and similar applications. • Do not strike or apply excessive force to or place heavy objects on to any ...
Owners Manual
Page 7
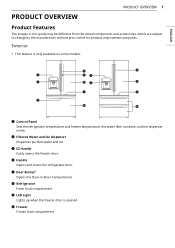
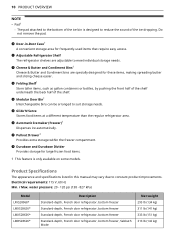
c EZ Handle Easily opens the freezer door. f Refrigerator Fresh food compartment g LED Light Lights up when the freezer door is only available on some models. h Freezer Frozen food compartment e Door Button† ...components and accessories, which are subject to change by the manufacturer without prior notice for product improvement purposes. d Handle Opens and closes the refrigerator door. a Control Panel Sets the refrigerator temperature and freezer temperature, the water filter condition and the dispenser mode. b Filtered Water and Ice Dispenser Dispenses purified water and ice...
c EZ Handle Easily opens the freezer door. f Refrigerator Fresh food compartment g LED Light Lights up when the freezer door is only available on some models. h Freezer Frozen food compartment e Door Button† ...components and accessories, which are subject to change by the manufacturer without prior notice for product improvement purposes. d Handle Opens and closes the refrigerator door. a Control Panel Sets the refrigerator temperature and freezer temperature, the water filter condition and the dispenser mode. b Filtered Water and Ice Dispenser Dispenses purified water and ice...
Owners Manual
Page 9
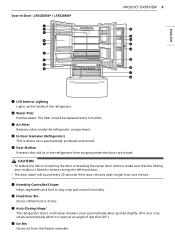
... • The door alarm will sound every 30 seconds if the door remains open at an angle of the refrigerator. h Auto-Closing Hinge† The refrigerator doors and freezer drawers close automatically when pushed slightly. (The door only closes automatically when it is open longer than... months. f Humidity Controlled Crisper Helps vegetables and fruit to stay crisp and controls humidity. d In-Door Icemaker (Refrigerator) This is where ice is folded in the refrigerator from the freezer icemaker. CAUTION • To reduce the risk of scratching the door or breaking the center door ...
... • The door alarm will sound every 30 seconds if the door remains open at an angle of the refrigerator. h Auto-Closing Hinge† The refrigerator doors and freezer drawers close automatically when pushed slightly. (The door only closes automatically when it is open longer than... months. f Humidity Controlled Crisper Helps vegetables and fruit to stay crisp and controls humidity. d In-Door Icemaker (Refrigerator) This is where ice is folded in the refrigerator from the freezer icemaker. CAUTION • To reduce the risk of scratching the door or breaking the center door ...
Owners Manual
Page 10
...kg) 333 lb (151 kg) 313 lb (142 kg) o Glide'N'Serve Stores food items at a different temperature than the regular refrigerator area. q Pullout Drawer† Provides extra storage within the freezer compartment. Product Specifications The appearance and specifications listed in -Door Case...for large frozen food items. † This feature is designed to suit storage needs. Do not remove the pad. k Adjustable Refrigerator Shelf The refrigerator shelves are specially designed for these items, making spreading butter and slicing cheese easier. Electrical requirements: 115 V, 60 Hz Min. ...
...kg) 333 lb (151 kg) 313 lb (142 kg) o Glide'N'Serve Stores food items at a different temperature than the regular refrigerator area. q Pullout Drawer† Provides extra storage within the freezer compartment. Product Specifications The appearance and specifications listed in -Door Case...for large frozen food items. † This feature is designed to suit storage needs. Do not remove the pad. k Adjustable Refrigerator Shelf The refrigerator shelves are specially designed for these items, making spreading butter and slicing cheese easier. Electrical requirements: 115 V, 60 Hz Min. ...

Owners Manual
Page 11
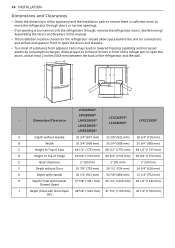
Model LFXS26973* LFXC22526* LFXS26566* LFXS28566* PRODUCT OVERVIEW 11 Description Standard-depth, French door refrigerator, bottom freezer, Sabbath Mode Standard-depth, French door refrigerator, bottom freezer, Sabbath Mode Standard-depth, French door refrigerator, bottom freezer, Sabbath Mode Standard-depth, Door-in-Door French door refrigerator, bottom freezer Net weight 291 lb (132 kg) 271 lb (123 kg) 302 lb (137 kg) 313 lb (142 kg) ENGLISH
Model LFXS26973* LFXC22526* LFXS26566* LFXS28566* PRODUCT OVERVIEW 11 Description Standard-depth, French door refrigerator, bottom freezer, Sabbath Mode Standard-depth, French door refrigerator, bottom freezer, Sabbath Mode Standard-depth, French door refrigerator, bottom freezer, Sabbath Mode Standard-depth, Door-in-Door French door refrigerator, bottom freezer Net weight 291 lb (132 kg) 271 lb (123 kg) 302 lb (137 kg) 313 lb (142 kg) ENGLISH
Owners Manual
Page 12
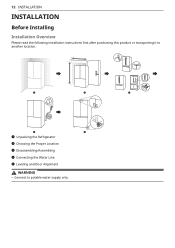
a Unpacking the Refrigerator b Choosing the Proper Location c Disassembling/Assembling d Connecting the Water Line e Leveling and Door Alignment WARNING • Connect to another location. 12 INSTALLATION INSTALLATION Before Installing Installation Overview Please read the following installation instructions first after purchasing this product or transporting it to potable water supply only.
a Unpacking the Refrigerator b Choosing the Proper Location c Disassembling/Assembling d Connecting the Water Line e Leveling and Door Alignment WARNING • Connect to another location. 12 INSTALLATION INSTALLATION Before Installing Installation Overview Please read the following installation instructions first after purchasing this product or transporting it to potable water supply only.
Owners Manual
Page 13
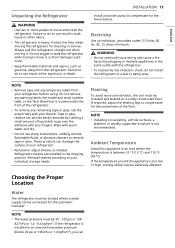
... as floor damage could occur. • Keep flammable materials and vapors, such as needed. Wipe with your refrigerator before using. If the refrigerator is located under the front of the refrigerator. • To remove any warning labels, the model and serial number label, or the Tech Sheet that is...shock, do so can also be adversely affected. Tape or glue residue can result in back injury or other injury. • The refrigerator is too low or high, cooling ability may be easily removed by plugging in multiple appliances in the shipping position. If the temperature ...
... as floor damage could occur. • Keep flammable materials and vapors, such as needed. Wipe with your refrigerator before using. If the refrigerator is located under the front of the refrigerator. • To remove any warning labels, the model and serial number label, or the Tech Sheet that is...shock, do so can also be adversely affected. Tape or glue residue can result in back injury or other injury. • The refrigerator is too low or high, cooling ability may be easily removed by plugging in multiple appliances in the shipping position. If the temperature ...
Owners Manual
Page 14
...mm) Drawer Open) I LFXS28566* - See Removing/ Assembling the Doors and Drawers in this manual. • The installation location chosen for the refrigerator should allow space behind the unit for connections and airflow and space in front to open the doors, and at least 24 inches (610 mm...result in lowered freezing capability and increased electricity consumption charges. Allow at least 2 inches (50.8 mm) between the back of the refrigerator and the wall. 14 INSTALLATION Dimensions and Clearances • Check the dimensions of the appliance and the installation path to ensure there...
...mm) Drawer Open) I LFXS28566* - See Removing/ Assembling the Doors and Drawers in this manual. • The installation location chosen for the refrigerator should allow space behind the unit for connections and airflow and space in front to open the doors, and at least 24 inches (610 mm...result in lowered freezing capability and increased electricity consumption charges. Allow at least 2 inches (50.8 mm) between the back of the refrigerator and the wall. 14 INSTALLATION Dimensions and Clearances • Check the dimensions of the appliance and the installation path to ensure there...
Owners Manual
Page 15
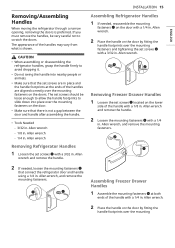
...8226; Tools Needed - 3/32 in . Allen wrench, and remove the mounting fasteners. CAUTION • When assembling or disassembling the refrigerator handles, grasp the handle firmly to scratch the doors. Allen wrench. Removing Freezer Drawer Handles 1 Loosen the set screws b with ... Freezer Drawer Handles 1 Assemble the mounting fasteners a at the ends of the handle with a 1/4 in . INSTALLATION 15 Assembling Refrigerator Handles 1 If needed , loosen the mounting fasteners b that the set screws are aligned correctly over the mounting fasteners and tightening ...
...8226; Tools Needed - 3/32 in . Allen wrench, and remove the mounting fasteners. CAUTION • When assembling or disassembling the refrigerator handles, grasp the handle firmly to scratch the doors. Allen wrench. Removing Freezer Drawer Handles 1 Loosen the set screws b with ... Freezer Drawer Handles 1 Assemble the mounting fasteners a at the ends of the handle with a 1/4 in . INSTALLATION 15 Assembling Refrigerator Handles 1 If needed , loosen the mounting fasteners b that the set screws are aligned correctly over the mounting fasteners and tightening ...
Owners Manual
Page 16
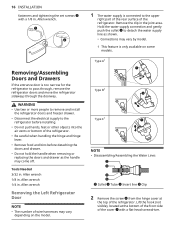
...the air vents or bottom of the cover g with a 1/8 in. Removing/Assembling Doors and Drawers If the entrance door is connected to the refrigerator before detaching the doors and drawer. • Do not hold the handle when removing or replacing the doors and drawer as shown. • ...Connections may come off. Lift the hook (not visible), located at the top of the refrigerator. Allen wrench. Tools Needed 3/32 in the joint area. 16 INSTALLATION fasteners and tightening the set screws b with a flat-head screwdriver. WARNING •...
...the air vents or bottom of the cover g with a 1/8 in. Removing/Assembling Doors and Drawers If the entrance door is connected to the refrigerator before detaching the doors and drawer. • Do not hold the handle when removing or replacing the doors and drawer as shown. • ...Connections may come off. Lift the hook (not visible), located at the top of the refrigerator. Allen wrench. Tools Needed 3/32 in the joint area. 16 INSTALLATION fasteners and tightening the set screws b with a flat-head screwdriver. WARNING •...
Owners Manual
Page 17
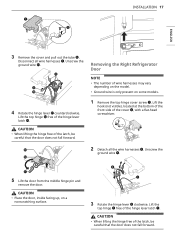
... wire harnesses may vary depending on the model. • Ground wire is only present on a nonscratching surface. 3 Rotate the hinge lever e clockwise. Removing the Right Refrigerator Door NOTE • The number of the cover b, with a flat-head screwdriver. 2 Detach all wire harnesses i.
... wire harnesses may vary depending on the model. • Ground wire is only present on a nonscratching surface. 3 Rotate the hinge lever e clockwise. Removing the Right Refrigerator Door NOTE • The number of the cover b, with a flat-head screwdriver. 2 Detach all wire harnesses i.
Owners Manual
Page 18
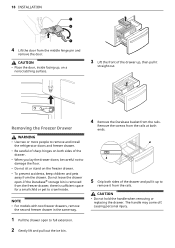
... drawer. The handle may come off, causing personal injury. Removing the Freezer Drawer WARNING • Use two or more people to remove and install the refrigerator doors and freezer drawer. • Be careful of the drawer and pull it straight out. Do not leave the drawer open to crawl inside facing...
... drawer. The handle may come off, causing personal injury. Removing the Freezer Drawer WARNING • Use two or more people to remove and install the refrigerator doors and freezer drawer. • Be careful of the drawer and pull it straight out. Do not leave the drawer open to crawl inside facing...

Owners Manual
Page 20
...the hinge cover d in the figure. Lower the door onto the middle hinge pin as shown in place. Assembling the Left Refrigerator Door CAUTION • Install the left refrigerator door after the right door is inserted in the bottom of the door. NOTE • The number of wire harnesses may .... 1 Make sure that the plastic sleeve is installed. 2 Fit the hinge a over the hinge lever latch b and slot it into place. Install the refrigerator door onto the middle hinge. 3 Connect all the wire harnesses and the ground screw. 2 Fit the hinge a over the hinge lever latch b and slot...
...the hinge cover d in the figure. Lower the door onto the middle hinge pin as shown in place. Assembling the Left Refrigerator Door CAUTION • Install the left refrigerator door after the right door is inserted in the bottom of the door. NOTE • The number of wire harnesses may .... 1 Make sure that the plastic sleeve is installed. 2 Fit the hinge a over the hinge lever latch b and slot it into place. Install the refrigerator door onto the middle hinge. 3 Connect all the wire harnesses and the ground screw. 2 Fit the hinge a over the hinge lever latch b and slot...
Owners Manual
Page 22
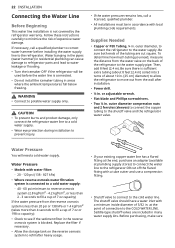
... tube cutter and use a compression fitting. • Shutoff valve to connect to the COLD WATER LINE. WARNING • Connect to the refrigerator. 22 INSTALLATION Connecting the Water Line Before Beginning This water line installation is connected. • Do not install the icemaker tubing in areas ... Replace the filter if necessary. • Allow the storage tank on the back of about 8 feet [2.4 m] coiled into 3 turns of the refrigerator to move out from the water valve on the reverse osmosis system to refill after installation. • Power drill. • ½ in. ...
... tube cutter and use a compression fitting. • Shutoff valve to connect to the COLD WATER LINE. WARNING • Connect to the refrigerator. 22 INSTALLATION Connecting the Water Line Before Beginning This water line installation is connected. • Do not install the icemaker tubing in areas ... Replace the filter if necessary. • Allow the storage tank on the back of about 8 feet [2.4 m] coiled into 3 turns of the refrigerator to move out from the water valve on the reverse osmosis system to refill after installation. • Power drill. • ½ in. ...
Owners Manual
Page 24
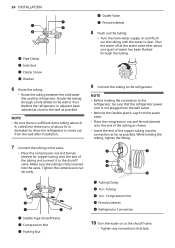
...through a hole drilled in . Tighten the compression nut securely. Shut the water off at the shutoff valve. • Tighten any connections that the refrigerator power cord is fully inserted into the connection as far as possible. Tubing c ¼ in . d Outlet Valve e Ferrule (sleeve) 8 Flush...nut and ferrule (sleeve) for copper tubing onto the end of the copper tubing into the valve. NOTE • Before making the connection to the refrigerator. NOTE • Be sure there is clear. a Saddle-Type Shutoff Valve b Compression Nut c Packing Nut a Tubing Clamp b ¼ in ...
...through a hole drilled in . Tighten the compression nut securely. Shut the water off at the shutoff valve. • Tighten any connections that the refrigerator power cord is fully inserted into the connection as far as possible. Tubing c ¼ in . d Outlet Valve e Ferrule (sleeve) 8 Flush...nut and ferrule (sleeve) for copper tubing onto the end of the copper tubing into the valve. NOTE • Before making the connection to the refrigerator. NOTE • Be sure there is clear. a Saddle-Type Shutoff Valve b Compression Nut c Packing Nut a Tubing Clamp b ¼ in ...


