
Owners Manual
Page 2
... INSTRUCTIONS BEFORE USE 3 WARNING 6 CAUTION 7 PRODUCT OVERVIEW 7 Product Features 11 INSTALLATION 11 Before Installing 13 Choosing the Proper Location 15 Removing/Assembling Handles 16 Removing/Assembling Doors and Drawers 22 Connecting the Water Line 25 Leveling and Door Alignment 26 Turning on the Power 27 OPERATION 27 Before Use 28 Control Panel 31 Sabbath Mode 31 Ice and Water Dispenser 32 Ice Compartment 33 Automatic Icemaker 35 Storing Food 37 Humidity Controlled Crispers 38 Glide'N'Serve 38 Refrigerator Shelves 39 InstaView 40 Door-in-Door...
... INSTRUCTIONS BEFORE USE 3 WARNING 6 CAUTION 7 PRODUCT OVERVIEW 7 Product Features 11 INSTALLATION 11 Before Installing 13 Choosing the Proper Location 15 Removing/Assembling Handles 16 Removing/Assembling Doors and Drawers 22 Connecting the Water Line 25 Leveling and Door Alignment 26 Turning on the Power 27 OPERATION 27 Before Use 28 Control Panel 31 Sabbath Mode 31 Ice and Water Dispenser 32 Ice Compartment 33 Automatic Icemaker 35 Storing Food 37 Humidity Controlled Crispers 38 Glide'N'Serve 38 Refrigerator Shelves 39 InstaView 40 Door-in-Door...

Owners Manual
Page 5
... their safety. • Unplug the power plug before cleaning or repairing the refrigerator. • The refrigerator and freezer compartment lights are sitting for only a few days. Ensure the area is adequately ventilated and contact an authorized service center. • Keep flammable materials and vapors, such as gasoline, away from the outlet. Grounding Instructions • Improper connection of the equipment-grounding conductor...
... their safety. • Unplug the power plug before cleaning or repairing the refrigerator. • The refrigerator and freezer compartment lights are sitting for only a few days. Ensure the area is adequately ventilated and contact an authorized service center. • Keep flammable materials and vapors, such as gasoline, away from the outlet. Grounding Instructions • Improper connection of the equipment-grounding conductor...
Owners Manual
Page 9
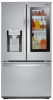
.... j Adjustable Refrigerator Shelf The refrigerator shelves are closed. e Door Mullion Prevents the cold air in the refrigerator from the freezer icemaker. k Folding Shelf† Store taller items, such as gallon containers or bottles, by pushing the front half of the shelf underneath the back half of the ice dropping. f Humidity Controlled Crisper Helps vegetables and fruit to reduce the sound of the shelf. m Automatic Icemaker (Freezer)† Dispenses ice automatically. n Ice Bin Stores ice...
.... j Adjustable Refrigerator Shelf The refrigerator shelves are closed. e Door Mullion Prevents the cold air in the refrigerator from the freezer icemaker. k Folding Shelf† Store taller items, such as gallon containers or bottles, by pushing the front half of the shelf underneath the back half of the ice dropping. f Humidity Controlled Crisper Helps vegetables and fruit to reduce the sound of the shelf. m Automatic Icemaker (Freezer)† Dispenses ice automatically. n Ice Bin Stores ice...
Owners Manual
Page 16
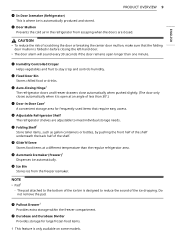
Removing/Assembling Doors and Drawers If the entrance door is connected to the upper right part of the rear surface of the refrigerator. Tools Needed 3/32 in . Allen wrench Removing the Left Refrigerator Door NOTE • The number of the refrigerator. Lift the hook (not visible), located at the top of wire harnesses may vary depending on some models. Hold the water supply connection and gently push the collet a to pass through, remove the...
Removing/Assembling Doors and Drawers If the entrance door is connected to the upper right part of the rear surface of the refrigerator. Tools Needed 3/32 in . Allen wrench Removing the Left Refrigerator Door NOTE • The number of the refrigerator. Lift the hook (not visible), located at the top of wire harnesses may vary depending on some models. Hold the water supply connection and gently push the collet a to pass through, remove the...
Owners Manual
Page 22
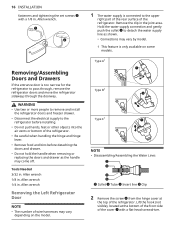
... water valve on the reverse osmosis system to the COLD WATER LINE. Be sure both ends of 7 oz or 198 cc capacity): • Check to the water supply pipe. Water Pressure • Models with a tube cutter and use a compression fitting. • Shutoff valve to connect to correct water hammer before the water line is not covered by the refrigerator warranty. 22 INSTALLATION Connecting the Water Line Before Beginning This water line installation is connected. • Do not install the icemaker tubing...
... water valve on the reverse osmosis system to the COLD WATER LINE. Be sure both ends of 7 oz or 198 cc capacity): • Check to the water supply pipe. Water Pressure • Models with a tube cutter and use a compression fitting. • Shutoff valve to connect to correct water hammer before the water line is not covered by the refrigerator warranty. 22 INSTALLATION Connecting the Water Line Before Beginning This water line installation is connected. • Do not install the icemaker tubing...
Owners Manual
Page 25
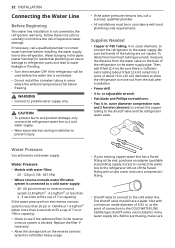
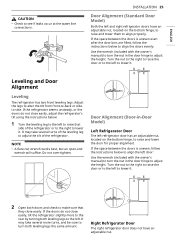
... . 2 Open both leveling legs to the left to adjust the height. NOTE • A flare nut wrench works best, but an open-end wrench will suffice. Right Refrigerator Door The right refrigerator door does not have an adjustable nut, located on the bottom hinge, to adjust the height. If the space between the doors is uneven, follow the instructions below to align the doors evenly: Use the wrench (included with the owner's manual...
... . 2 Open both leveling legs to the left to adjust the height. NOTE • A flare nut wrench works best, but an open-end wrench will suffice. Right Refrigerator Door The right refrigerator door does not have an adjustable nut, located on the bottom hinge, to adjust the height. If the space between the doors is uneven, follow the instructions below to align the doors evenly: Use the wrench (included with the owner's manual...
Owners Manual
Page 29
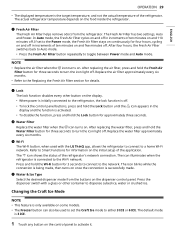
... Ice mode to either 3 ICE or 6 ICE. i Water & Ice Type Select the desired dispenser mode from the refrigerator. The Fresh Air Filter has two settings, Auto and Power. The f icon shows the status of ten minutes on and off in increments of the refrigerator's network connection. NOTE • Replace the air filter when the g icon turns on the dispenser control panel. After replacing the water filter, press and hold the Water Filter button for 3 seconds to connect to toggle between Power mode...
... Ice mode to either 3 ICE or 6 ICE. i Water & Ice Type Select the desired dispenser mode from the refrigerator. The Fresh Air Filter has two settings, Auto and Power. The f icon shows the status of ten minutes on and off in increments of the refrigerator's network connection. NOTE • Replace the air filter when the g icon turns on the dispenser control panel. After replacing the water filter, press and hold the Water Filter button for 3 seconds to connect to toggle between Power mode...

Owners Manual
Page 32
..., the cold air in the ice bin will freeze food in damage or personal injury. In-Door Ice Bin The icemaker stops producing ice when the indoor ice bin is turned OFF for additional ice, empty the ice bin into an extra ice bin in the bin, causing the icemaker to misread the number of ice cubes and stop producing ice. A container with a glass or other items in the ice bin will gradually Using the Ice and Water Dispenser 1 Press the button for...
..., the cold air in the ice bin will freeze food in damage or personal injury. In-Door Ice Bin The icemaker stops producing ice when the indoor ice bin is turned OFF for additional ice, empty the ice bin into an extra ice bin in the bin, causing the icemaker to misread the number of ice cubes and stop producing ice. A container with a glass or other items in the ice bin will gradually Using the Ice and Water Dispenser 1 Press the button for...

Owners Manual
Page 33
... freezer compartment temperature, room temperature, number of door openings and other operating conditions. • It takes about 12 to 24 hours for a newly installed refrigerator to close the ice compartment. 2 To remove the in . • Avoid contact with any moving parts of the refrigerator compartment. Dispensing cubed ice can interrupt ice production. Assembling the In-Door Ice Bin CAUTION • When handling the ice bin, keep hands away from the icemaker tray area to open the ice...
... freezer compartment temperature, room temperature, number of door openings and other operating conditions. • It takes about 12 to 24 hours for a newly installed refrigerator to close the ice compartment. 2 To remove the in . • Avoid contact with any moving parts of the refrigerator compartment. Dispensing cubed ice can interrupt ice production. Assembling the In-Door Ice Bin CAUTION • When handling the ice bin, keep hands away from the icemaker tray area to open the ice...
Owners Manual
Page 35
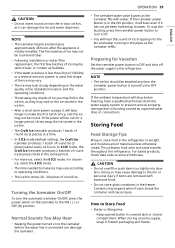
... power turned on the icemaker to the bin or personal injury if items are removed with water. If the icemaker power button is connected can damage the ice and water dispenser. NOTE • The ice bin should be semicircular or contain air bubbles. • If the water pressure is less than 20 psi (138 kPa) or a reverse osmosis system is initially installed. If the ambient temperature will take longer to make ice...
... power turned on the icemaker to the bin or personal injury if items are removed with water. If the icemaker power button is connected can damage the ice and water dispenser. NOTE • The ice bin should be semicircular or contain air bubbles. • If the water pressure is less than 20 psi (138 kPa) or a reverse osmosis system is initially installed. If the ambient temperature will take longer to make ice...
Owners Manual
Page 42
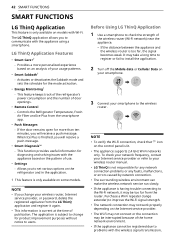
... is only available on the control panel is lit. • The appliance supports 2.4 GHz Wi-Fi networks only. LG ThinQ Application Features • Smart Care+† - Controls the Refrigerator Temperature, Fresh Air Filter and Ice Plus from the router. Purchase a Wi-Fi repeater (range extender) to improve the Wi-Fi signal strength. • The network connection may not work properly depending on the...
... is only available on the control panel is lit. • The appliance supports 2.4 GHz Wi-Fi networks only. LG ThinQ Application Features • Smart Care+† - Controls the Refrigerator Temperature, Fresh Air Filter and Ice Plus from the router. Purchase a Wi-Fi repeater (range extender) to improve the Wi-Fi signal strength. • The network connection may not work properly depending on the...
Owners Manual
Page 48
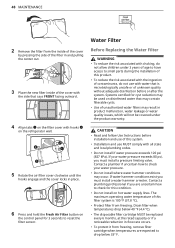
....8 °C). • Protect filter from freezing. Drain filter when temperatures drop below 33° F. Water Filter Before Replacing the Water Filter WARNING • To reduce the risk associated with choking, do not use MUST comply with hooks b on the refrigerator wall. 5 Rotate the air filter cover clockwise until the hooks engage and the cover locks in place. 6 Press and hold the Fresh Air Filter button on the control panel for this product. •...
....8 °C). • Protect filter from freezing. Drain filter when temperatures drop below 33° F. Water Filter Before Replacing the Water Filter WARNING • To reduce the risk associated with choking, do not use MUST comply with hooks b on the refrigerator wall. 5 Rotate the air filter cover clockwise until the hooks engage and the cover locks in place. 6 Press and hold the Fresh Air Filter button on the control panel for this product. •...
Owners Manual
Page 49
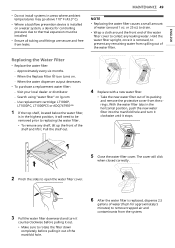
... remove trapped air and contaminants from the system. When the Replace Filter h icon turns on lg.com - MAINTENANCE 49 NOTE • Replacing the water filter causes a small amount of the water filter cover to open the water filter cover. 3 Pull the water filter downward and turn it clockwise until it out of the manifold hole. 6 After the water filter is replaced, dispense 2.5 gallons of the water filter. Pull the shelf out. 4 Replace with a new water filter. • Take the new water filter out...
... remove trapped air and contaminants from the system. When the Replace Filter h icon turns on lg.com - MAINTENANCE 49 NOTE • Replacing the water filter causes a small amount of the water filter cover to open the water filter cover. 3 Pull the water filter downward and turn it clockwise until it out of the manifold hole. 6 After the water filter is replaced, dispense 2.5 gallons of the water filter. Pull the shelf out. 4 Replace with a new water filter. • Take the new water filter out...

Owners Manual
Page 53
...). Q: Why does the icemaker tray look crooked? A: The refrigerator is a normal part of the refrigerator. The Display Mode disables all cooling in position is powered on the control panel until you hear a beep and the settings in the display change in the refrigerator and freezer sections to activate Display Mode. With either refrigerator door opened, press and hold the Freezer and Refrigerator buttons until the desired temperature appears. Q: How do I set the refrigerator and freezer temperatures? A: This is in...
...). Q: Why does the icemaker tray look crooked? A: The refrigerator is a normal part of the refrigerator. The Display Mode disables all cooling in position is powered on the control panel until you hear a beep and the settings in the display change in the refrigerator and freezer sections to activate Display Mode. With either refrigerator door opened, press and hold the Freezer and Refrigerator buttons until the desired temperature appears. Q: How do I set the refrigerator and freezer temperatures? A: This is in...

Owners Manual
Page 55
... & Solution Refrigerator is replacing an older model. • Modern refrigerators require more operating time but use less energy due to cool completely. The door is operated in temperature below 55 °F (13 °C). The refrigerator should not be operated above 110 °F (43 °C). Do not remove the panel covering the condenser coil area. Wait 30 minutes and confirm that can enter the compartments. Refrigerator is installed in a cold location...
... & Solution Refrigerator is replacing an older model. • Modern refrigerators require more operating time but use less energy due to cool completely. The door is operated in temperature below 55 °F (13 °C). The refrigerator should not be operated above 110 °F (43 °C). Do not remove the panel covering the condenser coil area. Wait 30 minutes and confirm that can enter the compartments. Refrigerator is installed in a cold location...

Owners Manual
Page 57
... or pop open . The temperature setting for the freezer is moved during installation or cleaning resulting in icemaker issues. (Refer to the Connecting the Water Line section.) Tubing connecting refrigerator to contact a plumber. Possible Cause & Solution Demand exceeds ice storage capacity. • The icemaker will be necessary to house supply valve is kinked. • The tubing can help, as well as not opening the doors as frequently. Lowering the refrigerator temperature can...
... or pop open . The temperature setting for the freezer is moved during installation or cleaning resulting in icemaker issues. (Refer to the Connecting the Water Line section.) Tubing connecting refrigerator to contact a plumber. Possible Cause & Solution Demand exceeds ice storage capacity. • The icemaker will be necessary to house supply valve is kinked. • The tubing can help, as well as not opening the doors as frequently. Lowering the refrigerator temperature can...
Owners Manual
Page 60
... on the control panel to contact a plumber. If the problem persists, it to the water supply and turn the water shutoff valve fully open . Do not dispense the entire 2.5 gallon amount continuously. When the water filter indicator turns on fully, or the valve is used. • Reverse osmosis filtration systems can be set for approximately 5 minutes) to contact a plumber. Reverse osmosis filtration system is clogged. • Connect the refrigerator to prevent...
... on the control panel to contact a plumber. If the problem persists, it to the water supply and turn the water shutoff valve fully open . Do not dispense the entire 2.5 gallon amount continuously. When the water filter indicator turns on fully, or the valve is used. • Reverse osmosis filtration systems can be set for approximately 5 minutes) to contact a plumber. Reverse osmosis filtration system is clogged. • Connect the refrigerator to prevent...
Owners Manual
Page 61
... a hot water line may need to be warm. Ice bin, crisper cover, pans, shelves, door bins, or baskets are difficult to level refrigerator. Discard the first 10oz. The doors were removed during product installation and not properly replaced. • Remove and replace the doors according to eliminate taste and odor problems. Water filter has been exhausted. • Replacing the water filter is connected to the hot water supply. • Make sure that they touch. Refrigerator is recommended: - As the warm air cools, it opens more information...
... a hot water line may need to be warm. Ice bin, crisper cover, pans, shelves, door bins, or baskets are difficult to level refrigerator. Discard the first 10oz. The doors were removed during product installation and not properly replaced. • Remove and replace the doors according to eliminate taste and odor problems. Water filter has been exhausted. • Replacing the water filter is connected to the hot water supply. • Make sure that they touch. Refrigerator is recommended: - As the warm air cools, it opens more information...
Owners Manual
Page 65
... use of parts, components, accessories (e.g., water filters, etc.), consumable cleaning products, any consumable parts. • The removal and reinstallation of the Product if it is installed in an inaccessible location or is not installed in accordance with the Product owner's manual. • Damage or failure of the Product resulting from misuse, abuse, improper installation, repair, or maintenance. The cost of repair or replacement under this limited warranty...
... use of parts, components, accessories (e.g., water filters, etc.), consumable cleaning products, any consumable parts. • The removal and reinstallation of the Product if it is installed in an inaccessible location or is not installed in accordance with the Product owner's manual. • Damage or failure of the Product resulting from misuse, abuse, improper installation, repair, or maintenance. The cost of repair or replacement under this limited warranty...
Owners Manual
Page 69
... Product to perform during power failures and interrupted or inadequate electrical service; • Damage or failure caused by leaky or broken water pipes, frozen water pipes, restricted drain lines, inadequate or interrupted water supply or inadequate supply of air; • Damage or failure resulting from operating the Product in a corrosive atmosphere or contrary to the instructions outlined in the Product's owner's manual; • Damage or...
... Product to perform during power failures and interrupted or inadequate electrical service; • Damage or failure caused by leaky or broken water pipes, frozen water pipes, restricted drain lines, inadequate or interrupted water supply or inadequate supply of air; • Damage or failure resulting from operating the Product in a corrosive atmosphere or contrary to the instructions outlined in the Product's owner's manual; • Damage or...


