Owner's Manual
Page 2
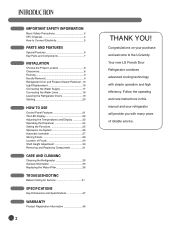
... Features 6 Key Parts and Components 7 INSTALLATION Choose the Proper Location 8 Clearances 8 Flooring 9 Handle Removal 9 Refrigerator Door and Freezer Drawer Removal ..10 Light Replacement 16 Connecting the Water Supply 17 Connecting the Water Lines 18 Leveling the Refrigerator Doors 19 Starting 20...Foods 28 Location of reliable service. IMPORTANT SAFETY INFORMATION Basic Safety Precautions 3 CFC Disposal 4 How to the LG family. Your new LG French Door Refrigerator combines advanced cooling technology with many years of Foods 29 Shelf Height Adjustment 30 Removing and ...
... Features 6 Key Parts and Components 7 INSTALLATION Choose the Proper Location 8 Clearances 8 Flooring 9 Handle Removal 9 Refrigerator Door and Freezer Drawer Removal ..10 Light Replacement 16 Connecting the Water Supply 17 Connecting the Water Lines 18 Leveling the Refrigerator Doors 19 Starting 20...Foods 28 Location of reliable service. IMPORTANT SAFETY INFORMATION Basic Safety Precautions 3 CFC Disposal 4 How to the LG family. Your new LG French Door Refrigerator combines advanced cooling technology with many years of Foods 29 Shelf Height Adjustment 30 Removing and ...
Owner's Manual
Page 3
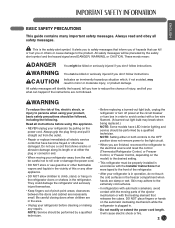
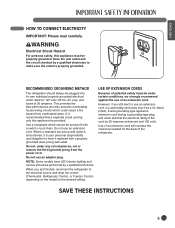
...It will identify the hazard, tell you how to the electrical source and reset the control (Thermostat Refrigerator Control, or Freezer Control, or Freezer Control, depending on the automatic icemaking mechanism while the refrigerator is the safety alert symbol. Be careful closing doors when ...the risk of pinch point areas; ENGLISH BASIC SAFETY PRECAUTIONS This guide contains many important safety messages. w This is plugged in the freezer compartment when hands are necessarily small. All safety messages will cause electric shock or fire. 3 NOTE: Service should be followed, ...
...It will identify the hazard, tell you how to the electrical source and reset the control (Thermostat Refrigerator Control, or Freezer Control, or Freezer Control, depending on the automatic icemaking mechanism while the refrigerator is the safety alert symbol. Be careful closing doors when ...the risk of pinch point areas; ENGLISH BASIC SAFETY PRECAUTIONS This guide contains many important safety messages. w This is plugged in the freezer compartment when hands are necessarily small. All safety messages will cause electric shock or fire. 3 NOTE: Service should be followed, ...
Owner's Manual
Page 4
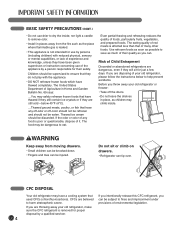
BASIC SAFETY PRECAUTIONS (CONT.) • Do not use drier to dry the inside . Before you throw away your old refrigerator or freezer: • Take off -color should not be refrozen and should not be injured. wWARNING Keep away from the fire such as the place where flammable ...
BASIC SAFETY PRECAUTIONS (CONT.) • Do not use drier to dry the inside . Before you throw away your old refrigerator or freezer: • Take off -color should not be refrozen and should not be injured. wWARNING Keep away from the fire such as the place where flammable ...
Owner's Manual
Page 5
... have it is properly grounded. However, if you are finished, reconnect the refrigerator to the electrical source and reset the control (Thermostat, Refrigerator Control, or Freezer Control, depending on the model) to use an extension cord.
... have it is properly grounded. However, if you are finished, reconnect the refrigerator to the electrical source and reset the control (Thermostat, Refrigerator Control, or Freezer Control, depending on the model) to use an extension cord.
Owner's Manual
Page 6
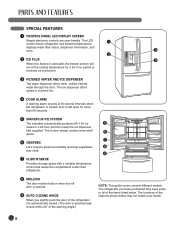
... in -door design creates more . 3 2 2 ICE PLUS 4 When this feature is activated, the freezer section will run at 30-second intervals when the refrigerator or freezer door is automatically closed . (The door is left door is opened. 9 AUTO CLOSING HINGE When you ...of the items listed below may not match your model. 6 The LED screen shows refrigerator and freezer temperatures, 1 displays water filter status, dispenser information, and more shelf 6 space. 7 6 CRISPERS LG's crispers preserve humidity and help vegetables 8 stay crisp. 9 7 GLIDE'N'SERVE Provides storage space ...
... in -door design creates more . 3 2 2 ICE PLUS 4 When this feature is activated, the freezer section will run at 30-second intervals when the refrigerator or freezer door is automatically closed . (The door is left door is opened. 9 AUTO CLOSING HINGE When you ...of the items listed below may not match your model. 6 The LED screen shows refrigerator and freezer temperatures, 1 displays water filter status, dispenser information, and more shelf 6 space. 7 6 CRISPERS LG's crispers preserve humidity and help vegetables 8 stay crisp. 9 7 GLIDE'N'SERVE Provides storage space ...
Owner's Manual
Page 10
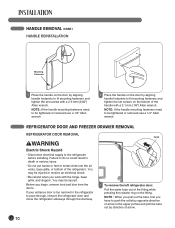
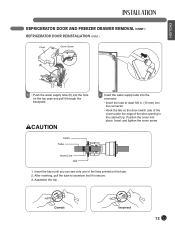
... wrench 2 Place the handle on the fitting. Collet 1 To remove the left refrigerator door: Pull the water tube out of the refrigerator. REFRIGERATOR DOOR AND FREEZER DRAWER REMOVAL REFRIGERATOR DOOR REMOVAL wWARNING Electric Shock Hazard • Disconnect electrical supply to be injured or receive an electrical shock. • Be careful when...
... wrench 2 Place the handle on the fitting. Collet 1 To remove the left refrigerator door: Pull the water tube out of the refrigerator. REFRIGERATOR DOOR AND FREEZER DRAWER REMOVAL REFRIGERATOR DOOR REMOVAL wWARNING Electric Shock Hazard • Disconnect electrical supply to be injured or receive an electrical shock. • Be careful when...
Owner's Manual
Page 11
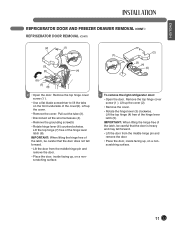
... surface. 11 Lift the top hinge (4) free of the hinge lever latch (8). IMPORTANT: When lifting the hinge free of the cover(2). ENGLISH REFRIGERATOR DOOR AND FREEZER DRAWER REMOVAL (CONT.) REFRIGERATOR DOOR REMOVAL (CONT.) (2) (1) (3) (5) (4) (6) (7) (8) 2 • Open the door. Lift up the cover (2). • Remove the cover. • Rotate the hinge lever (3) clockwise...
... surface. 11 Lift the top hinge (4) free of the hinge lever latch (8). IMPORTANT: When lifting the hinge free of the cover(2). ENGLISH REFRIGERATOR DOOR AND FREEZER DRAWER REMOVAL (CONT.) REFRIGERATOR DOOR REMOVAL (CONT.) (2) (1) (3) (5) (4) (6) (7) (8) 2 • Open the door. Lift up the cover (2). • Remove the cover. • Rotate the hinge lever (3) clockwise...
Owner's Manual
Page 12
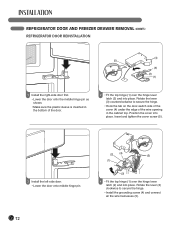
Rotate the lever (3) counterclockwise to secure the hinge. • Install the grounding screw (4) and connect all the wire harnesses (5). 12 REFRIGERATOR DOOR AND FREEZER DRAWER REMOVAL (CONT.) REFRIGERATOR DOOR REINSTALLATION (4) (5) (3) (2) (1) 1 Install the right-side door first. • Lower the door onto the middle hinge pin as shown. • Make ...
Rotate the lever (3) counterclockwise to secure the hinge. • Install the grounding screw (4) and connect all the wire harnesses (5). 12 REFRIGERATOR DOOR AND FREEZER DRAWER REMOVAL (CONT.) REFRIGERATOR DOOR REINSTALLATION (4) (5) (3) (2) (1) 1 Install the right-side door first. • Lower the door onto the middle hinge pin as shown. • Make ...
Owner's Manual
Page 13
... 6 Insert the water supply tube into the connector. • Insert the tube at least 5/8 in the cabinet top. Correct Incorrect 13 ENGLISH REFRIGERATOR DOOR AND FREEZER DRAWER REMOVAL (CONT.) REFRIGERATOR DOOR REINSTALLATION (CONT.) Cover Cover Screw (6) 5 • Push the water supply tube (6) into the hole on the top case and pull...
... 6 Insert the water supply tube into the connector. • Insert the tube at least 5/8 in the cabinet top. Correct Incorrect 13 ENGLISH REFRIGERATOR DOOR AND FREEZER DRAWER REMOVAL (CONT.) REFRIGERATOR DOOR REINSTALLATION (CONT.) Cover Cover Screw (6) 5 • Push the water supply tube (6) into the hole on the top case and pull...
Owner's Manual
Page 14
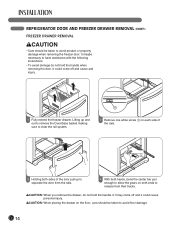
... It maybe necessary to avoid floor damage. 14 If it may come off and it could come off and cause and injury. 1 1 Fully extend the freezer drawer. Lifting up and out to remove the Dura Base basket making sure to clear the rail system. 2 Remove one white screw ቢ on each... damage do not hold the handle when removing the door. wCAUTION: When you remove the drawer, do not hold the handle. REFRIGERATOR DOOR AND FREEZER DRAWER REMOVAL (CONT.) FREEZER DRAWER REMOVAL wCAUTION • Care should be taken to release from their tracks. It could cause personal injury.
... It maybe necessary to avoid floor damage. 14 If it may come off and it could come off and cause and injury. 1 1 Fully extend the freezer drawer. Lifting up and out to remove the Dura Base basket making sure to clear the rail system. 2 Remove one white screw ቢ on each... damage do not hold the handle when removing the door. wCAUTION: When you remove the drawer, do not hold the handle. REFRIGERATOR DOOR AND FREEZER DRAWER REMOVAL (CONT.) FREEZER DRAWER REMOVAL wCAUTION • Care should be taken to release from their tracks. It could cause personal injury.
Owner's Manual
Page 15
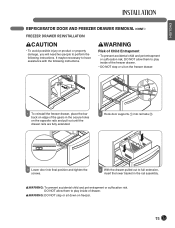
ENGLISH REFRIGERATOR DOOR AND FREEZER DRAWER REMOVAL (CONT.) FREEZER DRAWER REINSTALLATION wCAUTION • To avoid possible injury or product or property damage, you will need two people to perform the following instructions. It maybe ... final position and tighten the screws. 4 With the drawer pulled out to play inside of the freezer drawer. • DO NOT step or sit on the freezer drawer. 1 2 1 To reinstall the freezer drawer, place the bar back on freezer. 15 wWARNING: To prevent accidental child and pet entrapment or suffocation risk. wWARNING Risk of...
ENGLISH REFRIGERATOR DOOR AND FREEZER DRAWER REMOVAL (CONT.) FREEZER DRAWER REINSTALLATION wCAUTION • To avoid possible injury or product or property damage, you will need two people to perform the following instructions. It maybe ... final position and tighten the screws. 4 With the drawer pulled out to play inside of the freezer drawer. • DO NOT step or sit on the freezer drawer. 1 2 1 To reinstall the freezer drawer, place the bar back on freezer. 15 wWARNING: To prevent accidental child and pet entrapment or suffocation risk. wWARNING Risk of...
Owner's Manual
Page 16
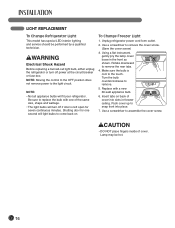
... turn off if door is cool to the light circuit. Push cover up to snap front into slots in the front as shown. To Change Freezer Light 1. NOTE: Moving the control to the OFF position does not remove power to the touch. NOTE: • Not all appliance bulbs will light bulbs..., either unplug the refrigerator or turn off power at the circuit breaker or fuse box. Using a flat instrument, gently pry the lamp cover loose in freezer ceiling.
... turn off if door is cool to the light circuit. Push cover up to snap front into slots in the front as shown. To Change Freezer Light 1. NOTE: Moving the control to the OFF position does not remove power to the touch. NOTE: • Not all appliance bulbs will light bulbs..., either unplug the refrigerator or turn off power at the circuit breaker or fuse box. Using a flat instrument, gently pry the lamp cover loose in freezer ceiling.
Owner's Manual
Page 19
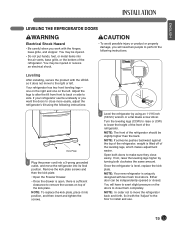
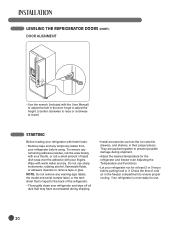
... or product or property damage, you work with two fresh food doors. Remove the kick plate screws and then the kick plate. • Open the Freezer Drawer. • Once the drawer is open, there is uniquely designed with the hinges, base grille, and stopper. NOTE: Your new refrigerator is sufficient clearance...
... or product or property damage, you work with two fresh food doors. Remove the kick plate screws and then the kick plate. • Open the Freezer Drawer. • Once the drawer is open, there is uniquely designed with the hinges, base grille, and stopper. NOTE: Your new refrigerator is sufficient clearance...
Owner's Manual
Page 20
To remove any temporary labels from your refrigerator before putting food in the freezer compartment to ensure proper cooling. Check the flow of cold air in it. Wipe with warm water and dry. Your refrigerator is taped to the ..., or rub a small amount of the refrigerator. • Thoroughly clean your refrigerator and wipe off all dust that is now ready for the refrigerator and freezer (see Adjusting the Temperature and Functions). • Let your fingers. Do not use . 20 NOTE: Do not remove any warning-type labels, the model and...
To remove any temporary labels from your refrigerator before putting food in the freezer compartment to ensure proper cooling. Check the flow of cold air in it. Wipe with warm water and dry. Your refrigerator is taped to the ..., or rub a small amount of the refrigerator. • Thoroughly clean your refrigerator and wipe off all dust that is now ready for the refrigerator and freezer (see Adjusting the Temperature and Functions). • Let your fingers. Do not use . 20 NOTE: Do not remove any warning-type labels, the model and...

Owner's Manual
Page 21
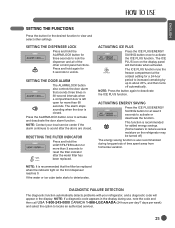
... status messages. 2 ICE TYPE BUTTON The ICE TYPE button is used to select Cubed Ice or Crushed Ice. 3 FREEZER BUTTON Press the FREEZER button to increase icemaking capabilities. ENGLISH CONTROL PANEL FEATURES For complete details on the control panel, including operation of the ...Fahrenheit to Celsius or vice versa. 4 REFRIGERATOR BUTTON Press the REFRIGERATOR button to adjust the temperature in the freezer compartment. 1 NOTE: When pressed simultaneously with the FREEZER button for more than 3 seconds to reset the filter indicator after the water filter has been replaced. 6...
... status messages. 2 ICE TYPE BUTTON The ICE TYPE button is used to select Cubed Ice or Crushed Ice. 3 FREEZER BUTTON Press the FREEZER button to increase icemaking capabilities. ENGLISH CONTROL PANEL FEATURES For complete details on the control panel, including operation of the ...Fahrenheit to Celsius or vice versa. 4 REFRIGERATOR BUTTON Press the REFRIGERATOR button to adjust the temperature in the freezer compartment. 1 NOTE: When pressed simultaneously with the FREEZER button for more than 3 seconds to reset the filter indicator after the water filter has been replaced. 6...

Owner's Manual
Page 22
... status messages. 1 DISPENSER SELECTION INDICATOR Shows Cubed ice or Crushed Ice selection that will be dispensed when the push switch is pressed. 2 FREEZER TEMPERATURE Indicates the set temperature of the freezer compartment in Celsius or Fahrenheit. 3 REFRIGERATOR TEMPERATURE Indicates the set temperature of the refrigerator compartment in Celsius or Fahrenheit. 4 ICE PLUS...
... status messages. 1 DISPENSER SELECTION INDICATOR Shows Cubed ice or Crushed Ice selection that will be dispensed when the push switch is pressed. 2 FREEZER TEMPERATURE Indicates the set temperature of the freezer compartment in Celsius or Fahrenheit. 3 REFRIGERATOR TEMPERATURE Indicates the set temperature of the refrigerator compartment in Celsius or Fahrenheit. 4 ICE PLUS...

Owner's Manual
Page 23
...Do the same to convert back to Fahrenheit. NOTE: Power Saving Mode function is set the REFRIGERATOR CONTROL at 37 degrees F and the FREEZER CONTROL at 0 degrees F. If dew gathers on the refrigerator door mullion at these setting for 5 seconds until the tone sounds. Caution When...Leave them for 24 hours (one day) to stabilize. ENGLISH ADJUSTING THE TEMPERATURES AND DISPLAY Adjust Freezer Temperature To adjust the temperature in the freezer compartment, press the FREEZER button to cycle through the range of available settings. The display will remain off until the issue...
...Do the same to convert back to Fahrenheit. NOTE: Power Saving Mode function is set the REFRIGERATOR CONTROL at 37 degrees F and the FREEZER CONTROL at 0 degrees F. If dew gathers on the refrigerator door mullion at these setting for 5 seconds until the tone sounds. Caution When...Leave them for 24 hours (one day) to stabilize. ENGLISH ADJUSTING THE TEMPERATURES AND DISPLAY Adjust Freezer Temperature To adjust the temperature in the freezer compartment, press the FREEZER button to cycle through the range of available settings. The display will remain off until the issue...
Owner's Manual
Page 25
... closed . NOTE: It is closed . If the water or ice cube taste starts to activate the ICE PLUS function. The ICE PLUS function runs the freezer compartment at least 3 seconds to activate or deactivate the function.
... closed . NOTE: It is closed . If the water or ice cube taste starts to activate the ICE PLUS function. The ICE PLUS function runs the freezer compartment at least 3 seconds to activate or deactivate the function.

Owner's Manual
Page 26
... pull out the bin as shown. 2 To reinstall the in-door ice bin, slightly slant the bin during replacement to level the ice in the freezer compartment so the icemaker can keep your hands out of ice cubes and stop producing ice when the ice bin is not closed tightly. Shake...
... pull out the bin as shown. 2 To reinstall the in-door ice bin, slightly slant the bin during replacement to level the ice in the freezer compartment so the icemaker can keep your hands out of ice cubes and stop producing ice when the ice bin is not closed tightly. Shake...
Owner's Manual
Page 27
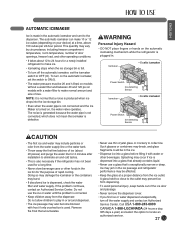
... Sensor lcemaker * 6 cells icemaker Power Switch Ice-detecting Sensor wCAUTION • The first ice and water may vary by circumstance, including freezer compartment temperature, room temperature, number of door openings, freezer load, and other operating conditions. • It takes about 20 pieces) and purge the water line for the purpose of ices...
... Sensor lcemaker * 6 cells icemaker Power Switch Ice-detecting Sensor wCAUTION • The first ice and water may vary by circumstance, including freezer compartment temperature, room temperature, number of door openings, freezer load, and other operating conditions. • It takes about 20 pieces) and purge the water line for the purpose of ices...

