Owner's Manual
Page 1
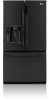
LFX25976** LFX21976** P/NO : MFL63728501 www.lg.com ENGLISH FRANÇAIS ESPAÑOL OWNER'S MANUAL FRENCH DOOR REFRIGERATOR Please read this owner's manual thoroughly before operating and keep it handy for reference at all times.
LFX25976** LFX21976** P/NO : MFL63728501 www.lg.com ENGLISH FRANÇAIS ESPAÑOL OWNER'S MANUAL FRENCH DOOR REFRIGERATOR Please read this owner's manual thoroughly before operating and keep it handy for reference at all times.
Owner's Manual
Page 2
...Automatic Icemaker 27 Storing Foods 28 Location of reliable service. Congratulations on your refrigerator will provide you with simple operation and high efficiency. Your new LG French Door Refrigerator combines advanced cooling technology with many years of Foods 29 Shelf Height Adjustment 30... CARE AND CLEANING Removing and Replacing Components 31 Cleaning the Refrigerator 35 General Information 35 Replacing the Water...
...Automatic Icemaker 27 Storing Foods 28 Location of reliable service. Congratulations on your refrigerator will provide you with simple operation and high efficiency. Your new LG French Door Refrigerator combines advanced cooling technology with many years of Foods 29 Shelf Height Adjustment 30... CARE AND CLEANING Removing and Replacing Components 31 Cleaning the Refrigerator 35 General Information 35 Replacing the Water...

Owner's Manual
Page 3
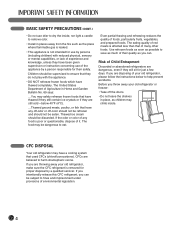
...contact with the Installer Instructions that releases the cubes. wWARNING To reduce the risk of this appliance. • NEVER unplug your refrigerator away from the outlet. • Repair or replace immediately all safety messages. Read all instructions before cleaning or making any other... your product, basic safety precautions should be killed or seriously injured if you don't follow instructions. They could damage the refrigerator and seriously injure themselves. • Keep fingers out of hazards that have LED interior lighting and service should be properly installed...
...contact with the Installer Instructions that releases the cubes. wWARNING To reduce the risk of this appliance. • NEVER unplug your refrigerator away from the outlet. • Repair or replace immediately all safety messages. Read all instructions before cleaning or making any other... your product, basic safety precautions should be killed or seriously injured if you don't follow instructions. They could damage the refrigerator and seriously injure themselves. • Keep fingers out of hazards that have LED interior lighting and service should be properly installed...
Owner's Manual
Page 4
... or color of any off-odor or off the doors. • Do not leave the shelves in place, as you are throwing away your old refrigerator, please follow the instructions below 40°F (4°C). ...Thawed ground meats, poultry, or fish that of many other foods. Use refrozen foods as soon ...as possible to save as much of their safety. If you intentionally release this CFC refrigerant, you are dangerous, even if they are believed to harm stratospheric ozone. The eating quality of red meats is affected less than that have thawed...
... or color of any off-odor or off the doors. • Do not leave the shelves in place, as you are throwing away your old refrigerator, please follow the instructions below 40°F (4°C). ...Thawed ground meats, poultry, or fish that of many other foods. Use refrozen foods as soon ...as possible to save as much of their safety. If you intentionally release this CFC refrigerant, you are dangerous, even if they are believed to harm stratospheric ozone. The eating quality of red meats is affected less than that have thawed...
Owner's Manual
Page 5
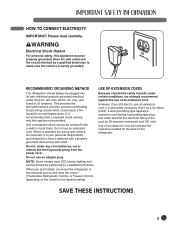
... or remove the third (ground) prong from overheated wires. However, if you are finished, reconnect the refrigerator to the electrical source and reset the control (Thermostat, Refrigerator Control, or Freezer Control, depending on the model) to make sure the outlet is absolutely necessary that ... with a switch or pull chain. SAVE THESE INSTRUCTIONS 5 RECOMMENDED GROUNDING METHOD The refrigerator should be plugged into its own individual properly grounded electrical outlet rated for the back of the refrigerator. NOTE: Some models have it be a UL-listed (USA), 3-wire grounding-...
... or remove the third (ground) prong from overheated wires. However, if you are finished, reconnect the refrigerator to the electrical source and reset the control (Thermostat, Refrigerator Control, or Freezer Control, depending on the model) to make sure the outlet is absolutely necessary that ... with a switch or pull chain. SAVE THESE INSTRUCTIONS 5 RECOMMENDED GROUNDING METHOD The refrigerator should be plugged into its own individual properly grounded electrical outlet rated for the back of the refrigerator. NOTE: Some models have it be a UL-listed (USA), 3-wire grounding-...
Owner's Manual
Page 6
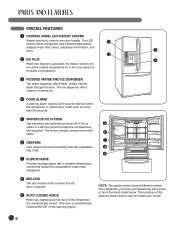
...and more. 3 2 2 ICE PLUS 4 When this feature is activated, the freezer section will run at 30-second intervals when the refrigerator or freezer door is left door is automatically closed within 30° of the items listed below. SPECIAL FEATURES 1 CONTROL PANEL LED ...dispenser offers cubed or crushed ice. 4 DOOR ALARM A warning alarm sounds at the coldest temperature for more shelf space. 6 7 6 CRISPERS LG's crispers preserve humidity and help vegetables 8 stay crisp. 9 7 GLIDE'N'SERVE Provides storage space with a variable temperature control that keeps the compartment ...
...and more. 3 2 2 ICE PLUS 4 When this feature is activated, the freezer section will run at 30-second intervals when the refrigerator or freezer door is left door is automatically closed within 30° of the items listed below. SPECIAL FEATURES 1 CONTROL PANEL LED ...dispenser offers cubed or crushed ice. 4 DOOR ALARM A warning alarm sounds at the coldest temperature for more shelf space. 6 7 6 CRISPERS LG's crispers preserve humidity and help vegetables 8 stay crisp. 9 7 GLIDE'N'SERVE Provides storage space with a variable temperature control that keeps the compartment ...
Owner's Manual
Page 7
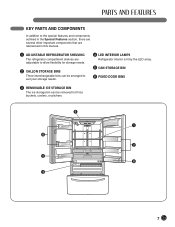
... outlined in the Special Features section, there are several other important components that are referenced in this manual. 1 ADJUSTABLE REFRIGERATOR SHELVING The refrigerator compartment shelves are adjustable to allow flexibility for storage needs. 2 GALLON STORAGE BINS Three interchangeable bins can be arranged to... suit your storage needs. 4 LED INTERIOR LAMPS Refrigerator interior is lit by the LED array. 5 CAN STORAGE BIN 6 FIXED DOOR BINS 3 REMOVABLE ICE STORAGE BIN The ice storage ...
... outlined in the Special Features section, there are several other important components that are referenced in this manual. 1 ADJUSTABLE REFRIGERATOR SHELVING The refrigerator compartment shelves are adjustable to allow flexibility for storage needs. 2 GALLON STORAGE BINS Three interchangeable bins can be arranged to... suit your storage needs. 4 LED INTERIOR LAMPS Refrigerator interior is lit by the LED array. 5 CAN STORAGE BIN 6 FIXED DOOR BINS 3 REMOVABLE ICE STORAGE BIN The ice storage ...
Owner's Manual
Page 8
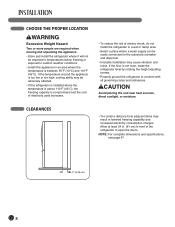
...PROPER LOCATION wWARNING Excessive Weight Hazard Two or more people are required when moving and unpacking the appliance. • Store and install the refrigerator where it will not be exposed to temperatures below freezing or exposed to outdoor weather conditions. • Install this appliance in front of...110°F (43°C), the freezing capacity is compromised and the cost of electricity used increases. • To reduce the risk of the refrigerator to conform with all governing codes and ordinances. If the floor is between 55°F (13°C) and 110°F (43°C). ...
...PROPER LOCATION wWARNING Excessive Weight Hazard Two or more people are required when moving and unpacking the appliance. • Store and install the refrigerator where it will not be exposed to temperatures below freezing or exposed to outdoor weather conditions. • Install this appliance in front of...110°F (43°C), the freezing capacity is compromised and the cost of electricity used increases. • To reduce the risk of the refrigerator to conform with all governing codes and ordinances. If the floor is between 55°F (13°C) and 110°F (43°C). ...
Owner's Manual
Page 9
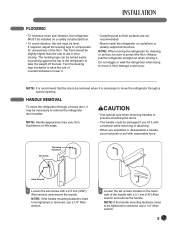
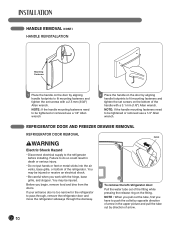
...pull with reasonable force. Turn the leveling legs clockwise to raise the unit or counterclockwise to lower it ; HANDLE REMOVAL To move the refrigerator through a narrow opening. NOTE: When moving it with a hammer while removing or attaching. • When you assemble or disassemble ... may be turned easily by pushing against the top of the floor. Always pull the refrigerator straight out when moving the refrigerator for unevenness of the refrigerator to remove the refrigerator door handles. Mounting Fasteners Set Screw Allen Wrench 1 Loosen the set screws located on ...
...pull with reasonable force. Turn the leveling legs clockwise to raise the unit or counterclockwise to lower it ; HANDLE REMOVAL To move the refrigerator through a narrow opening. NOTE: When moving it with a hammer while removing or attaching. • When you assemble or disassemble ... may be turned easily by pushing against the top of the floor. Always pull the refrigerator straight out when moving the refrigerator for unevenness of the refrigerator to remove the refrigerator door handles. Mounting Fasteners Set Screw Allen Wrench 1 Loosen the set screws located on ...
Owner's Manual
Page 10
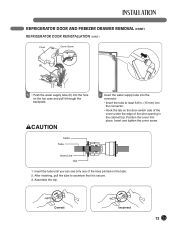
...fasteners and tighten the set screws with a 2.5 mm (3/32") Allen wrench. REFRIGERATOR DOOR AND FREEZER DRAWER REMOVAL REFRIGERATOR DOOR REMOVAL wWARNING Electric Shock Hazard • Disconnect electrical supply to pass through, remove the refrigerator door and move the refrigerator sideways through the doorway. NOTE : When you pull out the tube, first ... the air vents, base grille, or bottom of the handle with the hinge, base grille, and stopper. Collet 1 To remove the left refrigerator door: Pull the water tube out of the fitting while pressing the release ring on the bottom of the...
...fasteners and tighten the set screws with a 2.5 mm (3/32") Allen wrench. REFRIGERATOR DOOR AND FREEZER DRAWER REMOVAL REFRIGERATOR DOOR REMOVAL wWARNING Electric Shock Hazard • Disconnect electrical supply to pass through, remove the refrigerator door and move the refrigerator sideways through the doorway. NOTE : When you pull out the tube, first ... the air vents, base grille, or bottom of the handle with the hinge, base grille, and stopper. Collet 1 To remove the left refrigerator door: Pull the water tube out of the fitting while pressing the release ring on the bottom of the...
Owner's Manual
Page 11
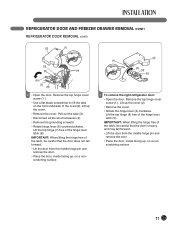
... remove the door. • Place the door, inside facing up , on a nonscratching surface. 11 Lift up the cover. • Remove the cover. REFRIGERATOR DOOR AND FREEZER DRAWER REMOVAL (CONT.) REFRIGERATOR DOOR REMOVAL (CONT.) (2) (1) (3) (5) (4) (6) (7) (8) 2 • Open the door. Lift the top hinge (7) free of the hinge lever latch (5). IMPORTANT: When lifting the ...the door from the middle hinge pin and remove the door. • Place the door, inside facing up , on a nonscratching surface. (2) (1) (3) (4) (5) 3 To remove the right refrigerator door: • Open the door.
... remove the door. • Place the door, inside facing up , on a nonscratching surface. 11 Lift up the cover. • Remove the cover. REFRIGERATOR DOOR AND FREEZER DRAWER REMOVAL (CONT.) REFRIGERATOR DOOR REMOVAL (CONT.) (2) (1) (3) (5) (4) (6) (7) (8) 2 • Open the door. Lift the top hinge (7) free of the hinge lever latch (5). IMPORTANT: When lifting the ...the door from the middle hinge pin and remove the door. • Place the door, inside facing up , on a nonscratching surface. (2) (1) (3) (4) (5) 3 To remove the right refrigerator door: • Open the door.
Owner's Manual
Page 12
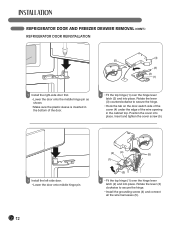
... FREEZER DRAWER REMOVAL (CONT.) REFRIGERATOR DOOR REINSTALLATION (4) (5) (3) (2) (1) 1 Install the right-side door first. • Lower the door onto the middle hinge pin as shown. • Make sure the plastic sleeve ...
... FREEZER DRAWER REMOVAL (CONT.) REFRIGERATOR DOOR REINSTALLATION (4) (5) (3) (2) (1) 1 Install the right-side door first. • Lower the door onto the middle hinge pin as shown. • Make sure the plastic sleeve ...
Owner's Manual
Page 13
.... • Insert the tube at least 5/8 in the cabinet top. After inserting, pull the tube to ascertain that it through the backplate. REFRIGERATOR DOOR AND FREEZER DRAWER REMOVAL (CONT.) REFRIGERATOR DOOR REINSTALLATION (CONT.) Cover Cover Screw (6) 5 • Push the water supply tube (6) into the hole on the door-switch side of the...
.... • Insert the tube at least 5/8 in the cabinet top. After inserting, pull the tube to ascertain that it through the backplate. REFRIGERATOR DOOR AND FREEZER DRAWER REMOVAL (CONT.) REFRIGERATOR DOOR REINSTALLATION (CONT.) Cover Cover Screw (6) 5 • Push the water supply tube (6) into the hole on the door-switch side of the...

Owner's Manual
Page 14
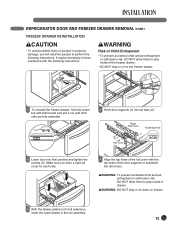
... come off and cause and injury. 1 To remove the freezer drawer, pull the drawer open to release from the track. It could cause personal injury. REFRIGERATOR DOOR AND FREEZER DRAWER REMOVAL (CONT.) FREEZER DRAWER REMOVAL wCAUTION • Care should be taken to avoid product or property damage when removing the freezer...
... come off and cause and injury. 1 To remove the freezer drawer, pull the drawer open to release from the track. It could cause personal injury. REFRIGERATOR DOOR AND FREEZER DRAWER REMOVAL (CONT.) FREEZER DRAWER REMOVAL wCAUTION • Care should be taken to avoid product or property damage when removing the freezer...
Owner's Manual
Page 15
... basket in the rail assembly. 15 It maybe necessary to perform the following instructions. wWARNING: To prevent accidental child and pet entrapment or suffocation risk. REFRIGERATOR DOOR AND FREEZER DRAWER REMOVAL (CONT.) FREEZER DRAWER REINSTALLATION wCAUTION • To avoid possible injury or product or property damage, you have assistance with the...
... basket in the rail assembly. 15 It maybe necessary to perform the following instructions. wWARNING: To prevent accidental child and pet entrapment or suffocation risk. REFRIGERATOR DOOR AND FREEZER DRAWER REMOVAL (CONT.) FREEZER DRAWER REINSTALLATION wCAUTION • To avoid possible injury or product or property damage, you have assistance with the...
Owner's Manual
Page 16
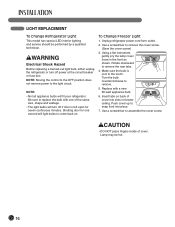
...of cover. wCAUTION • DO NOT place fingers inside of the same size, shape and wattage. • The light bulbs will fit your refrigerator. Shutting door for seven continuous minutes. Use a screwdriver to remove the rear tabs. 4. Using a flat instrument, gently pry the lamp cover ...loose in freezer ceiling. wWARNING Electrical Shock Hazard Before replacing a burned-out light bulb, either unplug the refrigerator or turn off power at the circuit breaker or fuse box. NOTE: Moving the control to the OFF position does not remove power to...
...of cover. wCAUTION • DO NOT place fingers inside of the same size, shape and wattage. • The light bulbs will fit your refrigerator. Shutting door for seven continuous minutes. Use a screwdriver to remove the rear tabs. 4. Using a flat instrument, gently pry the lamp cover ...loose in freezer ceiling. wWARNING Electrical Shock Hazard Before replacing a burned-out light bulb, either unplug the refrigerator or turn off power at the circuit breaker or fuse box. NOTE: Moving the control to the OFF position does not remove power to...
Owner's Manual
Page 17
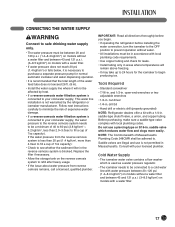
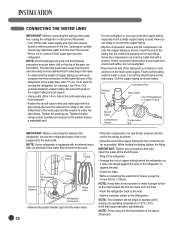
...kgf/cm2, more easily. NOTE: The Commonwealth of 7oz capacity). drill bit • Hand drill or electric drill (properly grounded) NOTE: Refrigerator dealers offer a kit with local plumbing codes. Before purchasing, make sure a saddle-type valve complies with a 1/4-in. Follow next instructions ...operation. • It is recommended that the total length of 7oz capacity): • Check to begin . • If operating the refrigerator before you begin producing ice. nut driver • 1/4-in . CONNECTING THE WATER SUPPLY wWARNING Connect to safe drinking water supply only. ...
...kgf/cm2, more easily. NOTE: The Commonwealth of 7oz capacity). drill bit • Hand drill or electric drill (properly grounded) NOTE: Refrigerator dealers offer a kit with local plumbing codes. Before purchasing, make sure a saddle-type valve complies with a 1/4-in. Follow next instructions ...operation. • It is recommended that the total length of 7oz capacity): • Check to begin . • If operating the refrigerator before you begin producing ice. nut driver • 1/4-in . CONNECTING THE WATER SUPPLY wWARNING Connect to safe drinking water supply only. ...
Owner's Manual
Page 18
...the washer is solidly in the 1/4-in . CONNECTING THE WATER LINES IMPORTANT: Before connecting the tubing to the water line, unplug the refrigerator or disconnect the power. • Turn off the shutoff valve on the water pipe. Opening an outside diameter) copper tubing. vertical COLD... water pipe near the refrigerator. Use 1/4-in -line water filter should not be used . hole in the cold water pipe you are cut square. • Using a drill,...
...the washer is solidly in the 1/4-in . CONNECTING THE WATER LINES IMPORTANT: Before connecting the tubing to the water line, unplug the refrigerator or disconnect the power. • Turn off the shutoff valve on the water pipe. Opening an outside diameter) copper tubing. vertical COLD... water pipe near the refrigerator. Use 1/4-in -line water filter should not be used . hole in the cold water pipe you are cut square. • Using a drill,...
Owner's Manual
Page 19
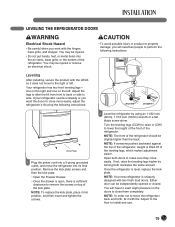
...perform the following instructions: LFX21976** LFX25976** Kick Plate 1 Plug the power cord into a 3-prong grounded outlet, and move to close more easily, adjust the refrigerator's tilt using an 11/32 inch (8mm), 11/16 inch (18mm) wrench or a flat blade screw driver. Adjust the legs to alter the tilt ...is level, replace the kickplate. NOTE: To replace the kick plate, place it into position, and then insert and tighten the screws. 2 Level the refrigerator by turning both doors to make sure they close easily. Turn the leveling legs (CCW) to raise or (CW) to side. NOTE: If someone ...
...perform the following instructions: LFX21976** LFX25976** Kick Plate 1 Plug the power cord into a 3-prong grounded outlet, and move to close more easily, adjust the refrigerator's tilt using an 11/32 inch (8mm), 11/16 inch (18mm) wrench or a flat blade screw driver. Adjust the legs to alter the tilt ...is level, replace the kickplate. NOTE: To replace the kick plate, place it into position, and then insert and tighten the screws. 2 Level the refrigerator by turning both doors to make sure they close easily. Turn the leveling legs (CCW) to raise or (CW) to side. NOTE: If someone ...

Owner's Manual
Page 20
...the tech sheet that may have accumulated during shipment. • Adjust the desired temperature for the refrigerator and freezer (see Adjusting the Temperature and Functions). • Let your refrigerator run for use sharp instruments, rubbing alcohol, flammable fluids, or abrasive cleaners to lower) STARTING ... and any remaining adhesive residue, rub the area briskly with your fingers. They are packed together to ensure proper cooling. LEVELING THE REFRIGERATOR DOORS (CONT.) DOOR ALIGNMENT • Use the wrench (Included with the User Manual) to adjust the bolt in the door hinge...
...the tech sheet that may have accumulated during shipment. • Adjust the desired temperature for the refrigerator and freezer (see Adjusting the Temperature and Functions). • Let your refrigerator run for use sharp instruments, rubbing alcohol, flammable fluids, or abrasive cleaners to lower) STARTING ... and any remaining adhesive residue, rub the area briskly with your fingers. They are packed together to ensure proper cooling. LEVELING THE REFRIGERATOR DOORS (CONT.) DOOR ALIGNMENT • Use the wrench (Included with the User Manual) to adjust the bolt in the door hinge...


