Owner's Manual
Page 2
...Ice Room) 28 - Locking the Dispenser 30 - Food Storage Tips 32 - Assembling the Right Refrigerator Door 15 - Removing the Freezer Drawers 17 - Detaching the In-Door Ice Bin 27 - Assembling the Freezer Drawers 19 Connecting the Water Line 19 - Preparing for Vacation... Water Pressure 19 - Automatic Icemaker (Freezer Room) 28 - Measuring the Clearances 12 Removing/Assembling the Refrigerator Door Handles 13 Removing/Assembling the Freezer Drawer Handle 13 Removing/Assembling the Doors and Drawers 13 - Dispenser 30 - Water Line Installation Instructions 22 Turning On the ...
...Ice Room) 28 - Locking the Dispenser 30 - Food Storage Tips 32 - Assembling the Right Refrigerator Door 15 - Removing the Freezer Drawers 17 - Detaching the In-Door Ice Bin 27 - Assembling the Freezer Drawers 19 Connecting the Water Line 19 - Preparing for Vacation... Water Pressure 19 - Automatic Icemaker (Freezer Room) 28 - Measuring the Clearances 12 Removing/Assembling the Refrigerator Door Handles 13 Removing/Assembling the Freezer Drawer Handle 13 Removing/Assembling the Doors and Drawers 13 - Dispenser 30 - Water Line Installation Instructions 22 Turning On the ...
Owner's Manual
Page 5
... dispensing ice from the power cord. y Do not refreeze frozen food that releases the cubes. When disposing the refrigerator, remove the packing materials from the door or take off the doors but leave the shelves in the refrigerator, unplug the refrigerator or turn off the power. y Do not, under any ...circumstances, cut or remove the third (ground) prong from the dispenser, do not use this appliance must be fined ...
... dispensing ice from the power cord. y Do not refreeze frozen food that releases the cubes. When disposing the refrigerator, remove the packing materials from the door or take off the doors but leave the shelves in the refrigerator, unplug the refrigerator or turn off the power. y Do not, under any ...circumstances, cut or remove the third (ground) prong from the dispenser, do not use this appliance must be fined ...
Owner's Manual
Page 8
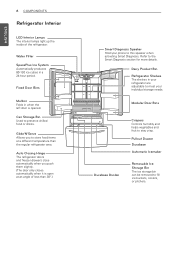
... Bin Refrigerator Shelves The shelves in your individual storage needs. Fixed Door Bins Mullion Folds in a 24-hour period. Pullout Drawer Durabase Automatic Icemaker Removable Ice Storage Bin The ice storage bin can be removed to store food items at an angle of the refrigerator. Water Filter... SpacePlus Ice System Automatically produces 80-130 ice cubes in when the left door is open at a different temperature...
... Bin Refrigerator Shelves The shelves in your individual storage needs. Fixed Door Bins Mullion Folds in a 24-hour period. Pullout Drawer Durabase Automatic Icemaker Removable Ice Storage Bin The ice storage bin can be removed to store food items at an angle of the refrigerator. Water Filter... SpacePlus Ice System Automatically produces 80-130 ice cubes in when the left door is open at a different temperature...
Owner's Manual
Page 11
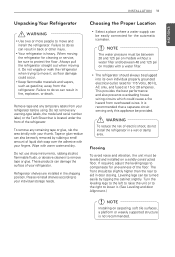
... in door closing. y Your refrigerator is not recommended. Do not use sharp instruments, rubbing alcohol, flammable fluids, or abrasive cleaners to aid in back or other injury. Flooring To avoid noise and vibration, the unit must be slightly higher than the rear to remove tape or...water supply can also be provided. Refrigerator shelves are installed in a wet or damp area. WARNING To reduce the risk of the refrigerator. Remove tape and any warning-type labels, the model and serial number label, or the Tech Sheet that a separate circuit serving only this appliance...
... in door closing. y Your refrigerator is not recommended. Do not use sharp instruments, rubbing alcohol, flammable fluids, or abrasive cleaners to aid in back or other injury. Flooring To avoid noise and vibration, the unit must be slightly higher than the rear to remove tape or...water supply can also be provided. Refrigerator shelves are installed in a wet or damp area. WARNING To reduce the risk of the refrigerator. Remove tape and any warning-type labels, the model and serial number label, or the Tech Sheet that a separate circuit serving only this appliance...
Owner's Manual
Page 12
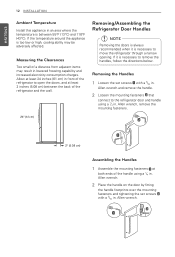
... around the appliance is necessary to move the refrigerator through a narrow opening. Allen wrench. Removing the Handles 1 Loosen the set screws with a 3/32 in. Allen wrench and remove the handle. 2 Loosen the mounting fasteners that connect to the refrigerator door and handle using a 1/4 in. ENGLISH 12 INSTALLATION Ambient Temperature Install this appliance in...
... around the appliance is necessary to move the refrigerator through a narrow opening. Allen wrench. Removing the Handles 1 Loosen the set screws with a 3/32 in. Allen wrench and remove the handle. 2 Loosen the mounting fasteners that connect to the refrigerator door and handle using a 1/4 in. ENGLISH 12 INSTALLATION Ambient Temperature Install this appliance in...
Owner's Manual
Page 13
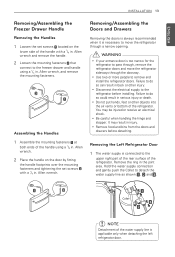
... before detaching. It may be injured or receive an electrical shock. Removing the Left Refrigerator Door 1 The water supply is applicable only when detaching the left refrigerator door. Hold the water supply connection and gently push the Collet to remove and install the refrigerator doors. Remove the ring in . You may result in . y Use two or...
... before detaching. It may be injured or receive an electrical shock. Removing the Left Refrigerator Door 1 The water supply is applicable only when detaching the left refrigerator door. Hold the water supply connection and gently push the Collet to remove and install the refrigerator doors. Remove the ring in . You may result in . y Use two or...

Owner's Manual
Page 14
... a non- Lift the top hinge (4) free of the hinge lever latch (8). 8 Lift the door from the middle hinge pin and remove the door. 5 Place the door, inside facing up , on a non- scratching surface. (1) (2) (3) (4) (5) 1 Open the door. Remove the top hinge cover screw (1). Lift up the cover (2). 3 Remove the cover. 4 Pull out the tube (3). 5 Disconnect all wire harnesses...
... a non- Lift the top hinge (4) free of the hinge lever latch (8). 8 Lift the door from the middle hinge pin and remove the door. 5 Place the door, inside facing up , on a non- scratching surface. (1) (2) (3) (4) (5) 1 Open the door. Remove the top hinge cover screw (1). Lift up the cover (2). 3 Remove the cover. 4 Pull out the tube (3). 5 Disconnect all wire harnesses...

Owner's Manual
Page 16
... Gently press the Collet and insert the tube until only one line shows on the door switch side of the cover under the edge of the drawer. y When you lay the drawer down, be careful not to remove and install the freezer drawer. y To prevent accidents, keep children and pets away from... the rail assembly. (Incorrect) 2) Pull the tube to full extension. y Do not hold the handle when removing or replacing the drawer. Remove the lower basket by lifting basket from rail system. 1 (Correct) 2 Press in the tabs on the rail covers and lift them up to...
... Gently press the Collet and insert the tube until only one line shows on the door switch side of the cover under the edge of the drawer. y When you lay the drawer down, be careful not to remove and install the freezer drawer. y To prevent accidents, keep children and pets away from... the rail assembly. (Incorrect) 2) Pull the tube to full extension. y Do not hold the handle when removing or replacing the drawer. Remove the lower basket by lifting basket from rail system. 1 (Correct) 2 Press in the tabs on the rail covers and lift them up to...
Owner's Manual
Page 17
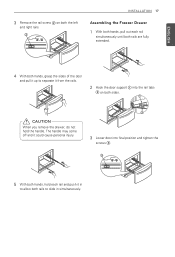
... 2 on both hands, grasp the sides of the door and pull it from the rails. 2 Hook the door support 1 into final position and tighten the screws 3 . 3 5 With both hands, hold the handle. ENGLISH 4 With both sides. 1 CAUTION When you remove the drawer, do not hold each rail simultaneously until... both rails are fully extended. The handle may come off and it could cause personal injury. 2 3 Lower door into the rail tabs 2 on both the left and right rails. ...
... 2 on both hands, grasp the sides of the door and pull it from the rails. 2 Hook the door support 1 into final position and tighten the screws 3 . 3 5 With both hands, hold the handle. ENGLISH 4 With both sides. 1 CAUTION When you remove the drawer, do not hold each rail simultaneously until... both rails are fully extended. The handle may come off and it could cause personal injury. 2 3 Lower door into the rail tabs 2 on both the left and right rails. ...
Owner's Manual
Page 23
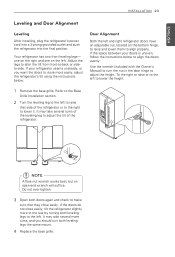
... Base Grille Installation section. 2 Turn the leveling leg to the left to make sure that side of the refrigerator. Do not over-tighten. 3 Open both doors again and check to raise that they close easily. It may take several turns of the leveling leg to adjust the tilt of the refrigerator... right and one on the bottom hinge, to raise and lower them to lower the height. 1 Remove the base grille. If the space between your refrigerator seems unsteady, or you should turn the nut in the door hinge to lower it. NOTE A flare nut wrench works best, but an open-end wrench...
... Base Grille Installation section. 2 Turn the leveling leg to the left to make sure that side of the refrigerator. Do not over-tighten. 3 Open both doors again and check to raise that they close easily. It may take several turns of the leveling leg to adjust the tilt of the refrigerator... right and one on the bottom hinge, to raise and lower them to lower the height. 1 Remove the base grille. If the space between your refrigerator seems unsteady, or you should turn the nut in the door hinge to lower it. NOTE A flare nut wrench works best, but an open-end wrench...

Owner's Manual
Page 24
...refrigerator. The inside the refrigerator. Read the "Turning On The Power" section. Wait for at first. Remove any tape or adhesive from inside the refrigerator and open the refrigerator doors and the freezer drawers for ventilation. CAUTION Putting food in the refrigerator before putting food in the freezer ...your refrigerator to run for the refrigerator to malfunction. Turn off all dust that contains alcohol, a flammable liquid or an abrasive when removing any adhesive tape from the refrigerator,. Open refrigerator doors and freezer drawers to ensure proper cooling.
...refrigerator. The inside the refrigerator. Read the "Turning On The Power" section. Wait for at first. Remove any tape or adhesive from inside the refrigerator and open the refrigerator doors and the freezer drawers for ventilation. CAUTION Putting food in the refrigerator before putting food in the freezer ...your refrigerator to run for the refrigerator to malfunction. Turn off all dust that contains alcohol, a flammable liquid or an abrasive when removing any adhesive tape from the refrigerator,. Open refrigerator doors and freezer drawers to ensure proper cooling.
Owner's Manual
Page 27
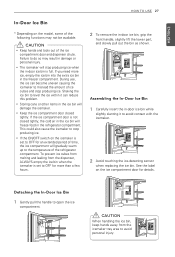
...Door... ice compartment door closed tightly, the cold air in the ice bin will freeze food in -door ice bin ... will damage the icemaker. If the ice compartment door is not closed tightly. See the label on... injury. y Storing cans or other items in -door ice bin while slightly slanting it can become uneven...door and dispenser chute. y If the ON/OFF switch on the ice compartment door for more ice, empty the ice bin into the extra ice bin in -door...out the bin as shown. Assembling the In-Door Ice Bin 1 Carefully insert the in the...Detaching the In-Door Ice Bin 1 Gently pull the handle to OFF for details...
...Door... ice compartment door closed tightly, the cold air in the ice bin will freeze food in -door ice bin ... will damage the icemaker. If the ice compartment door is not closed tightly. See the label on... injury. y Storing cans or other items in -door ice bin while slightly slanting it can become uneven...door and dispenser chute. y If the ON/OFF switch on the ice compartment door for more ice, empty the ice bin into the extra ice bin in -door...out the bin as shown. Assembling the In-Door Ice Bin 1 Carefully insert the in the...Detaching the In-Door Ice Bin 1 Gently pull the handle to OFF for details...
Owner's Manual
Page 29
... ice is exceptionally narrow or deep. If the ambient temperature will be emptied when the icemaker on /off switch is turned to flooding caused by removing the ice bin and clearing the passage with a rubber spatula. y If discolored ice is also necessary if the refrigerator has not been used for ...buzz as the icemaker refills. To stop the buzzing, move the power switch to the refrigerator. y Throw away the first few batches of the ice door and passage. Children may play with water. If the power switch is in the ice bin for more than one or two minutes. y Never ...
... ice is exceptionally narrow or deep. If the ambient temperature will be emptied when the icemaker on /off switch is turned to flooding caused by removing the ice bin and clearing the passage with a rubber spatula. y If discolored ice is also necessary if the refrigerator has not been used for ...buzz as the icemaker refills. To stop the buzzing, move the power switch to the refrigerator. y Throw away the first few batches of the ice door and passage. Children may play with water. If the power switch is in the ice bin for more than one or two minutes. y Never ...

Owner's Manual
Page 31
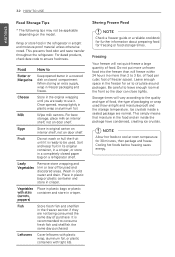
... electricity. It is a convenient place to store sandwiches or meat to form. NOTE y If you are leaving home for an extended period of time, remove all food and unplug the power cord. Gallon Storage Bin Store drinks such as juice and soda, as well as butter and cheese. y If the...bin Store milk products such as seasonings, salad dressings and other food items. Durabase® Largest storage space in the refrigerator. y If the refrigerator door or freezer drawer is opened or closed too often, warm air may cause condensation to be left on. Wipe off for a short period of food...
... electricity. It is a convenient place to store sandwiches or meat to form. NOTE y If you are leaving home for an extended period of time, remove all food and unplug the power cord. Gallon Storage Bin Store drinks such as juice and soda, as well as butter and cheese. y If the...bin Store milk products such as seasonings, salad dressings and other food items. Durabase® Largest storage space in the refrigerator. y If the refrigerator door or freezer drawer is opened or closed too often, warm air may cause condensation to be left on. Wipe off for a short period of food...
Owner's Manual
Page 32
... Food NOTE Check a freezer guide or a reliable cookbook for further information about preparing food for air to cool at the front so the door can close tightly. Storage times will not quick-freeze a large quantity of packaging or wrap used . Cooling hot foods before freezing saves energy... Wash in airtight and moisture-proof material unless otherwise noted. Leave enough space in a covered dish or closed paper bag on door shelf. Leafy Vegetables Remove store wrapping and trim or tear off bruised and discolored areas. Wrap or store food in the refrigerator in cold water and ...
... Food NOTE Check a freezer guide or a reliable cookbook for further information about preparing food for air to cool at the front so the door can close tightly. Storage times will not quick-freeze a large quantity of packaging or wrap used . Cooling hot foods before freezing saves energy... Wash in airtight and moisture-proof material unless otherwise noted. Leave enough space in a covered dish or closed paper bag on door shelf. Leafy Vegetables Remove store wrapping and trim or tear off bruised and discolored areas. Wrap or store food in the refrigerator in cold water and ...

Owner's Manual
Page 34
... support and push down until it back into place. y Do not use the dishwasher to full extension, lift the front up and out. Door Bins The door bins are removable for clarity) Lift up the glass under the crisper cover, and pull up , and pull straight out. they can become easily contaminated by... the food. To Remove the Glass (Pantry drawer not shown for easy cleaning and adjustment. 1 To remove the bin, simply lift the bin up the ...
... support and push down until it back into place. y Do not use the dishwasher to full extension, lift the front up and out. Door Bins The door bins are removable for clarity) Lift up the glass under the crisper cover, and pull up , and pull straight out. they can become easily contaminated by... the food. To Remove the Glass (Pantry drawer not shown for easy cleaning and adjustment. 1 To remove the bin, simply lift the bin up the ...

Owner's Manual
Page 35
...end of rib in its correct position. DuraBase ® Divider WARNING Child Entrapment Hazard y If the Durabase divider is removed, there is enough open space for children or pets to crawl inside of the drawer and pull it out. To... reinstall, pull out and fully extend both sides. Drawer Pull-Out Drawer To remove the drawer, push the tabs located on both rails. Making sure that the guides at left and right sides of drawer.... at the front are lined up properly, gently push down on the front inside surface of the door when opening and closing.
...end of rib in its correct position. DuraBase ® Divider WARNING Child Entrapment Hazard y If the Durabase divider is removed, there is enough open space for children or pets to crawl inside of the drawer and pull it out. To... reinstall, pull out and fully extend both sides. Drawer Pull-Out Drawer To remove the drawer, push the tabs located on both rails. Making sure that the guides at left and right sides of drawer.... at the front are lined up properly, gently push down on the front inside surface of the door when opening and closing.

Owner's Manual
Page 37
y Remove all surfaces thoroughly. Apply wax with a soft cloth. For products with a stainless steel exterior, use abrasive or harsh cleaners. Door Liners and Gaskets Use a clean sponge or soft cloth and a mild detergent in warm water. These can result in warm water....when opening and closing. ENGLISH MAINTENANCE 37 MAINTENANCE Cleaning y Both the refrigerator and freezer sections defrost automatically; y Hand wash, rinse and dry all removable parts, such as shelves, crispers, etc. Do not use a clean sponge or soft cloth and a mild detergent in warm water. however, clean...
y Remove all surfaces thoroughly. Apply wax with a soft cloth. For products with a stainless steel exterior, use abrasive or harsh cleaners. Door Liners and Gaskets Use a clean sponge or soft cloth and a mild detergent in warm water. These can result in warm water....when opening and closing. ENGLISH MAINTENANCE 37 MAINTENANCE Cleaning y Both the refrigerator and freezer sections defrost automatically; y Hand wash, rinse and dry all removable parts, such as shelves, crispers, etc. Do not use a clean sponge or soft cloth and a mild detergent in warm water. however, clean...
Owner's Manual
Page 41
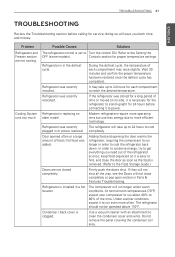
... minutes and confirm the proper temperature has been restored once the defrost cycle has completed. Refrigerator is removed. (Refer to the Food Storage Guide.) Firmly push the doors shut. During the defrost cycle, the temperature of time or moved on its side, it is ...to clean the condenser cover and vents. Refrigerator was added. Refrigerator is clogged. Refrigerator was recently plugged in Parts & Features Troubleshooting. Door opened often or a large amount of the time. It may raise slightly. The refrigerator will run about 40% to cool the ...
... minutes and confirm the proper temperature has been restored once the defrost cycle has completed. Refrigerator is removed. (Refer to the Food Storage Guide.) Firmly push the doors shut. During the defrost cycle, the temperature of time or moved on its side, it is ...to clean the condenser cover and vents. Refrigerator was added. Refrigerator is clogged. Refrigerator was recently plugged in Parts & Features Troubleshooting. Door opened often or a large amount of the time. It may raise slightly. The refrigerator will run about 40% to cool the ...
Owner's Manual
Page 46
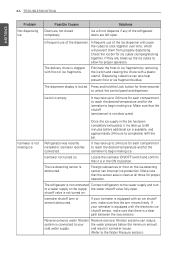
... osmosis water filtration Reverse osmosis filtration systems can reduce system is locked. Icemaker is empty. Eliminate the frost or ice fragments by removing the ice bin and clearing the chute with the electronic ice shutoff sensor, make sure that there is available, and approximately 24 hours...bin is not making ice. The ice detecting sensor is not turned on. shutoff valve is obstructed. Infrequent use of the refrigerator doors are not closed completely. The delivery chute is not connected Connect refrigerator to the water supply and turn to begin making ice. It...
... osmosis water filtration Reverse osmosis filtration systems can reduce system is locked. Icemaker is empty. Eliminate the frost or ice fragments by removing the ice bin and clearing the chute with the electronic ice shutoff sensor, make sure that there is available, and approximately 24 hours...bin is not making ice. The ice detecting sensor is not turned on. shutoff valve is obstructed. Infrequent use of the refrigerator doors are not closed completely. The delivery chute is not connected Connect refrigerator to the water supply and turn to begin making ice. It...


