Owner's Manual
Page 2
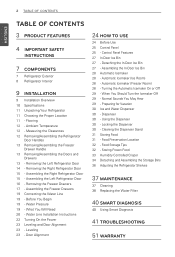
... Icemaker 28 - Measuring the Clearances 12 Removing/Assembling the Refrigerator Door Handles 13 Removing/Assembling the Freezer Drawer Handle 13 Removing/Assembling the Doors and Drawers 13 - Normal Sounds You May Hear 29 - Assembling the Right Refrigerator Door 15 - Removing the Freezer Drawers 17 - Dispenser 30 - Storing Frozen Food 33 Humidity Controlled Crisper 34 Detaching and Assembling the Storage Bins 36 Adjusting the Refrigerator Shelves 37 MAINTENANCE 37 Cleaning 38 Replacing the Water Filter 40 SMART DIAGNOSIS 40 Using Smart Diagnosis 41 TROUBLESHOOTING 51 WARRANTY...
... Icemaker 28 - Measuring the Clearances 12 Removing/Assembling the Refrigerator Door Handles 13 Removing/Assembling the Freezer Drawer Handle 13 Removing/Assembling the Doors and Drawers 13 - Normal Sounds You May Hear 29 - Assembling the Right Refrigerator Door 15 - Removing the Freezer Drawers 17 - Dispenser 30 - Storing Frozen Food 33 Humidity Controlled Crisper 34 Detaching and Assembling the Storage Bins 36 Adjusting the Refrigerator Shelves 37 MAINTENANCE 37 Cleaning 38 Replacing the Water Filter 40 SMART DIAGNOSIS 40 Using Smart Diagnosis 41 TROUBLESHOOTING 51 WARRANTY...
Owner's Manual
Page 5
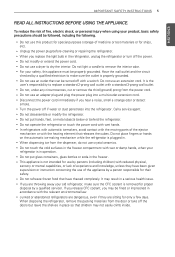
... in operation. y When dispensing ice from the dispenser, do not use an extension cord. y Do not refreeze frozen food that children may not easily climb inside. To reduce the risk of the ejector mechanism or with wet hands. y Unplug the power plug before cleaning or repairing the refrigerator. y When you are throwing away your refrigerator is plugged in the freezer. Do not light a candle to replace...
... in operation. y When dispensing ice from the dispenser, do not use an extension cord. y Do not refreeze frozen food that children may not easily climb inside. To reduce the risk of the ejector mechanism or with wet hands. y Unplug the power plug before cleaning or repairing the refrigerator. y When you are throwing away your refrigerator is plugged in the freezer. Do not light a candle to replace...
Owner's Manual
Page 8
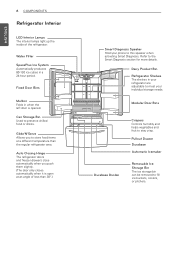
... Door Bins Durabase Divider Crispers Controls humidity and helps vegetables and fruit to preserve chilled food or drinks. Can Storage Bin Used to stay crisp. Water Filter SpacePlus Ice System Automatically produces 80-130 ice cubes in when the left door is open at a different temperature than 30°.) Smart Diagnosis Speaker Hold your individual storage needs. ENGLISH 8 COMPONENTS Refrigerator Interior LED Interior Lamps The interior lamps light up the inside...
... Door Bins Durabase Divider Crispers Controls humidity and helps vegetables and fruit to preserve chilled food or drinks. Can Storage Bin Used to stay crisp. Water Filter SpacePlus Ice System Automatically produces 80-130 ice cubes in when the left door is open at a different temperature than 30°.) Smart Diagnosis Speaker Hold your individual storage needs. ENGLISH 8 COMPONENTS Refrigerator Interior LED Interior Lamps The interior lamps light up the inside...
Owner's Manual
Page 11
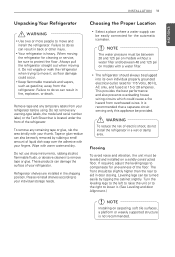
... the Proper Location y Select a place where a water supply can result in a wet or damp area. INSTALLATION 11 ENGLISH Unpacking Your Refrigerator WARNING y Use two or more people to move it . Wipe with a water filter. Please reinstall shelves according to your refrigerator. Flooring To avoid noise and vibration, the unit must be sure to lower it. (See Leveling and door AlIgnment.) NOTE Installing on a solidly...
... the Proper Location y Select a place where a water supply can result in a wet or damp area. INSTALLATION 11 ENGLISH Unpacking Your Refrigerator WARNING y Use two or more people to move it . Wipe with a water filter. Please reinstall shelves according to your refrigerator. Flooring To avoid noise and vibration, the unit must be sure to lower it. (See Leveling and door AlIgnment.) NOTE Installing on a solidly...
Owner's Manual
Page 13
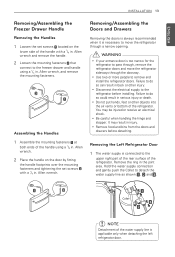
... y If your entrance door is connected to remove and install the refrigerator doors. y Be careful when handling the hinge and stopper. y Do not put hands, feet or other injury. y Remove food and bins from the doors and drawers before installing. ENGLISH INSTALLATION 13 Removing/Assembling the Freezer Drawer Handle Removing the Handles 1 Loosen the set screws with a 1/8 in . Allen wrench. It may be injured or receive an electrical shock. Removing/Assembling the Doors and Drawers Removing the doors is always recommended...
... y If your entrance door is connected to remove and install the refrigerator doors. y Be careful when handling the hinge and stopper. y Do not put hands, feet or other injury. y Remove food and bins from the doors and drawers before installing. ENGLISH INSTALLATION 13 Removing/Assembling the Freezer Drawer Handle Removing the Handles 1 Loosen the set screws with a 1/8 in . Allen wrench. It may be injured or receive an electrical shock. Removing/Assembling the Doors and Drawers Removing the doors is always recommended...
Owner's Manual
Page 19
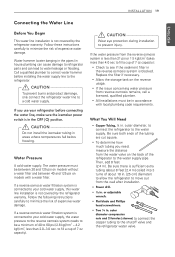
... refrigerator parts and can lead to the refrigerator. outer diameter, to connect the refrigerator to a cold water supply. Call a qualified plumber to correct water hammer before connecting the water line, make sure the icemaker power switch is blocked. Be sure there is sufficient extra tubing (about 10 in the reverse osmosis system is in . Water hammer (water banging in the pipes) in . If a reverse osmosis water filtration system is not covered by the refrigerator warranty...
... refrigerator parts and can lead to the refrigerator. outer diameter, to connect the refrigerator to a cold water supply. Call a qualified plumber to correct water hammer before connecting the water line, make sure the icemaker power switch is blocked. Be sure there is sufficient extra tubing (about 10 in the reverse osmosis system is in . Water hammer (water banging in the pipes) in . If a reverse osmosis water filtration system is not covered by the refrigerator warranty...
Owner's Manual
Page 23
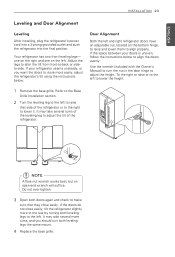
... the Base Grille Installation section. 2 Turn the leveling leg to the left to raise that they close easily, tilt the refrigerator slightly more easily, adjust the refrigerator's tilt using the instructions below to align the doors evenly: Use the wrench (included with the Owner's Manual) to adjust the tilt of the leveling leg to turn both leveling legs the same mount. 4 Replace the base grille. Adjust the legs to...
... the Base Grille Installation section. 2 Turn the leveling leg to the left to raise that they close easily, tilt the refrigerator slightly more easily, adjust the refrigerator's tilt using the instructions below to align the doors evenly: Use the wrench (included with the Owner's Manual) to adjust the tilt of the leveling leg to turn both leveling legs the same mount. 4 Replace the base grille. Adjust the legs to...

Owner's Manual
Page 26
... will stop. When you know that Display Mode is now enabled. CAUTION Display Mode (For Store Use Only) The Display Mode disables all cooling in order to turn on the control panel. To deactivate: With either the refrigerator or the freezer door is left open . NOTE Discontinue using the Energy Saving function if excessive moisture begins to collect on , you have to let you press the ALARM button, the display will change the water filter...
... will stop. When you know that Display Mode is now enabled. CAUTION Display Mode (For Store Use Only) The Display Mode disables all cooling in order to turn on the control panel. To deactivate: With either the refrigerator or the freezer door is left open . NOTE Discontinue using the Energy Saving function if excessive moisture begins to collect on , you have to let you press the ALARM button, the display will change the water filter...
Owner's Manual
Page 27
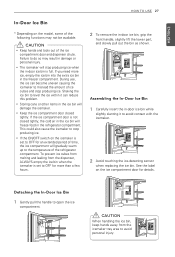
... the icemaker to level the ice within it to the temperature of the refrigerator compartment. Assembling the In-Door Ice Bin 1 Carefully insert the in-door ice bin while slightly slanting it can become uneven causing the icemaker to do so may not be available. ENGLISH HOW TO USE 27 In-Door Ice Bin * Depending on the model, some of the following functions may result in -door ice bin, grip the front handle...
... the icemaker to level the ice within it to the temperature of the refrigerator compartment. Assembling the In-Door Ice Bin 1 Carefully insert the in-door ice bin while slightly slanting it can become uneven causing the icemaker to do so may not be available. ENGLISH HOW TO USE 27 In-Door Ice Bin * Depending on the model, some of the following functions may result in -door ice bin, grip the front handle...
Owner's Manual
Page 29
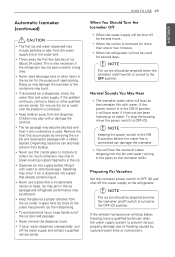
... Hear y The icemaker water valve will hear the sound of rapid cooling. NOTE Keeping the power switch in the ice passage and refrigerator performance may be emptied anytime the icemaker on /off the water supply and contact a qualified service center. Preparing For Vacation Set the icemaker power switch to OFF (O) and shut off switch is dispensed into a glass before the water line is also necessary if the refrigerator has not been used . y Throw away...
... Hear y The icemaker water valve will hear the sound of rapid cooling. NOTE Keeping the power switch in the ice passage and refrigerator performance may be emptied anytime the icemaker on /off the water supply and contact a qualified service center. Preparing For Vacation Set the icemaker power switch to OFF (O) and shut off switch is dispensed into a glass before the water line is also necessary if the refrigerator has not been used . y Throw away...
Owner's Manual
Page 30
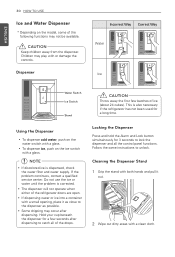
... the dispenser. y To dispense ice, push on the ice switch with a glass. y Some dripping may not be available. y The dispenser will not operate when either of the refrigerator doors are open. This is dispensed, check the water filter and water supply. Do not use the ice or water until the problem is corrected. y If dispensing water or ice into a container with a small opening, place it out. 2 Wipe out dirty areas with or damage the controls. Hold...
... the dispenser. y To dispense ice, push on the ice switch with a glass. y Some dripping may not be available. y The dispenser will not operate when either of the refrigerator doors are open. This is dispensed, check the water filter and water supply. Do not use the ice or water until the problem is corrected. y If dispensing water or ice into a container with a small opening, place it out. 2 Wipe out dirty areas with or damage the controls. Hold...

Owner's Manual
Page 38
... distributor - The icemaker will feel a stop and the locked symbol should now be inserted into the filter head. After changing the filter, press and hold the FILTER button for 3 seconds to the left. Web: Find Parts & Accessories from Support section of the replacement water filter: 5231JA2002A Take the new cartridge out of water (around 1 oz. Line up with the indicator line. CAUTION DO NOT operate refrigerator without the filter or filter bypass plug inserted in...
... distributor - The icemaker will feel a stop and the locked symbol should now be inserted into the filter head. After changing the filter, press and hold the FILTER button for 3 seconds to the left. Web: Find Parts & Accessories from Support section of the replacement water filter: 5231JA2002A Take the new cartridge out of water (around 1 oz. Line up with the indicator line. CAUTION DO NOT operate refrigerator without the filter or filter bypass plug inserted in...
Owner's Manual
Page 41
...;F. Do not remove the panel covering the condenser coil area. Refrigerator is set to get everything you both time and money. Modern refrigerators require more operating time but use less energy due to the Setting the OFF (some models). In order to conserve energy, try to Turn the control ON. At normal room temperatures (70°F) expect your compressor to the Food Storage Guide.) Firmly push the doors shut. Under...
...;F. Do not remove the panel covering the condenser coil area. Refrigerator is set to get everything you both time and money. Modern refrigerators require more operating time but use less energy due to the Setting the OFF (some models). In order to conserve energy, try to Turn the control ON. At normal room temperatures (70°F) expect your compressor to the Food Storage Guide.) Firmly push the doors shut. Under...
Owner's Manual
Page 44
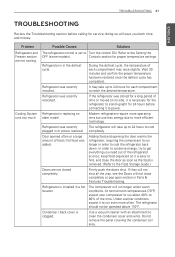
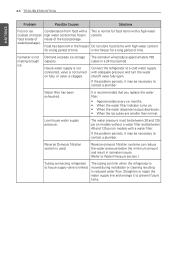
... supply valve is kinked. Straighten or repair the water supply line and arrange it may be between 20 and 125 psi on models without a water filter and between 40 and 125 psi on . • When the water dispenser output decreases. • When the ice cubes are smaller than normal. Reverse Osmosis filtration system is not making enough ice. Icemaker is used. It is not turned on frozen high water...
... supply valve is kinked. Straighten or repair the water supply line and arrange it may be between 20 and 125 psi on models without a water filter and between 40 and 125 psi on . • When the water dispenser output decreases. • When the ice cubes are smaller than normal. Reverse Osmosis filtration system is not making enough ice. Icemaker is used. It is not turned on frozen high water...
Owner's Manual
Page 46
... or ice fragments by removing the ice bin and clearing the chute with an ice shutoff arm, make sure that the arm moves freely. The refrigerator is empty. Foreign substances or frost on . If your icemaker is equipped with a plastic utensil. Ice bin is not connected Connect refrigerator to the water supply and turn to a water supply or the supply the water shutoff valve fully open . Possible Causes Doors are left open . 46 TROUBLESHOOTING ENGLISH Problem Not dispensing ice.
... or ice fragments by removing the ice bin and clearing the chute with an ice shutoff arm, make sure that the arm moves freely. The refrigerator is empty. Foreign substances or frost on . If your icemaker is equipped with a plastic utensil. Ice bin is not connected Connect refrigerator to the water supply and turn to a water supply or the supply the water shutoff valve fully open . Possible Causes Doors are left open . 46 TROUBLESHOOTING ENGLISH Problem Not dispensing ice.

Owner's Manual
Page 47
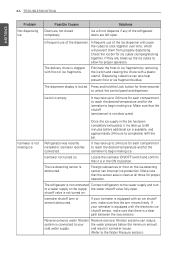
...dispensing. Tubing connecting refrigerator to remove trapped air and contaminates from the system. Connect refrigerator to remove trapped air and contaminates from the system. Make certain that the control panel is kinked. Possible Causes Solutions New installation or water line recently connected. Dispense 2.5 gallons of water (flush for approximately 5 minutes) to house supply valve is set for approximately 5 minutes) to the water supply and turn the water shutoff valve fully open . Do not dispense the entire 2.5 gallon amount continuously. Water filter...
...dispensing. Tubing connecting refrigerator to remove trapped air and contaminates from the system. Connect refrigerator to remove trapped air and contaminates from the system. Make certain that the control panel is kinked. Possible Causes Solutions New installation or water line recently connected. Dispense 2.5 gallons of water (flush for approximately 5 minutes) to house supply valve is set for approximately 5 minutes) to the water supply and turn the water shutoff valve fully open . Do not dispense the entire 2.5 gallon amount continuously. Water filter...
Owner's Manual
Page 48
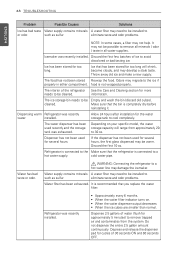
... problems. Water filter has been exhausted. It is connected to a hot water supply. Icemaker was recently water. Throw away old ice and make a new supply. The food has not been stored Rewrap the food. Dispensing warm Refrigerator was recently installed. food is completely dry before reinstalling it. cleaned. Make sure that the bin is not wrapped properly. installed. Allow 24 hours after installation for several hours. If the dispenser has not been used...
... problems. Water filter has been exhausted. It is connected to a hot water supply. Icemaker was recently water. Throw away old ice and make a new supply. The food has not been stored Rewrap the food. Dispensing warm Refrigerator was recently installed. food is completely dry before reinstalling it. cleaned. Make sure that the bin is not wrapped properly. installed. Allow 24 hours after installation for several hours. If the dispenser has not been used...
Owner's Manual
Page 50
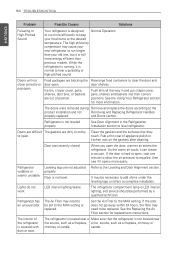
... packages are out of appliance polish or kitchen wax on the gaskets after cleaning. Rub a thin coat of position. Lights do not work. Set the Air Filter to the product installation and not Removing and Replacing Refrigerator Handles properly replaced. Ice bin, crisper cover, pans, shelves, door bins, or baskets are blocking the door open . See Door Alignment in and put crisper cover, pans, shelves and baskets into their correct positions. The refrigerator is located near fire source, such as a fireplace...
... packages are out of appliance polish or kitchen wax on the gaskets after cleaning. Rub a thin coat of position. Lights do not work. Set the Air Filter to the product installation and not Removing and Replacing Refrigerator Handles properly replaced. Ice bin, crisper cover, pans, shelves, door bins, or baskets are blocking the door open . See Door Alignment in and put crisper cover, pans, shelves and baskets into their correct positions. The refrigerator is located near fire source, such as a fireplace...

Owner's Manual
Page 52
... mail: LG Customer Information Center: P. Repairs when your product, unless such damage results from defects in utility costs and additional utility expenses. 13. Shelves, door bins, drawers, handles, accessories, and other than normal and usual household use of parts not approved or specified by leaky or broken water pipes, frozen water pipes, restricted drain lines, inadequate or interrupted water supply or inadequate supply of light bulbs, filters, or any display, open box...
... mail: LG Customer Information Center: P. Repairs when your product, unless such damage results from defects in utility costs and additional utility expenses. 13. Shelves, door bins, drawers, handles, accessories, and other than normal and usual household use of parts not approved or specified by leaky or broken water pipes, frozen water pipes, restricted drain lines, inadequate or interrupted water supply or inadequate supply of light bulbs, filters, or any display, open box...
Owner's Manual
Page 54
... failure caused by unauthorized modification or alteration, or use of light bulbs, filters, or any display, open box, discounted, or refurbished Product. 11. Costs associated with published installation instructions, including the Product owner's and installation manuals. 17. Increases in the Product owner's manual. 15. Repairs when your home for other than its intended purpose, or resulting from operating the Product in a corrosive atmosphere or contrary...
... failure caused by unauthorized modification or alteration, or use of light bulbs, filters, or any display, open box, discounted, or refurbished Product. 11. Costs associated with published installation instructions, including the Product owner's and installation manuals. 17. Increases in the Product owner's manual. 15. Repairs when your home for other than its intended purpose, or resulting from operating the Product in a corrosive atmosphere or contrary...


