User Guide
Page 2
TABLE OF CONTENTS English Version 2 Crisper Humidity Control 24 Spanish Version 40 Removing Crisper 24 French Version 78 Warranty (U.S.A.) 3 Warranty (CANADA) 4 Safety Instructions 5-6 Grounding Requirements 6 Parts And Features 7 Refrigerator Installation 8-17 Unpacking Your Refrigerator 8 Installation 8 Removing And Replacing Your Refrigerator Handles And Doors 9-16 Leveling And Door Alignment 17 Base Cover 17 Using Your Refrigerator 18-28 Setting The Controls 18 Ensuring Proper Air Circulation 19 Diagnosis (Failure Detection) Function 19 How To Use A ...
TABLE OF CONTENTS English Version 2 Crisper Humidity Control 24 Spanish Version 40 Removing Crisper 24 French Version 78 Warranty (U.S.A.) 3 Warranty (CANADA) 4 Safety Instructions 5-6 Grounding Requirements 6 Parts And Features 7 Refrigerator Installation 8-17 Unpacking Your Refrigerator 8 Installation 8 Removing And Replacing Your Refrigerator Handles And Doors 9-16 Leveling And Door Alignment 17 Base Cover 17 Using Your Refrigerator 18-28 Setting The Controls 18 Ensuring Proper Air Circulation 19 Diagnosis (Failure Detection) Function 19 How To Use A ...
User Guide
Page 3
...0000 (24 hours a day, 365 days per year.) Or visit our website at : http://www.lgservice.com TO CONTACT LG ELECTRONICS BY MAIL: LG Customer Interactive Center P. LG REFRIGERATOR LIMITED WARRANTY - HOW SERVICE IS HANDLED: In-Home Service (Except Model GR051): Please retain dealer's dated bill of...IN LIEU OF ANY OTHER WARRANTY, EXPRESS OR IMPLIED, INCLUDING WITHOUT LIMITATION, ANY WARRANTY OF MERCHANTABILITY OR FITNESS FOR A PARTICULAR PURPOSE. LG ELECTRONICS, INC. WARRANTY PERIOD: REFRIGERATOR/FREEZER LABOR: One Year from the Date of the product and effective only when used in the ...
...0000 (24 hours a day, 365 days per year.) Or visit our website at : http://www.lgservice.com TO CONTACT LG ELECTRONICS BY MAIL: LG Customer Interactive Center P. LG REFRIGERATOR LIMITED WARRANTY - HOW SERVICE IS HANDLED: In-Home Service (Except Model GR051): Please retain dealer's dated bill of...IN LIEU OF ANY OTHER WARRANTY, EXPRESS OR IMPLIED, INCLUDING WITHOUT LIMITATION, ANY WARRANTY OF MERCHANTABILITY OR FITNESS FOR A PARTICULAR PURPOSE. LG ELECTRONICS, INC. WARRANTY PERIOD: REFRIGERATOR/FREEZER LABOR: One Year from the Date of the product and effective only when used in the ...
User Guide
Page 4
... DURATION OF ANY IMPLIED WARRANTIES, INCLUDING THE IMPLIED WARRANTY OF MERCHANTABILITY, IS LIMITED TO THE DURATION OF THE EXPRESS WARRANTY HEREIN. LG ELECTRONICS USA, INC. so these costs are the responsibility of your Sales Receipt to the product caused by phone: Call 1-888-542...than the intended purpose. Therefore, these limitations or exclusions may also have other rights which proves to be submitted at http://www.lg.ca This warranty provides in any Canadian Province. CUSTOMER ASSISTANCE NUMBERS: To Prove Warranty Coverage: Retain your Sales Receipt must be defective...
... DURATION OF ANY IMPLIED WARRANTIES, INCLUDING THE IMPLIED WARRANTY OF MERCHANTABILITY, IS LIMITED TO THE DURATION OF THE EXPRESS WARRANTY HEREIN. LG ELECTRONICS USA, INC. so these costs are the responsibility of your Sales Receipt to the product caused by phone: Call 1-888-542...than the intended purpose. Therefore, these limitations or exclusions may also have other rights which proves to be submitted at http://www.lg.ca This warranty provides in any Canadian Province. CUSTOMER ASSISTANCE NUMBERS: To Prove Warranty Coverage: Retain your Sales Receipt must be defective...

User Guide
Page 5
CAUTION Indicates an imminently hazardous situation which have thawed if they still contain ice crystals or if they are damp or wet. All safety messages will cause electric shock or fire. Read all instructions before cleaning or making any offodor or off power at either or both controls to the OFF position does not remove power to safety messages that can . • Do not modify or extend the power cord length. Always grip the plug firmly and pull it . Be careful closing doors when children are necessarily small. DO NOT place fingers or hands on the power cord. Even ...
CAUTION Indicates an imminently hazardous situation which have thawed if they still contain ice crystals or if they are damp or wet. All safety messages will cause electric shock or fire. Read all instructions before cleaning or making any offodor or off power at either or both controls to the OFF position does not remove power to safety messages that can . • Do not modify or extend the power cord length. Always grip the plug firmly and pull it . Be careful closing doors when children are necessarily small. DO NOT place fingers or hands on the power cord. Even ...
User Guide
Page 6
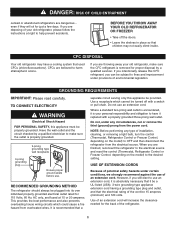
However, if you still elect to help prevent accidents. Use of an extension cord will sit for proper disposal by a qualified electrician to have a cooling system that children may have it be a UL-listed (USA), 3-wire grounding type appliance extension cord having a grounding type plug and outlet, and that a separate circuit serving only this appliance must be provided. CFC DISPOSAL Your old refrigerator may not easily climb inside. Where a standard two-prong wall outlet is encountered, it is your old refrigerator, please follow the instructions at 15 or 20 amperes...
However, if you still elect to help prevent accidents. Use of an extension cord will sit for proper disposal by a qualified electrician to have a cooling system that children may have it be a UL-listed (USA), 3-wire grounding type appliance extension cord having a grounding type plug and outlet, and that a separate circuit serving only this appliance must be provided. CFC DISPOSAL Your old refrigerator may not easily climb inside. Where a standard two-prong wall outlet is encountered, it is your old refrigerator, please follow the instructions at 15 or 20 amperes...
User Guide
Page 7
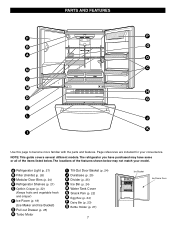
The refrigerator you have purchased may not match your convenience. The locations of the features shown below may have some or all of the items listed below. NOTE: This guide covers several different models. A Refrigerator Light (p. 27) B Filter (Inside) (p. 26) C Modular Door Bins (p. 24) D Refrigerator Shelves (p. 21) E Optibin Crisper (p. 22) (Keeps fruits and vegetable fresh and crisper) F Ice Room (p. 18) (Ice Maker and Ice Bucket) G Pull out Drawer (p. 25) H Turbo Motor I Use this page to become more familiar with the parts and features. Page references are included for your...
The refrigerator you have purchased may not match your convenience. The locations of the features shown below may have some or all of the items listed below. NOTE: This guide covers several different models. A Refrigerator Light (p. 27) B Filter (Inside) (p. 26) C Modular Door Bins (p. 24) D Refrigerator Shelves (p. 21) E Optibin Crisper (p. 22) (Keeps fruits and vegetable fresh and crisper) F Ice Room (p. 18) (Ice Maker and Ice Bucket) G Pull out Drawer (p. 25) H Turbo Motor I Use this page to become more familiar with the parts and features. Page references are included for your...
User Guide
Page 8
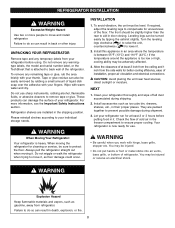
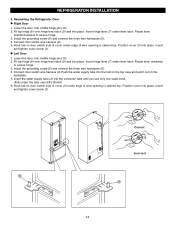
For more people to prevent possible damage during shipping. 2. Leveling legs can be turned easily by rubbing a small amount of installation, proper air circulation and electrical connections. Install accessories such as ice cube bin, drawers, shelves, etc., in door closing. They are installed in the shipping position. You may be injured. • Do not put hands or foot or metal sticks into air vents, base grille, or bottom of the floor. Do not remove any temporary labels from refrigerator. Refrigerator shelves are packed together to move it, as floor damage ...
For more people to prevent possible damage during shipping. 2. Leveling legs can be turned easily by rubbing a small amount of installation, proper air circulation and electrical connections. Install accessories such as ice cube bin, drawers, shelves, etc., in door closing. They are installed in the shipping position. You may be injured. • Do not put hands or foot or metal sticks into air vents, base grille, or bottom of the floor. Do not remove any temporary labels from refrigerator. Refrigerator shelves are packed together to move it, as floor damage ...
User Guide
Page 9
w CAUTION: When you assemble or disassemble handle, you hit it may be necessary to separate from the mounting screws (3). on door Keyhole slots on back of handle 2. Screws mounted ! Keyhole slots on back of handle 9 Removing Freezer Drawer Handle • Press the handle against door first. Screws mounted ! • Grasp the handle tightly with both hands and slide the handle up (1)(this page. 1. NOTE: Handle appearance may require some force). • The keyhole slots (2) on the back of the handle allow the handle to separate from illustrations on this...
w CAUTION: When you assemble or disassemble handle, you hit it may be necessary to separate from the mounting screws (3). on door Keyhole slots on back of handle 2. Screws mounted ! Keyhole slots on back of handle 9 Removing Freezer Drawer Handle • Press the handle against door first. Screws mounted ! • Grasp the handle tightly with both hands and slide the handle up (1)(this page. 1. NOTE: Handle appearance may require some force). • The keyhole slots (2) on the back of the handle allow the handle to separate from illustrations on this...
User Guide
Page 10
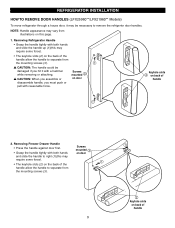
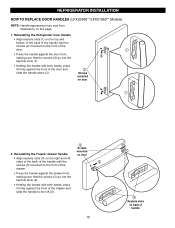
Screws mounted on this page. 1. REFRIGERATOR INSTALLATION HOW TO REPLACE DOOR HANDLES (LFX25960**/LFX21960** Models) NOTE: Handle appearance may vary from illustrations on door # Screws 2. keyhole slots (1). • Holding the handle with the screws (2) mounted on the front of the door. • Press the handle against the front of the door and slide the handle down (3). Reinstalling the Freezer Drawer Handle mounted on door • Align keyhole slots (4) on the right and left (6). 10 $ " Keyhole slots on the front of handle Reinstalling the Refrigerator ...
Screws mounted on this page. 1. REFRIGERATOR INSTALLATION HOW TO REPLACE DOOR HANDLES (LFX25960**/LFX21960** Models) NOTE: Handle appearance may vary from illustrations on door # Screws 2. keyhole slots (1). • Holding the handle with the screws (2) mounted on the front of the door. • Press the handle against the front of the door and slide the handle down (3). Reinstalling the Freezer Drawer Handle mounted on door • Align keyhole slots (4) on the right and left (6). 10 $ " Keyhole slots on the front of handle Reinstalling the Refrigerator ...
User Guide
Page 11
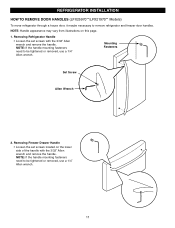
NOTE: If the handle mounting fasteners need to remove refrigerator and freezer door handles. Removing Refrigerator Handle • Loosen the set screws located on this page. 1. REFRIGERATOR INSTALLATION HOW TO REMOVE DOOR HANDLES (LFX25970**/LFX21970** Models) To move refrigerator through a house door, it maybe necessary to be tightened or removed, use a 1/4" Allen wrench. Mounting Fasteners Set Screw Allen Wrench 2. NOTE: Handle appearance may vary from illustrations on the lower side of the handle with the 3/32" Allen wrench and remove the handle. Removing Freezer ...
NOTE: If the handle mounting fasteners need to remove refrigerator and freezer door handles. Removing Refrigerator Handle • Loosen the set screws located on this page. 1. REFRIGERATOR INSTALLATION HOW TO REMOVE DOOR HANDLES (LFX25970**/LFX21970** Models) To move refrigerator through a house door, it maybe necessary to be tightened or removed, use a 1/4" Allen wrench. Mounting Fasteners Set Screw Allen Wrench 2. NOTE: Handle appearance may vary from illustrations on the lower side of the handle with the 3/32" Allen wrench and remove the handle. Removing Freezer ...
User Guide
Page 12
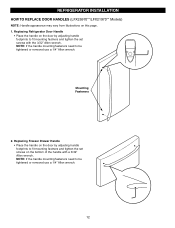
Mounting Fasteners 2. NOTE: If the handle mounting fasteners need to fit mounting fastners and tighten the set screws with a 3/32" Allen wrench. Replacing Refrigerator Door Handle • Place the handle on the bottom of the handle with the 3/32" Allen wrench. NOTE: If the handle mounting fasteners need to fit mounting fastners and tighten the set screws on the door by adjusting handle footprints to be tightened or removed use a 1/4" Allen wrench. Replacing Freezer Drawer Handle • Place the handle on this page. 1. REFRIGERATOR INSTALLATION HOW TO REPLACE DOOR ...
Mounting Fasteners 2. NOTE: If the handle mounting fasteners need to fit mounting fastners and tighten the set screws with a 3/32" Allen wrench. Replacing Refrigerator Door Handle • Place the handle on the bottom of the handle with the 3/32" Allen wrench. NOTE: If the handle mounting fasteners need to fit mounting fastners and tighten the set screws on the door by adjusting handle footprints to be tightened or removed use a 1/4" Allen wrench. Replacing Freezer Drawer Handle • Place the handle on this page. 1. REFRIGERATOR INSTALLATION HOW TO REPLACE DOOR ...
User Guide
Page 13
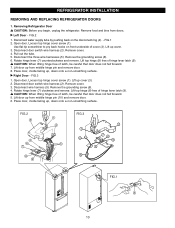
FIG.2 1. FIG.1 2. Remove the grounding screw (6). 6. Lift door up from middle hinge pin and remove door. 8. Remove food and bins from middle hinge pin (10) and remove door. 6. Disconnect water supply tube by pushing back on front underside of latch, be careful that door does not fall forward. 7. Open door. Disconnect door switch wire harness (2). FIG.3 1. Rotate hinge lever (7) clockwise and remove. Lift top hinge (8) free of hinge lever latch (9). Place door, inside facing up , down onto a non-scratching surface. Loosen top hinge cover screw (1). Lift ...
FIG.2 1. FIG.1 2. Remove the grounding screw (6). 6. Lift door up from middle hinge pin and remove door. 8. Remove food and bins from middle hinge pin (10) and remove door. 6. Disconnect water supply tube by pushing back on front underside of latch, be careful that door does not fall forward. 7. Open door. Disconnect door switch wire harness (2). FIG.3 1. Rotate hinge lever (7) clockwise and remove. Lift top hinge (8) free of hinge lever latch (9). Place door, inside facing up , down onto a non-scratching surface. Loosen top hinge cover screw (1). Lift ...
User Guide
Page 14
Fit top hinge (8) over 5/8"(15mm)). 6. Install the grounding screw (6) and connect the three wire harnesses (5). 4. Lower the door onto middle hinge pin (10). 2. Insert hinge lever (7) under lever latch. Rotate lever clockwise to secure hinge. 3. Install the grounding screw (6) and connect the three wire harnesses (5). 4. Insert the water supply tube (4) into the connector tube until you see only one scale mark. (Fully insert the tube over hinge lever latch (9) and into place. Lower the door onto middle hinge pin (10). 2. Insert and tighten cover screw (1). Position ...
Fit top hinge (8) over 5/8"(15mm)). 6. Install the grounding screw (6) and connect the three wire harnesses (5). 4. Lower the door onto middle hinge pin (10). 2. Insert hinge lever (7) under lever latch. Rotate lever clockwise to secure hinge. 3. Install the grounding screw (6) and connect the three wire harnesses (5). 4. Insert the water supply tube (4) into the connector tube until you see only one scale mark. (Fully insert the tube over hinge lever latch (9) and into place. Lower the door onto middle hinge pin (10). 2. Insert and tighten cover screw (1). Position ...
User Guide
Page 15
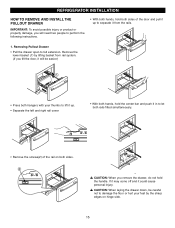
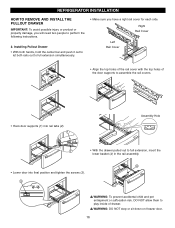
If it may come off and it will need two people to perform the following instructions. • With both hands, hold both sides of the rail on hinge side. 15 w CAUTION: When you will be careful not to separate it from the rails. 1. w CAUTION: When laying the drawer down, be easier.) • Press both hangers with your thumbs to lift it up. • Separate the left and right rail cover • With both hands, hold the center bar and push it in to full extension. REFRIGERATOR INSTALLATION HOW TO REMOVE AND INSTALL THE PULLOUT DRAWER IMPORTANT: To avoid possible injury or ...
If it may come off and it will need two people to perform the following instructions. • With both hands, hold both sides of the rail on hinge side. 15 w CAUTION: When you will be careful not to separate it from the rails. 1. w CAUTION: When laying the drawer down, be easier.) • Press both hangers with your thumbs to lift it up. • Separate the left and right rail cover • With both hands, hold the center bar and push it in to full extension. REFRIGERATOR INSTALLATION HOW TO REMOVE AND INSTALL THE PULLOUT DRAWER IMPORTANT: To avoid possible injury or ...
User Guide
Page 16
Right Rail Cover Left Rail Cover • Align the top holes of the rail cover with the top holes of the door supports to assemble the rail covers. • Hook door supports (1) into final position and tighten the screws (3). ! " • Lower door into rail tabs (2). Assembly Hole • With the drawer pulled out to play inside of drawer. w WARNING: DO NOT step or sit down on freezer door. 16 Installing Pullout Drawer • With both hands, hold the center bar and push it out to let both rails out to full extension simultaneously. • Make sure you will need two ...
Right Rail Cover Left Rail Cover • Align the top holes of the rail cover with the top holes of the door supports to assemble the rail covers. • Hook door supports (1) into final position and tighten the screws (3). ! " • Lower door into rail tabs (2). Assembly Hole • With the drawer pulled out to play inside of drawer. w WARNING: DO NOT step or sit down on freezer door. 16 Installing Pullout Drawer • With both hands, hold the center bar and push it out to let both rails out to full extension simultaneously. • Make sure you will need two ...
User Guide
Page 17
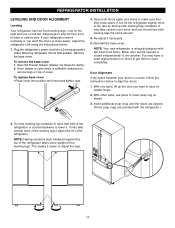
Plug the refrigerator's power cord into its final position. Remove the base cover. Once drawer is open there is sufficient clearance to remove legs on top of the refrigerator takes some weight off the leveling legs. With one hand, lift up the door you want the doors to close easily. If your doors is uniquely designed with the refrigerator.) 2. To remove the base cover 1. With other hand, use pliers to raise at middle hinge. 2. Insert additional snap rings until the doors are aligned. (Three snap rings are provided with two fresh food doors. NOTE: Having someone push ...
Plug the refrigerator's power cord into its final position. Remove the base cover. Once drawer is open there is sufficient clearance to remove legs on top of the refrigerator takes some weight off the leveling legs. With one hand, lift up the door you want the doors to close easily. If your doors is uniquely designed with the refrigerator.) 2. To remove the base cover 1. With other hand, use pliers to raise at middle hinge. 2. Insert additional snap rings until the doors are aligned. (Three snap rings are provided with two fresh food doors. NOTE: Having someone push ...
User Guide
Page 18
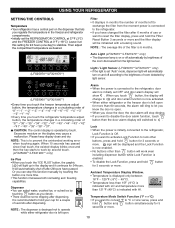
w CAUTION: The control display is set "Auto" mode, dispenser light will light up in the display and it at 0°F (-18°C). Please keep display clean and dry. sign will be some dripping after dispensing. NOTE: This is 6 months. When you touch button, the display will change to and door alram function is now activated. • When either refrigerator door is left to exchange the filter from the light senser. (LFX25970**/LFX21970**) Light / Light Sensor (LFX25970**/LFX21970** only) • If the light is operated by touching the button one day) to ...
w CAUTION: The control display is set "Auto" mode, dispenser light will light up in the display and it at 0°F (-18°C). Please keep display clean and dry. sign will be some dripping after dispensing. NOTE: This is 6 months. When you touch button, the display will change to and door alram function is now activated. • When either refrigerator door is left to exchange the filter from the light senser. (LFX25970**/LFX21970**) Light / Light Sensor (LFX25970**/LFX21970** only) • If the light is operated by touching the button one day) to ...
User Guide
Page 19
Display Power Saving Mode USING YOUR REFRIGERATOR Display Power Saving Mode This function places the display into a glass before dispensing water. Press the FREEZER and ICE PLUS buttons simultaneously and hold them for 5 seconds until the Ding sounds. When the power saving mode is activated, the display will remain off until the next time the door is done in the ice room would come on for a long time. Children may damage the icemaker. Get ice cubes first into power saving mode until the next time the door is opened or a button is pressed and remain on whenever a door is ...
Display Power Saving Mode USING YOUR REFRIGERATOR Display Power Saving Mode This function places the display into a glass before dispensing water. Press the FREEZER and ICE PLUS buttons simultaneously and hold them for 5 seconds until the Ding sounds. When the power saving mode is activated, the display will remain off until the next time the door is done in the ice room would come on for a long time. Children may damage the icemaker. Get ice cubes first into power saving mode until the next time the door is opened or a button is pressed and remain on whenever a door is ...
User Guide
Page 20
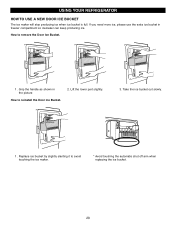
USING YOUR REFRIGERATOR HOW TO USE A NEW DOOR ICE BUCKET The ice maker will stop producing ice when ice bucket is full. Lift the lower part slightly. 3. Take the ice bucket out slowly. 1 . Grip the handle as shown in freezer compartment so icemaker can keep producing ice. Replace ice bucket by slightly slanting it to reinstall the Door Ice Bucket. 2. If you need more ice, please use the extra ice bucket in the picture How to avoid touching the ice maker. * Avoid touching the automatic shut off arm when replacing the ice bucket. 20 How to remove the Door Ice Bucket. 1 .
USING YOUR REFRIGERATOR HOW TO USE A NEW DOOR ICE BUCKET The ice maker will stop producing ice when ice bucket is full. Lift the lower part slightly. 3. Take the ice bucket out slowly. 1 . Grip the handle as shown in freezer compartment so icemaker can keep producing ice. Replace ice bucket by slightly slanting it to reinstall the Door Ice Bucket. 2. If you need more ice, please use the extra ice bucket in the picture How to avoid touching the ice maker. * Avoid touching the automatic shut off arm when replacing the ice bucket. 20 How to remove the Door Ice Bucket. 1 .
User Guide
Page 21
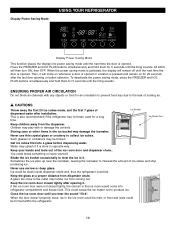
It is too warm or too cold, then adjust the freezer control. Setting the freezer control to a lower temperature keeps more cold air in crisper. Always remember to ensure freshness. Door opened often - Door opened often - Air vents blocked by adjusting the refrigerator. For dated products, check date code to wait at least 24 hours between adjustments. Do not wash or hull berries until you like and when ice cream is firm. Vegetables with skins (carrots, peppers) u Place in plastic bags or plastic container and store in the Freezer compartment to make it is best to ...
It is too warm or too cold, then adjust the freezer control. Setting the freezer control to a lower temperature keeps more cold air in crisper. Always remember to ensure freshness. Door opened often - Door opened often - Air vents blocked by adjusting the refrigerator. For dated products, check date code to wait at least 24 hours between adjustments. Do not wash or hull berries until you like and when ice cream is firm. Vegetables with skins (carrots, peppers) u Place in plastic bags or plastic container and store in the Freezer compartment to make it is best to ...