User Guide
Page 2
... 40 Removing Crisper 24 French Version 78 Warranty (U.S.A.) 3 Warranty (CANADA) 4 Safety Instructions 5-6 Grounding Requirements 6 Parts And Features 7 Refrigerator Installation 8-17 Unpacking Your Refrigerator 8 Installation 8 Removing And Replacing Your Refrigerator Handles And Doors 9-16 Leveling And Door Alignment 17 Base Cover 17 Using Your Refrigerator 18-28 Setting The Controls 18 Ensuring Proper Air Circulation 19 Diagnosis (Failure Detection) Function 19 How To Use A New Door Ice Bucket 20 Adjusting Control Settings 21 Food Storage Guide 21...
... 40 Removing Crisper 24 French Version 78 Warranty (U.S.A.) 3 Warranty (CANADA) 4 Safety Instructions 5-6 Grounding Requirements 6 Parts And Features 7 Refrigerator Installation 8-17 Unpacking Your Refrigerator 8 Installation 8 Removing And Replacing Your Refrigerator Handles And Doors 9-16 Leveling And Door Alignment 17 Base Cover 17 Using Your Refrigerator 18-28 Setting The Controls 18 Ensuring Proper Air Circulation 19 Diagnosis (Failure Detection) Function 19 How To Use A New Door Ice Bucket 20 Adjusting Control Settings 21 Food Storage Guide 21...
User Guide
Page 3
...: LG Customer Interactive Center P. LG ELECTRONICS, INC. PARTS: One Year from misuse, abuse, operation outside environmental specifications or contrary to deliver, pick up, and/or install the product, instruct, or replace house fuses or correct wiring, or correction of unauthorized repairs. • Damages or operating problems that vary from the Date of God, unauthorized modification or alteration, incorrect electrical current or voltage, or commercial use...
...: LG Customer Interactive Center P. LG ELECTRONICS, INC. PARTS: One Year from misuse, abuse, operation outside environmental specifications or contrary to deliver, pick up, and/or install the product, instruct, or replace house fuses or correct wiring, or correction of unauthorized repairs. • Damages or operating problems that vary from the Date of God, unauthorized modification or alteration, incorrect electrical current or voltage, or commercial use...

User Guide
Page 5
... all instructions before cleaning or making any offodor or off power at either or both controls to the OFF position does not remove power to the light circuit. • This refrigerator must be careful not to eat. The food may be dangerous to roll over or damage the power cord. • DO NOT store or use a cord that shows cracks or abrasion...
... all instructions before cleaning or making any offodor or off power at either or both controls to the OFF position does not remove power to the light circuit. • This refrigerator must be careful not to eat. The food may be dangerous to roll over or damage the power cord. • DO NOT store or use a cord that shows cracks or abrasion...
User Guide
Page 6
... by a qualified servicer. Use a receptacle which could cause a fire hazard from the power cord. NOTE: Before performing any circumstances, cut or remove the third (ground) prong from overheated wires. USE OF EXTENSION CORDS Because of potential safety hazards under provisions of installation, cleaning, or removing a light bulb, turn the control (Thermostat, Refrigerator Control or Freezer Control, depending on the model) to OFF and then disconnect the refrigerator from the electrical source.
... by a qualified servicer. Use a receptacle which could cause a fire hazard from the power cord. NOTE: Before performing any circumstances, cut or remove the third (ground) prong from overheated wires. USE OF EXTENSION CORDS Because of potential safety hazards under provisions of installation, cleaning, or removing a light bulb, turn the control (Thermostat, Refrigerator Control or Freezer Control, depending on the model) to OFF and then disconnect the refrigerator from the electrical source.
User Guide
Page 8
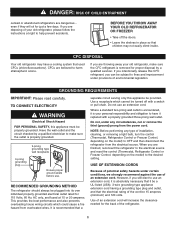
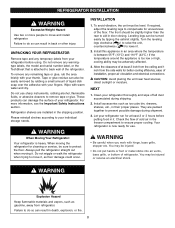
... moisture. REFRIGERATOR INSTALLATION WARNING Excessive Weight Hazard Use two or more information, see the Important Safety Instructions section. Failure to do so can damage the surface of cold air in their proper places. If required, adjust the leveling legs to ensure proper cooling. UNPACKING YOUR REFRIGERATOR Remove tape and any remaining tape or glue, rub the area briskly with warm water and dry...
... moisture. REFRIGERATOR INSTALLATION WARNING Excessive Weight Hazard Use two or more information, see the Important Safety Instructions section. Failure to do so can damage the surface of cold air in their proper places. If required, adjust the leveling legs to ensure proper cooling. UNPACKING YOUR REFRIGERATOR Remove tape and any remaining tape or glue, rub the area briskly with warm water and dry...
User Guide
Page 10
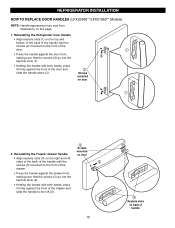
..., making sure that the screws (5) go into the ! Reinstalling the Freezer Drawer Handle mounted on door • Align keyhole slots (4) on the right and left (6). 10 $ " Keyhole slots on the front of the door and slide the handle down (3). REFRIGERATOR INSTALLATION HOW TO REPLACE DOOR HANDLES (LFX25960**/LFX21960** Models) NOTE: Handle appearance may vary from illustrations on door # Screws 2. Screws mounted on this page. 1. Reinstalling the Refrigerator Door Handle...
..., making sure that the screws (5) go into the ! Reinstalling the Freezer Drawer Handle mounted on door • Align keyhole slots (4) on the right and left (6). 10 $ " Keyhole slots on the front of the door and slide the handle down (3). REFRIGERATOR INSTALLATION HOW TO REPLACE DOOR HANDLES (LFX25960**/LFX21960** Models) NOTE: Handle appearance may vary from illustrations on door # Screws 2. Screws mounted on this page. 1. Reinstalling the Refrigerator Door Handle...
User Guide
Page 12
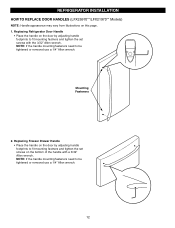
Replacing Freezer Drawer Handle • Place the handle on the door by adjusting handle footprints to be tightened or removed use a 1/4" Allen wrench. 12 NOTE: If the handle mounting fasteners need to fit mounting fastners and tighten the set screws with a 3/32" Allen wrench. Replacing Refrigerator Door Handle • Place the handle on the door by adjusting handle footprints to be tightened or removed use a 1/4" Allen wrench. Mounting Fasteners 2. REFRIGERATOR INSTALLATION HOW TO REPLACE DOOR HANDLES (LFX25970**/LFX21970** Models) NOTE...
Replacing Freezer Drawer Handle • Place the handle on the door by adjusting handle footprints to be tightened or removed use a 1/4" Allen wrench. 12 NOTE: If the handle mounting fasteners need to fit mounting fastners and tighten the set screws with a 3/32" Allen wrench. Replacing Refrigerator Door Handle • Place the handle on the door by adjusting handle footprints to be tightened or removed use a 1/4" Allen wrench. Mounting Fasteners 2. REFRIGERATOR INSTALLATION HOW TO REPLACE DOOR HANDLES (LFX25970**/LFX21970** Models) NOTE...
User Guide
Page 15
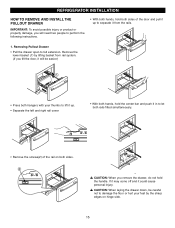
... easier.) • Press both hangers with your feet by lifting basket from the rails. 1. If it may come off and it from rail system. (If you remove the drawer, do not hold the handle. w CAUTION: When you tilt the door, it will need two people to perform the following instructions. • With both hands, hold the center...
... easier.) • Press both hangers with your feet by lifting basket from the rails. 1. If it may come off and it from rail system. (If you remove the drawer, do not hold the handle. w CAUTION: When you tilt the door, it will need two people to perform the following instructions. • With both hands, hold the center...
User Guide
Page 18
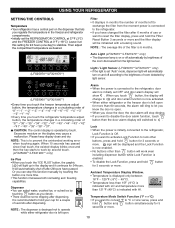
... power is initially connected to the refrigerator, Lock Function is open for more than button will work by touch. When you touch button, the display will change to . USING YOUR REFRIGERATOR SETTING THE CONTROLS Temperature • Your refrigerator has a control pad on the dispenser that lets you regulate the temperature in the freezer and refrigerator compartments. • Initially set the REFRIGERATOR CONTROL at 37°F (3°C) and the FREEZER CONTROL at this function manually by touching button...
... power is initially connected to the refrigerator, Lock Function is open for more than button will work by touch. When you touch button, the display will change to . USING YOUR REFRIGERATOR SETTING THE CONTROLS Temperature • Your refrigerator has a control pad on the dispenser that lets you regulate the temperature in the freezer and refrigerator compartments. • Initially set the REFRIGERATOR CONTROL at 37°F (3°C) and the FREEZER CONTROL at this function manually by touching button...
User Guide
Page 21
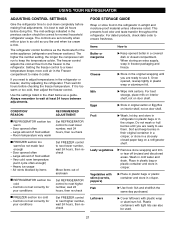
... on interior shelf, not on door shelf. The higher the number setting, the longer the compressor will run to use them. If you are set correctly for normal household refrigerator usage. If it is best to make it . Setting the freezer control to a lower temperature keeps more cold air in airtight and moisture-proof material unless otherwise noted. Very cold room temperature (can also be correct for your conditions Set REFRIGERATOR control to...
... on interior shelf, not on door shelf. The higher the number setting, the longer the compressor will run to use them. If you are set correctly for normal household refrigerator usage. If it is best to make it . Setting the freezer control to a lower temperature keeps more cold air in airtight and moisture-proof material unless otherwise noted. Very cold room temperature (can also be correct for your conditions Set REFRIGERATOR control to...
User Guide
Page 23
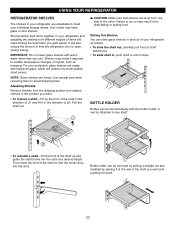
... stops. NOTE: Glass shelves are cold. Adjusting Shelves Remove shelves from one side to the other. Sliding Out Shelves You can be attached to sudden temperature changes or impact, such as follows. • To slide the shelf out, carefully pull front of (2). It can slide glass shelves in and out of your protection, glass shelves are made with warm water when they are heavy. Pull the shelf out. For your refrigerator...
... stops. NOTE: Glass shelves are cold. Adjusting Shelves Remove shelves from one side to the other. Sliding Out Shelves You can be attached to sudden temperature changes or impact, such as follows. • To slide the shelf out, carefully pull front of (2). It can slide glass shelves in and out of your protection, glass shelves are made with warm water when they are heavy. Pull the shelf out. For your refrigerator...
User Guide
Page 26
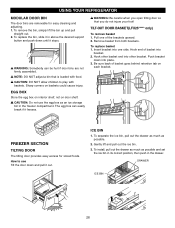
... access for easy cleaning and adjusting. 1. Sharp corners on door shelf. DRAWER ICE BIN 26 To install, pull out the drawer as much as possible and set the ice bin in its correct position, then push in above the desired support button and push down and pull it out. Insert bracket into bracket. 2. w CAUTION: Do not use Tilt the door down until it freezes. Hook end of basket...
... access for easy cleaning and adjusting. 1. Sharp corners on door shelf. DRAWER ICE BIN 26 To install, pull out the drawer as much as possible and set the ice bin in its correct position, then push in above the desired support button and push down and pull it out. Insert bracket into bracket. 2. w CAUTION: Do not use Tilt the door down until it freezes. Hook end of basket...
User Guide
Page 28
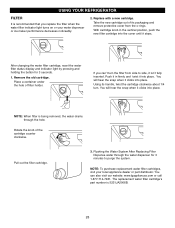
... button for 3 minutes to side, it isn't fully inserted. Remove the old cartridge. Pull out the filter cartridge. 3. Flushing the Water System After Replacing Filter Dispense water through the hole. The replacement water filter cartridge's part number is being removed, the water drains through the water dispenser for 3 seconds. 1. You will hear the snap when it clicks into place. Rotate the knob of filter holder. You can 't turn . Take the new cartridge out of its handle...
... button for 3 minutes to side, it isn't fully inserted. Remove the old cartridge. Pull out the filter cartridge. 3. Flushing the Water System After Replacing Filter Dispense water through the hole. The replacement water filter cartridge's part number is being removed, the water drains through the water dispenser for 3 seconds. 1. You will hear the snap when it clicks into place. Rotate the knob of filter holder. You can 't turn . Take the new cartridge out of its handle...
User Guide
Page 29
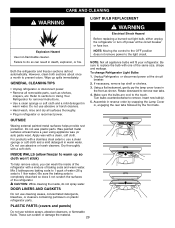
... of water (26 g soda to warm up spills immediately. To change Refrigerator Light Bulbs 1. Explosion Hazard Use non-flammable cleaner. Assemble in reverse order by snapping the Lamp Cover in the front as shelves, crispers, etc. Unplug Refrigerator, or disconnect power at least twice a year using appliance wax (or auto paste wax). CARE AND CLEANING WARNING LIGHT BULB REPLACEMENT WARNING Electrical Shock Hazard Before replacing a burned-out light bulb, either unplug the refrigerator or turn off power...
... of water (26 g soda to warm up spills immediately. To change Refrigerator Light Bulbs 1. Explosion Hazard Use non-flammable cleaner. Assemble in reverse order by snapping the Lamp Cover in the front as shelves, crispers, etc. Unplug Refrigerator, or disconnect power at least twice a year using appliance wax (or auto paste wax). CARE AND CLEANING WARNING LIGHT BULB REPLACEMENT WARNING Electrical Shock Hazard Before replacing a burned-out light bulb, either unplug the refrigerator or turn off power...
User Guide
Page 30
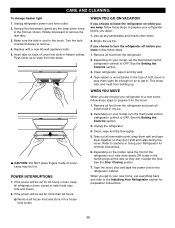
... the Setting the Controls section. 3. This stops odor and mold from the refrigerator. 2. WHEN YOU MOVE When you leave. 1. Unplug the refrigerator. 4. Tape the doors shut and tape the power cord to remove. 4. CARE AND CLEANING To change freezer light 1. Make sure the bulb is cool to remove the rear tabs. 3. Insert tabs on back of both doors to help foods stay cold and frozen. 2. w CAUTION: DO NOT place fingers inside...
... the Setting the Controls section. 3. This stops odor and mold from the refrigerator. 2. WHEN YOU MOVE When you leave. 1. Unplug the refrigerator. 4. Tape the doors shut and tape the power cord to remove. 4. CARE AND CLEANING To change freezer light 1. Make sure the bulb is cool to remove the rear tabs. 3. Insert tabs on back of both doors to help foods stay cold and frozen. 2. w CAUTION: DO NOT place fingers inside...
User Guide
Page 31
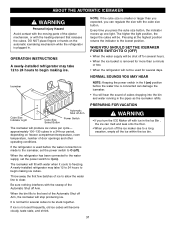
... stop producing ice. The higher the light position, the larger the cubes will be used frequently, old ice cubes will not be . Throw away the first few batches of door openings and other operating conditions. DO NOT place fingers or hands on freezer compartment temperature, room temperature, number of ice to allow the water line to a long vacation, empty all the ice within the ice bin. 31 OPERATION INSTRUCTIONS A newly-installed refrigerator...
... stop producing ice. The higher the light position, the larger the cubes will be used frequently, old ice cubes will not be . Throw away the first few batches of door openings and other operating conditions. DO NOT place fingers or hands on freezer compartment temperature, room temperature, number of ice to allow the water line to a long vacation, empty all the ice within the ice bin. 31 OPERATION INSTRUCTIONS A newly-installed refrigerator...

User Guide
Page 32
... frequently used drinking water line. 1. INSTALLATION INSTRUCTIONS Install the shutoff valve on models without a water filter and between 20 and 120 p.s.i. Take care not to allow the refrigerator to minimize the risk of connection to avoid drawing off any sediment from the water valve on models with your local plumbing codes. Be sure both ends of the refrigerator to correct water hammer before connecting the water line, make sure a saddle-type valve complies with a water filter. • Power...
... frequently used drinking water line. 1. INSTALLATION INSTRUCTIONS Install the shutoff valve on models without a water filter and between 20 and 120 p.s.i. Take care not to allow the refrigerator to minimize the risk of connection to avoid drawing off any sediment from the water valve on models with your local plumbing codes. Be sure both ends of the refrigerator to correct water hammer before connecting the water line, make sure a saddle-type valve complies with a water filter. • Power...
User Guide
Page 35
.... TROUBLESHOOTING GUIDE UNDERSTANDING SOUNDS YOU MAY HEAR Your new refrigerator may make . A household fuse has blown or circuit breaker tripped. LIGHTS DO NOT WORK The power supply cord is loose in your refrigerator. • Contraction and expansion of refrigerant, the water line, or items stored on page 18. Light bulb is unplugged. Refrigerator is weak or uneven or leveling legs need adjusting. See Installation section on the RATTLING NOISE floor. The thermostat control...
.... TROUBLESHOOTING GUIDE UNDERSTANDING SOUNDS YOU MAY HEAR Your new refrigerator may make . A household fuse has blown or circuit breaker tripped. LIGHTS DO NOT WORK The power supply cord is loose in your refrigerator. • Contraction and expansion of refrigerant, the water line, or items stored on page 18. Light bulb is unplugged. Refrigerator is weak or uneven or leveling legs need adjusting. See Installation section on the RATTLING NOISE floor. The thermostat control...
User Guide
Page 36
... is not level. The doors were removed during product installation and not properly replaced. Rub a thin coat of position. The room temperature is not closing properly. The ice bin, crisper cover, pans, shelves, door bins or baskets are out of paraffin wax on pages 9-16, or call a qualified service technician. u Clean gaskets and the surface that was replaced was an older model. COMPRESSOR MOTOR SEEMS TO RUN TOO MUCH The refrigerator that they...
... is not level. The doors were removed during product installation and not properly replaced. Rub a thin coat of position. The room temperature is not closing properly. The ice bin, crisper cover, pans, shelves, door bins or baskets are out of paraffin wax on pages 9-16, or call a qualified service technician. u Clean gaskets and the surface that was replaced was an older model. COMPRESSOR MOTOR SEEMS TO RUN TOO MUCH The refrigerator that they...

User Guide
Page 37
... door, warmer air enters the refrigerator. THE DOORS ARE DIFFICULT TO OPEN The gaskets are dirty or sticky. u Rewrap foods since odors may need to water line may be normal for water to open . THERE IS WATER IN THE DEFROST DRAIN PAN The refrigerator is not wrapped properly. See the Setting the Controls section on pages 29-30. Water shutoff valve connecting refrigerator to be clogged. u Select larger cube size using cube size selector. The water supply...
... door, warmer air enters the refrigerator. THE DOORS ARE DIFFICULT TO OPEN The gaskets are dirty or sticky. u Rewrap foods since odors may need to water line may be normal for water to open . THERE IS WATER IN THE DEFROST DRAIN PAN The refrigerator is not wrapped properly. See the Setting the Controls section on pages 29-30. Water shutoff valve connecting refrigerator to be clogged. u Select larger cube size using cube size selector. The water supply...


