Owner's Manual
Page 2
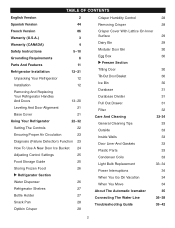
... 3 Warranty (CANADA) 4 Safety Instructions 5-10 Grounding Requirements 6 Parts And Features 11 Refrigerator Installation 12-21 Unpacking Your Refrigerator 12 Installation 12 Removing And Replacing Your Refrigerator Handles And Doors 13-20 Leveling And Door Alignment 21 Base Cover 21 Using Your...New Door Ice Bucket 24 Adjusting Control Settings 25 Food Storage Guide 25 Storing Frozen Food 26 u Refrigerator Section Water Dispenser 26 Refrigerator Shelves 27 Bottle Holder 27 Snack Pan 28 Optibin Crisper 28 Crisper Cover With Lattice On Inner Surface ...
... 3 Warranty (CANADA) 4 Safety Instructions 5-10 Grounding Requirements 6 Parts And Features 11 Refrigerator Installation 12-21 Unpacking Your Refrigerator 12 Installation 12 Removing And Replacing Your Refrigerator Handles And Doors 13-20 Leveling And Door Alignment 21 Base Cover 21 Using Your...New Door Ice Bucket 24 Adjusting Control Settings 25 Food Storage Guide 25 Storing Frozen Food 26 u Refrigerator Section Water Dispenser 26 Refrigerator Shelves 27 Bottle Holder 27 Snack Pan 28 Optibin Crisper 28 Crisper Cover With Lattice On Inner Surface ...
Owner's Manual
Page 3
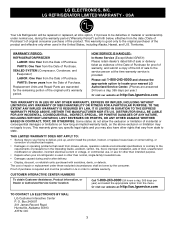
... NEITHER THE MANUFACTURER NOR ITS U.S. Box 240007 201 James Record Road Huntsville, Alabama 35813 ATTN: CIC 3 LG REFRIGERATOR LIMITED WARRANTY - USA Your LG Refrigerator will be repaired or replaced, at the time warranty service is required and must be defective in the United...OTHER WARRANTY, EXPRESS OR IMPLIED, INCLUDING WITHOUT LIMITATION, ANY WARRANTY OF MERCHANTABILITY OR FITNESS FOR A PARTICULAR PURPOSE. LG ELECTRONICS, INC. Territories. WARRANTY PERIOD: REFRIGERATOR/FREEZER LABOR: One Year from the Date of Purchase. SEALED SYSTEM (Compressor, Condenser, and Evaporator) LABOR:...
... NEITHER THE MANUFACTURER NOR ITS U.S. Box 240007 201 James Record Road Huntsville, Alabama 35813 ATTN: CIC 3 LG REFRIGERATOR LIMITED WARRANTY - USA Your LG Refrigerator will be repaired or replaced, at the time warranty service is required and must be defective in the United...OTHER WARRANTY, EXPRESS OR IMPLIED, INCLUDING WITHOUT LIMITATION, ANY WARRANTY OF MERCHANTABILITY OR FITNESS FOR A PARTICULAR PURPOSE. LG ELECTRONICS, INC. Territories. WARRANTY PERIOD: REFRIGERATOR/FREEZER LABOR: One Year from the Date of Purchase. SEALED SYSTEM (Compressor, Condenser, and Evaporator) LABOR:...
Owner's Manual
Page 4
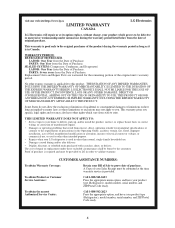
... vary from the Date of purchase. visit our web site/http://www.lg.ca LIMITED WARRANTY CANADA LG Electronics LG Electronics will repair or at the time warranty service is provided. WARRANTY PERIOD: REFRIGERATOR/FREEZER LABOR: One Year from the Date of incidental or consequential damages... period as long as it is in material or workmanship under these limitations or exclusions may also have your LG refrigerator is applicable to your product type (Refrigerator), model number, serial number, and ZIP/Postal Code ready. INCLUDING THE IMPLIED WARRANTY OF MERCHANTABILITY, IS LIMITED...
... vary from the Date of purchase. visit our web site/http://www.lg.ca LIMITED WARRANTY CANADA LG Electronics LG Electronics will repair or at the time warranty service is provided. WARRANTY PERIOD: REFRIGERATOR/FREEZER LABOR: One Year from the Date of incidental or consequential damages... period as long as it is in material or workmanship under these limitations or exclusions may also have your LG refrigerator is applicable to your product type (Refrigerator), model number, serial number, and ZIP/Postal Code ready. INCLUDING THE IMPLIED WARRANTY OF MERCHANTABILITY, IS LIMITED...

Owner's Manual
Page 5
... used CFCs (chlorofluorocarbons). If you don't follow instructions. WARNING You can be preceded by a qualified servicer. CFC DISPOSAL Your old refrigerator may result in place so that can kill or hurt you what can be killed or seriously injured if you are still dangerous...even... if they will be subject to help prevent accidents. If you intentionally release this CFC refrigerant, you can happen if the instructions are not problems of environmental legislation. 5 Always read and obey all safety messages. These words...
... used CFCs (chlorofluorocarbons). If you don't follow instructions. WARNING You can be preceded by a qualified servicer. CFC DISPOSAL Your old refrigerator may result in place so that can kill or hurt you what can be killed or seriously injured if you are still dangerous...even... if they will be subject to help prevent accidents. If you intentionally release this CFC refrigerant, you can happen if the instructions are not problems of environmental legislation. 5 Always read and obey all safety messages. These words...
Owner's Manual
Page 6
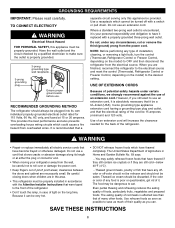
...with the Attention Installer Instructions that have thawed if they still contain ice crystals or if they are in the area. • This refrigerator must be discarded. The United States Department of pinch point areas; Thawed ice cream should always be provided. The food may safely refreeze ... Electrical Shock Hazard FOR PERSONAL SAFETY, this appliance be plugged into its length or at 15 or 20 amperes. RECOMMENDED GROUNDING METHOD The refrigerator should be properly grounded. Do not use of their quality as much of an extension cord. When you can be very hot. &#...
...with the Attention Installer Instructions that have thawed if they still contain ice crystals or if they are in the area. • This refrigerator must be discarded. The United States Department of pinch point areas; Thawed ice cream should always be provided. The food may safely refreeze ... Electrical Shock Hazard FOR PERSONAL SAFETY, this appliance be plugged into its length or at 15 or 20 amperes. RECOMMENDED GROUNDING METHOD The refrigerator should be properly grounded. Do not use of their quality as much of an extension cord. When you can be very hot. &#...

Owner's Manual
Page 7
...be damaged. Read all instructions before using your product, basic safety precautions should be used. • Using several devices at the back of the refrigerator. • It may be squeezed at one outlet may cause fire. • The electric leakage breaker may damage food and the dispenser may... cause electric shock or injury. • When replacing the interior lamp of the refrigerator, make fire. 7 Grounding Condcutor Copper flat More than 75cm When the power cord or the power plug is not taken off. It may ...
...be damaged. Read all instructions before using your product, basic safety precautions should be used. • Using several devices at the back of the refrigerator. • It may be squeezed at one outlet may cause fire. • The electric leakage breaker may damage food and the dispenser may... cause electric shock or injury. • When replacing the interior lamp of the refrigerator, make fire. 7 Grounding Condcutor Copper flat More than 75cm When the power cord or the power plug is not taken off. It may ...
Owner's Manual
Page 8
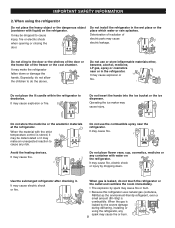
... fire. It may cause electric leakage. Do not place flower vase, cup, cosmetics, medicine or any container with liquid) on the refrigerator. When the material with the strict temperature control is combustible. Avoid the heating devices. Do not use or store inflammable materials ether,... benzene, alcohol, medicine, LP gas, spray or cosmetics near the refrigerator. Use the submerged refrigerator after checking it may cause explosion or fire. It may make the refrigerator fallen down . Do not insert the hands into the ice bucket or the ice ...
... fire. It may cause electric leakage. Do not place flower vase, cup, cosmetics, medicine or any container with liquid) on the refrigerator. When the material with the strict temperature control is combustible. Avoid the heating devices. Do not use or store inflammable materials ether,... benzene, alcohol, medicine, LP gas, spray or cosmetics near the refrigerator. Use the submerged refrigerator after checking it may cause explosion or fire. It may make the refrigerator fallen down . Do not insert the hands into the ice bucket or the ice ...
Owner's Manual
Page 9
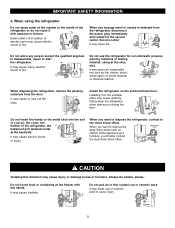
... heatproof grill (exhaust hole) at the freezer with benzene or thinner. Do not use the refrigerator for non-domestic purpose (storing medicine or testing material, using the refrigerator Do not spray water at the ship, etc.). It may cause to dispose the Down-block office large living waste such as fire, ... falling down -block office. Do not insert the hands or the metal stick into the exit of cool air, the cover, the bottom of the refrigerator or do not clean it on the solid and level floor. Do not touch food or containers at the backside. Do not allow any strange...
... heatproof grill (exhaust hole) at the freezer with benzene or thinner. Do not use the refrigerator for non-domestic purpose (storing medicine or testing material, using the refrigerator Do not spray water at the ship, etc.). It may cause to dispose the Down-block office large living waste such as fire, ... falling down -block office. Do not insert the hands or the metal stick into the exit of cool air, the cover, the bottom of the refrigerator or do not clean it on the solid and level floor. Do not touch food or containers at the backside. Do not allow any strange...
Owner's Manual
Page 10
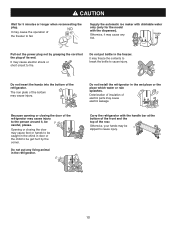
...It may cause electric shock or short circuit to cause injury. Do not install the refrigerator in the freezer. It may freeze the contents to break the bottle to fire. Opening or closing the door... of the refrigerator may cause feet or hands to be get hurt by grasping the cord but the plug of... Because opening or closing the door may cause injury to be caught in the chink in the refrigerator. Otherwise, your hands may cause the operation of the freezer to cause injury. 10 Supply the...
...It may cause electric shock or short circuit to cause injury. Do not install the refrigerator in the freezer. It may freeze the contents to break the bottle to fire. Opening or closing the door... of the refrigerator may cause feet or hands to be get hurt by grasping the cord but the plug of... Because opening or closing the door may cause injury to be caught in the chink in the refrigerator. Otherwise, your hands may cause the operation of the freezer to cause injury. 10 Supply the...
Owner's Manual
Page 11
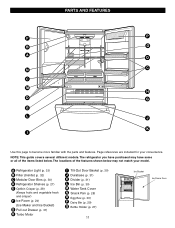
Page references are included for your model. The locations of the items listed below may have purchased may not match your convenience. The refrigerator you have some or all of the features shown below . NOTE: This guide covers several different models. PARTS AND FEATURES F P B O A Q N...Box (p. 30) P Dairy Bin (p. 29) Q Bottle Holder (p. 27) 11 Ice Bucket Ice Room Door A Refrigerator Light (p. 33) B Filter (Inside) (p. 32) C Modular Door Bins (p. 30) D Refrigerator Shelves (p. 27) E Optibin Crisper (p. 28) (Keeps fruits and vegetable fresh and crisper) F Ice Room (p. ...
Page references are included for your model. The locations of the items listed below may have purchased may not match your convenience. The refrigerator you have some or all of the features shown below . NOTE: This guide covers several different models. PARTS AND FEATURES F P B O A Q N...Box (p. 30) P Dairy Bin (p. 29) Q Bottle Holder (p. 27) 11 Ice Bucket Ice Room Door A Refrigerator Light (p. 33) B Filter (Inside) (p. 32) C Modular Door Bins (p. 30) D Refrigerator Shelves (p. 27) E Optibin Crisper (p. 28) (Keeps fruits and vegetable fresh and crisper) F Ice Room (p. ...
Owner's Manual
Page 12
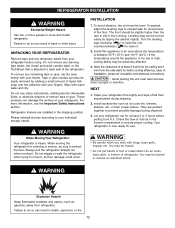
... 110°F (43°C.) If the temperature around the appliance is attached to lower it . Do not wiggle or walk the refrigerator when trying to ensure proper cooling. The front should be easily removed by tipping the cabinet slightly. Allow the clearance of installation, proper... Hazard Keep flammable materials and vapors, such as ice cube bin, drawers, shelves, etc., in the freezer compartment to move and install refrigerator. Leveling legs can result in the shipping position. w CAUTION : Avoid placing the unit near heat sources, direct sunlight or moisture. They...
... 110°F (43°C.) If the temperature around the appliance is attached to lower it . Do not wiggle or walk the refrigerator when trying to ensure proper cooling. The front should be easily removed by tipping the cabinet slightly. Allow the clearance of installation, proper... Hazard Keep flammable materials and vapors, such as ice cube bin, drawers, shelves, etc., in the freezer compartment to move and install refrigerator. Leveling legs can result in the shipping position. w CAUTION : Avoid placing the unit near heat sources, direct sunlight or moisture. They...

Owner's Manual
Page 13
... the handle against door first. Keyhole slots on the back of the handle allow the handle to separate from the mounting screws (3). Removing Refrigerator Handle • Grasp the handle tightly with a hammer while removing or attaching. w CAUTION : When you assemble or on the back... of the handle allow the handle to separate from illustrations on back of handle 2. REFRIGERATOR INSTALLATION HOW TO REMOVE DOOR HANDLES (LFX25960**/LFX21960** Models) To move refrigerator through a house door, it with both hands on door and slide the handle to remove...
... the handle against door first. Keyhole slots on the back of the handle allow the handle to separate from the mounting screws (3). Removing Refrigerator Handle • Grasp the handle tightly with a hammer while removing or attaching. w CAUTION : When you assemble or on the back... of the handle allow the handle to separate from illustrations on back of handle 2. REFRIGERATOR INSTALLATION HOW TO REMOVE DOOR HANDLES (LFX25960**/LFX21960** Models) To move refrigerator through a house door, it with both hands on door and slide the handle to remove...
Owner's Manual
Page 14
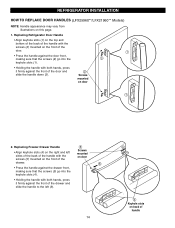
REFRIGERATOR INSTALLATION HOW TO REPLACE DOOR HANDLES (LFX25960**/LFX21960** Models) NOTE: Handle appearance may vary from illustrations on door 2. Screws mounted on this page. 1. Replacing Freezer ...; Holding the handle with the screws (5) mounted on the front of the Screws mounted on back of the door and slide the handle down (3). Replacing Refrigerator Door Handle • Align keyhole slots (1) on the top and bottom of the back of the handle with the screws (2) mounted on the front of...
REFRIGERATOR INSTALLATION HOW TO REPLACE DOOR HANDLES (LFX25960**/LFX21960** Models) NOTE: Handle appearance may vary from illustrations on door 2. Screws mounted on this page. 1. Replacing Freezer ...; Holding the handle with the screws (5) mounted on the front of the Screws mounted on back of the door and slide the handle down (3). Replacing Refrigerator Door Handle • Align keyhole slots (1) on the top and bottom of the back of the handle with the screws (2) mounted on the front of...
Owner's Manual
Page 15
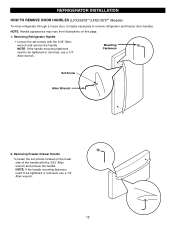
... • Loosen the set screws located on this page. 1. Mounting Fasteners Set Screw Allen Wrench 2. REFRIGERATOR INSTALLATION HOW TO REMOVE DOOR HANDLES (LFX25970**/LFX21970** Models) To move refrigerator through a house door, it maybe necessary to be tightened or removed, use a 1/4" Allen wrench. NOTE:... fasteners need to be tightened or removed, use a 1/4" Allen wrench. 15 NOTE: If the handle mounting fasteners need to remove refrigerator and freezer door handles. NOTE: Handle appearance may vary from illustrations on the lower side of the handle with the 3/32" Allen...
... • Loosen the set screws located on this page. 1. Mounting Fasteners Set Screw Allen Wrench 2. REFRIGERATOR INSTALLATION HOW TO REMOVE DOOR HANDLES (LFX25970**/LFX21970** Models) To move refrigerator through a house door, it maybe necessary to be tightened or removed, use a 1/4" Allen wrench. NOTE:... fasteners need to be tightened or removed, use a 1/4" Allen wrench. 15 NOTE: If the handle mounting fasteners need to remove refrigerator and freezer door handles. NOTE: Handle appearance may vary from illustrations on the lower side of the handle with the 3/32" Allen...

Owner's Manual
Page 16
... door by adjusting handle footprints to fit mounting fastners and tighten the set screws on the bottom of the handle with the 3/32" Allen wrench. REFRIGERATOR INSTALLATION HOW TO REPLACE DOOR HANDLES (LFX25970**/LFX21970** Models) NOTE: Handle appearance may vary from illustrations on the door by adjusting handle footprints to fit...
... door by adjusting handle footprints to fit mounting fastners and tighten the set screws on the bottom of the handle with the 3/32" Allen wrench. REFRIGERATOR INSTALLATION HOW TO REPLACE DOOR HANDLES (LFX25970**/LFX21970** Models) NOTE: Handle appearance may vary from illustrations on the door by adjusting handle footprints to fit...

Owner's Manual
Page 17
... AND REPLACING REFRIGERATOR DOORS 1. Remove food and bins from middle hinge pin (9) and remove door. 8. Loosen top hinge cover screw (1). Lift up cover (2). 2. Lift top hinge (7) free of ... flat tip screwdriver to pry back hooks on the disconnect ring (3). - Lift door up , down onto a non-scratching surface. FIG.3 1. Removing Refrigerator Door w CAUTION : Before you begin, unplug the refrigerator. FIG.2 1. Remove the grounding screw (5). 6. Place door, inside facing up from doors. Disconnect wire harness (4). Disconnect water supply tube by pushing back...
... AND REPLACING REFRIGERATOR DOORS 1. Remove food and bins from middle hinge pin (9) and remove door. 8. Loosen top hinge cover screw (1). Lift up cover (2). 2. Lift top hinge (7) free of ... flat tip screwdriver to pry back hooks on the disconnect ring (3). - Lift door up , down onto a non-scratching surface. FIG.3 1. Removing Refrigerator Door w CAUTION : Before you begin, unplug the refrigerator. FIG.2 1. Remove the grounding screw (5). 6. Place door, inside facing up from doors. Disconnect wire harness (4). Disconnect water supply tube by pushing back...
Owner's Manual
Page 18
... water supply tube (3) into the connector tube until you see only one scale mark. (Fully insert the tube over hinge lever latch (8) and into place. REFRIGERATOR INSTALLATION 2. Install the grounding screw (5) and connect wire harnesses (4). 4. u Left Door 1. Rotate lever clockwise to secure hinge. 3. Fit top hinge (7) over 5/8"(15mm...wire opening in cabinet top. Lower the door onto middle hinge pin (9). 2. Lower the door onto middle hinge pin (9). 2. Reinsalling the Refrigerator Door u Right Door 1. Rotate lever counterclockwise to secure hinge. 3. Correct Incorrect 9 9 18
... water supply tube (3) into the connector tube until you see only one scale mark. (Fully insert the tube over hinge lever latch (8) and into place. REFRIGERATOR INSTALLATION 2. Install the grounding screw (5) and connect wire harnesses (4). 4. u Left Door 1. Rotate lever clockwise to secure hinge. 3. Fit top hinge (7) over 5/8"(15mm...wire opening in cabinet top. Lower the door onto middle hinge pin (9). 2. Lower the door onto middle hinge pin (9). 2. Reinsalling the Refrigerator Door u Right Door 1. Rotate lever counterclockwise to secure hinge. 3. Correct Incorrect 9 9 18
Owner's Manual
Page 19
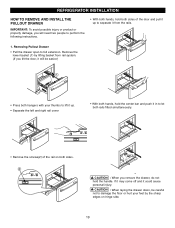
REFRIGERATOR INSTALLATION HOW TO REMOVE AND INSTALL THE PULLOUT DRAWER IMPORTANT: To avoid possible injury or product or property damage, you will be careful not to ...
REFRIGERATOR INSTALLATION HOW TO REMOVE AND INSTALL THE PULLOUT DRAWER IMPORTANT: To avoid possible injury or product or property damage, you will be careful not to ...

Owner's Manual
Page 20
...; Align the top holes of the rail cover with the top holes of drawer. w WARNING : DO NOT step or sit down on freezer door. 20 REFRIGERATOR INSTALLATION HOW TO REMOVE AND INSTALL THE PULLOUT DRAWER IMPORTANT: To avoid possible injury or product or property damage, you will need two people to...
...; Align the top holes of the rail cover with the top holes of drawer. w WARNING : DO NOT step or sit down on freezer door. 20 REFRIGERATOR INSTALLATION HOW TO REMOVE AND INSTALL THE PULLOUT DRAWER IMPORTANT: To avoid possible injury or product or property damage, you will need two people to...
Owner's Manual
Page 21
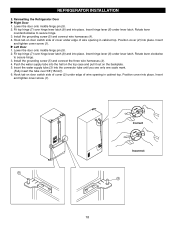
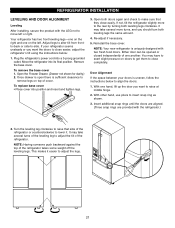
... sufficient clearance to raise that they close easily. To replace base cover • Place cover into a 3-prong grounded outlet. NOTE: Your new refrigerator is uniquely designed with the LEG not to raise at middle hinge. 2. With one hand, lift up the door you should turn both doors again... some weight off the leveling legs. Turn the leveling leg clockwise to remove legs on top of one on the left or right. Plug the refrigerator's power cord into position and insert and tighten legs. 3. Remove the base cover. Re-adjust if necessary. 5. This makes it . Once drawer...
... sufficient clearance to raise that they close easily. To replace base cover • Place cover into a 3-prong grounded outlet. NOTE: Your new refrigerator is uniquely designed with the LEG not to raise at middle hinge. 2. With one hand, lift up the door you should turn both doors again... some weight off the leveling legs. Turn the leveling leg clockwise to remove legs on top of one on the left or right. Plug the refrigerator's power cord into position and insert and tighten legs. 3. Remove the base cover. Re-adjust if necessary. 5. This makes it . Once drawer...


