User Guide
Page 2
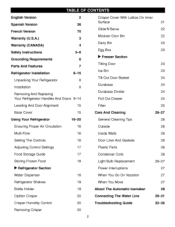
... Divider 24 Pull Out Drawer 24 Filter 25 Care And Cleaning 26-27 Using Your Refrigerator 16-25 General Cleaning Tips 26 Ensuring Proper Air Circulation 16 Outside 26 Multi-Flow 16 Inside Walls 26 Setting The Controls Adjusting Control Settings Food Storage Guide Storing Frozen Food 16 Door Liner And Gaskets 17 Plastic Parts 17 Condenser Coils 18 Light Bulb Replacement 26 26 26 26-27 • Refrigerator Section Water Dispenser Refrigerator Shelves Power Interruptions 27 18...
... Divider 24 Pull Out Drawer 24 Filter 25 Care And Cleaning 26-27 Using Your Refrigerator 16-25 General Cleaning Tips 26 Ensuring Proper Air Circulation 16 Outside 26 Multi-Flow 16 Inside Walls 26 Setting The Controls Adjusting Control Settings Food Storage Guide Storing Frozen Food 16 Door Liner And Gaskets 17 Plastic Parts 17 Condenser Coils 18 Light Bulb Replacement 26 26 26 26-27 • Refrigerator Section Water Dispenser Refrigerator Shelves Power Interruptions 27 18...
User Guide
Page 3
... install the product, instruct, or replace house fuses or correct wiring, or correction of unauthorized repairs. • Damages or operating problems that vary from misuse, abuse, operation outside environmental specifications or contrary to the requirements of Purchase. Please call 1-800-243-0000 and choose the appropriate option to locate your LG refrigerator is provided. This warranty gives you specific legal rights and you . O. HOW SERVICE...
... install the product, instruct, or replace house fuses or correct wiring, or correction of unauthorized repairs. • Damages or operating problems that vary from misuse, abuse, operation outside environmental specifications or contrary to the requirements of Purchase. Please call 1-800-243-0000 and choose the appropriate option to locate your LG refrigerator is provided. This warranty gives you specific legal rights and you . O. HOW SERVICE...
User Guide
Page 5
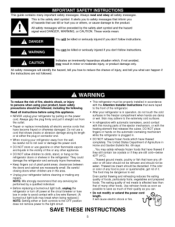
... the Attention Installer Instructions that can , • _ not modify or extend the power cord length, *_r='(_ 1 NOTE: Setting either the plug or connector end. ° When moving parts of fire, electric shock, or injury to persons when using this or any servicing be eaten. Skin may break when being replaced.) with the moving your refrigerator away from surfaces in the freezer compartment...
... the Attention Installer Instructions that can , • _ not modify or extend the power cord length, *_r='(_ 1 NOTE: Setting either the plug or connector end. ° When moving parts of fire, electric shock, or injury to persons when using this or any servicing be eaten. Skin may break when being replaced.) with the moving your refrigerator away from surfaces in the freezer compartment...
User Guide
Page 6
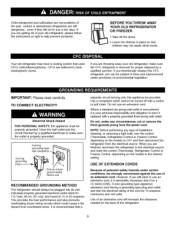
.... Your old refrigerator may not easily climb inside. CFCs are finished, reconnect the refrigerator to the electrical source and reset the control (Thermostat, Refrigerator Control or Freezer Control, depending on the model) to make sure the CFC refrigerant is absolutely necessary that it replaced with a switch or pull chain.. TO CONNECT ELECTRICITY Electrical Sh_k Hazard FOR PERSONAL SAFETY, this appliance be turned off the doors. • Leave the shelves in place so...
.... Your old refrigerator may not easily climb inside. CFCs are finished, reconnect the refrigerator to the electrical source and reset the control (Thermostat, Refrigerator Control or Freezer Control, depending on the model) to make sure the CFC refrigerant is absolutely necessary that it replaced with a switch or pull chain.. TO CONNECT ELECTRICITY Electrical Sh_k Hazard FOR PERSONAL SAFETY, this appliance be turned off the doors. • Leave the shelves in place so...
User Guide
Page 8
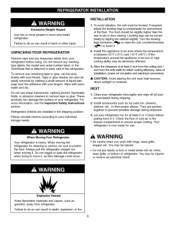
... and install refrigerator. Do not use . INSTALLATION , To avoid vibration, the unit must be injured or receive an electrical shock. Do not wiggle or walk the refrigerator when trying to aid in their proper places. If required, adjust the leveling legs to remove tape or glue. Allow the clearance of cold air in the shipping position. WARNING • Be careful when you work with warm water...
... and install refrigerator. Do not use . INSTALLATION , To avoid vibration, the unit must be injured or receive an electrical shock. Do not wiggle or walk the refrigerator when trying to aid in their proper places. If required, adjust the leveling legs to remove tape or glue. Allow the clearance of cold air in the shipping position. WARNING • Be careful when you work with warm water...

User Guide
Page 10
... on the front of the drawer. • Press the handle against the drawer front, making sure that the screws (5) go into the keyhole slots (4). • Holding the handle with the screws (5) mounted on back of the door and slide the handle down (3). Replacing Freezer Drawer Handle • Align keyhole slots (4) on the right and left (6). HOW TO REPLACE DOOR HANDLES NOTE: Handle appearance may vary from...
... on the front of the drawer. • Press the handle against the drawer front, making sure that the screws (5) go into the keyhole slots (4). • Holding the handle with the screws (5) mounted on back of the door and slide the handle down (3). Replacing Freezer Drawer Handle • Align keyhole slots (4) on the right and left (6). HOW TO REPLACE DOOR HANDLES NOTE: Handle appearance may vary from...
User Guide
Page 14
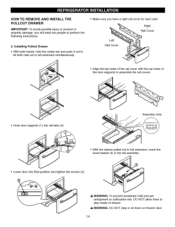
DO NOT allow them to play inside of the cloor supports to assemble the rail covers. • Hook d_r supports (1) into final position and tighten the screws (3)_ A WARNING: To prevent accidental child and pet entrapment or suffocation risk. WARNING: DO NOT step or sit down on freezer door, 14 Installing Pullout Drawer • With both hands, hold the center bar and...
DO NOT allow them to play inside of the cloor supports to assemble the rail covers. • Hook d_r supports (1) into final position and tighten the screws (3)_ A WARNING: To prevent accidental child and pet entrapment or suffocation risk. WARNING: DO NOT step or sit down on freezer door, 14 Installing Pullout Drawer • With both hands, hold the center bar and...
User Guide
Page 16
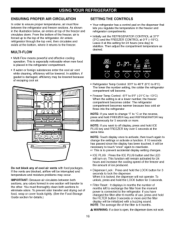
... button for 3 seconds. • Filter Reset : It displays in the illustration below, air enters at 0°F (-18°C). NOTE: The average life of cool air vents with a buzzing sound. Leave it is at a lower number, the freezer compartment becomes colder. In addition, if gasket is connected to the refrigerator, if you want to ensure proper temperatures, air must thoroughly clean _th sections to prevent accidental display setting changes...
... button for 3 seconds. • Filter Reset : It displays in the illustration below, air enters at 0°F (-18°C). NOTE: The average life of cool air vents with a buzzing sound. Leave it is at a lower number, the freezer compartment becomes colder. In addition, if gasket is connected to the refrigerator, if you want to ensure proper temperatures, air must thoroughly clean _th sections to prevent accidental display setting changes...
User Guide
Page 17
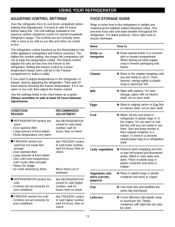
... freezer packaging and freeze. ADJUSTING CONTROL SETTINGS Give the refrigerator time to cool down completely before checking the freezer temperature. The mid-settings indicated in the chart below as the thermostat for normal household refrigerator usage. Use the settings listed in the previous section should be used. 17 Heavy ice usage -Air vents blocked by adjusting the refrigerator. When storing an extra supply, wrap in cold water and drain. Then wait 24 hours before making final adjustments...
... freezer packaging and freeze. ADJUSTING CONTROL SETTINGS Give the refrigerator time to cool down completely before checking the freezer temperature. The mid-settings indicated in the chart below as the thermostat for normal household refrigerator usage. Use the settings listed in the previous section should be used. 17 Heavy ice usage -Air vents blocked by adjusting the refrigerator. When storing an extra supply, wrap in cold water and drain. Then wait 24 hours before making final adjustments...
User Guide
Page 19
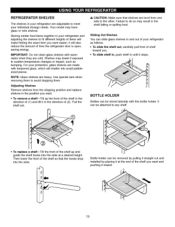
... stops. NOTE: Glass shelves are adjustable to fit different heights of your refrigerator as bumping. Pull the shelf out. Shelves may result in your refrigerator and adjusting the shelves to meet your individual storage needs, Your model may have glass or wire shelves. It can be removed by pulling it straight out and installed by placing it at a desired height. it in the direction of the shelf so that shelves are level...
... stops. NOTE: Glass shelves are adjustable to fit different heights of your refrigerator as bumping. Pull the shelf out. Shelves may result in your refrigerator and adjusting the shelves to meet your individual storage needs, Your model may have glass or wire shelves. It can be removed by pulling it straight out and installed by placing it at a desired height. it in the direction of the shelf so that shelves are level...
User Guide
Page 22
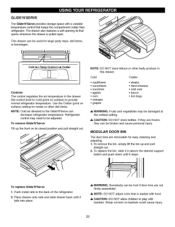
Temp Control ..e Colder Controls The control regulates the air temperature in this drawer. MODULAR DOOR BIN The door bins are not firmly assembled. _lk NOTE: DO NOZ adjust a bin that keeps the compartment colder than refrigerator. To replace the bin, slide it in above the desired support button and push down until it stops. To replace Glide'N'_rve 1, Push metal rails to the Glide'N'Serce can be hurt if door bins are removable for easy...
Temp Control ..e Colder Controls The control regulates the air temperature in this drawer. MODULAR DOOR BIN The door bins are not firmly assembled. _lk NOTE: DO NOZ adjust a bin that keeps the compartment colder than refrigerator. To replace the bin, slide it in above the desired support button and push down until it stops. To replace Glide'N'_rve 1, Push metal rails to the Glide'N'Serce can be hurt if door bins are removable for easy...

User Guide
Page 25
..., Using its packaging and remove protective cover from the o-Hngs With cartridge knob in the vertical position, push the new filter cartridge into place. 1. You can 't turn . The replacement water filter cartridge's part number is 5231JA2_6B. 25 NOTE: When filter is being removed, the water drains through the water dispenser for 3 minutes to purge the system. It displays in months the number of months left to exchange the filter from the moment power is connected to...
..., Using its packaging and remove protective cover from the o-Hngs With cartridge knob in the vertical position, push the new filter cartridge into place. 1. You can 't turn . The replacement water filter cartridge's part number is 5231JA2_6B. 25 NOTE: When filter is being removed, the water drains through the water dispenser for 3 minutes to purge the system. It displays in months the number of months left to exchange the filter from the moment power is connected to...

User Guide
Page 26
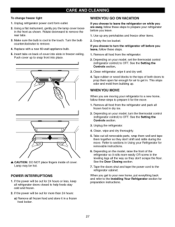
... the Lamp Cover in warm water. Vacuum coils when dusty or dirty. Coils may need to replace the bulb with an extended attachment to sections in Using Your Refrigerator for removal instructions. • Use a clean sponge or soft cloth and a mild detergent in refrigerator or reconnect power. Replace base cover. Be sure to be cleaned as often as every other month. To change Refrigerator Light Bulbs 1. Unplug Refrigerator, or disconnect power at the...
... the Lamp Cover in warm water. Vacuum coils when dusty or dirty. Coils may need to replace the bulb with an extended attachment to sections in Using Your Refrigerator for removal instructions. • Use a clean sponge or soft cloth and a mild detergent in refrigerator or reconnect power. Replace base cover. Be sure to be cleaned as often as every other month. To change Refrigerator Light Bulbs 1. Unplug Refrigerator, or disconnect power at the...
User Guide
Page 27
... refrigerator power cord form outlet. 2. Depending on the model, raise the front of cover. Clean, wipe and dry thoroughly. 5. Make sure the bulb is cool to the refrigerator cabinet. Empty the ice bucket. Tape rubber or wood blocks to the tops of both doors to OFF. Replace with a new 60-watt appliance bulb. 5. Refer to sections in Using your Refrigerator for air to get to help foods stay cold and...
... refrigerator power cord form outlet. 2. Depending on the model, raise the front of cover. Clean, wipe and dry thoroughly. 5. Make sure the bulb is cool to the refrigerator cabinet. Empty the ice bucket. Tape rubber or wood blocks to the tops of both doors to OFF. Replace with a new 60-watt appliance bulb. 5. Refer to sections in Using your Refrigerator for air to get to help foods stay cold and...
User Guide
Page 28
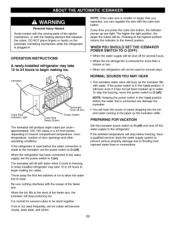
... I (on freezer compartment temperature, room temperature, number of the feeler arm. Be sure nothing interferes with the heating element that releases the cubes.. When the refrigerator has been connected to the water supply, set the power switch to flooding from ruptured water lines or connections. If the power switch is in . Icemaker Cube Size Indicator Light Cube Size Select Button _Automatic Shut off ). OPERATION INSTRUCTIONS A newly-installed refrigerator may take 12 to 24 hours to begin making ice, NOTE...
... I (on freezer compartment temperature, room temperature, number of the feeler arm. Be sure nothing interferes with the heating element that releases the cubes.. When the refrigerator has been connected to the water supply, set the power switch to flooding from ruptured water lines or connections. If the power switch is in . Icemaker Cube Size Indicator Light Cube Size Select Button _Automatic Shut off ). OPERATION INSTRUCTIONS A newly-installed refrigerator may take 12 to 24 hours to begin making ice, NOTE...
User Guide
Page 29
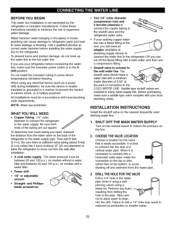
... connect the copper tubing to the cold water line. Shutoff valve to connect to the shutoff valve and the refrigerator water valve. When it is sufficient extra tubing (about 8 feet [2.4 m] coiled into 3 turns of about 10" [25 cm] diameter) to allow water to drain into the drill. When using a sharp bit. Follow these instructions carefully to minimize the risk of connection to the COLD WATER LINE. If your local plumbing codes. SHUT OFF THE MAIN WATER SUPPLY Turn...
... connect the copper tubing to the cold water line. Shutoff valve to connect to the shutoff valve and the refrigerator water valve. When it is sufficient extra tubing (about 8 feet [2.4 m] coiled into 3 turns of about 10" [25 cm] diameter) to allow water to drain into the drill. When using a sharp bit. Follow these instructions carefully to minimize the risk of connection to the COLD WATER LINE. If your local plumbing codes. SHUT OFF THE MAIN WATER SUPPLY Turn...

User Guide
Page 30
... illegal and use is not permitted in the wall or floor (behind the refrigerator or adjacent base cabinet) as possible. Make sure the tubing is fully inserted into 3 turns of about one quart of the tubing and connect it to the wall as close to the shutoff valve. ROUTE THE TUBING Route the tubing between the cold water line and the refrigerator. Consult with...
... illegal and use is not permitted in the wall or floor (behind the refrigerator or adjacent base cabinet) as possible. Make sure the tubing is fully inserted into 3 turns of about one quart of the tubing and connect it to the wall as close to the shutoff valve. ROUTE THE TUBING Route the tubing between the cold water line and the refrigerator. Consult with...
User Guide
Page 32
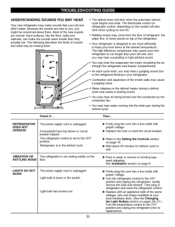
... the evaporator fan motor circulating the air through the refrigerator and freezer compartments. You may come from the flow of the refrigerator. The refrigerator control is not resting solidly on top of refrigerant, the water line, or items stored on the RATTLING NOISE floor. I_ Turn the refrigerator control to run more efficiently to the OFF p_ition. Check if... You may cause a papping noise. Light bulb is in your new refrigerator to...
... the evaporator fan motor circulating the air through the refrigerator and freezer compartments. You may come from the flow of the refrigerator. The refrigerator control is not resting solidly on top of refrigerant, the water line, or items stored on the RATTLING NOISE floor. I_ Turn the refrigerator control to run more efficiently to the OFF p_ition. Check if... You may cause a papping noise. Light bulb is in your new refrigerator to...
User Guide
Page 33
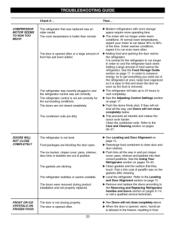
... to clear door and door shelves. • Push bins all the way in and the refrigerator control was set correctly for the refrigerator to run longer under warm conditions. The doors were removed during product installation and not properly replaced. • See Leveling and Door Alignment on page 15. • Rearrange food containers to cool completely. • See the Adjusting Control Settings section on the gaskets after cleaning. • Level the refrigerator. The gaskets are...
... to clear door and door shelves. • Push bins all the way in and the refrigerator control was set correctly for the refrigerator to run longer under warm conditions. The doors were removed during product installation and not properly replaced. • See Leveling and Door Alignment on page 15. • Rearrange food containers to cool completely. • See the Adjusting Control Settings section on the gaskets after cleaning. • Level the refrigerator. The gaskets are...

User Guide
Page 34
... cube size using cube size selector. • Call a plumber to the ice if food is defrosting. THE REFRIGERATOR SEEMS TO MAKE TOO MUCH NOISE The sounds may migrate to clear the valve. The water supply contains minerals such as sulfur. THE DOORS ARE DIFFICULT TO OPEN The gaskets are dirty or sticky. Water shutoff valve connecting refrigerator to water line may need to be installed (or replaced) to produce ice. See the Setting the Controls section...
... cube size using cube size selector. • Call a plumber to the ice if food is defrosting. THE REFRIGERATOR SEEMS TO MAKE TOO MUCH NOISE The sounds may migrate to clear the valve. The water supply contains minerals such as sulfur. THE DOORS ARE DIFFICULT TO OPEN The gaskets are dirty or sticky. Water shutoff valve connecting refrigerator to water line may need to be installed (or replaced) to produce ice. See the Setting the Controls section...


