User Guide
Page 2
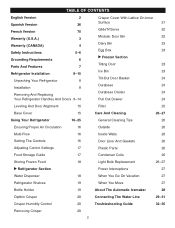
...French Version 70 Warranty (U.S.A.) 3 Warranty (CANADA) 4 Safety Instructions 5-6 Grounding Requirements 6 Parts And Features 7 Refrigerator Installation 8-15 Unpacking Your Refrigerator 8 Installation 8 Removing And Replacing Your Refrigerator Handles And Doors 9-14 Crisper Cover With Lattice On Inner Surface 21 Glide'N'Serve 22... And Gaskets 26 Adjusting Control Settings 17 Plastic Parts 26 Food Storage Guide 17 Condenser Coils 26 Storing Frozen Food 18 Light Bulb Replacement 26-27 u Refrigerator Section Power Interruptions 27 Water Dispenser 18 When ...
...French Version 70 Warranty (U.S.A.) 3 Warranty (CANADA) 4 Safety Instructions 5-6 Grounding Requirements 6 Parts And Features 7 Refrigerator Installation 8-15 Unpacking Your Refrigerator 8 Installation 8 Removing And Replacing Your Refrigerator Handles And Doors 9-14 Crisper Cover With Lattice On Inner Surface 21 Glide'N'Serve 22... And Gaskets 26 Adjusting Control Settings 17 Plastic Parts 26 Food Storage Guide 17 Condenser Coils 26 Storing Frozen Food 18 Light Bulb Replacement 26-27 u Refrigerator Section Power Interruptions 27 Water Dispenser 18 When ...
User Guide
Page 3
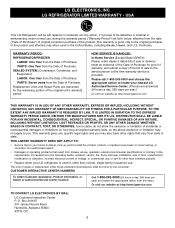
... above exclusion or limitation may not apply to you may also have other than intended purpose. • Repairs when your LG refrigerator is provided. CUSTOMER INTERACTIVE CENTER NUMBERS To obtain Customer Assistance, Product Information, or Dealer or Authorized Service Center location: Call... WARRANTY PERIOD ABOVE. O. PARTS: One Year from the Date of Purchase. PARTS: Seven years from the menu. Box 240007 201 James Record Road Huntsville, Alabama 35824 ATTN: CIC 3 This warranty gives you specific legal rights and you . LG REFRIGERATOR LIMITED WARRANTY - DISTRIBUTOR SHALL...
... above exclusion or limitation may not apply to you may also have other than intended purpose. • Repairs when your LG refrigerator is provided. CUSTOMER INTERACTIVE CENTER NUMBERS To obtain Customer Assistance, Product Information, or Dealer or Authorized Service Center location: Call... WARRANTY PERIOD ABOVE. O. PARTS: One Year from the Date of Purchase. PARTS: Seven years from the menu. Box 240007 201 James Record Road Huntsville, Alabama 35824 ATTN: CIC 3 This warranty gives you specific legal rights and you . LG REFRIGERATOR LIMITED WARRANTY - DISTRIBUTOR SHALL...
User Guide
Page 4
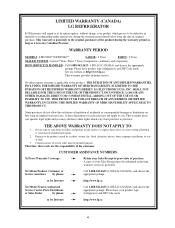
... TO THIS PRODUCT. This warranty gives you specific legal rights and you may not apply to you. LIMITED WARRANTY (CANADA) LG REFRIGERATOR LG Electronics will repair or at its option replace, without charge, your product which vary from the date of original purchase. This...of the consumer. A copy of God. 3. or by Internet: http://www.lg.ca To Obtain Nearest Authorized Service Center, Parts Distributor, or Sales Dealer by accident, vermin, fire, flood, alteration, misues, abuse, improper installation, or acts of your product type (refrigerator) and ZIP Code ready.
... TO THIS PRODUCT. This warranty gives you specific legal rights and you may not apply to you. LIMITED WARRANTY (CANADA) LG REFRIGERATOR LG Electronics will repair or at its option replace, without charge, your product which vary from the date of original purchase. This...of the consumer. A copy of God. 3. or by Internet: http://www.lg.ca To Obtain Nearest Authorized Service Center, Parts Distributor, or Sales Dealer by accident, vermin, fire, flood, alteration, misues, abuse, improper installation, or acts of your product type (refrigerator) and ZIP Code ready.
User Guide
Page 5
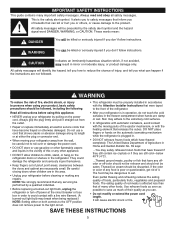
... Bulletin No. 69 says: ...You may break when being replaced.) NOTE: Setting either the plug or connector end. • When moving parts of hazards that any repairs. It alerts you to safety messages that inform you don't follow instructions. These words mean: DANGER You will ... instructions before cleaning or making any servicing be performed by a qualified individual. • Before replacing a burned-out light bulb, unplug the refrigerator or turn off -color should not be refrozen and should not be killed or seriously injured if you can be eaten. IMPORTANT SAFETY INSTRUCTIONS...
... Bulletin No. 69 says: ...You may break when being replaced.) NOTE: Setting either the plug or connector end. • When moving parts of hazards that any repairs. It alerts you to safety messages that inform you don't follow instructions. These words mean: DANGER You will ... instructions before cleaning or making any servicing be performed by a qualified individual. • Before replacing a burned-out light bulb, unplug the refrigerator or turn off -color should not be refrozen and should not be killed or seriously injured if you can be eaten. IMPORTANT SAFETY INSTRUCTIONS...
User Guide
Page 7
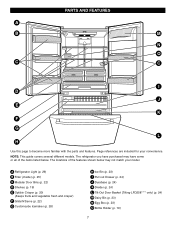
...have some or all of the features shown below may have purchased may not match your convenience. NOTE: This guide covers several different models. A Refrigerator Light (p. 26) B Filter (Inside) (p. 25) C Modular Door Bins (p. 22) D Shelves (p. 19) E Optibin Crisper (p. 20...22) G Customcube Icemaker (p. 28) H Ice Bin (p. 23) I D J E K F G L H Use this page to become more familiar with the parts and features. Page references are included for your model. PARTS AND FEATURES A B M N O C C I Pull out Drawer (p. 24) J Durabase (p. 24) K Divider (p. 24) L Tilt-Out Door Basket (...
...have some or all of the features shown below may have purchased may not match your convenience. NOTE: This guide covers several different models. A Refrigerator Light (p. 26) B Filter (Inside) (p. 25) C Modular Door Bins (p. 22) D Shelves (p. 19) E Optibin Crisper (p. 20...22) G Customcube Icemaker (p. 28) H Ice Bin (p. 23) I D J E K F G L H Use this page to become more familiar with the parts and features. Page references are included for your model. PARTS AND FEATURES A B M N O C C I Pull out Drawer (p. 24) J Durabase (p. 24) K Divider (p. 24) L Tilt-Out Door Basket (...
User Guide
Page 24
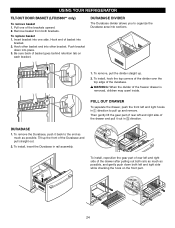
... pull the divider staight up the front of the drawer and pull it back to organize the Durabase area into sections. 1. Hook 24 USING YOUR REFRIGERATOR TILT-OUT DOOR BASKET (LFD25860** only) To remove basket 1. To replace basket 1. Hook end of basket goes behind retention tab on the front... part. Be sure back of basket into other bracket. Insert bracket into place. 3. DURABASE 1. PULL OUT DRAWER To separate the drawer, push the front left ...
... pull the divider staight up the front of the drawer and pull it back to organize the Durabase area into sections. 1. Hook 24 USING YOUR REFRIGERATOR TILT-OUT DOOR BASKET (LFD25860** only) To remove basket 1. To replace basket 1. Hook end of basket goes behind retention tab on the front... part. Be sure back of basket into other bracket. Insert bracket into place. 3. DURABASE 1. PULL OUT DRAWER To separate the drawer, push the front left ...
User Guide
Page 25
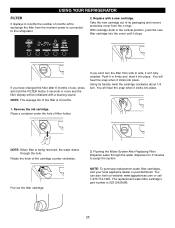
..., it clicks into place. 1. Rotate the knob of filter holder. The replacement water filter cartridge's part number is being removed, the water drains through the water dispenser for 3 minutes to the refrigerator. 2. If you can also visit our website: www.lgappliances.com or call 1-877-714-7481....Filter Dispense water through the hole. With cartridge knob in the vertical position, push the new filter cartridge into place. USING YOUR REFRIGERATOR FILTER It displays in months the number of months left to exchange the filter from the moment power is connected to purge the system...
..., it clicks into place. 1. Rotate the knob of filter holder. The replacement water filter cartridge's part number is being removed, the water drains through the water dispenser for 3 minutes to the refrigerator. 2. If you can also visit our website: www.lgappliances.com or call 1-877-714-7481....Filter Dispense water through the hole. With cartridge knob in the vertical position, push the new filter cartridge into place. USING YOUR REFRIGERATOR FILTER It displays in months the number of months left to exchange the filter from the moment power is connected to purge the system...
User Guide
Page 26
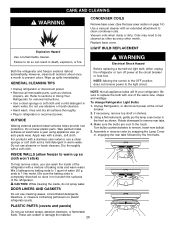
...(s). 5. Coils may need to be cleaned as often as shelves, crispers, etc. GENERAL CLEANING TIPS • Unplug refrigerator or disconnect power. • Remove all removable parts, such as every other month. Do not use cleaning waxes, concentrated detergents, bleaches, or cleaners containing petroleum on page... to the touch. CARE AND CLEANING WARNING CONDENSER COILS Remove base cover. (See the base cover section on plastic refrigerator parts. PLASTIC PARTS (covers and panels) Do not use abrasive or harsh cleaners. • Hand wash, rinse and dry all appliance bulbs will ...
...(s). 5. Coils may need to be cleaned as often as shelves, crispers, etc. GENERAL CLEANING TIPS • Unplug refrigerator or disconnect power. • Remove all removable parts, such as every other month. Do not use cleaning waxes, concentrated detergents, bleaches, or cleaners containing petroleum on page... to the touch. CARE AND CLEANING WARNING CONDENSER COILS Remove base cover. (See the base cover section on plastic refrigerator parts. PLASTIC PARTS (covers and panels) Do not use abrasive or harsh cleaners. • Hand wash, rinse and dry all appliance bulbs will ...
User Guide
Page 27
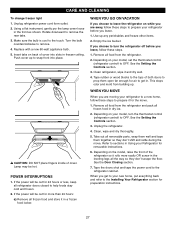
...wood blocks to prop them together so they don't scrape the floor. Unplug the refrigerator. 4. Take out all removable parts, wrap them well and tape them open far enough for 24 hours or less, keep all food from the refrigerator. 2. Make sure the bulb is cool to remove. 4. Use up . Depending... on back of both doors to the tops of cover into place. Remove all refrigerator doors ...
...wood blocks to prop them together so they don't scrape the floor. Unplug the refrigerator. 4. Take out all removable parts, wrap them well and tape them open far enough for 24 hours or less, keep all food from the refrigerator. 2. Make sure the bulb is cool to remove. 4. Use up . Depending... on back of both doors to the tops of cover into place. Remove all refrigerator doors ...
User Guide
Page 28
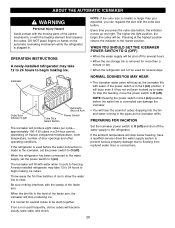
...to allow the water line to O (off) and shut off ). ABOUT THE AUTOMATIC ICEMAKER WARNING Personal Injury Hazard Avoid contact with the moving parts of the feeler arm. The icemaker will become cloudy, taste stale, and shrink. PREPARING FOR VACATION Set the icemaker power switch to clear. ...will fill with the cube size button. approximately 100-130 cubes in a 24-hour period, depending on the automatic icemaking mechanism while the refrigerator is removed for more than you expected, you press the cube size button, the indicator moves up to the lowest position. DO NOT ...
...to allow the water line to O (off) and shut off ). ABOUT THE AUTOMATIC ICEMAKER WARNING Personal Injury Hazard Avoid contact with the moving parts of the feeler arm. The icemaker will become cloudy, taste stale, and shrink. PREPARING FOR VACATION Set the icemaker power switch to clear. ...will fill with the cube size button. approximately 100-130 cubes in a 24-hour period, depending on the automatic icemaking mechanism while the refrigerator is removed for more than you expected, you press the cube size button, the indicator moves up to the lowest position. DO NOT ...
User Guide
Page 29
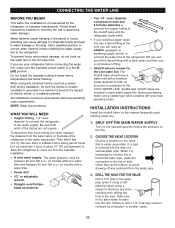
...screwdriver. • Two 1/4 ″ outer diameter compression nuts and 2 ferrules (sleeves) to connect the copper tubing to the shutoff valve and the refrigerator water valve. • If your local plumbing codes. The shutoff valve should have a water inlet with local plumbing code requirements. Before purchasing, make... shutoff valve on models with your existing copper water line has a flared fitting at the end, you can cause damage to refrigerator parts and lead to move out from drilling the hole in areas where temperatures fall below freezing. SHUT OFF THE MAIN WATER SUPPLY ...
...screwdriver. • Two 1/4 ″ outer diameter compression nuts and 2 ferrules (sleeves) to connect the copper tubing to the shutoff valve and the refrigerator water valve. • If your local plumbing codes. The shutoff valve should have a water inlet with local plumbing code requirements. Before purchasing, make... shutoff valve on models with your existing copper water line has a flared fitting at the end, you can cause damage to refrigerator parts and lead to move out from drilling the hole in areas where temperatures fall below freezing. SHUT OFF THE MAIN WATER SUPPLY ...


