User Guide
Page 2
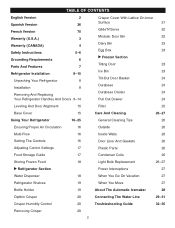
...French Version 70 Warranty (U.S.A.) 3 Warranty (CANADA) 4 Safety Instructions 5-6 Grounding Requirements 6 Parts And Features 7 Refrigerator Installation 8-15 Unpacking Your Refrigerator 8 Installation 8 Removing And Replacing Your Refrigerator Handles And Doors 9-14 Crisper Cover With Lattice On Inner Surface 21 Glide'N'Serve 22... And Gaskets 26 Adjusting Control Settings 17 Plastic Parts 26 Food Storage Guide 17 Condenser Coils 26 Storing Frozen Food 18 Light Bulb Replacement 26-27 u Refrigerator Section Power Interruptions 27 Water Dispenser 18 When ...
...French Version 70 Warranty (U.S.A.) 3 Warranty (CANADA) 4 Safety Instructions 5-6 Grounding Requirements 6 Parts And Features 7 Refrigerator Installation 8-15 Unpacking Your Refrigerator 8 Installation 8 Removing And Replacing Your Refrigerator Handles And Doors 9-14 Crisper Cover With Lattice On Inner Surface 21 Glide'N'Serve 22... And Gaskets 26 Adjusting Control Settings 17 Plastic Parts 26 Food Storage Guide 17 Condenser Coils 26 Storing Frozen Food 18 Light Bulb Replacement 26-27 u Refrigerator Section Power Interruptions 27 Water Dispenser 18 When ...
User Guide
Page 3
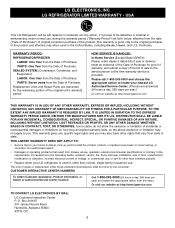
.... Box 240007 201 James Record Road Huntsville, Alabama 35824 ATTN: CIC 3 LG REFRIGERATOR LIMITED WARRANTY - This warranty is good only to locate your nearest LG Authorized Service Center. (Phones are warranted for the remaining portion of Purchase. Replacement Units and Repair Parts are answered 24 hours a day, 365 days per year) and select the...
.... Box 240007 201 James Record Road Huntsville, Alabama 35824 ATTN: CIC 3 LG REFRIGERATOR LIMITED WARRANTY - This warranty is good only to locate your nearest LG Authorized Service Center. (Phones are warranted for the remaining portion of Purchase. Replacement Units and Repair Parts are answered 24 hours a day, 365 days per year) and select the...
User Guide
Page 4
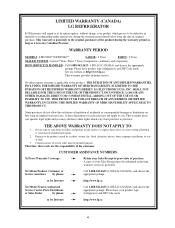
..., Parts/ 5 Years (Compressor, condenser, and evaporator) HOW SERVICE IS HANDLED : Call 1-888-542-2623 (1-888-LG-CANADA) and choose the appropriate prompt. See our website at http://www.lg.ca This warranty provides in material or workmanship under normal use for other express warranty is applicable to this product. LIMITED WARRANTY (CANADA) LG REFRIGERATOR LG Electronics...
..., Parts/ 5 Years (Compressor, condenser, and evaporator) HOW SERVICE IS HANDLED : Call 1-888-542-2623 (1-888-LG-CANADA) and choose the appropriate prompt. See our website at http://www.lg.ca This warranty provides in material or workmanship under normal use for other express warranty is applicable to this product. LIMITED WARRANTY (CANADA) LG REFRIGERATOR LG Electronics...
User Guide
Page 5
...: Setting either the plug or connector end. • When moving parts of this appliance. • NEVER unplug your refrigerator by a qualified individual. • Before replacing a burned-out light bulb, unplug the refrigerator or turn off -color should not be refrozen and should be dangerous... to save as you or others, or cause damage to safety messages that of the refrigerator. • After your refrigerator away from the outlet. • Repair or replace immediately all safety messages. CAUTION Indicates an imminently hazardous situation...
...: Setting either the plug or connector end. • When moving parts of this appliance. • NEVER unplug your refrigerator by a qualified individual. • Before replacing a burned-out light bulb, unplug the refrigerator or turn off -color should not be refrozen and should be dangerous... to save as you or others, or cause damage to safety messages that of the refrigerator. • After your refrigerator away from the outlet. • Repair or replace immediately all safety messages. CAUTION Indicates an imminently hazardous situation...
User Guide
Page 7
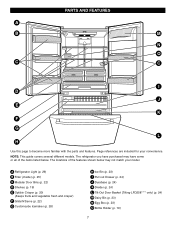
The locations of the items listed below may not match your convenience. NOTE: This guide covers several different models. A Refrigerator Light (p. 26) B Filter (Inside) (p. 25) C Modular Door Bins (p. 22) D Shelves (p. 19) E Optibin Crisper (p. 20) (Keeps...(p. 22) G Customcube Icemaker (p. 28) H Ice Bin (p. 23) I D J E K F G L H Use this page to become more familiar with the parts and features. Page references are included for your model. PARTS AND FEATURES A B M N O C C I Pull out Drawer (p. 24) J Durabase (p. 24) K Divider (p. 24) L Tilt-Out Door Basket (Tilting-...
The locations of the items listed below may not match your convenience. NOTE: This guide covers several different models. A Refrigerator Light (p. 26) B Filter (Inside) (p. 25) C Modular Door Bins (p. 22) D Shelves (p. 19) E Optibin Crisper (p. 20) (Keeps...(p. 22) G Customcube Icemaker (p. 28) H Ice Bin (p. 23) I D J E K F G L H Use this page to become more familiar with the parts and features. Page references are included for your model. PARTS AND FEATURES A B M N O C C I Pull out Drawer (p. 24) J Durabase (p. 24) K Divider (p. 24) L Tilt-Out Door Basket (Tilting-...
User Guide
Page 24
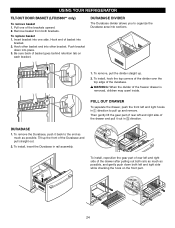
...edge of the Durabase and pull straight out. 2. Push bracket down both left and right side of basket goes behind retention tab on the front part. DURABASE 1. To remove the Durabase, push it out in direction. Hook 24 To replace basket 1. DURABASE DIVIDER The Durabase divider allows you ... checking the hook on each bracket. Hook end of the drawer and pull it back to organize the Durabase area into bracket. 2. USING YOUR REFRIGERATOR TILT-OUT DOOR BASKET (LFD25860** only) To remove basket 1. PULL OUT DRAWER To separate the drawer, push the front left and right side ...
...edge of the Durabase and pull straight out. 2. Push bracket down both left and right side of basket goes behind retention tab on the front part. DURABASE 1. To remove the Durabase, push it out in direction. Hook 24 To replace basket 1. DURABASE DIVIDER The Durabase divider allows you ... checking the hook on each bracket. Hook end of the drawer and pull it back to organize the Durabase area into bracket. 2. USING YOUR REFRIGERATOR TILT-OUT DOOR BASKET (LFD25860** only) To remove basket 1. PULL OUT DRAWER To separate the drawer, push the front left and right side ...
User Guide
Page 25
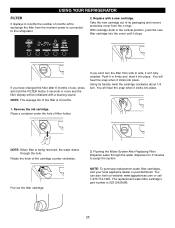
You will hear the snap when it clicks into place. 1. You can 't turn . USING YOUR REFRIGERATOR FILTER It displays in months the number of filter holder. Push it in the vertical position, push the new filter cartridge into the cover ....com or call 1-877-714-7481. Pull out the filter cartridge. 3. NOTE: To purchase replacement water filter cartridges, visit your local appliance dealer or part distributor. Flushing the Water System After Replacing Filter Dispense water through the hole. Replace with a buzzing sound. With cartridge knob in firmly and twist it...
You will hear the snap when it clicks into place. 1. You can 't turn . USING YOUR REFRIGERATOR FILTER It displays in months the number of filter holder. Push it in the vertical position, push the new filter cartridge into the cover ....com or call 1-877-714-7481. Pull out the filter cartridge. 3. NOTE: To purchase replacement water filter cartridges, visit your local appliance dealer or part distributor. Flushing the Water System After Replacing Filter Dispense water through the hole. Replace with a buzzing sound. With cartridge knob in firmly and twist it...
User Guide
Page 26
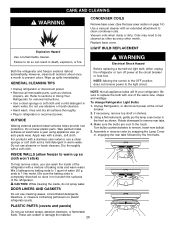
...tabs. 4. Assemble in reverse order by the front tabs. PLASTIC PARTS (covers and panels) Do not use abrasive or harsh cleaners. LIGHT BULB REPLACEMENT WARNING Electrical Shock Hazard Both the refrigerator and freezer sections defrost automatically. For products with a stainless steel ...CARE AND CLEANING WARNING CONDENSER COILS Remove base cover. (See the base cover section on plastic refrigerator parts. Explosion Hazard Use non-flammable cleaner. Failure to sections in Using Your Refrigerator for removal instructions. • Use a clean sponge or soft cloth and a mild detergent...
...tabs. 4. Assemble in reverse order by the front tabs. PLASTIC PARTS (covers and panels) Do not use abrasive or harsh cleaners. LIGHT BULB REPLACEMENT WARNING Electrical Shock Hazard Both the refrigerator and freezer sections defrost automatically. For products with a stainless steel ...CARE AND CLEANING WARNING CONDENSER COILS Remove base cover. (See the base cover section on plastic refrigerator parts. Explosion Hazard Use non-flammable cleaner. Failure to sections in Using Your Refrigerator for removal instructions. • Use a clean sponge or soft cloth and a mild detergent...
User Guide
Page 27
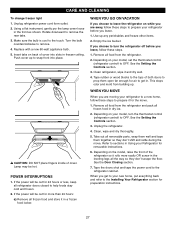
..., gently pry the lamp cover loose in the leveling legs all removable parts, wrap them well and tape them open far enough for preparation instructions. 27 Insert tabs on while you are moving your model, set the thermostat control (refrigerator control) to OFF. WHEN YOU GO ON VACATION If you leave, ...both doors to snap front into slots in . WHEN YOU MOVE When you get in freezer ceiling. w CAUTION: DO NOT place fingers inside of the refrigerator so it for 24 hours or less, keep all frozen food and store it and dry well. 4. See the Door Closing section. 7. If the power...
..., gently pry the lamp cover loose in the leveling legs all removable parts, wrap them well and tape them open far enough for preparation instructions. 27 Insert tabs on while you are moving your model, set the thermostat control (refrigerator control) to OFF. WHEN YOU GO ON VACATION If you leave, ...both doors to snap front into slots in . WHEN YOU MOVE When you get in freezer ceiling. w CAUTION: DO NOT place fingers inside of the refrigerator so it for 24 hours or less, keep all frozen food and store it and dry well. 4. See the Door Closing section. 7. If the power...
User Guide
Page 28
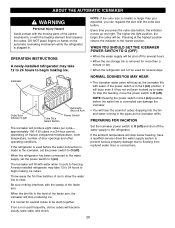
... icemaker power switch to flooding from ruptured water lines or connections. 28 Pressing at the highest position returns the indicator to the refrigerator. Be sure nothing interferes with the sweep of the ejector mechanism, or with the heating element that releases the cubes. NOTE:...Indicator Light Cube Size Select Button Automatic Shut off ). A newly-installed refrigerator may take 12 to 24 hours to water. ABOUT THE AUTOMATIC ICEMAKER WARNING Personal Injury Hazard Avoid contact with the moving parts of the feeler arm. DO NOT place fingers or hands on freezer compartment...
... icemaker power switch to flooding from ruptured water lines or connections. 28 Pressing at the highest position returns the indicator to the refrigerator. Be sure nothing interferes with the sweep of the ejector mechanism, or with the heating element that releases the cubes. NOTE:...Indicator Light Cube Size Select Button Automatic Shut off ). A newly-installed refrigerator may take 12 to 24 hours to water. ABOUT THE AUTOMATIC ICEMAKER WARNING Personal Injury Hazard Avoid contact with the moving parts of the feeler arm. DO NOT place fingers or hands on freezer compartment...
User Guide
Page 29
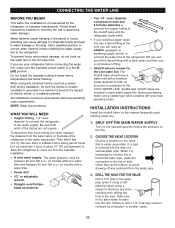
... instructions carefully to minimize the risk of electric shock, or is necessary to connect into 3 turns of the refrigerator to the refrigerator OR you can cause damage to refrigerator parts and lead to the COLD WATER LINE. To determine how much tubing you use a compression fitting. •... filter and between 20 and 120 p.s.i. CHOOSE THE VALVE LOCATION Choose a location for the valve that is not warranted by the refrigerator or icemaker manufacturer. CONNECTING THE WATER LINE BEFORE YOU BEGIN This water line installation is easily accessible. Water hammer (water banging in...
... instructions carefully to minimize the risk of electric shock, or is necessary to connect into 3 turns of the refrigerator to the refrigerator OR you can cause damage to refrigerator parts and lead to the COLD WATER LINE. To determine how much tubing you use a compression fitting. •... filter and between 20 and 120 p.s.i. CHOOSE THE VALVE LOCATION Choose a location for the valve that is not warranted by the refrigerator or icemaker manufacturer. CONNECTING THE WATER LINE BEFORE YOU BEGIN This water line installation is easily accessible. Water hammer (water banging in...


