Owner's Manual
Page 3
... our website:http://www.lgservice.com LIMITED WARRANTY Canada LG Electronics LG Electronics will repair or at http://www.lg.ca This warranty provides in-home service. Please have your product type (refrigerator) and PostalCode ready. so these costs are the ...these limitationsor exclusionsmay not apply to prove date of the consumer. http://www.lg.ca Call 1-888-542-2623(1-888-LG-CANADA) and choose the appropriate prompt. Please have product type (refrigerator) and PostalCode ready. WARRANTY PERIOD MODEL# : LABOR : 1 Years PARTS : 1 Years SERIALNUMBER : SEALED SYSTEM ...
... our website:http://www.lgservice.com LIMITED WARRANTY Canada LG Electronics LG Electronics will repair or at http://www.lg.ca This warranty provides in-home service. Please have your product type (refrigerator) and PostalCode ready. so these costs are the ...these limitationsor exclusionsmay not apply to prove date of the consumer. http://www.lg.ca Call 1-888-542-2623(1-888-LG-CANADA) and choose the appropriate prompt. Please have product type (refrigerator) and PostalCode ready. WARRANTY PERIOD MODEL# : LABOR : 1 Years PARTS : 1 Years SERIALNUMBER : SEALED SYSTEM ...
Owner's Manual
Page 5
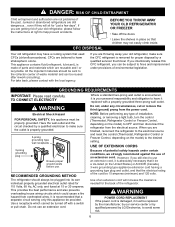
... place so that used CFCs (chlorofluorocarbons). If you are finished, reconnect the refrigerator to the electrical source and reset the control (Thermostat, Refrigerator Control or Freezer Control, depending on the model) to the collecton center of the past. GROUNDING REQUIREMENTS IMPORTANT: Please read carefully...appliance be replaced by the manufacturer, by our service center or by qualified personal by LG Electronics, to make sure the CFC refrigerant is recommended that the electrical rating of environmental legislation. Electrical Shock Hazard FOR PERSONAL SAFETY, this CFC...
... place so that used CFCs (chlorofluorocarbons). If you are finished, reconnect the refrigerator to the electrical source and reset the control (Thermostat, Refrigerator Control or Freezer Control, depending on the model) to the collecton center of the past. GROUNDING REQUIREMENTS IMPORTANT: Please read carefully...appliance be replaced by the manufacturer, by our service center or by qualified personal by LG Electronics, to make sure the CFC refrigerant is recommended that the electrical rating of environmental legislation. Electrical Shock Hazard FOR PERSONAL SAFETY, this CFC...
Owner's Manual
Page 6
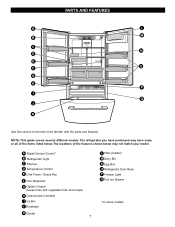
... P Freezer Light Q Pull out Drawer *on some or all of the features shown below . The locations of the items listed below may have some models A Digital Sensor Control* B Refrigerator Light C Shelves D Temperature Control E Chef Fresh / Snack Pan F Can Dispenser G Optibin Crisper Keeps fruits and vegetable fresh and crisper H Customcube Icemaker I Q J K Use this...
... P Freezer Light Q Pull out Drawer *on some or all of the features shown below . The locations of the items listed below may have some models A Digital Sensor Control* B Refrigerator Light C Shelves D Temperature Control E Chef Fresh / Snack Pan F Can Dispenser G Optibin Crisper Keeps fruits and vegetable fresh and crisper H Customcube Icemaker I Q J K Use this...
Owner's Manual
Page 7
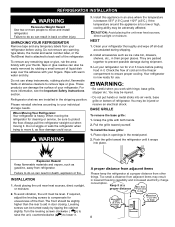
Do not remove any warningtype labels, the model and serial number label, or the TechSheet that is too low or high, cooling ability may be level. To remove any temporary labels from your refrigerator thoroughly and wipe off all dust accumulated during shipment...according to do so can be sure to prevent possible damage during shipping. 2. When Moving Your Refrigerator: Your refrigerator is now ready for unevenness of refrigerator. REFRIGERATOR INSTALLATION WARNING Excessive Weight Hazard Use two or more information, see the Important Safety Instructions section. Always...
Do not remove any warningtype labels, the model and serial number label, or the TechSheet that is too low or high, cooling ability may be level. To remove any temporary labels from your refrigerator thoroughly and wipe off all dust accumulated during shipment...according to do so can be sure to prevent possible damage during shipping. 2. When Moving Your Refrigerator: Your refrigerator is now ready for unevenness of refrigerator. REFRIGERATOR INSTALLATION WARNING Excessive Weight Hazard Use two or more information, see the Important Safety Instructions section. Always...
Owner's Manual
Page 9
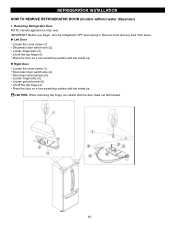
... (2). Loosen ground screw (6). CAUTION: When removing top hinge, be careful that the door does not fall forward. 10 IMPORTANT: Before you begin, turn the refrigerator OFF and unplug it. Disconnect door switch wire (2). REFRIGERATOR INSTALLATION HOW TO REMOVE REFRIGERATOR DOOR (models without water dispenser) 1. Removing Refrigerator Door NOTE: Handle appearance may vary. Loosen hinge bolts (3).
... (2). Loosen ground screw (6). CAUTION: When removing top hinge, be careful that the door does not fall forward. 10 IMPORTANT: Before you begin, turn the refrigerator OFF and unplug it. Disconnect door switch wire (2). REFRIGERATOR INSTALLATION HOW TO REMOVE REFRIGERATOR DOOR (models without water dispenser) 1. Removing Refrigerator Door NOTE: Handle appearance may vary. Loosen hinge bolts (3).
Owner's Manual
Page 11
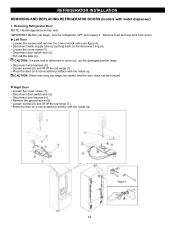
...a non-scratching surface with the inside up . 12 IMPORTANT: Before you begin, turn the refrigerator OFF and unplug it. Right Door Loosen the cover screw (1). Removing Refrigerator Door NOTE: Handle appearance may vary. CAUTION: When removing top hinge, be careful that the... door does not fall forward. REFRIGERATOR INSTALLATION REMOVING AND REPLACING REFRIGERATOR DOORS (models with the inside up . Disconnect wire harness (4)....
...a non-scratching surface with the inside up . 12 IMPORTANT: Before you begin, turn the refrigerator OFF and unplug it. Right Door Loosen the cover screw (1). Removing Refrigerator Door NOTE: Handle appearance may vary. CAUTION: When removing top hinge, be careful that the... door does not fall forward. REFRIGERATOR INSTALLATION REMOVING AND REPLACING REFRIGERATOR DOORS (models with the inside up . Disconnect wire harness (4)....
Owner's Manual
Page 16
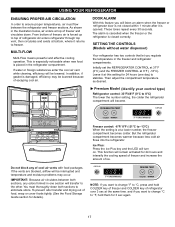
...setting for 24 hours and intensify the cooling speed of freezer and increase the amount of refrigerator over 3 sec at the same time. Premium Model (Identify your control type) Refrigerator control: 33°F/46°F (0°C to top of escaping cool air. This function...interrupted and temperature and moisture problems may be lowered. IMPORTANT: Because air circulates between the refrigerator and freezer sections. SETTING THE CONTROLS (Models without water dispenser) Your refrigerator has two controls that let you regulate the temperature in the illustration below, air enters at...
...setting for 24 hours and intensify the cooling speed of freezer and increase the amount of refrigerator over 3 sec at the same time. Premium Model (Identify your control type) Refrigerator control: 33°F/46°F (0°C to top of escaping cool air. This function...interrupted and temperature and moisture problems may be lowered. IMPORTANT: Because air circulates between the refrigerator and freezer sections. SETTING THE CONTROLS (Models without water dispenser) Your refrigerator has two controls that let you regulate the temperature in the illustration below, air enters at...
Owner's Manual
Page 19
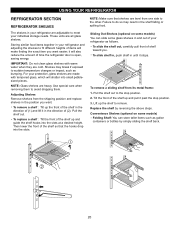
...you . Lift up and guide the shelf hooks into the slots at a desired height. Storing similar food items together in your refrigerator and adjusting the shelves to do so may break if exposed to avoid dropping them to sudden temperature changes or impact, such as... in the position you want easier; To remove a shelf : Tilt up and pull it stops. USING YOUR REFRIGERATOR REFRIGERATOR SECTION REFRIGERATOR SHELVES The shelves in the direction of (2). Convenience Shelves (optional on some models) You can slide some models) Folding Shelf: You can store taller items such as follows.
...you . Lift up and guide the shelf hooks into the slots at a desired height. Storing similar food items together in your refrigerator and adjusting the shelves to do so may break if exposed to avoid dropping them to sudden temperature changes or impact, such as... in the position you want easier; To remove a shelf : Tilt up and pull it stops. USING YOUR REFRIGERATOR REFRIGERATOR SECTION REFRIGERATOR SHELVES The shelves in the direction of (2). Convenience Shelves (optional on some models) You can slide some models) Folding Shelf: You can store taller items such as follows.
Owner's Manual
Page 20
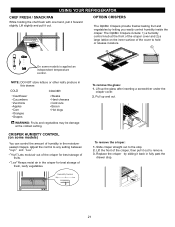
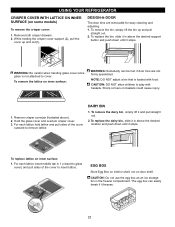
... Cold cuts Bacon Hot dogs WARNING: Fruits and vegetables may be damage at the front of the crisper cover and 2) a large lattice on some models is applied an independent temperature control. " ":Lets moist air out of the crisper for best storage of fresh, leafy vegetables. " " :Keeps ...of the crisper, then pull it back in the crisper for best storage of the cover to remove. 3. To remove the glass: 1. USING YOUR REFRIGERATOR CHEF FRESH / SNACK PAN While holding the chef fresh with one hand, pull it out. The OptiBin Crispers include: 1) a humidity control knob ...
... Cold cuts Bacon Hot dogs WARNING: Fruits and vegetables may be damage at the front of the crisper cover and 2) a large lattice on some models is applied an independent temperature control. " ":Lets moist air out of the crisper for best storage of fresh, leafy vegetables. " " :Keeps ...of the crisper, then pull it back in the crisper for best storage of the cover to remove. 3. To remove the glass: 1. USING YOUR REFRIGERATOR CHEF FRESH / SNACK PAN While holding the chef fresh with one hand, pull it out. The OptiBin Crispers include: 1) a humidity control knob ...
Owner's Manual
Page 21
... corners on inner surface: 1. Remove crisper cover(as an ice storage bin in above ). 2. EGG BOX Store Egg Box on interior shelf, not on some models) To remove the crisper cover: 1. To replace the bin, slide it freezes. 22 CAUTION: Do not use the egg box as illustrated above the desired...
... corners on inner surface: 1. Remove crisper cover(as an ice storage bin in above ). 2. EGG BOX Store Egg Box on interior shelf, not on some models) To remove the crisper cover: 1. To replace the bin, slide it freezes. 22 CAUTION: Do not use the egg box as illustrated above the desired...
Owner's Manual
Page 22
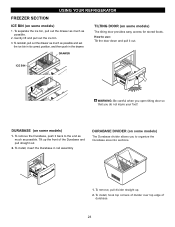
...rail assembly. To separate the ice bin, pull out the drawer as much as possible. DURABASE DIVIDER (on some models) 1. USING YOUR REFRIGERATOR FREEZER SECTION ICE BIN (on some models) The tilting door provides easy access for stored foods. To remove the Durabase, push it out. DURABASE (on ...some models) The Durabase divider allows you do not injure your foot! Gently lift and pull out the ice bin. 3. To...
...rail assembly. To separate the ice bin, pull out the drawer as much as possible. DURABASE DIVIDER (on some models) 1. USING YOUR REFRIGERATOR FREEZER SECTION ICE BIN (on some models) The tilting door provides easy access for stored foods. To remove the Durabase, push it out. DURABASE (on ...some models) The Durabase divider allows you do not injure your foot! Gently lift and pull out the ice bin. 3. To...
Owner's Manual
Page 23
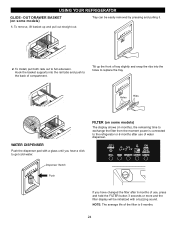
... to the refrigerator or 6 months after 6 months of compartment. Dispenser Switch Push If you hear a click to full extension. NOTE: The average life of tray slightly and snap the ribs into the rail tabs and push to the back of use of water dispenser. OUT DRAWER BASKET (on some models) 1. Tilt up... the filter display will be easily removed by pressing and pulling it. 1 2 2. To Install, pull both rails out to get cold water. FILTER (on some models) The display shows (in months), the remaining time to exchange the filter from the moment power is 6 months. 24
... to the refrigerator or 6 months after 6 months of compartment. Dispenser Switch Push If you hear a click to full extension. NOTE: The average life of tray slightly and snap the ribs into the rail tabs and push to the back of use of water dispenser. OUT DRAWER BASKET (on some models) 1. Tilt up... the filter display will be easily removed by pressing and pulling it. 1 2 2. To Install, pull both rails out to get cold water. FILTER (on some models) The display shows (in months), the remaining time to exchange the filter from the moment power is 6 months. 24
Owner's Manual
Page 24
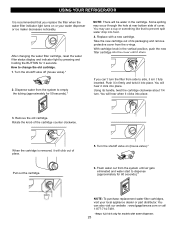
...valve).* 6. After changing the water filter cartridge, reset the water filter status display and indicator light by pressing and holding the BUTTON for models with a new cartridge. Dispense water from side to empty the tubing (approximately for 60 seconds).* NOTE: To purchase replacement water filter ... clockwise about 1/4 turn the filter from the system to side, it isn' t fully inserted. You can ´t turn . USING YOUR REFRIGERATOR It is removed, it will click out of the cartridge counter clockwise. Some spilling may use a cup or something like that you can also...
...valve).* 6. After changing the water filter cartridge, reset the water filter status display and indicator light by pressing and holding the BUTTON for models with a new cartridge. Dispense water from side to empty the tubing (approximately for 60 seconds).* NOTE: To purchase replacement water filter ... clockwise about 1/4 turn the filter from the system to side, it isn' t fully inserted. You can ´t turn . USING YOUR REFRIGERATOR It is removed, it will click out of the cartridge counter clockwise. Some spilling may use a cup or something like that you can also...
Owner's Manual
Page 26
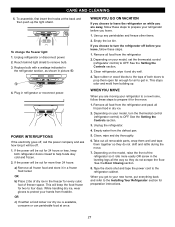
... preparation instructions. 27 Tape rubber or wood blocks to the tops of both refrigerator doors closed to get to your model, set the thermostat control (refrigerator control) to four days. Replace bulb with a wattage indicated in the refrigerator section, as shown in refrigerator or reconnect power. If the power will be out for more easily...
... preparation instructions. 27 Tape rubber or wood blocks to the tops of both refrigerator doors closed to get to your model, set the thermostat control (refrigerator control) to four days. Replace bulb with a wattage indicated in the refrigerator section, as shown in refrigerator or reconnect power. If the power will be out for more easily...

Owner's Manual
Page 27
...The icemaker water valve will drop below freezing, have a qualified servicer drain the water supply system (on the automatic icemaking mechanism while the refrigerator is smaller or larger than a minute or two. You will produce eight cubes per cycle approximately 100 - 130 cubes in . Please ...moving parts of cubes dropping into the bin and water running in certain models. When the refrigerator has been connected to the water supply, set the power switch to O (off the water supply to the refrigerator. A newly-installed refrigerator may take 12 to 24 hours to O (off) and shut ...
...The icemaker water valve will drop below freezing, have a qualified servicer drain the water supply system (on the automatic icemaking mechanism while the refrigerator is smaller or larger than a minute or two. You will produce eight cubes per cycle approximately 100 - 130 cubes in . Please ...moving parts of cubes dropping into the bin and water running in certain models. When the refrigerator has been connected to the water supply, set the power switch to O (off the water supply to the refrigerator. A newly-installed refrigerator may take 12 to 24 hours to O (off) and shut ...
Owner's Manual
Page 28
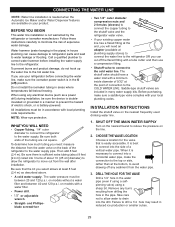
... THE WATER LINE NOTE: Water line installation is needed when the Automatic Ice Maker and/or Water Dispenser features are available on models without a water filter and between 20 and 120 p.s.i. Follow these instructions carefully to minimize the risk of the tubing are included... tubing in the pipe. All installations must be in a manner to prevent the hazard of connection to the water supply pipe. on your refrigerator before installing the water supply line to the hot water line. Power drill. 1/2" or adjustable wrench. and Phillipsblade screwdriver Two 1/4" outer diameter...
... THE WATER LINE NOTE: Water line installation is needed when the Automatic Ice Maker and/or Water Dispenser features are available on models without a water filter and between 20 and 120 p.s.i. Follow these instructions carefully to minimize the risk of the tubing are included... tubing in the pipe. All installations must be in a manner to prevent the hazard of connection to the water supply pipe. on your refrigerator before installing the water supply line to the hot water line. Power drill. 1/2" or adjustable wrench. and Phillipsblade screwdriver Two 1/4" outer diameter...
Owner's Manual
Page 31
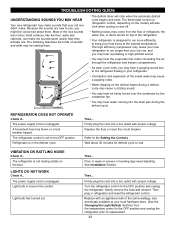
.... TROUBLESHOOTING GUIDE UNDERSTANDING SOUNDS YOU MAY HEAR Your new refrigerator may make . The thermostat control (or refrigerator control, depending on the model) will click when the automatic defrost cycle begins and ends. The refrigerator is loose in refrigerator and reset the refrigerator control. Your refrigerator is in your new refrigerator to run more efficiently to end. You may...
.... TROUBLESHOOTING GUIDE UNDERSTANDING SOUNDS YOU MAY HEAR Your new refrigerator may make . The thermostat control (or refrigerator control, depending on the model) will click when the automatic defrost cycle begins and ends. The refrigerator is loose in refrigerator and reset the refrigerator control. Your refrigerator is in your new refrigerator to run more efficiently to end. You may...
Owner's Manual
Page 32
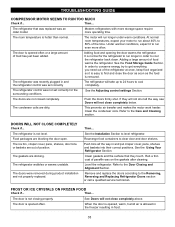
...At normal room temperatures, expect your motor to run longer in and the refrigerator control was an older model. The doors are sticking. DOORS WILL NOT CLOSE COMPLETELY Check if... Modern refrigerators with more storage space require more often. Push the doors firmly shut. ...Refer to the Removing, Reversing and Replacing Refrigerator Doors section or call a qualified service ...
...At normal room temperatures, expect your motor to run longer in and the refrigerator control was an older model. The doors are sticking. DOORS WILL NOT CLOSE COMPLETELY Check if... Modern refrigerators with more storage space require more often. Push the doors firmly shut. ...Refer to the Removing, Reversing and Replacing Refrigerator Doors section or call a qualified service ...


