
Owner's Manual
Page 8
...mounted on this page. 1. CAUTION: When you assemble or disassemble handle, you remove and attach the handle. Replacing Refrigerator Door Handle Align keyhole slots (1) on the top and bottom of the back of the door. HOW TO REPLACE DOOR HANDLES NOTE: Handle appearance may vary from illustrations... on this page. 1. Press the handle against the front of the handle allow the handle to remove the refrigerator door handles. NOTE: Handle appearance may vary from the mounting screws (3). REFRIGERATOR INSTALLATION TOOLS YOU MAY NEED 10 mm 1/4 in 3/8 in...
...mounted on this page. 1. CAUTION: When you assemble or disassemble handle, you remove and attach the handle. Replacing Refrigerator Door Handle Align keyhole slots (1) on the top and bottom of the back of the door. HOW TO REPLACE DOOR HANDLES NOTE: Handle appearance may vary from illustrations... on this page. 1. Press the handle against the front of the handle allow the handle to remove the refrigerator door handles. NOTE: Handle appearance may vary from the mounting screws (3). REFRIGERATOR INSTALLATION TOOLS YOU MAY NEED 10 mm 1/4 in 3/8 in...

Owner's Manual
Page 13
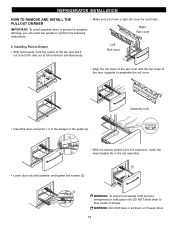
... both rails fitted simultaneously. 14 Remove the lower basket (1) by the sharp edges on hinge side. • With both hands, hold both sides of the door and pull it up . • Separate the left and right rail cover • With both hands, hold handle. CAUTION: When laying down the drawer, ... screws mounted in front of the bar and push it in to full lower extension. Then pull out the handle. (This may require some force). Assembly is the reverse order of disassembly. • Remove the screws(2) of the rail on both sides. 2 HOW TO REMOVE AND INSTALL THE PULLOUT DRAWER IMPORTANT...
... both rails fitted simultaneously. 14 Remove the lower basket (1) by the sharp edges on hinge side. • With both hands, hold both sides of the door and pull it up . • Separate the left and right rail cover • With both hands, hold handle. CAUTION: When laying down the drawer, ... screws mounted in front of the bar and push it in to full lower extension. Then pull out the handle. (This may require some force). Assembly is the reverse order of disassembly. • Remove the screws(2) of the rail on both sides. 2 HOW TO REMOVE AND INSTALL THE PULLOUT DRAWER IMPORTANT...
Owner's Manual
Page 14
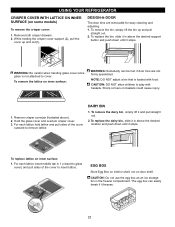
... out to let both rails out to play inside of drawer. WARNING: DO NOT step or sit down on Freezer Door. 15 Assembly hole • Insert the door connector (1) to the hanger of the door supports to perform the following instructions. • Make sure you will need two people to...top holes of the guide (2). 1 • With the drawer pulled out to full extension, insert the 2 lower basket (4) in the rail assembly. 4 • Lower door into final position and tighten the screws (3) 3 WARNING: To prevent accidental child and pet entrapment or suffocation risk DO NOT allow them to ...
... out to let both rails out to play inside of drawer. WARNING: DO NOT step or sit down on Freezer Door. 15 Assembly hole • Insert the door connector (1) to the hanger of the door supports to perform the following instructions. • Make sure you will need two people to...top holes of the guide (2). 1 • With the drawer pulled out to full extension, insert the 2 lower basket (4) in the rail assembly. 4 • Lower door into final position and tighten the screws (3) 3 WARNING: To prevent accidental child and pet entrapment or suffocation risk DO NOT allow them to ...
Owner's Manual
Page 21
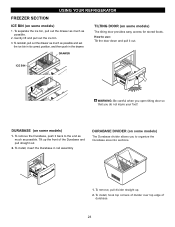
... on inner surface: 1. For each lattice hold lattice and pull sides of the cover to remove lattice. The egg box can be hurt if door bins are removable for easy cleaning and adjusting. 1. While holding the crisper cover support (2), pull the cover up and pull straight out. 2. NOTE...inner surface: WARNING: Somebody can easily break if it and pull straight out. 2. CAUTION: DO NOT allow children to cover. DESIGN-A-DOOR The door bins are not firmly assembled. To replace the dairy bin, slide it stops. To remove the dairy bin, simply lift it freezes. 22 EGG BOX Store Egg...
... on inner surface: 1. For each lattice hold lattice and pull sides of the cover to remove lattice. The egg box can be hurt if door bins are removable for easy cleaning and adjusting. 1. While holding the crisper cover support (2), pull the cover up and pull straight out. 2. NOTE...inner surface: WARNING: Somebody can easily break if it and pull straight out. 2. CAUTION: DO NOT allow children to cover. DESIGN-A-DOOR The door bins are not firmly assembled. To replace the dairy bin, slide it stops. To remove the dairy bin, simply lift it freezes. 22 EGG BOX Store Egg...
Owner's Manual
Page 22
... the ice bin, pull out the drawer as much as possible and set the ice bin in its correct position, and then push in rail assembly. DURABASE (on some models) The Durabase divider allows you do not injure your foot! DURABASE DIVIDER (on some models) 1. To remove, pull divider straight up... that you to the end as much as possible. 2. Gently lift and pull out the ice bin. 3. How to use: Tilt the door down and pull it back to organize the Durabase area into sections. 12 1. To remove the Durabase, push it out. To install, hook top corners ...
... the ice bin, pull out the drawer as much as possible and set the ice bin in its correct position, and then push in rail assembly. DURABASE (on some models) The Durabase divider allows you do not injure your foot! DURABASE DIVIDER (on some models) 1. To remove, pull divider straight up... that you to the end as much as possible. 2. Gently lift and pull out the ice bin. 3. How to use: Tilt the door down and pull it back to organize the Durabase area into sections. 12 1. To remove the Durabase, push it out. To install, hook top corners ...
Owner's Manual
Page 26
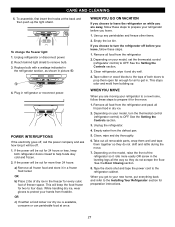
...freezer space. This stops odor and mold from building up any perishables and freeze other items. 2. Tape the doors shut and tape the power cord to remove bulb. 3. To assemble, first insert the hooks at once. Replace bulb with a wattage indicated in the refrigerator section, as shown ... model, set the thermostat control (refrigerator control) to prop them together so they do not shift and rattle during the move . 1. See the Door Closing section. 8. This will be off before you leave, follow these steps. 1. If you choose to turn the thermostat control (refrigerator control)...
...freezer space. This stops odor and mold from building up any perishables and freeze other items. 2. Tape the doors shut and tape the power cord to remove bulb. 3. To assemble, first insert the hooks at once. Replace bulb with a wattage indicated in the refrigerator section, as shown ... model, set the thermostat control (refrigerator control) to prop them together so they do not shift and rattle during the move . 1. See the Door Closing section. 8. This will be off before you leave, follow these steps. 1. If you choose to turn the thermostat control (refrigerator control)...


