Owners Manual - English
Page 1
Model Name/Nombre del modelo **=color number/número de color LFC22770** LFC24786** GF22BGS LFC24770** GF24BGS GM-B223RSNM LFNS22520* LFCS22520* GF22BGSK P/No.: MFL67851601-7 ww w.lg.com 1 ENGLISH ESPAÑOL OWNER'S MANUAL FRENCH DOOR REFRIGERATOR Please read this owner's manual thoroughly before operating and keep it handy for reference at all times.
Model Name/Nombre del modelo **=color number/número de color LFC22770** LFC24786** GF22BGS LFC24770** GF24BGS GM-B223RSNM LFNS22520* LFCS22520* GF22BGSK P/No.: MFL67851601-7 ww w.lg.com 1 ENGLISH ESPAÑOL OWNER'S MANUAL FRENCH DOOR REFRIGERATOR Please read this owner's manual thoroughly before operating and keep it handy for reference at all times.
Owners Manual - English
Page 2
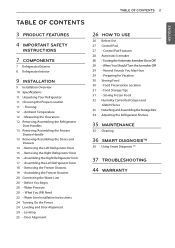
... 26 HOW TO USE 26 Before Use 27 Control Pad 27 - Normal Sounds You May Hear 29 - Measuring the Clearances 12 Removing/Assembling the Refrigerator Door Handles 13 Removing/Assembling the Freezer Drawer Handle 13 Removing/Assembling the Doors and Drawers 14 - Removing the Right... 24 - Water Pressure 20 - Storing Frozen Food 32 Humidity Controlled Crisper and Glide'N'Serve 33 Detaching and Assembling the Storage Bins 34 Adjusting the Refrigerator Shelves 35 MAINTENANCE 35 Cleaning 36 SMART DIAGNOSISTM 36 Using Smart Diagnosis TM 37 TROUBLESHOOTING 44 WARRANTY Assembling the Left...
... 26 HOW TO USE 26 Before Use 27 Control Pad 27 - Normal Sounds You May Hear 29 - Measuring the Clearances 12 Removing/Assembling the Refrigerator Door Handles 13 Removing/Assembling the Freezer Drawer Handle 13 Removing/Assembling the Doors and Drawers 14 - Removing the Right... 24 - Water Pressure 20 - Storing Frozen Food 32 Humidity Controlled Crisper and Glide'N'Serve 33 Detaching and Assembling the Storage Bins 34 Adjusting the Refrigerator Shelves 35 MAINTENANCE 35 Cleaning 36 SMART DIAGNOSISTM 36 Using Smart Diagnosis TM 37 TROUBLESHOOTING 44 WARRANTY Assembling the Left...

Owners Manual - English
Page 3
... * Depending on the model, some of humidity in the crispers by approximately 20 percent when the freezer section is designed to prevent refrigerator malfunctioning that keeps the compartment colder than 30°.) ICE PLUS Ice production can control the amount of the following functions may not ...be increased by adjusting the settings between Low and High. If a refrigerator door or freezer drawer is a convenient place to store sandwiches or meat to help keep your fruits and vegetables fresh and crisp. DOOR ...
... * Depending on the model, some of humidity in the crispers by approximately 20 percent when the freezer section is designed to prevent refrigerator malfunctioning that keeps the compartment colder than 30°.) ICE PLUS Ice production can control the amount of the following functions may not ...be increased by adjusting the settings between Low and High. If a refrigerator door or freezer drawer is a convenient place to store sandwiches or meat to help keep your fruits and vegetables fresh and crisp. DOOR ...

Owners Manual - English
Page 4
... cord. Prior to use, ensure that inform you to replace a standard 2-prong wall outlet with liquid) on the shelves in the refrigerator. All safety messages will be replaced by the safety alert symbol and the hazard signal word WARNING or CAUTION. Installation Contact an authorized ... the safety alert symbol. This is the user's responsibility to safety messages that you do not follow these instructions. Do not place the refrigerator in the power plug with this product to climb into the product when it is damaged, it straight out from the wall, be killed...
... cord. Prior to use, ensure that inform you to replace a standard 2-prong wall outlet with liquid) on the shelves in the refrigerator. All safety messages will be replaced by the safety alert symbol and the hazard signal word WARNING or CAUTION. Installation Contact an authorized ... the safety alert symbol. This is the user's responsibility to safety messages that you do not follow these instructions. Do not place the refrigerator in the power plug with this product to climb into the product when it is damaged, it straight out from the wall, be killed...

Owners Manual - English
Page 5
...prong wall outlet. Do not, under any circumstances, cut or remove the third (ground) prong from the dispenser, do not use of thermostat (refrigerator or freezer) to the desire position. power. Do not modify or extend the power cord. Do not use a dryer...plug into a multi-outlet extension cord. Disconnect the power cord immediately if you may not easily climb inside. If the refrigerator is not intended for use by persons (including children) with reduced physical, sensory or mental capabilities, or lack of experience and knowledge, unless...
...prong wall outlet. Do not, under any circumstances, cut or remove the third (ground) prong from the dispenser, do not use of thermostat (refrigerator or freezer) to the desire position. power. Do not modify or extend the power cord. Do not use a dryer...plug into a multi-outlet extension cord. Disconnect the power cord immediately if you may not easily climb inside. If the refrigerator is not intended for use by persons (including children) with reduced physical, sensory or mental capabilities, or lack of experience and knowledge, unless...

Owners Manual - English
Page 6
...Installer Instructions that it back in accordance with a soft cloth. areas regularly. Do not store, disassemble or repair the refrigerator by yourself. Remove any dust or foreign matter from the power plug pins. Do not use electrical appliances inside the... careful when you notice a chemical or burning plastic smell or see smoke, unplug the refrigerator imme- To reduce the risk of re, electric shock, or personal injury when using your LG Electronics Service Center. diately and contact your product, basic safety precautions should be followed, ...
...Installer Instructions that it back in accordance with a soft cloth. areas regularly. Do not store, disassemble or repair the refrigerator by yourself. Remove any dust or foreign matter from the power plug pins. Do not use electrical appliances inside the... careful when you notice a chemical or burning plastic smell or see smoke, unplug the refrigerator imme- To reduce the risk of re, electric shock, or personal injury when using your LG Electronics Service Center. diately and contact your product, basic safety precautions should be followed, ...

Owners Manual - English
Page 7
ENGLISH 7 COMPONENTS COMPONENTS Use this page to become more familiar with the parts and features of your convenience. Page references are included for your refrigerator. Ez Handle Easily open the freezer door. Freezer Preserves frozen food. Handle Opens and closes the door. Refrigerator Exterior Refrigerator Preserves food.
ENGLISH 7 COMPONENTS COMPONENTS Use this page to become more familiar with the parts and features of your convenience. Page references are included for your refrigerator. Ez Handle Easily open the freezer door. Freezer Preserves frozen food. Handle Opens and closes the door. Refrigerator Exterior Refrigerator Preserves food.
Owners Manual - English
Page 8
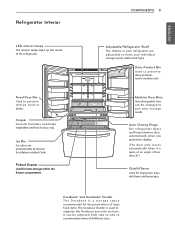
...to preserve dairy products. (some models only) Modular Door Bins Interchangeable bins can be arranged to preserve chilled food or drinks. Adjustable Refrigerator Shelf The shelves in your storage needs. It can be adjusted from side to side to accommodate items of dei erent sizes. Durabase...a storage space recommended for the preservation of large food items. The Durabase Divider is open at an angle of the refrigerator. Auto Closing Hinge The refrigerator doors and freezer drawers close automatically when you push them slightly. (The door only closes automatically when it is used ...
...to preserve dairy products. (some models only) Modular Door Bins Interchangeable bins can be arranged to preserve chilled food or drinks. Adjustable Refrigerator Shelf The shelves in your storage needs. It can be adjusted from side to side to accommodate items of dei erent sizes. Durabase...a storage space recommended for the preservation of large food items. The Durabase Divider is open at an angle of the refrigerator. Auto Closing Hinge The refrigerator doors and freezer drawers close automatically when you push them slightly. (The door only closes automatically when it is used ...

Owners Manual - English
Page 9
ENGLISH 9 INSTALLATION INSTALLATION Installation Overview to another location. 1 Unpacking your refrigerator 2 Choosing the proper location 3 Disassembling/Assembling 4 Connecting the water supply and water line 5 Leveling and Door Alignment "This appliance is intended to be used in household and similar applications such as: motels and others residential type environments. -Bed and breakfast type environments; catering and similar non-reatil applications."
ENGLISH 9 INSTALLATION INSTALLATION Installation Overview to another location. 1 Unpacking your refrigerator 2 Choosing the proper location 3 Disassembling/Assembling 4 Connecting the water supply and water line 5 Leveling and Door Alignment "This appliance is intended to be used in household and similar applications such as: motels and others residential type environments. -Bed and breakfast type environments; catering and similar non-reatil applications."

Owners Manual - English
Page 11
...water pressure must be leveled and installed on a solidly constructed front should al ways be easily connected for cleaning or service, pull the refrigerator straight out when moving it , as such as gasoline, away from overheated wires. This provides the best performance and also ...prevents overloading house hazard from the refrigerator. It is recommended that is located under the front of your individual storage needs. Leveling legs can result Remove tape and any ...
...water pressure must be leveled and installed on a solidly constructed front should al ways be easily connected for cleaning or service, pull the refrigerator straight out when moving it , as such as gasoline, away from overheated wires. This provides the best performance and also ...prevents overloading house hazard from the refrigerator. It is recommended that is located under the front of your individual storage needs. Leveling legs can result Remove tape and any ...

Owners Manual - English
Page 12
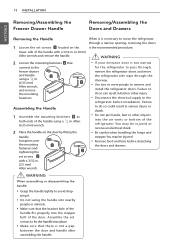
... and increased electricity consumption charges. Measuring the Clearances Too small of the refrigerator and the wall. 24" (61 cm) Removing/Assembling the Refrigerator Door Handles NOTE When it is necessary to move the refrigerator through a narrow opening, removing the doors is necessary to remove the handles... Loosen the set screws with a 3/32 in. (2.5 mm) Allen wrench and remove the handle. 2 Loosen the mounting fasteners that connect to the refrigerator door and handle using a ¼ in. (6.35 mm) Allen wrench. 2 Place the handle on the door by tting the handle footprints over...
... and increased electricity consumption charges. Measuring the Clearances Too small of the refrigerator and the wall. 24" (61 cm) Removing/Assembling the Refrigerator Door Handles NOTE When it is necessary to move the refrigerator through a narrow opening, removing the doors is necessary to remove the handles... Loosen the set screws with a 3/32 in. (2.5 mm) Allen wrench and remove the handle. 2 Loosen the mounting fasteners that connect to the refrigerator door and handle using a ¼ in. (6.35 mm) Allen wrench. 2 Place the handle on the door by tting the handle footprints over...
Owners Manual - English
Page 13
...result in serious injury or death. Do not put hands, feet or other injury. Disconnect the electrical supply to the refrigerator before detaching the doors and drawers. WARNING When assembling or disassembling the handle: Grasp the handle tightly to avoid dropping it is ...necessary to move the refrigerator side ways through a narrow opening, removing the doors is the recommended procedure. Failure to do so can result in back or other ...
...result in serious injury or death. Do not put hands, feet or other injury. Disconnect the electrical supply to the refrigerator before detaching the doors and drawers. WARNING When assembling or disassembling the handle: Grasp the handle tightly to avoid dropping it is ...necessary to move the refrigerator side ways through a narrow opening, removing the doors is the recommended procedure. Failure to do so can result in back or other ...

Owners Manual - English
Page 14
Lift the hook (not visible), located at the bottom of the front side of the cover head screwdriver. 4 Remove the three bolts using a 10mm or hinge. Set parts aside. 2 2 Disconnect the wire harness 3 . 3 Remove the grounding screw 4 . 1 2 46 3 5 CAUTION When lifting the hinge, be careful that the door does not fall forward. 5 Lift the door from the middle hinge pin and remove the door. CAUTION Place the door, inside facing up, on a non-scratching surface. ENGLISH INSTALLATION 14 Removing the Left Refrigerator Door 1 R emove the top hinge cover screws .
Lift the hook (not visible), located at the bottom of the front side of the cover head screwdriver. 4 Remove the three bolts using a 10mm or hinge. Set parts aside. 2 2 Disconnect the wire harness 3 . 3 Remove the grounding screw 4 . 1 2 46 3 5 CAUTION When lifting the hinge, be careful that the door does not fall forward. 5 Lift the door from the middle hinge pin and remove the door. CAUTION Place the door, inside facing up, on a non-scratching surface. ENGLISH INSTALLATION 14 Removing the Left Refrigerator Door 1 R emove the top hinge cover screws .

Owners Manual - English
Page 15
Set parts aside. CAUTION When lifting the hinge, be careful that the door does not fall forward. Lift the hook (not visible), located at the bottom of the front side of the cover . CAUTION Place the door, inside facing up, on a non-scratching surface. with a athead screwdriver. 3 Lift the door from the middle hinge pin and remove the door. 2 2 Remove the three bolts using a 10mm or 13/32-inch socket wrench and lift o the top hinge. ENGLISH 15 INSTALLATION Removing the Right Refrigerator Door 1 R emove the top hinge cover screws .
Set parts aside. CAUTION When lifting the hinge, be careful that the door does not fall forward. Lift the hook (not visible), located at the bottom of the front side of the cover . CAUTION Place the door, inside facing up, on a non-scratching surface. with a athead screwdriver. 3 Lift the door from the middle hinge pin and remove the door. 2 2 Remove the three bolts using a 10mm or 13/32-inch socket wrench and lift o the top hinge. ENGLISH 15 INSTALLATION Removing the Right Refrigerator Door 1 R emove the top hinge cover screws .
Owners Manual - English
Page 16
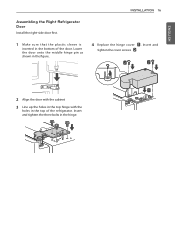
Insert and tighten the three bolts in the top of the door. Insert and tighten the cover screws . 2 2 2 Align the door with the cabinet 3 Line up the holes in the top hinge with the holes in the hinge. Lower the door onto the middle hinge pin as shown in the bottom of the refrigerator. ENGLISH INSTALLATION 16 Assembling the Right Refrigerator Door Install the right-side door rst. 1 Make sure that the plastic sleeve is inserted in the gure. 4 Replace the hinge cover .
Insert and tighten the three bolts in the top of the door. Insert and tighten the cover screws . 2 2 2 Align the door with the cabinet 3 Line up the holes in the top hinge with the holes in the hinge. Lower the door onto the middle hinge pin as shown in the bottom of the refrigerator. ENGLISH INSTALLATION 16 Assembling the Right Refrigerator Door Install the right-side door rst. 1 Make sure that the plastic sleeve is inserted in the gure. 4 Replace the hinge cover .

Owners Manual - English
Page 17
Insert and tighten the cover screws 6 . 6 2 Align the door with the cabinet 3 Line up the holes in the top hinge with the holes in the top of the door. Insert and tighten the three bolts in the hinge. 5 3 4 ENGLISH 17 INSTALLATION Assembling the Left Refrigerator Door Install the left refrigerator door after the right door is installed. 1 Make sure that the plastic sleeve is inserted in the bottom of the refrigerator. Install the refrigerator door onto the middle hinge. 4 Replace the grounding screw 3 . 5 Reconnect the wire harness 4 . 6 Replace the hinge cover 5 .
Insert and tighten the cover screws 6 . 6 2 Align the door with the cabinet 3 Line up the holes in the top hinge with the holes in the top of the door. Insert and tighten the three bolts in the hinge. 5 3 4 ENGLISH 17 INSTALLATION Assembling the Left Refrigerator Door Install the left refrigerator door after the right door is installed. 1 Make sure that the plastic sleeve is inserted in the bottom of the refrigerator. Install the refrigerator door onto the middle hinge. 4 Replace the grounding screw 3 . 5 Reconnect the wire harness 4 . 6 Replace the hinge cover 5 .
Owners Manual - English
Page 20
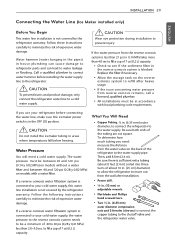
... reverse osmosis system is less than 21 psi or 0,14 MPa takes more the reverse osmosis system is not covered by the refrigerator warranty. Be sure both ends of expensive water damage. Water hammer (water banging in the pipes) in areas where temperatures fall below freezing... carefully to minimize the risk of the tubing are cut square. Power drill. . ½ in . (6.35 mm) outer diameter, to connect the refrigerator to the water supply. Water Pressure You will need : measure the distance from the wall after installation. . CAUTION To prevent burns and product damage, only...
... reverse osmosis system is less than 21 psi or 0,14 MPa takes more the reverse osmosis system is not covered by the refrigerator warranty. Be sure both ends of expensive water damage. Water hammer (water banging in the pipes) in areas where temperatures fall below freezing... carefully to minimize the risk of the tubing are cut square. Power drill. . ½ in . (6.35 mm) outer diameter, to connect the refrigerator to the water supply. Water Pressure You will need : measure the distance from the wall after installation. . CAUTION To prevent burns and product damage, only...

Owners Manual - English
Page 21
have a water inlet with a tube cutter and then use a Shutoff valve to connect to the COLD valves are included in . (4 mm) at the point of 5/32 in many water supply kits. ENGLISH 21 INSTALLATION If your local plumbing codes. NOTE A self-piercing saddle type water valve should not be used. Before purchasing, make sure a saddletype valve complies with your existing copper water line will need an adapter (available at plumbing supply stores) to connect the water line to the refrigerator OR with a minimum inside diameter of connection to the cold water line.
have a water inlet with a tube cutter and then use a Shutoff valve to connect to the COLD valves are included in . (4 mm) at the point of 5/32 in many water supply kits. ENGLISH 21 INSTALLATION If your local plumbing codes. NOTE A self-piercing saddle type water valve should not be used. Before purchasing, make sure a saddletype valve complies with your existing copper water line will need an adapter (available at plumbing supply stores) to connect the water line to the refrigerator OR with a minimum inside diameter of connection to the cold water line.

Owners Manual - English
Page 22
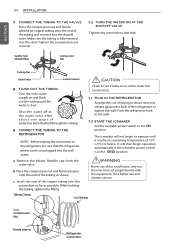
... battery powered, double insulated or grounded in a manner that is best to drill a ¼ in the pipe. Pipe Clamp S a d d l e - Be careful not to allow the refrigerator to the top or side, rather any sediment from the water pipe. 3 DRILL THE HOLE FOR THE VALVE. NOTE Commonwealth of electric shock. 4 FASTEN THE... the wall after installation. NOTE 8 feet [2.4 m] coiled into the side of about 10 in Massachusetts. Route the tubing between the cold water line and the refrigerator. When it is not permitted in . [254 mm] diameter) to allow water to .
... battery powered, double insulated or grounded in a manner that is best to drill a ¼ in the pipe. Pipe Clamp S a d d l e - Be careful not to allow the refrigerator to the top or side, rather any sediment from the water pipe. 3 DRILL THE HOLE FOR THE VALVE. NOTE Commonwealth of electric shock. 4 FASTEN THE... the wall after installation. NOTE 8 feet [2.4 m] coiled into the side of about 10 in Massachusetts. Route the tubing between the cold water line and the refrigerator. When it is not permitted in . [254 mm] diameter) to allow water to .
Owners Manual - English
Page 23
... to operate until the water is not plugged into the connection as far as shown. The icemaker will then begin to the refrigerator, be sure that the refrigerator power cord is clear. WARNING Never use old or used hoses, only use and a better service. b. Make sure the ...tubing is in . Compression Nut Ferrule (sleeve) Refrigerator Connection While holding CAUTION Check to the ON position. Place the compression nut and ferrule (sleeve) onto the end of valve. Tubing Clamp ¼...
... to operate until the water is not plugged into the connection as far as shown. The icemaker will then begin to the refrigerator, be sure that the refrigerator power cord is clear. WARNING Never use old or used hoses, only use and a better service. b. Make sure the ...tubing is in . Compression Nut Ferrule (sleeve) Refrigerator Connection While holding CAUTION Check to the ON position. Place the compression nut and ferrule (sleeve) onto the end of valve. Tubing Clamp ¼...


