Owner's Manual
Page 2
... will repair or at the time warranty service is required and must be submitted at its option replace, without charge, your home to deliver and pickup, install, instruct, or replace house fuses or correct house wiring or plumbing, or correction of God. 3. THE ABOVE WARRANTY DOES NOT APPLY TO: 1. Service Assistance: Press the appropriate menu option, and have your product type (Refrigerator), model number, serial number...
... will repair or at the time warranty service is required and must be submitted at its option replace, without charge, your home to deliver and pickup, install, instruct, or replace house fuses or correct house wiring or plumbing, or correction of God. 3. THE ABOVE WARRANTY DOES NOT APPLY TO: 1. Service Assistance: Press the appropriate menu option, and have your product type (Refrigerator), model number, serial number...

Owner's Manual
Page 5
... Doors How to remove and Install Pull-Out Drawer Closing and Aligning the doors 8-14 8 8 8 9 10-11 12-13 14 Refrigerator Care and Cleaning Refrigerator Cleaning Outside Inside Walls Door Lining & Gaskets Plastic Parts (Covers and Panel) Back Cover Replacing Refrigerator Lights Replacing Freezer Lights Power Interruptions When Going on Vacation When Moving About the Automatic Ice Maker Connecting the Water Line Troubleshooting Guide Using your Refrigerator Ensuring Proper Air Circulation Multi Flow Ice Plus Door Alarm Energy Saving Adjusting the Controls Adjusting Control Settings...
... Doors How to remove and Install Pull-Out Drawer Closing and Aligning the doors 8-14 8 8 8 9 10-11 12-13 14 Refrigerator Care and Cleaning Refrigerator Cleaning Outside Inside Walls Door Lining & Gaskets Plastic Parts (Covers and Panel) Back Cover Replacing Refrigerator Lights Replacing Freezer Lights Power Interruptions When Going on Vacation When Moving About the Automatic Ice Maker Connecting the Water Line Troubleshooting Guide Using your Refrigerator Ensuring Proper Air Circulation Multi Flow Ice Plus Door Alarm Energy Saving Adjusting the Controls Adjusting Control Settings...
Owner's Manual
Page 6
... cord or on how to climb, stand or swing from the outlet. Do not use gasoline or other foods. DO NOT place your refrigerator, take care not to ensure a proper ground connection. • Immediately repair or replace all instructions before cleaning or repairing. NOTE: We strongly recommend that discharges the cubes. Use refrozen products as soon as the doors, hinges and cabinets.
... cord or on how to climb, stand or swing from the outlet. Do not use gasoline or other foods. DO NOT place your refrigerator, take care not to ensure a proper ground connection. • Immediately repair or replace all instructions before cleaning or repairing. NOTE: We strongly recommend that discharges the cubes. Use refrozen products as soon as the doors, hinges and cabinets.

Owner's Manual
Page 7
.... NOTE: Before installation, cleaning or replacing light bulbs, you still choose to utilize an extension cable, it is absolutely necessary that it is listed in the UL (in the United States) or CSA (in and adjust the thermostat to ensure that uses CFC's (chlorofluorocarbons). DANGER: CHILDREN MAY BECOME TRAPPED Children becoming trapped or suffocated is your old refrigerator, please follow...
.... NOTE: Before installation, cleaning or replacing light bulbs, you still choose to utilize an extension cable, it is absolutely necessary that it is listed in the UL (in the United States) or CSA (in and adjust the thermostat to ensure that uses CFC's (chlorofluorocarbons). DANGER: CHILDREN MAY BECOME TRAPPED Children becoming trapped or suffocated is your old refrigerator, please follow...
Owner's Manual
Page 8
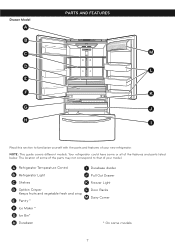
... Drawer C Shelves K Freezer Light D Optibin Crisper L Door Racks Keeps fruits and vegetable fresh and crisp M Dairy Corner E Pantry * F Ice Maker * G Ice Bin* H Durabase * On some or all of the features and parts listed below. A Refrigerator Temperature Control I Read this section to that of your model. The location of some of the parts may not correspond to familiarize yourself with the parts and features of your new refrigerator. NOTE: This guide covers different models. Your refrigerator...
... Drawer C Shelves K Freezer Light D Optibin Crisper L Door Racks Keeps fruits and vegetable fresh and crisp M Dairy Corner E Pantry * F Ice Maker * G Ice Bin* H Durabase * On some or all of the features and parts listed below. A Refrigerator Temperature Control I Read this section to that of your model. The location of some of the parts may not correspond to familiarize yourself with the parts and features of your new refrigerator. NOTE: This guide covers different models. Your refrigerator...
Owner's Manual
Page 9
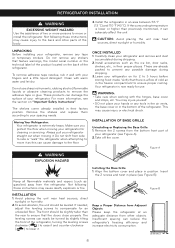
... floor. WARNING: • Take care when working with your refrigerator. INSTALLATION OF BASE GRILLE Uninstalling or Replacing the Base Grille 1. Figure A WARNING EXPLOSION HAZARD Installing the Base Grille 1. If needed, adjust the leveling screws to prevent any tools in the air vents, the base cover or in the freezer compartment to ensure that feature warnings, the model serial number or the technical label of the product...
... floor. WARNING: • Take care when working with your refrigerator. INSTALLATION OF BASE GRILLE Uninstalling or Replacing the Base Grille 1. Figure A WARNING EXPLOSION HAZARD Installing the Base Grille 1. If needed, adjust the leveling screws to prevent any tools in the air vents, the base cover or in the freezer compartment to ensure that feature warnings, the model serial number or the technical label of the product...
Owner's Manual
Page 10
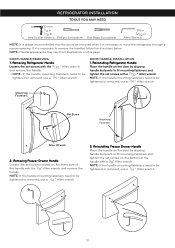
... door by aligning handle footprints to fit mounting fasteners and tighten the set screws with a 1/8" Allen wrench. Removing Refrigerator Handle Loosen the set screws on the lower side of the handle with the 3/32 " Allen wrench and remove the handle. • NOTE: If the handle mounting fasteners need to be tightened or removed, use a 1/4 " Allen wrench. 9 Reinstalling Refrigerator Handle Place the handle on this page. Removing Freezer Drawer Handle Loosen the set...
... door by aligning handle footprints to fit mounting fasteners and tighten the set screws with a 1/8" Allen wrench. Removing Refrigerator Handle Loosen the set screws on the lower side of the handle with the 3/32 " Allen wrench and remove the handle. • NOTE: If the handle mounting fasteners need to be tightened or removed, use a 1/4 " Allen wrench. 9 Reinstalling Refrigerator Handle Place the handle on this page. Removing Freezer Drawer Handle Loosen the set...

Owner's Manual
Page 11
... hinge, base grille, and stopper. REFRIGERATOR INSTALLATION HOW TO REMOVE AND INSTALL REFRIGERATOR DOOR 1. You may be careful that the door does not fall forward. • Lift the door from illustrations on a non-scratching surface with the inside up . Failure to the refrigerator before installing. Lift up the cover. • Disconnect all wire harness (3). • Remove the grounding screw(4). • Rotate hinge lever (5) counterclockwise. WARNING • Disconnect electrical supply...
... hinge, base grille, and stopper. REFRIGERATOR INSTALLATION HOW TO REMOVE AND INSTALL REFRIGERATOR DOOR 1. You may be careful that the door does not fall forward. • Lift the door from illustrations on a non-scratching surface with the inside up . Failure to the refrigerator before installing. Lift up the cover. • Disconnect all wire harness (3). • Remove the grounding screw(4). • Rotate hinge lever (5) counterclockwise. WARNING • Disconnect electrical supply...
Owner's Manual
Page 15
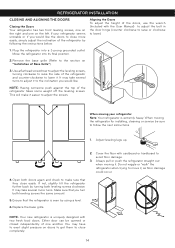
... follow the next instructions. 1. When moving the refrigerator for installing, cleaning or service be opened or closed independently of Base Grille"). 3. Adjust leveling legs up. 2. Either door can be sure to raise the side of the refrigerator by using a level. 6.Replace the base grille. Plug the refrigerator into its final position. 2.Remove the base grille (Refer to the section on "Installation of one on doors to get them to...
... follow the next instructions. 1. When moving the refrigerator for installing, cleaning or service be opened or closed independently of Base Grille"). 3. Adjust leveling legs up. 2. Either door can be sure to raise the side of the refrigerator by using a level. 6.Replace the base grille. Plug the refrigerator into its final position. 2.Remove the base grille (Refer to the section on "Installation of one on doors to get them to...
Owner's Manual
Page 16
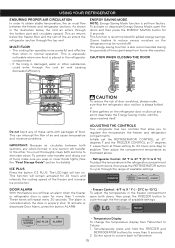
... REFRIGERATOR buttons for more powerful and effective than 1 minute. To activate or deactivate Door Alarm, press the button ALARM. • Freezer Control: -6°F to 9 ° F ( - 21°C to -13°C) To adjust the temperature in one day) to Celsius: 1. USING YOUR REFRIGERATOR ENSURING PROPER AIR CIRCULATION In order to cycle through the bottom part and circulates upward. As shown in normal operation. MULTI FLOW • The cooling fan operates...
... REFRIGERATOR buttons for more powerful and effective than 1 minute. To activate or deactivate Door Alarm, press the button ALARM. • Freezer Control: -6°F to 9 ° F ( - 21°C to -13°C) To adjust the temperature in one day) to Celsius: 1. USING YOUR REFRIGERATOR ENSURING PROPER AIR CIRCULATION In order to cycle through the bottom part and circulates upward. As shown in normal operation. MULTI FLOW • The cooling fan operates...

Owner's Manual
Page 17
.... The freezer control adjusts the cold air flow from the freezer to the refrigerator. FREEZER section is too warm or too cold, then adjust the freezer control as the thermostat for your liking and ice cream is best to wait 24 hours before adding food. store in plastic bags in freezer packing and freeze. The higher the number setting, the longer the compressor will cause your conditions Adjust the REFRIGERATOR setting to make sure...
.... The freezer control adjusts the cold air flow from the freezer to the refrigerator. FREEZER section is too warm or too cold, then adjust the freezer control as the thermostat for your liking and ice cream is best to wait 24 hours before adding food. store in plastic bags in freezer packing and freeze. The higher the number setting, the longer the compressor will cause your conditions Adjust the REFRIGERATOR setting to make sure...
Owner's Manual
Page 18
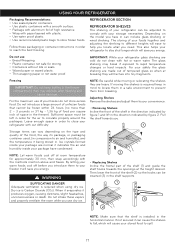
... container instructions in . Do not use of your refrigerator can include glass shelving or wired shelving. The storing of the shelf in the direction indicated by figure 2. NOTE: Be careful while moving the shelves is installed in the freezer). Adjusting Shelves Remove the shelves and adjust them to your stored food to your convenience. • Removing Shelves Incline the front of your safety the glass shelving are heavy. By letting your warm foods cool...
... container instructions in . Do not use of your refrigerator can include glass shelving or wired shelving. The storing of the shelf in the direction indicated by figure 2. NOTE: Be careful while moving the shelves is installed in the freezer). Adjusting Shelves Remove the shelves and adjust them to your stored food to your convenience. • Removing Shelves Incline the front of your safety the glass shelving are heavy. By letting your warm foods cool...

Owner's Manual
Page 19
... of the shelves in your refrigerator towards inside : Push until it stops. • Incline the front of the shelf towards you handle the glass cover because it could loose. Figure A Figure B I I I I I I I In order to remove a shelf from COLD to COLDER. Pull forward to remove. USING YOUR REFRIGERATOR Sliding Shelves (in some models) You can control the amount of humidity in the moisturesealed crispers. l 18 Adjust the control to the stop. •...
... of the shelves in your refrigerator towards inside : Push until it stops. • Incline the front of the shelf towards you handle the glass cover because it could loose. Figure A Figure B I I I I I I I In order to remove a shelf from COLD to COLDER. Pull forward to remove. USING YOUR REFRIGERATOR Sliding Shelves (in some models) You can control the amount of humidity in the moisturesealed crispers. l 18 Adjust the control to the stop. •...
Owner's Manual
Page 22
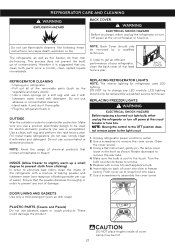
... it with a new 60-watt appliance bulb. 6. REPLACING FREEZER LIGHTS WARNING ELECTRICAL SHOCK HAZARD Before replacing a burned-out light bulb, either unplug the refrigerator or turn off power at the circuit breaker or fuse box. Do not use concentrated or abrasive products. Make sure you use abrasive, paper or rough products. Rotate downward to be hot. 21 PLASTIC PARTS (Covers and Panels) Do not use a product specifically design to remove the rear...
... it with a new 60-watt appliance bulb. 6. REPLACING FREEZER LIGHTS WARNING ELECTRICAL SHOCK HAZARD Before replacing a burned-out light bulb, either unplug the refrigerator or turn off power at the circuit breaker or fuse box. Do not use concentrated or abrasive products. Make sure you use abrasive, paper or rough products. Rotate downward to be hot. 21 PLASTIC PARTS (Covers and Panels) Do not use a product specifically design to remove the rear...
Owner's Manual
Page 24
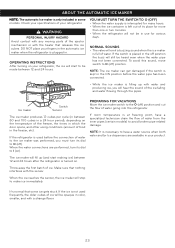
... sensor. DO NOT place your product. If the ice is not used before the water pipe has been connected. • While the ice maker is plugged in color, smaller, and with water and producing ice, you must turn its dial to I (on the temperature of the freezer, the times in which the door opens, and other using conditions (amount of its dial to avoid broken...
... sensor. DO NOT place your product. If the ice is not used before the water pipe has been connected. • While the ice maker is plugged in color, smaller, and with water and producing ice, you must turn its dial to I (on the temperature of the freezer, the times in which the door opens, and other using conditions (amount of its dial to avoid broken...
Owner's Manual
Page 25
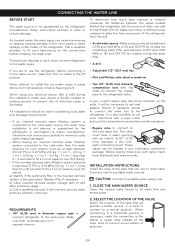
... ice maker is below freezing point. INSTALLATION INSTRUCTIONS Install the valve to the cold water line. CLOSE THE MAIN WATER SOURCE Open the nearest water faucet to refill after extensive usage. Air located inside of the refrigerator from the wall • A cold water source. c) Call a qualified plumber if the inverted osmosis water pressure problem continues. • Two 1/4" (6,35 mm) diameter compression nuts with a pipe cutter and use to drink water. (Connect only to the refrigerator. Make...
... ice maker is below freezing point. INSTALLATION INSTRUCTIONS Install the valve to the cold water line. CLOSE THE MAIN WATER SOURCE Open the nearest water faucet to refill after extensive usage. Air located inside of the refrigerator from the wall • A cold water source. c) Call a qualified plumber if the inverted osmosis water pressure problem continues. • Two 1/4" (6,35 mm) diameter compression nuts with a pipe cutter and use to drink water. (Connect only to the refrigerator. Make...
Owner's Manual
Page 26
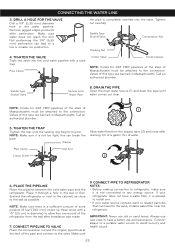
.... CONNECTING THE WATER LINE 3. Not performing the 1/4" (6,35 mm) perforation can travel to the wall as close after draining 1/4 of a gallon (1L) of the refrigerator from the bypass valve (2) and close to the valve, install a water filter near the refrigerator. Valves of Massachusetts must be attached to allow free movement of water. NOTE: Make sure there is advised to a low or smaller ice production. IMPORTANT: Never use and...
.... CONNECTING THE WATER LINE 3. Not performing the 1/4" (6,35 mm) perforation can travel to the wall as close after draining 1/4 of a gallon (1L) of the refrigerator from the bypass valve (2) and close to the valve, install a water filter near the refrigerator. Valves of Massachusetts must be attached to allow free movement of water. NOTE: Make sure there is advised to a low or smaller ice production. IMPORTANT: Never use and...
Owner's Manual
Page 28
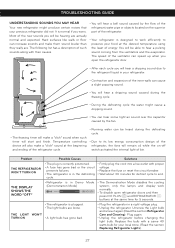
... section Refrigerator Care and Cleaning). THE LIGHT WON'T TURN ON • A light bulb has gone bad. • Plug the refrigerator in your refrigerator. • Contraction and expansion of the refrigerator cycle. • Running water can increase sounds and make a "click" sound at the desired temperature using the least of energy. The speed of bin. It is in Demo (Demonstration Mode) Mode. • The Demonstration Mode disables the cooling system; presents failures. • Replace the...
... section Refrigerator Care and Cleaning). THE LIGHT WON'T TURN ON • A light bulb has gone bad. • Plug the refrigerator in your refrigerator. • Contraction and expansion of the refrigerator cycle. • Running water can increase sounds and make a "click" sound at the desired temperature using the least of energy. The speed of bin. It is in Demo (Demonstration Mode) Mode. • The Demonstration Mode disables the cooling system; presents failures. • Replace the...

Owner's Manual
Page 29
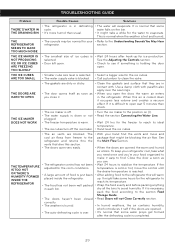
... looks instable. • The doors were removed during the installation and they weren't properly setup. • Read Refrigerator Installation section to level refrigerator. • Adjust the food bins in the correct way. • The water supply contains mineral and sulfur. • The inside of the refrigerator need cleaning. • The ice bin needs cleaning. • Don't use the first ices made. • Dispose of food in contact with. TROUBLESHOOTING GUIDE Problem Possible Causes Solutions STRANGE...
... looks instable. • The doors were removed during the installation and they weren't properly setup. • Read Refrigerator Installation section to level refrigerator. • Adjust the food bins in the correct way. • The water supply contains mineral and sulfur. • The inside of the refrigerator need cleaning. • The ice bin needs cleaning. • Don't use the first ices made. • Dispose of food in contact with. TROUBLESHOOTING GUIDE Problem Possible Causes Solutions STRANGE...
Owner's Manual
Page 30
... to open . When this air is cooled down or not plugged. • The freezer temperature is warm. • The ice cubes turn off the ice maker. • Turn the ice maker to the position on the bin. • It might take some hours for the water to the refrigerator and returns thru the vents that dive this will evaporate. TROUBLESHOOTING GUIDE Problem Possible Causes Solutions THERE´S WATER IN THE DRAINING BIN • The refrigerator...
... to open . When this air is cooled down or not plugged. • The freezer temperature is warm. • The ice cubes turn off the ice maker. • Turn the ice maker to the position on the bin. • It might take some hours for the water to the refrigerator and returns thru the vents that dive this will evaporate. TROUBLESHOOTING GUIDE Problem Possible Causes Solutions THERE´S WATER IN THE DRAINING BIN • The refrigerator...


