User Guide
Page 2
...Version 70 Warranty (U.S.A.) 3 Warranty (CANADA) 4 Safety Instructions 5-6 Grounding Requirements 6 Parts And Features 7 Refrigerator Installation 8-15 Unpacking Your Refrigerator 8 Installation 8 Base Cover 8 Removing And Replacing Your Refrigerator Handles And Doors 9-14 Crisper Cover With Lattice On Inner Surface 21 ... 16 Door Liner And Gaskets 25 Setting The Controls 16 Plastic Parts 25 Adjusting Control Settings 17 Condenser Coils 25 Food Storage Guide 17 Light Bulb Replacement 25-26 Storing Frozen Food 18 Power Interruptions 26 u Refrigerator...
...Version 70 Warranty (U.S.A.) 3 Warranty (CANADA) 4 Safety Instructions 5-6 Grounding Requirements 6 Parts And Features 7 Refrigerator Installation 8-15 Unpacking Your Refrigerator 8 Installation 8 Base Cover 8 Removing And Replacing Your Refrigerator Handles And Doors 9-14 Crisper Cover With Lattice On Inner Surface 21 ... 16 Door Liner And Gaskets 25 Setting The Controls 16 Plastic Parts 25 Adjusting Control Settings 17 Condenser Coils 25 Food Storage Guide 17 Light Bulb Replacement 25-26 Storing Frozen Food 18 Power Interruptions 26 u Refrigerator...
User Guide
Page 3
... consumer. THIS LIMITED WARRANTY DOES NOT APPLY TO: • Service trips to your home to you. USA Your LG Refrigerator will repaired or replaced, at the time warranty service is provided. This warranty gives you specific legal rights and you may also have other...our website at : http://www.lgservice.com TO CONTACT LG ELECTRONICS BY MAIL: LG Customer Interactive Center P. Box 240007 201 James Record Road Huntsville, Alabama 35824 ATTN: CIC 3 PARTS: One Year from the Date of Purchase. Replacement Units and Repair Parts are answered 24 hours a day, 365 days per...
... consumer. THIS LIMITED WARRANTY DOES NOT APPLY TO: • Service trips to your home to you. USA Your LG Refrigerator will repaired or replaced, at the time warranty service is provided. This warranty gives you specific legal rights and you may also have other...our website at : http://www.lgservice.com TO CONTACT LG ELECTRONICS BY MAIL: LG Customer Interactive Center P. Box 240007 201 James Record Road Huntsville, Alabama 35824 ATTN: CIC 3 PARTS: One Year from the Date of Purchase. Replacement Units and Repair Parts are answered 24 hours a day, 365 days per...
User Guide
Page 4
... or by Internet: http://www.lg.ca To Obtain Nearest Authorized Service Center, Parts Distributor, or Sales Dealer by Internet: http://www.lg.ca 4 WARRANTY PERIOD MODEL# : LFC21760** LFC25760** LABOR : 1 Year PARTS : 1 Year SEALED SYSTEM : Labor/ 1 Year, Parts/ 7 Years (Compressor, condenser,...LG-CANADA) and choose the appropriate prompt. To Obtain Product, Customer, or Service Assistance by accident, vermin, fire, flood, alteration, misues, abuse, improper installation, or acts of the consumer. No other rights which proves to deliver and pickup, install, instruct, or replace...
... or by Internet: http://www.lg.ca To Obtain Nearest Authorized Service Center, Parts Distributor, or Sales Dealer by Internet: http://www.lg.ca 4 WARRANTY PERIOD MODEL# : LFC21760** LFC25760** LABOR : 1 Year PARTS : 1 Year SEALED SYSTEM : Labor/ 1 Year, Parts/ 7 Years (Compressor, condenser,...LG-CANADA) and choose the appropriate prompt. To Obtain Product, Customer, or Service Assistance by accident, vermin, fire, flood, alteration, misues, abuse, improper installation, or acts of the consumer. No other rights which proves to deliver and pickup, install, instruct, or replace...
User Guide
Page 5
... • After your refrigerator away from the outlet. • Repair or replace immediately all safety messages. The food may break when being replaced.) NOTE: Setting either the plug or connector end. • When moving parts of the ejector mechanism, or with the Attention Installer Instructions that have any...which , if not avoided, may adhere to persons when using this or any servicing be performed by a qualified individual. • Before replacing a burned-out light bulb, unplug the refrigerator or turn off -color should not be refrozen and should be careful not to save as...
... • After your refrigerator away from the outlet. • Repair or replace immediately all safety messages. The food may break when being replaced.) NOTE: Setting either the plug or connector end. • When moving parts of the ejector mechanism, or with the Attention Installer Instructions that have any...which , if not avoided, may adhere to persons when using this or any servicing be performed by a qualified individual. • Before replacing a burned-out light bulb, unplug the refrigerator or turn off -color should not be refrozen and should be careful not to save as...
User Guide
Page 12
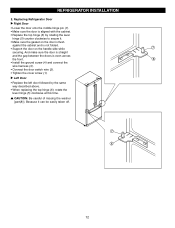
...careful of missing the washer [part(8)]. REFRIGERATOR INSTALLATION 2. Because it . • Make sure the gasket on the door is flush against the cabinet and is not folded. • Support the door on the handle side while 7 securing. u Left Door • Replace the left door followed by ...the gap between the doors is aligned with the cabinet. • Replace the top hinge (6) by the same way described above. • When replacing the top hinge (6), rotate the lever hinge (5) clockwise at this time. Replacing Refrigerator Door u Right Door • Lower the door onto the...
...careful of missing the washer [part(8)]. REFRIGERATOR INSTALLATION 2. Because it . • Make sure the gasket on the door is flush against the cabinet and is not folded. • Support the door on the handle side while 7 securing. u Left Door • Replace the left door followed by ...the gap between the doors is aligned with the cabinet. • Replace the top hinge (6) by the same way described above. • When replacing the top hinge (6), rotate the lever hinge (5) clockwise at this time. Replacing Refrigerator Door u Right Door • Lower the door onto the...

User Guide
Page 24
... as much as possible. PULL OUT DRAWER To separate the drawer, push the front left and right side while checking the hook on the front part. w WARNING: When the guide of the Durabase and pull straight out. 2. DURABASE DIVIDER The Durabase divider allows you hear a clicking sound and ...remove the wire rack. 2. Tilt up . 2. To remove the Durabase, push it locks into sections. 1. To replace, hook the end of durabase. To install, hook top corners of divider over top edge of the rack in direction to organize the Durabase area...
... as much as possible. PULL OUT DRAWER To separate the drawer, push the front left and right side while checking the hook on the front part. w WARNING: When the guide of the Durabase and pull straight out. 2. DURABASE DIVIDER The Durabase divider allows you hear a clicking sound and ...remove the wire rack. 2. Tilt up . 2. To remove the Durabase, push it locks into sections. 1. To replace, hook the end of durabase. To install, hook top corners of divider over top edge of the rack in direction to organize the Durabase area...
User Guide
Page 25
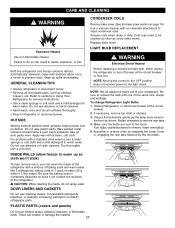
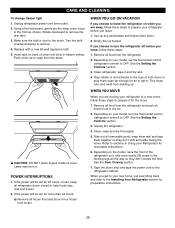
... appliance bulbs will fit your refrigerator. Do not wax plastic parts. For products with one of the same size, shape and wattage. Do not use window sprays, abrasive cleansers, or flammable fluids. Before replacing a burned-out light bulb, either unplug the refrigerator or ...soda to 1 quart of the refrigerator. These can result in warm water. Replace base cover. LIGHT BULB REPLACEMENT WARNING Electrical Shock Hazard Both the refrigerator and freezer sections defrost automatically. NOTE: Not all removable parts, such as shown. Using a flat instrument, gently pry the lamp cover ...
... appliance bulbs will fit your refrigerator. Do not wax plastic parts. For products with one of the same size, shape and wattage. Do not use window sprays, abrasive cleansers, or flammable fluids. Before replacing a burned-out light bulb, either unplug the refrigerator or ...soda to 1 quart of the refrigerator. These can result in warm water. Replace base cover. LIGHT BULB REPLACEMENT WARNING Electrical Shock Hazard Both the refrigerator and freezer sections defrost automatically. NOTE: Not all removable parts, such as shown. Using a flat instrument, gently pry the lamp cover ...
User Guide
Page 26
... a new home, follow these steps to OFF. See the Setting the Controls section. 3. Take out all removable parts, wrap them well and tape them open far enough for removable instructions. 6. See the Door Closing section. 7. Replace with a new 60-watt appliance bulb. 5. Insert tabs on the model, raise the front of both...
... a new home, follow these steps to OFF. See the Setting the Controls section. 3. Take out all removable parts, wrap them well and tape them open far enough for removable instructions. 6. See the Door Closing section. 7. Replace with a new 60-watt appliance bulb. 5. Insert tabs on the model, raise the front of both...


