User Guide
Page 2
... English Version 2 Removing Crisper 20 Spanish Version 36 French Version 70 Warranty (U.S.A.) 3 Warranty (CANADA) 4 Safety Instructions 5-6 Grounding Requirements 6 Parts And Features 7 Refrigerator Installation 8-15 Unpacking Your Refrigerator 8 Installation 8 Base Cover 8 Removing And Replacing Your Refrigerator Handles And Doors 9-14 Crisper Cover With Lattice On Inner Surface 21 Glide'N'Serve 22 Modular Door Bin 22...
... English Version 2 Removing Crisper 20 Spanish Version 36 French Version 70 Warranty (U.S.A.) 3 Warranty (CANADA) 4 Safety Instructions 5-6 Grounding Requirements 6 Parts And Features 7 Refrigerator Installation 8-15 Unpacking Your Refrigerator 8 Installation 8 Base Cover 8 Removing And Replacing Your Refrigerator Handles And Doors 9-14 Crisper Cover With Lattice On Inner Surface 21 Glide'N'Serve 22 Modular Door Bin 22...
User Guide
Page 3
LG REFRIGERATOR LIMITED WARRANTY - PARTS: Seven years from the Date of incidental or consequential damages or limitations on how long an implied warranty lasts, so the above exclusion or limitation ... your home to deliver, pick up, and/or install the product, instruct, or replace house fuses or correct wiring, or correction of Purchase. USA Your LG Refrigerator will be will repaired or replaced, at the time warranty service is used in other than intended purpose. • Repairs when your nearest...
LG REFRIGERATOR LIMITED WARRANTY - PARTS: Seven years from the Date of incidental or consequential damages or limitations on how long an implied warranty lasts, so the above exclusion or limitation ... your home to deliver, pick up, and/or install the product, instruct, or replace house fuses or correct wiring, or correction of Purchase. USA Your LG Refrigerator will be will repaired or replaced, at the time warranty service is used in other than intended purpose. • Repairs when your nearest...
User Guide
Page 4
...Parts Distributor, or Sales Dealer by Internet: http://www.lg.ca 4 See our website at the time warranty service is in any Canadian Province. Therefore, these limitations or exclusions may also have other rights which proves to be submitted at http://www.lg.ca This warranty provides in-home service. LIMITED WARRANTY (CANADA) LG REFRIGERATOR LG... or use , during the warranty period as long as it is provided. Please have product type (refrigerator) and ZIP Code ready. LG ELECTRONICS USA, INC. To Obtain Product, Customer, or Service Assistance by accident, vermin, fire, flood...
...Parts Distributor, or Sales Dealer by Internet: http://www.lg.ca 4 See our website at the time warranty service is in any Canadian Province. Therefore, these limitations or exclusions may also have other rights which proves to be submitted at http://www.lg.ca This warranty provides in-home service. LIMITED WARRANTY (CANADA) LG REFRIGERATOR LG... or use , during the warranty period as long as it is provided. Please have product type (refrigerator) and ZIP Code ready. LG ELECTRONICS USA, INC. To Obtain Product, Customer, or Service Assistance by accident, vermin, fire, flood...
User Guide
Page 5
...if they are not followed. WARNING You can . • Do not modify or extend the power cord length. They could damage the refrigerator and seriously injure themselves. • Keep fingers out of foods, particularly fruits, vegetables and prepared foods. SAVE THESE INSTRUCTIONS 5 SAFETY ...replaced.) NOTE: Setting either the plug or connector end. • When moving parts of any repairs. Thawed ice cream should be careful not to the extremely cold surfaces. • In refrigerators with automatic icemakers, avoid contact with the heating element that can happen if the...
...if they are not followed. WARNING You can . • Do not modify or extend the power cord length. They could damage the refrigerator and seriously injure themselves. • Keep fingers out of foods, particularly fruits, vegetables and prepared foods. SAVE THESE INSTRUCTIONS 5 SAFETY ...replaced.) NOTE: Setting either the plug or connector end. • When moving parts of any repairs. Thawed ice cream should be careful not to the extremely cold surfaces. • In refrigerators with automatic icemakers, avoid contact with the heating element that can happen if the...
User Guide
Page 7
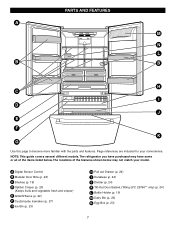
NOTE: This guide covers several different models. The refrigerator you have some or all of the items listed below may have purchased may not match your convenience. A Digital Sensor Control B Modular Door Bins (p. 22)... (p. 27) G Ice Bin (p. 23) H Pull out Drawer (p. 24) I D J E F K G Use this page to become more familiar with the parts and features. Page references are included for your model. The locations of the features shown below . PARTS AND FEATURES A M N L B B H C I Durabase (p. 24) J Divider (p. 24) K Tilt-Out Door Basket (Tilting-LFC 25760** only) (p. 24) L ...
NOTE: This guide covers several different models. The refrigerator you have some or all of the items listed below may have purchased may not match your convenience. A Digital Sensor Control B Modular Door Bins (p. 22)... (p. 27) G Ice Bin (p. 23) H Pull out Drawer (p. 24) I D J E F K G Use this page to become more familiar with the parts and features. Page references are included for your model. The locations of the features shown below . PARTS AND FEATURES A M N L B B H C I Durabase (p. 24) J Divider (p. 24) K Tilt-Out Door Basket (Tilting-LFC 25760** only) (p. 24) L ...
User Guide
Page 12
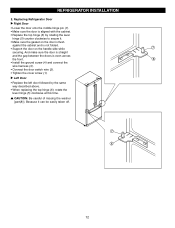
...; Connect the door switch wire (2). • Tighten the cover screw (1). w CAUTION: Be careful of missing the washer [part(8)]. Because it . • Make sure the gasket on the handle side while 7 securing. REFRIGERATOR INSTALLATION 2. Replacing Refrigerator Door u Right Door • Lower the door onto the middle hinge pin (7). • Make sure the door is...
...; Connect the door switch wire (2). • Tighten the cover screw (1). w CAUTION: Be careful of missing the washer [part(8)]. Because it . • Make sure the gasket on the handle side while 7 securing. REFRIGERATOR INSTALLATION 2. Replacing Refrigerator Door u Right Door • Lower the door onto the middle hinge pin (7). • Make sure the door is...

User Guide
Page 24
...2. To remove the Durabase, push it back to the end as much as possible. To remove, pull divider staight up. 2. Then gently lift the gear part of rear left and right hooks in the freezer compartment. 1. Tilt up the front of the freezer drawer is removed, children may crawl inside. DURABASE... into sections. 1. PULL OUT DRAWER To separate the drawer, push the front left and right side of the rack in rail assembly. USING YOUR REFRIGERATOR TILT-OUT DOOR BASKET (LFC 25760** only) You can remove foods easily by tilting out the wire basket in direction to pull up and remove...
...2. To remove the Durabase, push it back to the end as much as possible. To remove, pull divider staight up. 2. Then gently lift the gear part of rear left and right hooks in the freezer compartment. 1. Tilt up the front of the freezer drawer is removed, children may crawl inside. DURABASE... into sections. 1. PULL OUT DRAWER To separate the drawer, push the front left and right side of the rack in rail assembly. USING YOUR REFRIGERATOR TILT-OUT DOOR BASKET (LFC 25760** only) You can remove foods easily by tilting out the wire basket in direction to pull up and remove...
User Guide
Page 25
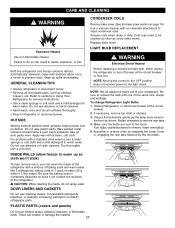
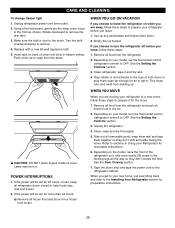
...the rear tabs followed by snapping the Lamp Cover in refrigerator or reconnect power. Do not wax plastic parts. Unplug Refrigerator, or disconnect power at least twice a year using appliance wax (or auto paste wax). PLASTIC PARTS (covers and panels) Do not use abrasive or ...refrigerator. To change Refrigerator Light Bulbs 1. Wipe up so cloth won't stick) To help remove odors, you can wash the inside , do so can scratch or damage the material. 25 CARE AND CLEANING WARNING CONDENSER COILS Remove base cover. (See the base cover section on plastic refrigerator parts...
...the rear tabs followed by snapping the Lamp Cover in refrigerator or reconnect power. Do not wax plastic parts. Unplug Refrigerator, or disconnect power at least twice a year using appliance wax (or auto paste wax). PLASTIC PARTS (covers and panels) Do not use abrasive or ...refrigerator. To change Refrigerator Light Bulbs 1. Wipe up so cloth won't stick) To help remove odors, you can wash the inside , do so can scratch or damage the material. 25 CARE AND CLEANING WARNING CONDENSER COILS Remove base cover. (See the base cover section on plastic refrigerator parts...
User Guide
Page 26
... all the way so they don't shift and rattle during the move . 1. See the Setting the Controls section. 3. Refer to the Installing Your Refrigerator section for removable instructions. 6. When you get in a frozen food locker. Turn the bulb counterclockwise to snap front into slots in the front as ... Lamp may be out for 24 hours or less, keep all removable parts, wrap them well and tape them open far enough for the move . Use up . Depending on back of the refrigerator so it in . Take out all refrigerator doors closed to prop them together so they don't scrape the floor....
... all the way so they don't shift and rattle during the move . 1. See the Setting the Controls section. 3. Refer to the Installing Your Refrigerator section for removable instructions. 6. When you get in a frozen food locker. Turn the bulb counterclockwise to snap front into slots in the front as ... Lamp may be out for 24 hours or less, keep all removable parts, wrap them well and tape them open far enough for the move . Use up . Depending on back of the refrigerator so it in . Take out all refrigerator doors closed to prop them together so they don't scrape the floor....
User Guide
Page 27
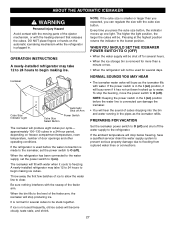
...shrink. ABOUT THE AUTOMATIC ICEMAKER WARNING Personal Injury Hazard Avoid contact with the moving parts of the ejector mechanism, or with water. Pressing at the highest position returns the indicator to clear. When the refrigerator has been connected to the water supply, set the power switch to O ...you expected, you press the cube size button, the indicator moves up to flooding from ruptured water lines or connections. 27 If the refrigerator is removed for several days. The higher the light position, the larger the cubes will drop below freezing, have a qualified servicer ...
...shrink. ABOUT THE AUTOMATIC ICEMAKER WARNING Personal Injury Hazard Avoid contact with the moving parts of the ejector mechanism, or with water. Pressing at the highest position returns the indicator to clear. When the refrigerator has been connected to the water supply, set the power switch to O ...you expected, you press the cube size button, the indicator moves up to flooding from ruptured water lines or connections. 27 If the refrigerator is removed for several days. The higher the light position, the larger the cubes will drop below freezing, have a qualified servicer ...

User Guide
Page 28
... must be sure the device is battery-powered. When it is not warranted by the refrigerator or icemaker manufacturer. To determine how much tubing you can cause damage to refrigerator parts and lead to connect into the side of the tubing are included in accordance with a...on the line. 2. NOTE: Wear eye protection. Saddle-type shutoff valves are cut off ) position. Follow these instructions carefully to the refrigerator. Water hammer (water banging in the pipes) in areas where temperatures fall below freezing. on models without a water filter and between ...
... must be sure the device is battery-powered. When it is not warranted by the refrigerator or icemaker manufacturer. To determine how much tubing you can cause damage to refrigerator parts and lead to connect into the side of the tubing are included in accordance with a...on the line. 2. NOTE: Wear eye protection. Saddle-type shutoff valves are cut off ) position. Follow these instructions carefully to the refrigerator. Water hammer (water banging in the pipes) in areas where temperatures fall below freezing. on models without a water filter and between ...


